










Transform Your Kitchen on a Budget: The Complete Guide to Installing Contact Paper Countertops
If you’ve been dreaming of a kitchen makeover but dreading the price tag that comes with traditional renovations, contact paper countertops might be exactly the solution you’ve been looking for. This budget-friendly DIY approach has exploded in popularity over recent years, and for good reason. With a modest investment of time and materials, you can completely transform the look of your kitchen surfaces without spending thousands of dollars on stone, quartz, or laminate replacements. The results, when done correctly, can genuinely surprise you with how polished and professional they appear.
Contact paper has evolved dramatically from the simple shelf liner rolls of decades past. Today’s versions come in an impressive range of finishes, from realistic marble and granite patterns to sleek matte solids and even wood grain textures. Many modern options are waterproof, heat-resistant to a degree, and designed specifically for high-traffic surfaces like countertops. The adhesive technology has also improved significantly, making it easier to apply without bubbles and repositionable enough that beginners can correct mistakes during the process without ruining the material entirely.
This guide will walk you through every step of the installation process, from gathering your materials and preparing your surface to applying the contact paper and caring for it long-term. Whether you’re a seasoned DIY enthusiast or picking up a craft knife for the very first time, the instructions here are designed to give you the best possible outcome. The key is patience, preparation, and a willingness to take your time with each phase of the project. Rushing is the number one cause of poor results, so set aside a full day if your countertops are extensive.
Why Contact Paper Is Worth Considering
Beyond the obvious cost savings, contact paper offers something traditional countertop materials simply cannot: reversibility. Renters in particular benefit enormously from this, as most lease agreements prohibit permanent alterations to kitchens and bathrooms. Contact paper can be removed cleanly from most surfaces without leaving damage, assuming the underlying countertop was in reasonable condition before application. This makes it ideal for anyone who wants to refresh a space temporarily, whether you’re waiting to save money for a full renovation or simply want a change without long-term commitment.
The creative flexibility is another compelling advantage. You can mix and match patterns on different surfaces within the same kitchen, giving an island a different look from the perimeter counters, for instance. Unlike permanent countertops where you’re locked into one choice, contact paper can be replaced as trends evolve or as your personal taste changes. Some homeowners update their contact paper every year or two simply because it’s an easy and affordable way to keep the space feeling fresh and current without any major disruption to daily life.
Gathering Your Materials and Tools
Before you begin any installation project, having everything on hand before you start is essential to a smooth workflow. Running out to the hardware store mid-application can cause adhesive to partially set in awkward positions, making the rest of the job much harder than it needs to be. Take the time to measure your countertops carefully before purchasing contact paper, and always buy ten to fifteen percent more than your measurements suggest you’ll need. Mistakes happen, patterns need to be matched, and having extra material is far cheaper than making a second trip mid-project.
The tools you’ll need are relatively simple and inexpensive. A good squeegee or plastic smoothing tool is arguably the most important item after the contact paper itself, as it’s what you’ll use to eliminate air bubbles during application. A sharp craft knife or box cutter with fresh blades will make trimming edges clean and precise — dull blades drag and tear, leaving ragged edges that undermine the finished look. A long metal ruler or straightedge is helpful for guiding those trim cuts along edges and corners. A heat gun or hair dryer is useful for stretching the material around curved edges and helping it adhere to tricky spots.
You will also want to have on hand the following items before you begin:
- Isopropyl alcohol (70% or higher) for cleaning and degreasing the surface
- Clean lint-free cloths or paper towels for wiping down the countertop
- A spray bottle filled with a small amount of soapy water (useful for wet application method)
- Painter’s tape to hold the material in position before full commitment
- Scissors for rough cutting before fine trimming with the craft knife
- A measuring tape and pencil or chalk for marking cut lines
When selecting your contact paper, pay close attention to the product specifications. Not all contact paper is created equal, and the cheapest options often have thinner vinyl that tears easily, adhesive that fails under moisture, or patterns that look obviously flat and artificial. Spending a little more on a quality brand pays dividends in both the ease of application and the longevity of the finished product. Look for products explicitly marketed for countertop use, with thickness ratings of at least 4 mil and descriptions noting water resistance and durability.

Preparing Your Countertop Surface
Surface preparation is, without exaggeration, the most critical step in the entire process. No matter how carefully you apply the contact paper or how high-quality the material is, adhesion will fail quickly if the underlying surface has any grease, dust, moisture, or debris on it. Kitchens in particular accumulate invisible layers of cooking grease that standard cleaning products may not fully remove. This is why isopropyl alcohol is the preferred cleaning agent for this task — it cuts through residue that dish soap leaves behind and evaporates quickly without leaving its own film.
Begin by clearing everything off your countertops and giving them a thorough wipe-down with your usual kitchen cleaner. Once the surface appears visually clean, go over it again with a cloth soaked in isopropyl alcohol, working in sections and letting each section dry fully before moving on. Pay particular attention to the areas around the stove and sink, as these tend to accumulate the most grease and moisture-related residue. If you notice any areas where the existing countertop finish is peeling, chipping, or lifting, address those before proceeding, as they will create raised spots that show through the contact paper and potentially cause it to lift prematurely.
Allow the cleaned surface to dry completely — this typically takes at least thirty minutes in a well-ventilated kitchen. Some installers recommend letting it sit for a full hour to be certain. While you’re waiting, this is an excellent time to unroll your contact paper and let it relax at room temperature if it has been tightly rolled. Freshly unrolled contact paper can have a tendency to curl back, which makes application difficult. Laying it flat on a clean floor or table for a while helps it lie flatter and behave more predictably during application.
Addressing Damage and Uneven Areas
If your existing countertops have significant damage — deep gouges, chips at the edges, or areas where the laminate is bubbling — contact paper alone won’t fully conceal these issues. For minor surface imperfections, a countertop filler or wood filler product applied and sanded smooth can help create a flatter base. The better the condition of the underlying surface, the more convincing and durable your contact paper installation will be. Spending an hour addressing these issues before you begin is time very well spent.
Edge conditions deserve particular attention during your preparation phase. Countertop edges that are rounded, bullnosed, or beveled present a challenge for contact paper application that squared-off edges do not. You’ll need to decide in advance whether you’re applying the paper to the edges as well as the flat surface, and if so, how you’ll handle the transition. Many experienced installers apply the flat surface first and then wrap a separate strip of contact paper around the edge, overlapping slightly, rather than trying to stretch one piece around the corner. This gives a cleaner result and reduces the chance of lifting at the edge over time.
Applying the Contact Paper Step by Step
With your surface fully prepared and your materials ready, you’re now ready to begin the actual application. Start at one end of the countertop and work your way to the other, rather than trying to apply the entire piece at once. There are two primary methods for applying contact paper: the dry method and the wet method. The dry method involves peeling the backing a few inches at a time and smoothing as you go, while the wet method uses a light mist of soapy water on the surface to allow repositioning before the adhesive fully sets. For beginners, the wet method is generally more forgiving and recommended.
If using the wet method, lightly mist the cleaned countertop with your soapy water solution before beginning. Peel back the first six inches of backing from your contact paper, fold the backing under itself, and carefully align the front edge and side edge of your paper with the countertop. Lower it onto the wet surface — the soapy water creates a temporary barrier that prevents the adhesive from immediately bonding, giving you time to slide the material into perfect position. Once you’re happy with the alignment, use your squeegee to push the water and any air bubbles from the center outward toward the edges, working methodically in overlapping strokes.
Continue peeling back the protective backing in increments of six to eight inches at a time, always smoothing with the squeegee as you go before peeling back more. Keep consistent tension on the material as you pull it forward — too much tension will cause it to stretch and distort the pattern, while too little will allow it to drape and fold. If a bubble appears that your squeegee can’t push out, lift the paper back carefully before it has fully bonded and re-smooth. Take your time at corners and edges, using a heat gun on a low setting to gently warm the material and make it more pliable when going around any curves.
Trimming and Finishing the Edges
Once the main surface is applied and smoothed to your satisfaction, you’ll need to trim the excess material from all edges. This is where a fresh, sharp blade makes an enormous difference in the quality of the finished result. Hold your craft knife at a consistent angle — roughly forty-five degrees is a good starting point — and draw it along the edge in one smooth, confident stroke rather than multiple sawing motions. Use your metal straightedge as a guide wherever the edge is straight, pressing it firmly to prevent it from slipping during the cut.
Where the countertop meets the backsplash or wall, press the contact paper firmly into the joint before cutting to ensure there’s no gap where moisture can work its way underneath. This junction is one of the most vulnerable points in the installation and one of the most common places where contact paper begins to peel over time if not handled carefully. Some installers apply a thin bead of clear silicone caulk along this joint after the contact paper is installed for additional water protection, which is a smart precaution particularly if the area is close to the sink.

Handling Sinks, Outlets, and Obstacles
Cutting around a sink or cooktop cutout is one of the trickier parts of a contact paper countertop installation, but it’s entirely manageable with a methodical approach. Begin by applying your contact paper over the entire surface including over the cutout, smoothing it as flat as possible. Once it’s fully adhered to the surrounding area, use your craft knife to cut an X pattern through the contact paper within the cutout, creating four triangular flaps. Press each flap down into the cutout and trim them away close to the edge of the countertop opening. Finish by running your knife along the inside edge of the cutout for a clean line.
Outlet covers and switch plates on the countertop backsplash area, if you’re covering that too, should be removed before you begin application. It’s far easier to work around the recessed electrical boxes and then replace the covers over the top of the contact paper than to try to cut precise rectangles around the covers while they’re in place. Remember to turn off power to those outlets at the breaker before removing the covers, and be careful not to let any soapy water from the wet application method run into electrical openings during the installation process.
Corners where two countertop sections meet at a right angle — such as in an L-shaped or U-shaped kitchen — require careful planning. The cleanest approach is to run the contact paper on each section independently, with each piece trimmed to meet precisely at the inside corner, rather than trying to wrap one piece around. Take your time measuring and cutting the pieces so they butt up tightly against each other at the corner joint. You can run a thin line of clear caulk over this seam once both pieces are in place to seal it and minimize the visibility of the joint.
Problem-Solving Common Application Challenges
Even with careful preparation and technique, you may encounter challenges during your installation. Stubborn air bubbles that refuse to squeegee out can often be addressed by making a tiny pinhole in the center of the bubble with a straight pin, then pressing the air out gently through that hole. The tiny hole is essentially invisible once the air is released and the surface smoothed flat. If a section of paper has adhered crookedly and needs to be repositioned, warming it gently with a hair dryer can soften the adhesive slightly and allow you to peel it back without tearing. Work slowly and use even heat distribution to avoid stretching the material unevenly.
Lifting edges, especially near the sink and in high-humidity areas, can sometimes occur within the first few days if the adhesive didn’t bond fully in those areas. If you notice an edge beginning to lift before it has fully set, clean the area with alcohol, let it dry, and press it back down firmly with your fingers, then apply pressure with a squeegee. In persistent cases, a small amount of craft glue applied under the lifted edge with a toothpick can help rebond it. Catching lifting early before the adhesive has dried out entirely makes a successful repair much more likely.
Caring for and Maintaining Your Contact Paper Countertops
With your installation complete, establishing good care habits will determine how long your contact paper countertops look their best. The most important rule is to avoid harsh chemical cleaners, abrasive scrubbing pads, and anything that could scratch or chemically degrade the vinyl surface. A gentle dish soap diluted in warm water, applied with a soft cloth or sponge, is sufficient for everyday cleaning. Dry the surface after cleaning rather than letting water pool on it, particularly near edges and seams where standing water can work its way underneath the material over time.
Heat is the primary enemy of contact paper countertops. While many quality products are rated to handle moderate heat, placing hot pots or pans directly from the stove or oven onto the surface can cause the adhesive to soften and the vinyl to warp or discolor. Always use trivets and hot pads, which is simply good practice regardless of what material your countertops are made of. Similarly, sharp knives used directly on the surface will cut through the vinyl, so use a cutting board for all food preparation. These simple habits will extend the life of your installation dramatically.
With proper care, quality contact paper countertops can last anywhere from two to five years before showing significant wear. Areas around the sink and stove naturally see more stress and may need attention sooner than other sections. The good news is that because contact paper is inexpensive and the installation skills are now in your repertoire, touching up or completely redoing a worn section is a manageable afternoon project rather than a major undertaking. Many people find that doing the project once gives them the confidence and technique to make future installations even faster and cleaner than the first.
When to Replace vs. Repair
Knowing when to repair a section of contact paper versus replacing it entirely is a judgment call based on the extent of the damage and how the material is behaving. Small tears, isolated lifting edges, and minor surface scratches in limited areas are all candidates for spot repair rather than full replacement. However, if you notice widespread adhesive failure — where large sections are lifting or the paper has developed a cloudy, milky appearance beneath the surface — it typically indicates moisture infiltration, and the best solution is a full removal and fresh installation. Trying to apply new contact paper over failing old material almost never produces good results.
Removal of contact paper, when the time comes, is generally straightforward. Warming the surface with a hair dryer or heat gun softens the adhesive and allows you to peel the material away in strips. Any adhesive residue left behind can be removed with a commercial adhesive remover or with isopropyl alcohol and a bit of patience. If the contact paper was applied to a surface in good condition, removal should leave that surface essentially unchanged, which is one of the most appealing aspects of this approach for renters and budget-conscious homeowners alike who want flexibility as their needs and tastes evolve.
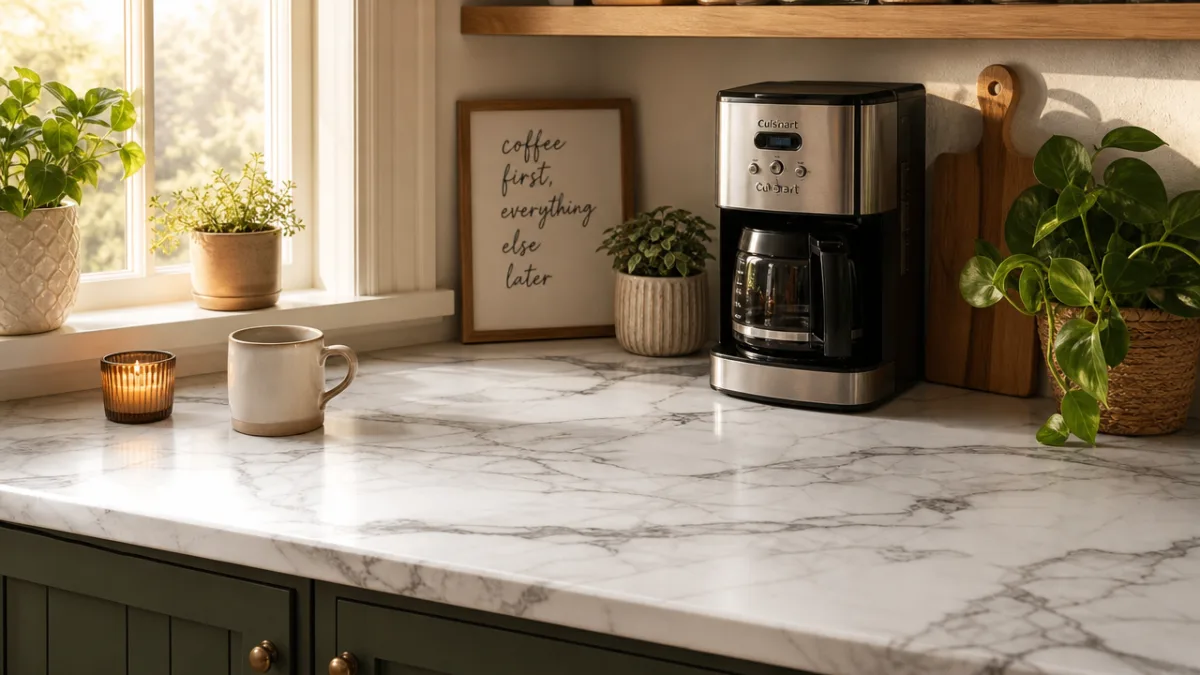
Inspiring Design Ideas and Pattern Choices
One of the most enjoyable aspects of contact paper countertops is the sheer breadth of design possibilities available. Marble patterns remain perennially popular and for good reason — they bring an air of elegance and brightness to a kitchen at a fraction of the cost of genuine stone. The key when choosing a marble pattern is to look for one with realistic variation and depth rather than a perfectly uniform repetitive tile pattern, which tends to look artificial. Many premium contact paper brands now offer patterns with genuine photographic texture and subtle shading that reads as convincingly real from any normal viewing distance.
For a more contemporary or industrial look, concrete-effect and slate-effect contact papers have gained considerable popularity in recent years. These pair beautifully with stainless steel appliances, open shelving, and dark cabinetry for a moody, sophisticated kitchen aesthetic. Wood grain contact papers in lighter tones like ash or blonde oak work wonderfully in Scandinavian-style or farmhouse kitchens, creating warmth and a natural feel that contrasts nicely with white cabinetry. The range of available options has never been broader, and browsing through options before committing to a purchase can be genuinely exciting.
Don’t feel constrained to using the same pattern throughout your entire kitchen. Using a striking pattern on an island while keeping the perimeter counters in a solid color or more subtle texture is a design approach borrowed from professional kitchen designers who use contrasting countertop materials to add visual interest and define different functional zones. Contact paper makes this kind of layered, intentional design thinking accessible to anyone willing to take on the project. The relatively low cost also means that experimenting with bold choices carries less risk — if you decide after six months that the pattern isn’t quite right for the space, replacing it is a straightforward project that won’t break the bank.
Combining Contact Paper with Other Budget Updates
Contact paper countertops make the greatest impact when combined with other thoughtful, budget-friendly updates to the kitchen. Painting cabinets in a fresh color, replacing outdated hardware with contemporary pulls and knobs, adding peel-and-stick tile to the backsplash, and updating lighting fixtures are all projects that individually cost relatively little but together produce a kitchen that looks genuinely renovated rather than merely refreshed. The countertop transformation tends to be the most visually dramatic of these changes, making it a natural anchor for a broader budget renovation effort.
As you plan your contact paper installation, consider the overall color story of your kitchen and how the pattern you choose will interact with your cabinet color, flooring, and wall paint. Bringing samples of your existing materials — or at minimum, clear photographs taken in good light — when shopping for contact paper helps ensure that what you select will harmonize rather than clash. The most beautiful installation can feel disappointing if the pattern chosen fights against the other elements in the room, so a little planning at the outset pays off significantly in the quality of the final result.








What do you think?
It is nice to know your opinion. Leave a comment.