










Basement Home Theater Ideas Everyone Wants to Copy
Planning Your Dream Basement Home Theater
Transforming your basement into a dedicated home theater is one of the most rewarding home improvement projects you can undertake. Unlike other rooms in the house, a basement offers a naturally dark, enclosed environment that is ideal for creating an immersive cinematic experience. The absence of windows and the below-grade location help with sound containment and light control, two of the most critical factors in building a high-quality screening room. With thoughtful planning, even a modest basement space can rival the experience of a commercial cinema.
Before swinging a hammer or ordering a single piece of equipment, you need to assess your space carefully. Take precise measurements of the room’s length, width, and ceiling height, because these dimensions will determine everything from screen size to speaker placement. A ceiling height of at least eight feet is generally recommended for a comfortable theater setup, though nine or ten feet opens up even more design possibilities. Also check for any load-bearing walls, plumbing lines, or HVAC ductwork that might affect your layout plans, as working around these elements early saves significant headaches later.
Budgeting is the framework upon which every design decision rests. Home theaters can range from a few thousand dollars for a basic setup to well over fifty thousand for a fully custom installation. The good news is that you do not need an unlimited budget to create something spectacular. Prioritizing your spending on a quality projector or display and excellent audio equipment will deliver the most impact per dollar spent. Décor, seating, and finishing touches can be scaled up or down depending on what remains in the budget after the core technology is in place.
Understanding Room Acoustics Before You Build
Acoustics are often the most overlooked aspect of basement theater design, yet they have a profound effect on your overall experience. Untreated concrete walls and hard flooring create harsh sound reflections that muddy dialogue and distort music. Investing in acoustic panels, bass traps in the corners, and diffusers on the rear wall will dramatically improve the clarity and depth of your sound system. These treatments do not have to be ugly — modern acoustic panels come in fabric-wrapped designs that can be custom colored to match any décor scheme.
The shape of your basement matters just as much as the materials you use to treat it. Long, narrow rooms tend to create flutter echo, where sound bounces back and forth between parallel walls. Breaking up this problem with staggered acoustic panels, bookshelves filled with irregularly shaped objects, or even angled wall sections can significantly reduce this phenomenon. Investing in a basic room analysis tool or hiring an acoustic consultant for even a single session can pay enormous dividends when it comes time to enjoy your finished theater.
Flooring choices also play an important acoustic role in a basement theater. Thick, wall-to-wall carpet with a quality pad underneath absorbs mid-to-high frequency sound reflections from the floor, which is the largest flat surface in the room. If you prefer hardwood or luxury vinyl plank for aesthetic reasons, a large, plush area rug covering most of the seating area can achieve a similar effect. Some homeowners opt for a hybrid approach, using carpet in the primary seating zone while maintaining hard flooring in transitional areas and along the sides.
Choosing the Right Display Technology
The display is the centerpiece of your home theater, and the choice between a large-screen television and a projector-and-screen combination is one of the most consequential decisions you will make. Modern 4K OLED and QLED televisions offer breathtaking picture quality with perfect black levels and vibrant colors that projectors historically have struggled to match. For rooms up to about 120 inches diagonal, a premium television is often the easier, lower-maintenance option. They require no ambient light control, have built-in streaming apps, and are ready to use out of the box without calibration concerns.
Projectors, however, create an experience that is fundamentally different and uniquely cinematic. When you project a 120-inch or 150-inch image onto a dedicated screen in a properly darkened room, the sense of immersion is difficult to replicate with even the largest flat-panel display. Short-throw and ultra-short-throw laser projectors have dramatically closed the gap in terms of brightness and color accuracy, making them viable even in spaces that cannot achieve total darkness. Pairing a quality laser projector with an acoustically transparent screen also allows you to place center-channel speakers directly behind the screen, which is exactly how commercial theaters position their audio for the most natural dialogue reproduction.
Screen selection deserves as much attention as the projector itself. Gain ratings, which measure how much light a screen reflects back toward the viewer, matter enormously depending on your room’s light control and seating arrangement. A flat gain of 1.0 is ideal for rooms with excellent light control and a wide seating area. Higher-gain screens focus more light toward the center seats but can create hot-spotting for viewers on the sides. Ambient light rejecting (ALR) screens are a newer innovation that can be transformative for basements that receive some natural or artificial light, reflecting projector light while absorbing overhead room light.

Calibrating Your Display for Maximum Impact
Even the most expensive display technology will disappoint if it is not properly calibrated. Out-of-the-box settings from manufacturers are typically optimized for showroom floors under bright fluorescent lighting, not for the dim, controlled environment of a home theater. A professional ISF-certified calibrator can measure and adjust color temperature, gamma, white balance, and color gamut to match industry reference standards. While this service costs money, it ensures that what you are seeing on screen is what the filmmaker intended, which is the closest you can get to a true cinematic experience at home.
For those who prefer a do-it-yourself approach, calibration discs and software tools like Calman or ChromaPure make it possible to achieve excellent results without professional help. These tools guide you through a step-by-step process of adjusting picture settings using test patterns and a colorimeter, which is a sensor that reads the light output from your screen. Spending an afternoon on calibration will yield improvements that are immediately visible and deeply satisfying, turning a good picture into a genuinely great one.
Regular recalibration is also important to keep in mind. Projector lamps and laser light engines gradually dim over time, and OLED panels can experience subtle shifts in color accuracy after thousands of hours of use. Setting a reminder to check calibration once a year, or whenever you notice the picture looking off, ensures your investment continues to perform at its best for the life of the equipment. Think of it the same way you would think about tuning a musical instrument — a one-time setup is a great start, but ongoing maintenance keeps things sounding, or in this case looking, their best.
Designing a Surround Sound System That Stuns
No home theater is truly complete without a properly designed surround sound system. The difference between watching a film with great audio versus mediocre audio is staggering — sound design accounts for roughly half of the emotional impact of any movie. A well-configured 5.1 system consisting of three front speakers, two surround speakers, and a subwoofer is the minimum for a genuine cinematic experience. Stepping up to 7.1 adds two additional surround channels for better envelopment, and the increasingly popular Dolby Atmos and DTS:X object-based audio formats require additional overhead speakers to create a truly three-dimensional soundscape.
Speaker placement in a basement theater follows guidelines established by Dolby, DTS, and the Imaging Science Foundation that have been refined over decades of research and real-world testing. The left, center, and right front speakers should be positioned at or near ear level when seated, ideally in a slight arc following the curvature of the screen. The center channel is the most important single speaker in the system because it handles the majority of on-screen dialogue, so it should be placed as close to the screen as physically possible. Surround speakers in a 5.1 system are best positioned slightly above ear level and to the sides of the seating position, angled inward.
Subwoofer placement is a science and an art unto itself. Low frequencies are omnidirectional, meaning the brain cannot easily pinpoint their source, which is why a single subwoofer can effectively serve an entire room. However, every room has acoustic modes — frequencies that build up in certain locations and cancel out in others — and these modes dramatically affect how bass sounds in different seating positions. Experimenting with subwoofer placement, including the often-counterintuitive technique of temporarily placing the subwoofer in your primary listening seat and crawling around the room to find where it sounds best, can make a significant difference in bass quality and evenness.
AV Receivers and Processor Selection
The AV receiver or separate processor-amplifier combination is the nerve center of your home theater, routing audio and video signals to all of your components and applying room correction processing. Modern AV receivers from brands like Denon, Marantz, Yamaha, and Anthem include sophisticated automatic calibration systems — such as Audyssey, YPAO, and ARC Genesis — that measure your room’s acoustic characteristics and apply digital signal processing corrections. These systems have become remarkably capable and can correct for many common room acoustic problems, though they work best when combined with physical acoustic treatments rather than as a substitute for them.
Power output matters, but perhaps less than marketing materials suggest. Most home theater speakers are reasonably efficient, and a receiver with 80 to 100 watts per channel is sufficient to achieve reference listening levels in a typical basement theater. Where receiver quality truly shows its value is in the quality of the digital-to-analog converters, the low noise floor of the preamplifier stage, and the stability of the power supply under dynamic, multi-channel loads. Choosing a receiver from a reputable brand at a mid-to-upper price point generally ensures these fundamentals are well-executed.
Future-proofing your receiver purchase is a smart strategy given how quickly audio and video standards evolve. Ensuring your receiver supports the latest HDMI specification — currently HDMI 2.1, which enables 4K at 120Hz and 8K video passthrough — as well as the latest object-based audio formats will extend the useful life of your investment. Many enthusiasts also choose to add a separate high-current power amplifier for the front three speakers, using the receiver’s amplifier for the surrounds and heights. This approach, sometimes called a separates configuration, can yield noticeably better dynamics and lower distortion in the most demanding passages.

Seating, Lighting, and Interior Design
Seating is where comfort meets cinema, and getting it right makes every viewing session a pleasure rather than an endurance test. Dedicated home theater recliners with motorized footrests, cup holders, and even built-in heating and massage functions are available at a wide range of price points. When laying out your seating, the generally accepted rule of thumb is that the optimal viewing distance for a 4K display is approximately 1.5 times the diagonal screen size, though many enthusiasts prefer to sit somewhat closer for a more immersive field of view. Tiered risers for a second row of seating not only improve sightlines dramatically but also add an architectural element that makes the room feel genuinely theatrical.
Lighting design in a home theater serves both functional and aesthetic purposes. Dimmable LED lighting on separate circuits allows you to create distinct scenes for watching, intermission, and cleaning up. Bias lighting — placing LED strips behind the television or screen to create a soft glow on the wall — reduces eye strain during long viewing sessions and can improve perceived contrast by providing a reference point for the eye. Step lighting along the sides of risers and aisles is both a safety feature and a design element that adds a sophisticated, venue-like atmosphere to the space.
The color palette and materials you choose for the walls, ceiling, and flooring set the overall mood of the theater. Deep, dark colors — charcoal, navy, burgundy, forest green — on the walls minimize light reflection from the screen, which improves perceived image contrast and reduces eye fatigue. A black ceiling further enhances this effect and creates a sense of the space extending upward into darkness, much like a real cinema. Fabric wall panels not only look elegant but serve the dual purpose of acoustic treatment, killing two birds with one stone and helping to justify their cost as a functional investment rather than purely decorative spending.
Smart Home Integration and Control Systems
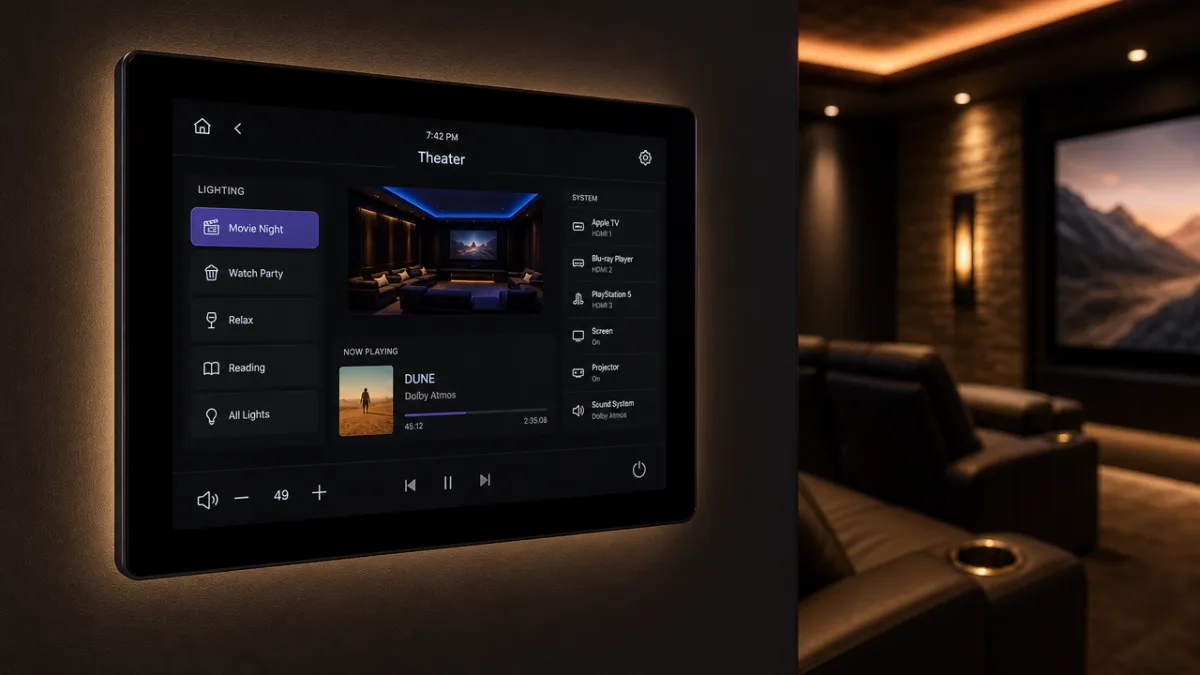
A well-integrated home theater should be effortless to operate. Modern control systems from companies like Control4, Crestron, and Savant allow you to program single-button scenes that dim the lights, lower the projector screen, power on all your equipment, and select the right input — all simultaneously. Even more affordable solutions like Lutron Caseta for lighting combined with a universal remote such as the Logitech Harmony or URC can provide a seamless experience without a five-figure investment in professional automation hardware. The goal is to make using the theater intuitive enough that guests of any technical ability can enjoy it without assistance.
Streaming and source management is another area where thoughtful planning pays off. Dedicated media servers running software like Plex or Kodi allow you to maintain a local library of films and music that streams instantly without buffering or compression artifacts from internet-based services. Pairing a media server with a quality network-attached storage (NAS) device gives you the capacity to store dozens or hundreds of 4K Blu-ray rips in their full, uncompressed glory. For physical media enthusiasts, an Oppo-style disc player or its modern equivalent ensures that the highest quality source material is always available for films that demand the absolute best presentation.
Network infrastructure deserves dedicated attention in a home theater build. Wired Ethernet connections are always preferable to Wi-Fi for streaming devices and smart home hubs, as they eliminate the variability and potential interference inherent in wireless networking. Running Cat6 cables to all device locations during the construction phase costs very little extra but provides a rock-solid foundation for decades of use. If your home network is shared with other users, a managed switch with quality-of-service settings can prioritize theater traffic to prevent buffering during peak usage hours.
Construction Details and Finishing Touches
The construction phase of your basement theater is where careful planning translates into tangible results. Sound isolation — keeping sound in the theater from disturbing the rest of the house and preventing outside noise from intruding on your viewing — is best addressed at this stage, because retrofitting it later is far more costly and disruptive. Decoupled wall construction using resilient channels or sound isolation clips, combined with two layers of drywall with a viscoelastic compound like Green Glue between them, can achieve dramatic improvements in sound transmission loss. Sealing all penetrations for electrical boxes, HVAC ducts, and cable runs with acoustic putty pads and backer rod is equally important, as even small gaps can undermine an otherwise well-constructed wall system.
Dedicated electrical circuits are a practical necessity for a home theater, not a luxury. High-current amplifiers and subwoofers can draw significant power, and sharing circuits with other household loads introduces the risk of interference and voltage sag during dynamic passages. Ideally, the theater should have its own dedicated panel or at minimum several dedicated 20-amp circuits wired directly from the main electrical panel. Installing a whole-house surge protector at the panel, combined with a quality power conditioner at the equipment rack, protects your investment from both external lightning events and internal switching noise generated by other appliances.
Cable management, while unglamorous, is a hallmark of a professionally finished theater. Running all speaker cables, HDMI cables, and power lines through conduit or dedicated raceways within the walls before drywall goes up makes the finished space look clean and intentional. Color-coding cables during installation and leaving pull strings in conduit for future upgrades are practices that seem like minor details but save enormous frustration years later when it is time to add a new piece of equipment or troubleshoot a mysterious issue. A well-labeled patch panel or cable tray at the equipment rack location completes the professional touch.
Personalizing Your Theater Space
The finishing touches are what transform a functional screening room into a space that truly reflects your personality and passion for cinema. Framed movie posters in backlit display frames add color and visual interest to walls that might otherwise feel stark. A concession stand area with a mini-refrigerator, popcorn machine, and snack storage brings the full movie-going experience home in a way that delights guests of all ages. Custom signage above the entrance, theatrical curtains flanking the screen, and a vintage-style marquee displaying now-playing titles are details that signal to everyone who enters that this is a space built by someone who genuinely loves movies.
Consider adding a wet bar or beverage station if local building codes permit plumbing in your basement. Even a simple setup with a small sink, a wine refrigerator, and storage for glassware and spirits eliminates the need to pause the film and trek upstairs for refreshments. Some homeowners integrate a pass-through from an adjacent mechanical room to store equipment racks out of sight while keeping all connections accessible. These thoughtful conveniences elevate the daily usability of the space and make it the natural gathering point for family movie nights, game-watching parties, and special occasion screenings.
Finally, remember that a home theater is a living space that will evolve with your tastes, your family’s needs, and the technology landscape. Building in flexibility — extra conduit runs, a few spare electrical circuits, modular acoustic panel arrangements — means your theater can grow and change without requiring a complete rebuild. Some of the finest home theaters in the world started as modest, well-planned spaces that were progressively refined over years as their owners learned more, saved more, and discovered what truly mattered to them in a cinematic experience. The journey of building and improving your basement home theater is itself a deeply satisfying pursuit, one that rewards patience, research, and a genuine love of the art of cinema.








What do you think?
It is nice to know your opinion. Leave a comment.