










DIY Mosaic Garden Path with Butterfly Stepping Stones: A Complete Guide to Creating Your Own Backyard Masterpiece
There is something deeply satisfying about walking through a garden and feeling the solid, beautiful presence of handcrafted stepping stones beneath your feet. A mosaic garden path transforms an ordinary backyard into a personal work of art, and butterfly-themed stepping stones add a whimsical, nature-inspired touch that brings joy every time you see them. Whether you are a seasoned crafter or a complete beginner, this project is entirely achievable with the right materials, a little patience, and a willingness to embrace the creative process.
Mosaic art has been practiced for thousands of years, from the grand floors of Roman villas to the intricate tilework of Byzantine churches. Bringing this ancient craft into your garden connects your outdoor space to a long tradition of human artistry and decoration. Butterfly designs in particular carry rich symbolic meaning across many cultures, representing transformation, renewal, and the delicate beauty of the natural world — themes that feel especially appropriate in a garden setting where living things grow and change with the seasons.
This comprehensive guide will walk you through every step of the process, from gathering your materials and planning your design to laying the stones and sealing them for lasting durability. By the end, you will have a garden path that is uniquely yours, built with your own hands and reflecting your own creative vision. Let us begin the journey toward a more beautiful, more personal outdoor space.
Gathering Your Materials and Tools
Before you can create anything beautiful, you need to assemble the right supplies. The foundation of any mosaic stepping stone is a solid base, and for this project, you have two main options. You can purchase pre-cast concrete stepping stones from a garden center, which saves time and provides a reliable, weather-tested surface. Alternatively, you can cast your own stones using a stepping stone mold, portland cement, and sand, which gives you complete control over the shape, thickness, and size of each stone.
For the mosaic itself, you will need tesserae — the small pieces of tile, glass, or ceramic that make up the design. Broken ceramic dishes and tiles are a wonderfully economical and eco-friendly choice, and they come in a wide variety of colors and textures. You can also purchase glass mosaic tiles, vitreous glass tiles, or even decorative pebbles from craft stores. For a butterfly design, look for tiles in rich jewel tones such as cobalt blue, deep purple, amber, and turquoise, as these colors capture the iridescent quality of butterfly wings beautifully.
Your supply list should also include tile nippers for cutting tesserae to shape, tile adhesive or thinset mortar for attaching pieces to the stone, unsanded grout in a color that complements your tiles, a grout float or old credit card for spreading grout, protective gloves and safety glasses, and a sealer rated for outdoor use. A permanent marker and some graph paper for sketching your design beforehand will also prove invaluable. Having everything organized and within reach before you start will make the creative process far more enjoyable and efficient.
Planning and Designing Your Butterfly Pattern
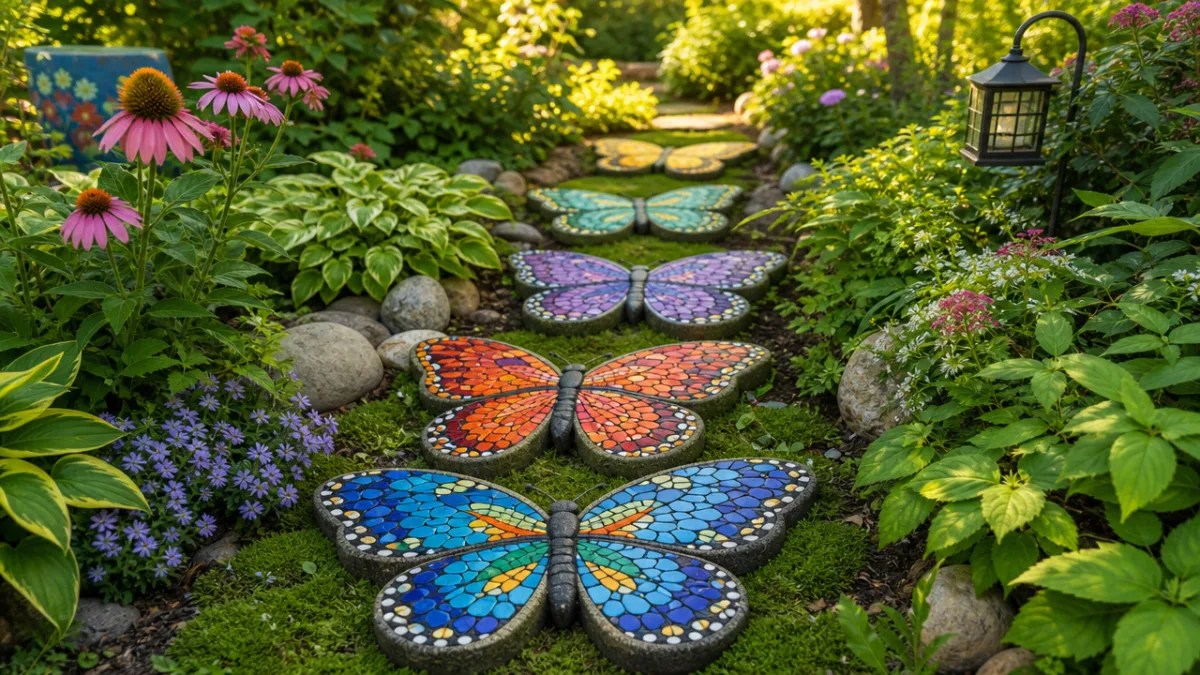
The design phase is where your project truly comes to life, and it deserves careful thought and attention. Start by measuring your stepping stone and drawing a same-scale template on graph paper. A butterfly design works beautifully because it is naturally symmetrical, which makes it easier to plan and execute. Begin by sketching the basic butterfly silhouette — two large upper wings, two smaller lower wings, a central body, and delicate antennae. Keep the shapes bold and simple, because intricate details can be very difficult to execute in mosaic form, especially for a first project.
Once you have your basic shape, think carefully about color. The most visually striking mosaic stepping stones tend to use a limited palette of three to five colors that contrast well against each other and against the background. You might choose a warm amber and deep orange for the wings with black outlines to mimic the appearance of a monarch butterfly, or cool blues and purples with silver accents for a more fantastical, ethereal look. The background tiles surrounding the butterfly can be a single neutral color like cream or gray, which will allow the butterfly itself to stand out, or you might fill the background with a pattern of small green and white tiles to suggest leaves and light.
Consider also the overall path as a composition. If you are making multiple stepping stones, each could feature a different butterfly species, or you could create a sense of movement by positioning butterflies at different angles on successive stones, as if a butterfly is traveling along the path. You might alternate butterfly stones with simpler geometric designs to create rhythm and visual interest without overwhelming the eye. Spend as much time as you need on this planning phase — changes on paper are easy, but changes once the tiles are set in mortar are quite another matter.
Preparing Your Base and Setting the Tesserae
If you are casting your own stepping stones, mix your concrete according to the package directions and pour it into your mold, smoothing the surface level with a screed or piece of scrap wood. Allow the stone to cure for the time specified by the manufacturer — typically at least 24 to 48 hours — before you attempt to work on it. A stone that has not fully cured can crack under the pressure of grouting or even just handling. If you are using pre-made stones, give them a light sanding to roughen the surface, which will help the adhesive bond more securely.
Transfer your butterfly design onto the stone surface using a chalk pencil or water-soluble marker. This gives you a guide to follow as you place your tiles, reducing the guesswork and helping you maintain the proportions of your design. Lay out all your tesserae on the stone without adhesive first, like assembling a puzzle, so you can see exactly how everything fits together before you commit. This dry-run step can reveal problems — a tile that is slightly too large, a color that does not quite work — that are much easier to fix before anything is glued down.
Apply your tile adhesive or thinset mortar to a small section of the stone at a time, using a notched trowel or a craft stick to spread it evenly to a depth of about three to four millimeters. Press each tessera firmly into the adhesive, maintaining consistent small gaps between pieces for the grout to fill later. Work methodically from the center of the design outward. Pay special attention to the edges of your butterfly, making sure the outlines are clean and crisp. Allow the adhesive to cure fully — usually 24 hours — before proceeding to the grouting stage, and keep the stone covered and away from direct sunlight during this time.
Grouting, Sealing, and Finishing Your Stepping Stones
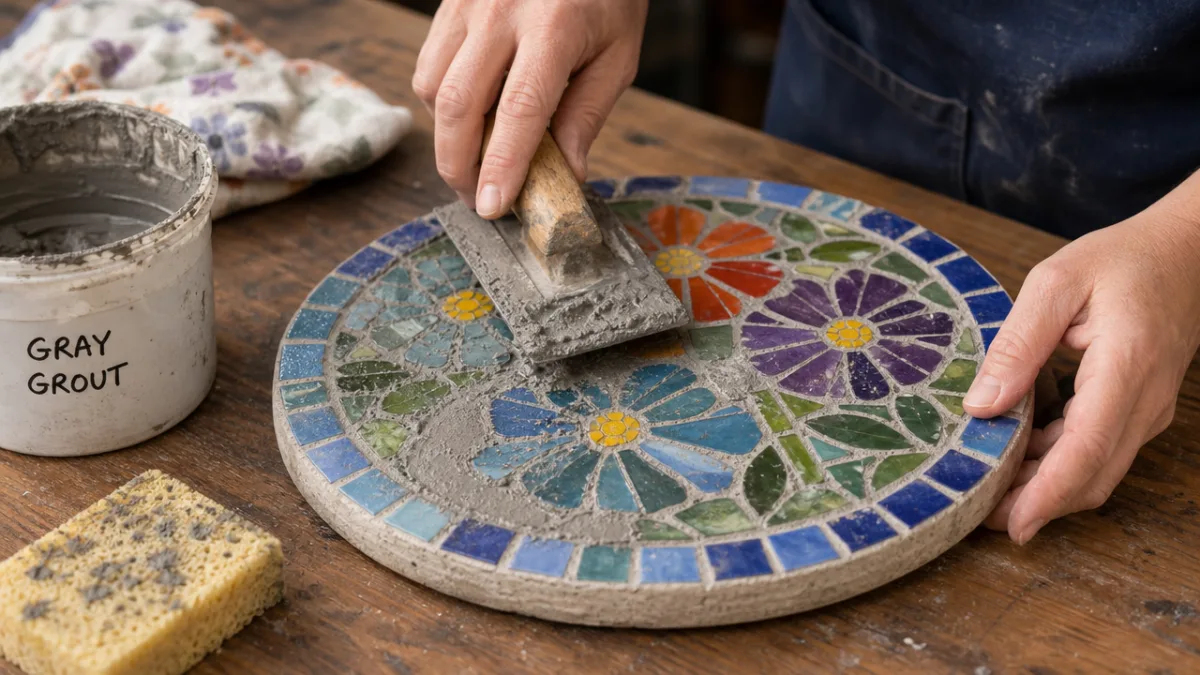
Grouting is the step that truly unifies a mosaic and makes it look polished and professional. Mix your unsanded grout according to the manufacturer’s directions until it reaches a smooth, peanut butter-like consistency. Put on your gloves — grout is alkaline and can irritate skin with prolonged contact. Use a grout float or a folded piece of burlap to press the grout firmly into all the gaps between the tesserae, working it in different directions to ensure every space is completely filled. Do not rush this step; air pockets in the grout can lead to crumbling once the stone is in use outdoors.
Once the entire surface is grouted, wait about 15 to 20 minutes for the grout to begin to firm up slightly, then use a damp sponge to carefully wipe away the excess from the surface of the tiles. Rinse your sponge frequently and use light, circular motions to avoid pulling grout out of the gaps. A hazy film will remain on the tiles even after this first wipe-down — this is normal. After the grout has cured for several hours, buff this haze away with a dry, soft cloth to reveal the full brilliance of your mosaic. Step back and take a moment to appreciate what you have made.
Sealing your stepping stones is a critical final step that should not be skipped, especially for pieces that will be exposed to the weather year-round. Choose an outdoor-rated tile and grout sealer and apply it according to the manufacturer’s instructions, usually with a small brush or sponge applicator. The sealer penetrates the grout and helps prevent moisture from seeping in, which can cause cracking and spalling in freezing temperatures. Apply at least two coats, allowing full drying time between each coat. Your stone will now be far more resistant to frost, rain, and the general rigors of outdoor life.
Installing Your Path and Caring for Your Mosaic Stones
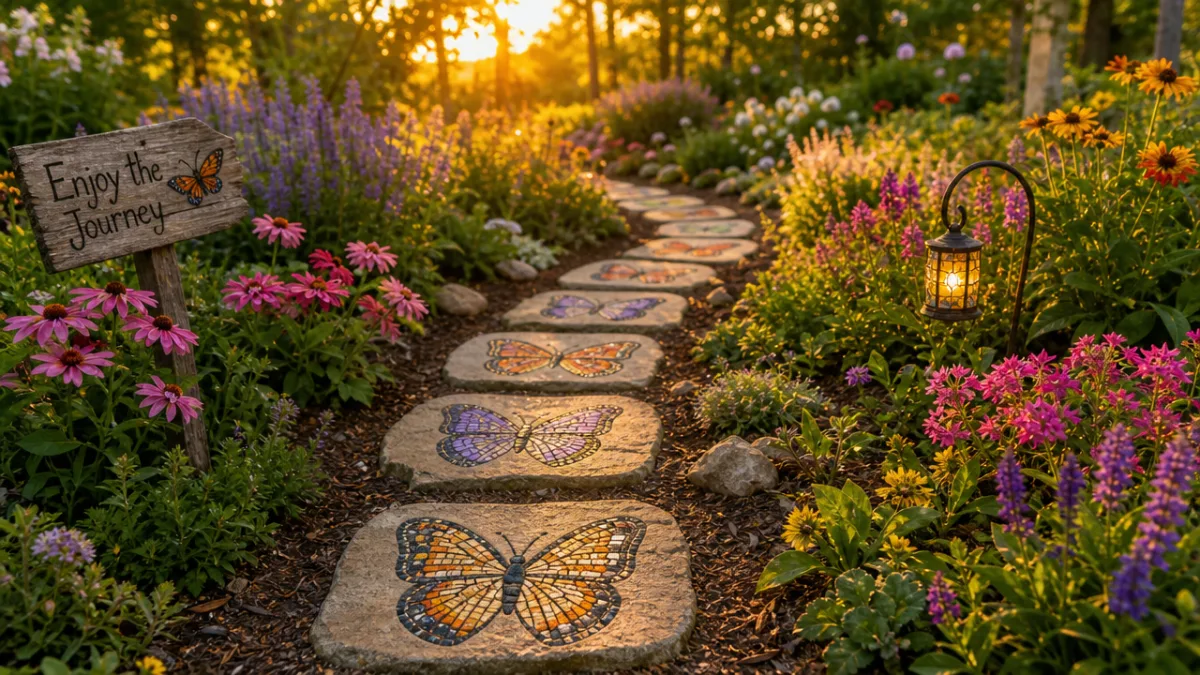
With your stepping stones complete and sealed, the final and deeply satisfying stage is actually laying your garden path. Choose your route thoughtfully, considering how people naturally move through the space and where the path will be most useful and most visible. A gentle curve almost always looks more natural and graceful than a perfectly straight line in a garden setting. Lay the stones out on top of the grass or soil first to test the spacing — stepping stones should be placed roughly 18 to 24 inches apart, center to center, which corresponds to a comfortable average stride length for most adults.
To install each stone, set it in place and trace around its edge with a spade or garden knife. Remove the stone and dig out the soil to a depth that will leave the stone sitting flush with or very slightly above the surrounding ground level. This is important for two reasons: a stone that sits too high is a tripping hazard, and a stone that sits too low will collect water and potentially shift as the ground freezes and thaws. Add a one-to-two-inch layer of coarse sand or fine gravel to the bottom of the excavation, tamp it down firmly, set the stone in place, and check it for level with a small spirit level before moving on to the next one.
Over time, even the most well-made and well-installed stepping stones will require some maintenance to keep them looking their best. Here is a simple seasonal care routine to keep your path beautiful for years to come:
- Spring: Inspect each stone for any grout cracking or tile loss that may have occurred over winter. Re-grout and re-seal any areas that need attention before the growing season gets underway.
- Summer: Brush away accumulated soil, moss, and plant debris regularly. A stiff-bristled brush and plain water are usually all you need. Avoid harsh chemical cleaners that could degrade the grout.
- Autumn: Apply a fresh coat of outdoor sealer before the first frost to protect the grout from freeze-thaw damage. Remove fallen leaves promptly, as they retain moisture that can accelerate weathering.
- Winter: In climates with heavy snow, avoid using metal snow shovels or ice picks directly on the mosaic surface, as these can chip tiles and damage the grout. A plastic shovel or a gentle broom is much kinder to the stonework.
Beyond basic maintenance, your mosaic garden path is also an invitation to continued creativity. As you gain confidence with the techniques, you might consider adding decorative borders along the edges of the path using small river pebbles or ground cover plants. You could create matching mosaic tiles for a birdbath surround or a garden wall plaque that echoes the butterfly theme of the path. The skills you have developed making these stepping stones are fully transferable to any number of other mosaic projects, and many people find that one project quickly leads to another as their enthusiasm for this ancient, satisfying craft grows.
Troubleshooting Common Mosaic Challenges
Even experienced crafters encounter setbacks, and it is entirely normal for your first mosaic project to present some unexpected challenges. One of the most common issues is tiles lifting away from the base after the adhesive has dried. This usually happens for one of two reasons: either the adhesive layer was too thin, or the base surface was too smooth for a good bond. If this happens, simply pry off the affected tiles using a craft knife or small chisel, clean both surfaces thoroughly, and re-set the tiles using a fresh, slightly thicker layer of adhesive. Make sure the stone surface is clean and slightly roughened before you begin any repairs.
Grout cracking is another frequent frustration, particularly in outdoor applications where temperature fluctuations are significant. Fine hairline cracks in grout are usually cosmetic and can be addressed with a grout pen or a small amount of fresh grout pressed in with a fingertip. Wider cracks, however, may indicate a structural issue with the base stone or inadequate curing time. In these cases, you may need to remove and replace the cracked sections of grout entirely. This is tedious but not difficult: a grout saw or oscillating tool can remove old grout without damaging the surrounding tiles, and fresh grout can then be applied and sealed as before.
Color inconsistency is a subtler challenge that can undermine the visual impact of a beautiful design. Grout color, in particular, often looks quite different when wet versus when fully dried, and many beginners are surprised to find that a grout that appeared to be a perfect warm gray comes out much lighter or darker than expected. Always test your grout color on a scrap piece of tile before committing to the full project. Similarly, different batches of glass or ceramic tile can vary slightly in color even when they bear the same product name, so it is wise to purchase slightly more tile than you think you will need from the same batch to ensure color consistency across all your stepping stones.
Inspiring Variations and Creative Extensions
Once you have mastered the basic butterfly stepping stone, an entire world of creative possibilities opens up before you. You might explore different butterfly species as design inspirations — the bold graphic patterns of a zebra longwing, the ghostly translucence of a glasswing butterfly, or the dramatic tailed wings of a swallowtail each offer completely different aesthetic possibilities. You could even create a path that tells the story of butterfly metamorphosis, beginning with a stone showing a leaf and egg, progressing through a caterpillar and chrysalis design, and culminating in the fully emerged butterfly at the end of the path.
The mosaic technique itself also invites experimentation with materials beyond conventional tile. Broken mirror tiles add dramatic reflectivity and make a mosaic sparkle in sunlight. Smooth sea glass in frosted blues and greens brings a coastal, beachcombed quality to a design. Vintage china fragments with floral or blue-and-white patterns create a charming, cottage-garden aesthetic that works beautifully with traditional planting schemes. Natural stones and pebbles of different colors can be incorporated alongside tile to blur the line between the handmade and the natural in a way that feels particularly appropriate in a garden setting.
Consider also expanding your mosaic work beyond the path itself to create a cohesive garden art installation. A mosaic-tiled garden table that echoes the butterfly motif of the path creates a lovely focal point for outdoor dining or entertaining. A series of small mosaic plaques mounted on the garden fence or wall can extend the path’s visual theme upward and outward into the broader landscape. You might even consider collaborating with family members or friends on different stones, so that the completed path becomes a collective artwork that carries the creative energy of multiple people, each stone slightly different in style and character, all unified by the shared butterfly theme.








What do you think?
It is nice to know your opinion. Leave a comment.