










23 Mesmerizing DIY Stepping Stones to Realize for Your Backyard
Why DIY Stepping Stones Transform Your Outdoor Space
There’s something genuinely satisfying about walking a garden path you made yourself. DIY stepping stones are one of those weekend projects that just hits differently — you get the practical payoff of a real garden feature and the creative satisfaction of making it exactly the way you want it. Whether you’re working with a big sprawling backyard or a small raised bed situation, the right arrangement of stepping stones can completely change how your outdoor space feels, giving visitors (and yourself) a clear, beautiful route through your landscape.
And they’re not just pretty — stepping stones do real work. They protect your lawn from constant foot traffic, keep things from turning into a muddy mess when it rains, and give people a defined path through garden beds that might otherwise get accidentally trampled. When you make them yourself, you control everything: the size, the shape, the color, the texture. You’re not stuck choosing from whatever the garden center happens to stock.
The cost savings are pretty hard to argue with, too. Store-bought decorative stepping stones can run anywhere from fifteen to sixty dollars each, and once you start adding them up for a full backyard path, it gets expensive fast. Making your own brings that cost way down — often to just a few dollars per stone — using a basic concrete mix, some molds, and whatever decorative materials catch your eye. You might already have half of what you need sitting around the house.
Essential Materials and Tools You Will Need
Before you jump in, it’s worth taking a few minutes to get your materials together — it makes the whole process a lot smoother. The foundation of any stepping stone is concrete mix, and for most DIY projects, a standard sand mix or stepping stone mix from the hardware store works great. These mixes are pre-proportioned, easy to handle, and cure into something tough enough to handle years of rain, heat, and freeze-thaw cycles without falling apart.
Your mold is what determines the shape of your stone, and your options are wider than you might think. Pre-made plastic molds designed for this purpose are a good starting point — they come in round, square, and leaf shapes and take the guesswork out of things. But once you start looking around your house, you’ll find all kinds of possibilities: old cake pans, pie tins, plastic storage lids, cardboard forms reinforced with tape, shallow wooden frames, even large natural leaves. The main thing is that the mold can hold wet concrete without flexing too much and can be peeled away or removed cleanly once everything has cured.
For decoration, you’re really only limited by your imagination. Glass pebbles, mosaic tiles, sea glass, river rocks, broken ceramic dishes, coins, marbles, shells — all of these create beautiful effects when pressed into wet concrete. You’ll also want a few basic tools: a mixing bucket, a trowel or sturdy spoon, disposable gloves (concrete is alkaline and hard on skin), and a misting bottle to keep the surface damp while it cures. Lay down a drop cloth or old tarp underneath your workspace and cleanup becomes much less of a headache.
Top Techniques for Stunning Decorative Effects
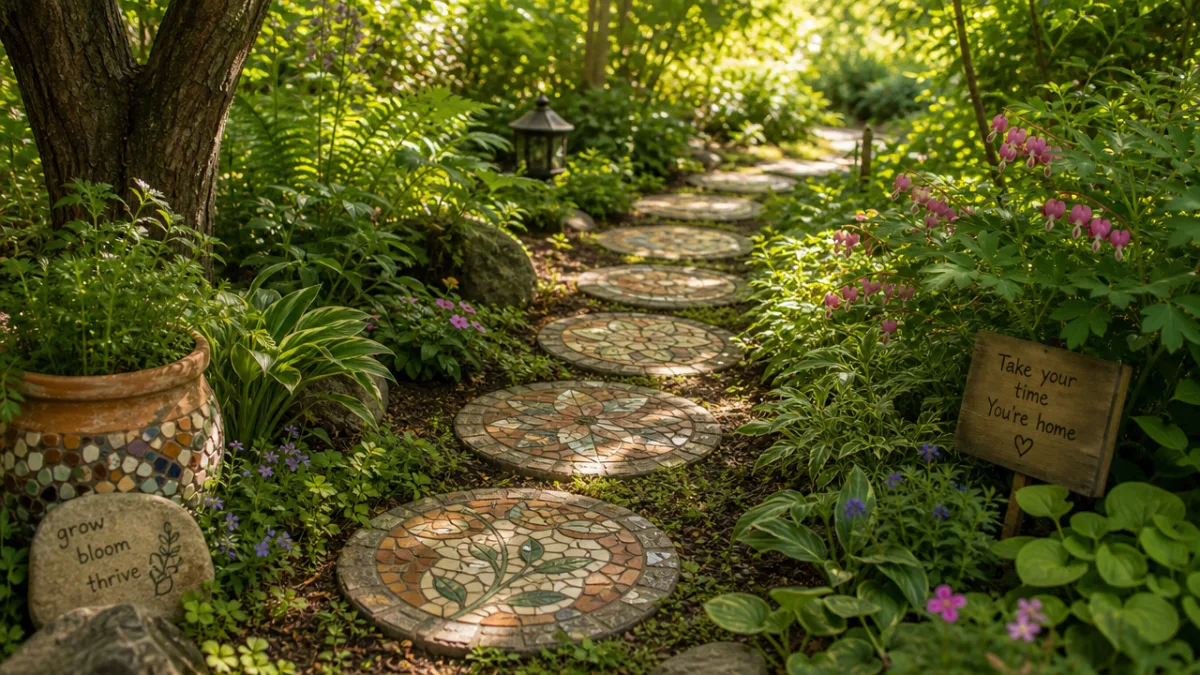
One of the most popular approaches is the mosaic method, where you press broken tiles, glass pieces, or pebbles into the surface of wet concrete to build up patterns and color. The trick is working with some purpose once your concrete is poured — you’ve got roughly thirty to forty-five minutes before the surface starts to set and stops cooperating. Sketch your design on paper ahead of time and sort your materials by color and size before you start. That little bit of prep work makes the whole thing far less stressful.
Leaf imprint stones are a totally different vibe and they look absolutely stunning in a garden setting. You press a large leaf — hostas, elephant ears, rhubarb, and tropical plants all work beautifully — vein-side down into wet concrete, then pull it away after partial curing to reveal a detailed botanical impression of every vein and edge. These are gorgeous on their own, but they really come alive when you paint the recessed impression with outdoor acrylic in a contrasting color, or rub a bit of iron oxide pigment into the grooves to bring out all that organic texture.
Stamping is another approach worth trying, especially if you want to add text or imagery without needing any particular artistic skill. Rubber stamps made for concrete, or even firm foam stamps, press cleanly into a partially set surface and leave clear impressions. A lot of people use this to add family names, house numbers, inspirational words, or decorative details. You can also mix concrete dyes or pigment powders directly into your batch, or dust them onto the wet surface before it sets, to create stones in colors that actually coordinate with the rest of your garden.
Creative Design Ideas for Every Garden Style
If your garden leans cottage or bohemian, try making a mismatched collection of stones in different sizes and shapes, each one decorated differently using reclaimed dishes and tiles in warm earthy tones broken up with pops of jewel-bright color. The deliberately eclectic look feels personal and collected rather than like something you ordered in a set — and it only gets better as moss and natural patina work their way into the surfaces over time. Arrange them in a gently winding path that meanders through your flower beds rather than cutting straight across.
Minimalist or modern gardens call for something cleaner. Large square or rectangular stones in a neutral palette, with just one subtle design element to keep things from feeling stark — a ring of smooth white pebbles, a single geometric shape, a pressed botanical outline. Space them farther apart in a deliberate pattern across gravel or low ground cover and you get something that feels architecturally intentional rather than crafty. It’s a completely different look, but just as effective.
For families with kids, stepping stones are one of the best backyard traditions going. Pressing small handprints into wet concrete is a classic for a reason — it creates a permanent record of your kids at a particular age, and it’s the kind of thing families genuinely treasure for decades. You can fit multiple handprints into one large stone or build a path that adds a new stone each year. Pet paw prints work wonderfully too, either pressed directly or guided with a pet-safe impression kit.
For a Zen or Japanese-inspired path, the whole approach shifts toward restraint and quiet intention. Smooth river stones set into carefully raked patterns, irregular flagstone-shaped stones with rough edges, finishes in dark charcoal or slate gray — all of these contribute to a meditative atmosphere. A small brushed metal symbol, a single smooth black stone at the center, or a simple circular impression can be all the detail you need. The beauty here is in what you leave out as much as what you put in, especially when the surrounding planting includes bamboo, ornamental grasses, and moss.
Step-by-Step Guide to Making Your First Stepping Stone
This is genuinely an afternoon project, even if you’ve never worked with concrete before. Start by setting up your workspace outside or somewhere with good ventilation, laying out your drop cloth and getting everything within arm’s reach. Lightly coat the inside of your mold with cooking spray or a thin layer of petroleum jelly — this is your release agent, and it’s what lets you pop the finished stone out cleanly without cracking or tearing.
Mix your concrete according to the package directions, aiming for something in the neighborhood of thick oatmeal or peanut butter. It should hold its shape when you scoop it without crumbling, but it definitely shouldn’t pour. Fill your mold and tap the sides firmly to bring any trapped air bubbles to the surface — bubbles left in place can weaken the finished stone. Smooth the surface level with the top of the mold using a trowel or your gloved fingers. If you’re doing a leaf imprint, this is when you press the leaf in, vein-side down, and smooth the concrete up around the edges.
For mosaic or embedded decorations, wait about ten to fifteen minutes after pouring before you start pressing things in. That short window lets the concrete firm up just enough that your pieces sit on top rather than sinking in too deep, while still being soft enough to accept them with a firm push. Make sure each piece is pressed at least halfway in so it actually bonds securely. Once you’re happy with how everything looks, mist the surface lightly with water, cover it loosely with plastic wrap to slow the cure, and move it somewhere shaded to rest undisturbed.
The concrete will reach its initial set in twenty-four to forty-eight hours, at which point you can gently peel or flex the mold away. That said, full curing takes around twenty-eight days — concrete just keeps getting stronger during that time. For the first week, keep the stone shaded and mist it with water daily to support that process (it’s called hydration, and it’s what gives concrete its long-term toughness). After the first week you can move it to your garden, but try to keep heavy foot traffic off it for at least two or three more weeks if you can.
Placement, Spacing, and Long-Term Care
How you place your stones matters at least as much as how you make them. The single most important factor is stride length — for most adults, stepping stones feel natural and comfortable when their centers sit about eighteen to twenty-four inches apart. Before you commit to digging anything in, lay the stones out and actually walk the path a few times at your normal pace. Move them around until every step lands effortlessly without any stretching or shuffling. It sounds obvious, but it makes a big difference.
Think about grade and drainage too. Stepping stones should sit slightly below or flush with the surrounding soil or lawn so a mower can pass over them without hitting them and so water runs off rather than pooling. For each stone, dig a shallow bed about an inch deeper than the stone’s thickness, add a half-inch of coarse sand at the bottom, set the stone in place, and check it with a level before pressing it down firmly. That’s really all the installation requires — it keeps stones stable, level, and properly settled into the landscape.
Once they’re in, the upkeep is minimal. Concrete is durable by nature, but applying a concrete sealer every two to three years gives you added protection against moisture, freeze-thaw damage, and fading of any pigments or paint you’ve added. Sealer also makes embedded glass and mosaic tiles look more vibrant — almost jewel-like. Between sealings, a stiff brush and some mild soapy water is all you need to keep them looking good year after year.
- Seal your finished stones with an outdoor concrete sealer every two to three years to protect color and surface integrity against moisture and UV exposure.
- Check stones annually for any that have shifted, settled unevenly, or cracked, and reset or replace them before the problem worsens or creates a tripping hazard.
- Allow moss to grow naturally in shaded, moist garden areas for a charming aged appearance, or treat with a diluted bleach solution if you prefer a clean surface.
- If embedded tiles or glass pieces loosen over time, re-adhere them with exterior-grade epoxy, which bonds reliably to both concrete and ceramic or glass surfaces.
- Store unused concrete mix in a sealed, airtight container away from moisture to ensure it remains usable for repairs or future projects without clumping or premature curing.
The best thing about making your own stepping stones, though, is what they mean over time. Unlike anything you’d buy at a garden center, handmade stones carry something of the person who made them — the specific arrangement of glass pebbles you chose on one particular afternoon, the handprint of a kid at a certain age, the leaf impression from a plant that has since grown into something different. As your garden changes around them, those stones quietly hold the story of the people who tend the space. That’s something you really can’t buy.








What do you think?
It is nice to know your opinion. Leave a comment.