










How to Crochet Baby Safe Amigurumi Eyes: A Complete Guide
Why Eye Safety Matters in Baby Amigurumi
If you’re making amigurumi for a baby or young toddler, the eyes you choose matter more than you might think. Here’s the thing about plastic safety eyes — despite the name, they’re not actually safe for children under three. Those little components can become serious choking hazards if a determined baby manages to pull or gnaw them off a favorite stuffed toy. Before you even pick up your hook and yarn for a baby project, this is the one thing you really need to understand.
The American Academy of Pediatrics and various toy safety organizations have long warned both parents and crafters about small detachable parts on toys meant for infants and toddlers. Even the most tightly attached plastic safety eye can work itself loose over time — think about what it goes through with repeated washing, chewing, and the kind of enthusiastic rough handling only a baby can deliver. A well-meaning handmade gift can become genuinely dangerous if the maker hasn’t thought through how it’ll hold up to all of that.
The good news is that the amigurumi community has come up with some really lovely baby-safe eye techniques that are every bit as charming and expressive as plastic eyes. These methods involve crocheting, embroidering, or building eyes directly into the fabric of the amigurumi itself, so there’s nothing separate that could ever come off. Once you get comfortable with these techniques, you might even find — as a lot of crafters do — that they give your finished toys a softer, more whimsical quality. Safer and more beautiful? That’s a pretty great outcome.
Materials You Will Need for Baby Safe Eyes
Getting your materials together before you start will save you a lot of frustration. The good news is you probably already have most of this in your craft stash. Yarn is obviously your main material — you’ll want black for pupils and outlines, white for highlights, and whatever colors you’d like for irises if you’re going for a more detailed look on your characters.
You’ll also want some embroidery floss in coordinating or contrasting colors, since floss gives you a level of precision that yarn just can’t match when you’re working tiny details on a crocheted surface. A blunt-tipped tapestry needle is absolutely essential — both for weaving in ends and for the embroidery itself. Please skip the sharp-tipped needles here; they can create small holes in your crochet fabric that may widen over time and end up undermining your whole eye design.
A few other things worth having on hand: stitch markers to track your position when you’re crocheting eyes into the fabric, rounded-tip scissors, and some felt in black or other eye colors as an alternative backing option. Some crafters also like to use a non-toxic, washable fabric glue as an extra layer of security when attaching felt pieces, though good embroidery work alone is generally enough when it’s done right. Have everything ready before you sit down and the whole process will go much more smoothly.
- Black, white, and colored yarn in a weight that matches your project
- Embroidery floss in black and accent colors
- Blunt tapestry needles in various sizes
- Stitch markers for placement accuracy
- Non-toxic fabric glue for felt eye applications
- Rounded-tip scissors
- Felt squares in black, white, and other eye colors

Method One: The Embroidered Eye Technique
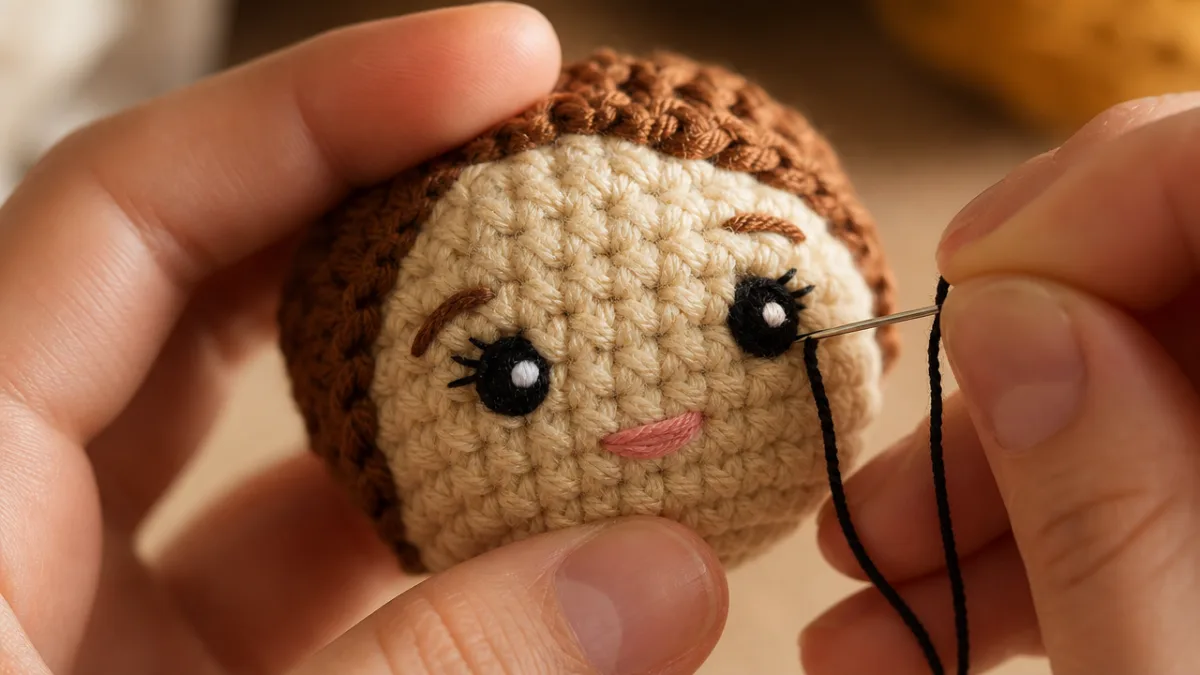
Most experienced crafters and toy safety advocates will tell you that embroidered eyes are the gold standard for baby-safe amigurumi, and it’s easy to see why. You use embroidery floss or thin yarn threaded onto a tapestry needle to stitch the eye design directly onto the surface of your crocheted head or body. The thread is literally woven through the crochet stitches and knotted securely on the inside of the stuffed piece, which means there is absolutely nothing that can be pulled, chewed, or twisted off — no matter how persistent the baby.
Start by marking your eye placement on the finished amigurumi head using stitch markers or a small erasable fabric pen. Symmetrical placement is one of the trickiest parts of this whole process, so don’t rush it. A really helpful trick is to count the stitches from the center front of the head outward to each eye position, making sure both eyes land the same distance from the centerline. Height matters too — eyes tend to look best when they sit roughly halfway between the top of the head and the bottom of the chin.
Once you’ve got your placement sorted, thread your tapestry needle with about eighteen to twenty-four inches of black embroidery floss. Push the needle in from the inside of the amigurumi and bring it out where you want the center of the eye to be. From there, work a series of straight stitches radiating from the center or clustered tightly together to build up a solid oval or circular shape. For a more dimensional look, layer multiple rounds of stitches in alternating directions until the eye is dense enough to read clearly. Finish by running the needle back inside and tying a firm double knot before trimming the thread.
Method Two: Crocheted Eye Circles
Crocheted eye circles are small flat discs worked separately and then sewn onto the amigurumi face with a length of yarn and a tapestry needle. Since they’re made entirely from yarn, they’re soft, washable, and have no rigid parts that could hurt a child. This method is also wonderfully flexible — you can make eyes in any size, shape, or color combination you like, and then add embroidered pupils and highlights on top for extra expressiveness.
To make a basic eye circle, start with a magic ring and work six single crochets into it for a small eye, or increase to twelve stitches in round two if you want something larger. Slip stitch to join and pull the magic ring as tight as it will go — you really don’t want any gap in the center, since even a small opening could catch on little fingers or become a starting point for unraveling. Fasten off and leave a long tail for sewing. A lot of crafters like to work a second color round to suggest an iris before adding a black embroidered pupil on top.
The sewing attachment is where you need to be really thorough. Thread that long yarn tail onto your tapestry needle and sew all the way around the outer edge of the circle, catching every stitch of the circle and every corresponding stitch on the amigurumi head. When you’re done, the eye should sit completely flush against the head and feel totally firm. Run your needle through the interior of the head at least twice more before you knot and trim. And then give it a real tug — if it moves at all, keep sewing.
- Work a magic ring and close it tightly to eliminate any center gap
- Crochet six to twelve single crochets depending on desired eye size
- Add a second color round for an iris if desired
- Fasten off leaving a long sewing tail
- Embroider a pupil and white highlight dot onto the finished circle
- Sew securely around every stitch of the circle’s outer edge
- Run needle through the interior multiple times before final knotting
- Tug firmly to confirm complete security before gifting the toy
Method Three: Felt Eye Appliqués
Felt eye appliqués sit somewhere between fully embroidered eyes and crocheted circles. They give you clean, crisp edges and a slightly different texture that a lot of crafters find easier to work with, especially when you want really consistent, symmetrical results. The basic idea is simple: cut precise circles or ovals from black felt, optionally add small white highlight dots, and stitch or glue them securely onto the face. When they’re properly stitched down, felt eyes are completely safe for babies and honestly pretty hard to mess up.
Cutting perfect felt circles freehand is harder than it sounds, so most people use circle punches, coin templates, or printable templates sized for their specific project. For a small amigurumi, something in the eight to twelve millimeter range usually works well; larger pieces might need circles up to twenty millimeters. Spend a little more on good quality craft felt rather than the cheapest option you can find — better felt holds its shape through washing and doesn’t fray or fall apart at the edges. Cut your white highlight dots from contrasting felt at about a quarter of the size of the main eye circle.
For maximum security, use two methods together. Start with a small dot of non-toxic, washable fabric glue on the back of each felt piece, press it firmly in place, and hold it for about thirty seconds. Let it dry completely before moving on to step two: stitching. Thread a fine tapestry needle with black thread or floss and stitch all the way around the perimeter of each eye piece using a tight blanket stitch or whip stitch. The combination of glue and stitching creates a seriously durable attachment that’ll hold up to machine washing and plenty of baby enthusiasm without any risk of the piece coming loose.
Adding Personality: Highlights, Pupils, and Expression
One of the really fun things about yarn-based eyes is how much personality you can pack into them with just a few simple embroidery details layered on top. A small white highlight dot stitched in the upper portion of each eye is one of the most effective tricks in amigurumi — it instantly makes the eyes look bright and alive, like light is actually catching them. It sounds like such a small thing, but that one detail is often the difference between a face that’s cute and a face that genuinely sparkles.
You can also play with shape and placement to suggest all kinds of different moods and characters. Slightly tilted oval eyes give a sleepy, dreamy vibe that’s perfect for a bedtime lovey. Big round eyes placed lower on the face create that classic wide-eyed innocent look. A row of tiny embroidered lashes above the eye reads as feminine, while a simple arched eyebrow stitched above each eye gives a character a warm, friendly expression. Once you start experimenting, you’ll realize how much expressive range you have even within these very simple, safe techniques.
Color is another huge part of what makes eyes feel alive and character-specific. Black is standard for pupils and outlines, but the iris area of crocheted eye circles can be any color you want. Deep amber on a woodland creature, bright blue on a cloud, warm brown on a teddy bear — these details do real storytelling work. Even working within the constraints of baby-safe methods, you have a genuinely rich creative vocabulary to draw from, and the more you practice, the more naturally all of it will come to you.
Finishing, Testing, and Care Instructions
Before any baby amigurumi leaves your hands, it needs a proper safety check — not just a quick admiring glance at how adorable it is. The tug test is non-negotiable: grab each eye firmly between your thumb and index finger and pull with real force, the way a determined toddler actually would. If anything shifts, loosens, or starts to separate, fix it before you go any further. Don’t talk yourself into thinking a slightly wobbly eye is probably fine. Babies are shockingly strong when something has caught their interest, and “probably fine” isn’t good enough here.
While you’re at it, go over the whole toy. Check that every seam between joined sections is completely closed — any gap is a potential escape route for stuffing, and stuffing is a choking hazard. Make sure all yarn ends are thoroughly woven in and trimmed so nothing is accessible from the outside. If you added any buttons or extra embellishments anywhere on the toy, take a hard look at whether they’re truly necessary and whether they’re truly secure. The safest baby amigurumi tend to be on the simpler side, letting shape, color, and expression do the work instead of added bits and pieces.
One last thing that a lot of crafters skip but really shouldn’t: include care instructions with the gift. A small handwritten or printed card noting the fiber content, washing method, and drying instructions goes a long way. Most acrylic or cotton yarn amigurumi can go through a gentle cold machine wash cycle inside a mesh laundry bag and then air dry flat. Let the parents know to check the eyes and seams after every few washes just to make sure everything is still holding up. It’s a thoughtful touch that shows you cared about the toy’s safety long after it left your hands — and any parent will genuinely appreciate that.
- Perform a firm tug test on every eye and embellishment before gifting
- Inspect all seams and joints for completeness and security
- Confirm all yarn ends are fully woven in and inaccessible from outside
- Machine wash on gentle cold cycle inside a mesh laundry bag
- Air dry flat to preserve shape and prevent distortion
- Re-inspect eyes and seams after every several washes
- Keep the toy away from children under 12 months without supervision regardless of construction method
At the end of the day, making amigurumi with baby-safe eyes is an act of care — for your craft and for the little person who’s going to receive it. Choosing embroidery, crocheted circles, or well-stitched felt appliqués over plastic safety eyes means you’re sending something into the world that brings joy without worry. And here’s the thing: once you get comfortable with these techniques, you might find yourself reaching for them even on projects that aren’t for babies. The softness, the expressiveness, the complete security — a lot of crafters decide pretty quickly that yarn-based eyes aren’t just a safe alternative. They’re actually better.








What do you think?
It is nice to know your opinion. Leave a comment.