










12+ Small Craft Room Ideas That Don’t Feel Cluttered
If you’re a crafter with a small space, you already know the struggle — bins overflowing, ribbons tangled around everything, and surfaces buried under half-finished projects you swore you’d get back to. The good news? A small room doesn’t have to mean a chaotic one. With a little planning and some smart choices around storage and layout, even a tiny craft nook can feel calm, functional, and genuinely inspiring. Here are more than a dozen ideas to help you get there.
1. Start With a Smart Layout That Maximizes Every Square Foot
Before you buy a single storage bin or piece of furniture, take some time to actually think about how you work. Do you sit at a table cutting fabric, or do you prefer standing at a counter for mixed-media projects? Do you need to spread out big canvases, or are you mostly doing small paper crafts? Getting honest about your workflow is the single most important thing you can do when designing a small craft room — a layout built around your real habits will always beat something you copied straight from a Pinterest board.
In tight spaces, an L-shaped or U-shaped desk setup tends to work really well. Running your work surface along two or three walls gives you a lot more usable counter space without eating up the middle of the room. Keeping that center area open makes the whole space feel airier and prevents the claustrophobic feeling that sneaks up on you in small rooms. If your room is particularly narrow, even a single run of countertop along one long wall — with floating shelves above it — can give you a surprisingly generous place to work.
One thing people often forget about is traffic flow. Even in a small room, you should be able to move easily between your work area and your storage without squeezing past chairs or bumping into shelving. Try to leave at least 36 inches of clearance in front of anywhere you’ll be accessing regularly. And if your door swings inward, it might be worth swapping it for a pocket door or a barn-style sliding door — you’d be amazed how much usable floor space disappears every time that door arc swings open.
2. Use Vertical Space as Your Secret Weapon
Floor space is precious in a small craft room, which means your walls are doing you a serious disservice if you’re not using them to their full potential. Most people put up a few shelves and call it a day, but really leaning into vertical storage means thinking all the way up to the ceiling. Install shelves that start just above your work surface and go right to the top of the wall. The highest shelves are perfect for things you don’t reach for often — seasonal supplies, specialty tools — while the shelves at eye level stay reserved for your everyday go-tos.
Pegboards are an absolute game-changer in craft rooms, and they’re especially well-suited here because there’s such a huge variety of hooks, baskets, and holders made specifically for them. Mount a large pegboard above your main work surface and suddenly your scissors, rulers, tape dispensers, and even little bins of buttons and beads are all within arm’s reach without taking up a single inch of your desk. As a bonus, you can see everything at a glance, which means less time hunting for your rotary cutter mid-project.
Don’t overlook the gap between the tops of your upper cabinets and the ceiling either. That dead zone — usually somewhere between six and eighteen inches — can be fitted with shallow shelving or used for labeled boxes of archival supplies. And the backs of doors? Almost always ignored, almost always useful. An over-the-door organizer with clear pockets can hold a surprising amount of small stuff — stickers, stamps, ink pads, washi tape, small tools — without taking up any floor or wall space at all.
3. Choose Furniture That Does Double or Triple Duty
In a small craft room, every single piece of furniture needs to pull its weight — ideally in more than one way. A standard desk that only gives you a work surface is a bit of a waste when you’re working with limited square footage. Look instead for work tables with built-in drawers, lower shelves, or fold-down extensions that expand when you need extra space and tuck away when you don’t. Murphy-style craft tables that fold flat against the wall are especially brilliant if your craft room also doubles as a guest room or a home office.
Storage ottomans and benches along the walls are another smart pick — they work as seating for guests, as extra perches when you need to work at a lower surface, and as hidden storage for bulky items like fabric rolls, yarn, or large paper pads. Rolling carts (the kind people often call craft trolleys) are similarly hardworking. They tuck under your desk when you’re not using them, roll right out to your side when you need supplies, and can be wheeled out of the room entirely when you want the space for something else.
If your room is truly tiny, or if your craft space is sharing square footage with another room, it’s worth looking into a craft armoire. A well-designed one can pack a fold-out work surface, multiple shelves, organizers, and tool holders all behind two closed doors. With the doors shut, it looks like a regular piece of bedroom furniture. Open it up and you’ve got a fully self-contained little studio. For anyone who needs their creative space to disappear on command, it’s hard to beat.
4. Implement a Color-Coded and Transparent Storage System
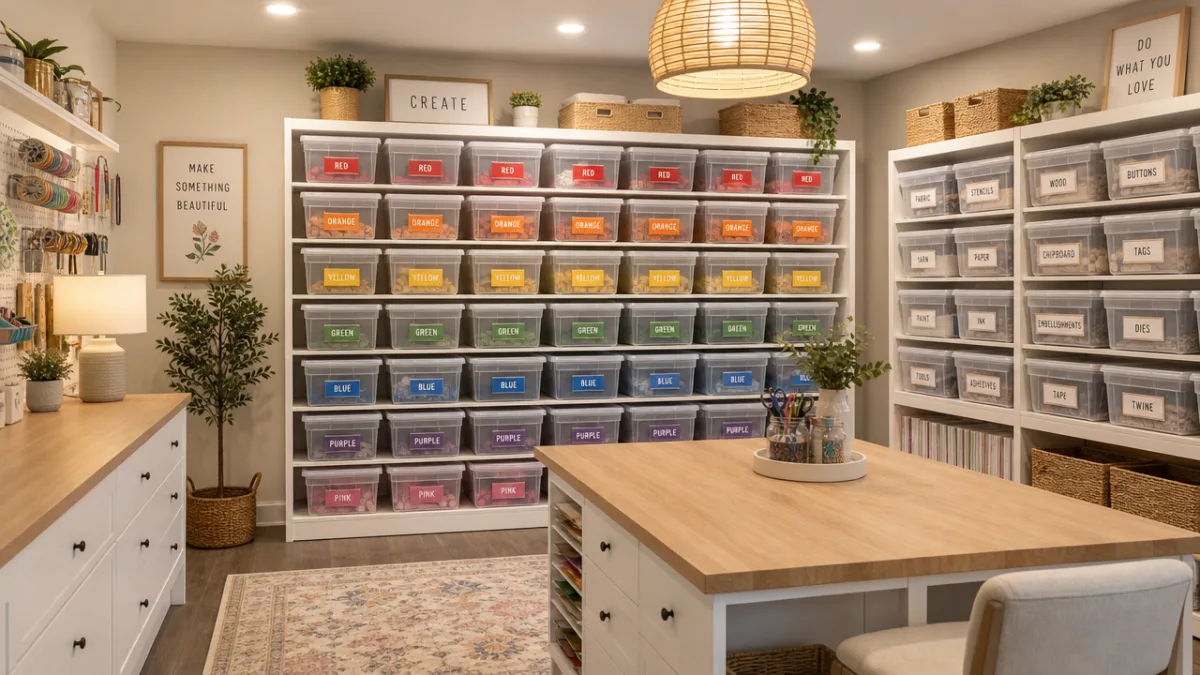
A lot of the time, a craft room doesn’t feel small because of its actual size — it feels small because of visual chaos. Getting a consistent storage system in place can completely change how the space feels, almost overnight. The two most powerful principles here are transparency and color-coding. When your containers are clear, you can see what’s inside at a glance without opening everything or reading a dozen labels. That alone makes it so much easier to put things away and find them again, which means your room naturally stays tidier over time.
Color-coding adds another layer that your brain can process instantly. Pick a color for each category of supply — maybe blue for sewing notions, green for paper crafting, yellow for stamping and ink, red for adhesives. Then use colored labels, colored bins, or even a strip of washi tape on shelf edges to mark where each category lives. This works great for adults and is especially handy if kids share the space too. It takes the guesswork out of tidying up and makes it easy to notice at a glance when something is running low.
When you’re shopping for containers, try to resist the temptation to grab a random assortment of whatever’s cheapest. A unified set — same brand, same style, same color palette — creates a visual calm that makes even a fully loaded craft room feel organized rather than overwhelming. This doesn’t have to be expensive. Dollar stores and discount retailers often carry stackable clear containers in consistent sizes. Buy a few more than you think you need upfront so that when your collection grows, you can expand within the same system rather than starting from scratch.
5. Control the Visual Noise With a Cohesive Aesthetic
Here’s something a little counterintuitive: all those beautiful ribbons, papers, fabrics, and paints you’ve collected can actually make your room feel more cramped if they’re displayed without any visual framework holding them together. Creating a cohesive aesthetic doesn’t mean hiding your supplies away — it means giving them a backdrop that lets them look intentional rather than overwhelming. Starting with a neutral, light-colored palette for your walls, furniture, and storage gives your colorful supplies room to breathe visually without competing with everything else in the room.
White and off-white are popular choices for small craft rooms for good reason — they reflect light and make space feel bigger. But you don’t have to go stark white if that doesn’t feel like you. A soft sage green, a warm greige, or a pale sky blue can all work as neutral backdrops while still giving the room some personality. The idea is just to keep the large surfaces — walls, cabinets, desk — relatively calm, so the pops of color from your supplies feel like intentional moments of interest rather than visual noise you can’t escape.
Lighting is just as important as color, and it’s something that gets overlooked way too often. Bad lighting makes a small room feel like a cave and makes detail work genuinely harder. Layer your sources: bright overhead lighting to eliminate shadows, LED strips under shelves to illuminate your desk from above, and a good adjustable task lamp for close work like hand stitching or intricate paper cutting. Well-lit rooms consistently feel larger, cleaner, and more inviting — regardless of how many square feet they actually are.
6. Establish Zones to Keep Projects and Supplies Organized
Even in a tiny room, splitting your space into dedicated functional zones makes a real difference in how your craft sessions actually feel. Think about the way a good kitchen is designed — there’s a prep area, a cooking area, a plating area — and each zone has the relevant tools nearby. In a craft room, your zones might be a cutting and measuring area, a detail work area, a supplies storage zone, and a works-in-progress area where unfinished projects can live without spilling onto your main workspace.
That works-in-progress zone is worth paying special attention to, because unfinished projects are one of the biggest sources of craft room chaos. Instead of letting half-finished things spread across every surface, give them a dedicated home — a specific shelf, cart, or set of bins that’s exclusively for active projects. Give each project its own tray, bin, or clear bag so all the pieces stay together and can be set aside easily when you switch gears. This way you can have several projects going at once (which, let’s be honest, most of us do) without the room looking like a creative explosion happened.
A restocking zone is another small but genuinely useful organizational habit. Keep a notepad or a little whiteboard in your craft room just for writing down supplies that are running low or things you want to add. The moment you use up your last roll of double-sided tape or your final sheet of a particular cardstock, write it down. It prevents that frustrating mid-project discovery that you’re out of something critical, and it also cuts down on impulse-buying duplicates — which is one of the quieter contributors to an overstuffed craft room.
7. Bring in Inspiration Without Adding Clutter
Your craft room should make you feel like creating the moment you walk in. That means it needs more than just good storage — it needs a little soul. The trick in a small space is adding inspiration without adding visual clutter. One of the cleanest ways to do this is to dedicate one wall or a single corkboard panel as your inspiration board, where you can pin swatches, color palettes, sketches, and reference images. Containing it to one defined spot keeps it from creeping everywhere while still giving you something personal and dynamic to look at as you work.
Plants are another lovely addition that won’t eat into your storage or crowd your workspace. A few small pots on a windowsill or a trailing pothos on a high shelf bring in organic color and texture that feels completely different from the manufactured colors of craft supplies. Research consistently shows that having plants around improves mood and can even boost creative thinking, which sounds like a good enough reason to me. Stick with low-maintenance varieties like succulents, pothos, or snake plants — they’ll hold up fine even if you get deep into a project and forget to water anything for a week.
And finally, be thoughtful about what you display versus what you tuck away. Curate your open shelves like a shop owner would style a retail display — with a clear visual theme, balanced groupings, and enough breathing room between items that each one can actually be seen. Rotate things out seasonally or when a project wraps up to keep the space feeling fresh and current. A craft room that feels personally curated and genuinely cared for is one you’ll actually want to be in — and that’s really the whole point of having one.
Conclusion: Small Space, Big Creative Energy
A small craft room isn’t a limitation — it’s an invitation to be more intentional about how you organize, what you keep, and how you design the space around the way you actually create. The ideas in this guide — smart layouts, vertical storage, multifunctional furniture, cohesive aesthetics — all work together to make a room feel significantly bigger and more functional than its square footage might suggest. The crafters with the most organized and inspiring small rooms aren’t necessarily the ones with the most money or the most space. They’re the ones who took the time to think carefully about what they actually need and built their room around that.
Don’t try to overhaul everything at once — that’s a great way to end up with an even bigger mess halfway through and no motivation to finish. Instead, pick one area or one system and start there. Sort out your ribbon storage one afternoon. Tackle your paper organization the following weekend. Small, consistent improvements add up faster than you’d expect. Before long, you might find that the room you thought was too small is actually everything you need — and that it’s starting to invite you in rather than stress you out every time you open the door.








What do you think?
It is nice to know your opinion. Leave a comment.