










12 DIY Quilted Car Trash Basket Free Patterns: Keep Your Vehicle Tidy in Style
Why Every Car Needs a Quilted Trash Basket
If you spend any significant time in your vehicle, you already know how quickly clutter can accumulate. Receipts, snack wrappers, coffee cups, and miscellaneous scraps seem to multiply on their own, turning a clean interior into a rolling landfill almost overnight. A dedicated trash receptacle is one of the simplest and most effective solutions to this universal problem, and making one yourself means you get exactly the size, shape, and style that suits your car and your personality.
Quilted car trash baskets have surged in popularity among sewing and crafting communities for very good reason. Unlike flimsy plastic bags or store-bought organizers that crack, fade, or simply look generic, a handmade quilted basket brings warmth, texture, and genuine personality to your vehicle’s interior. The quilted construction also adds structural integrity, meaning your basket holds its shape even when empty, and the layers of batting provide a degree of padding that protects whatever it touches against the hard surfaces of your car door or console.
Perhaps the most exciting aspect of this project is the sheer variety of free patterns available online. Whether you prefer a classic patchwork aesthetic, a modern minimalist design, or something festive and seasonal, there is a pattern tailored to your taste. Making a quilted car trash basket is also an excellent entry point for beginner quilters, since the small scale keeps the project manageable while still teaching foundational techniques like cutting, piecing, quilting, and finishing that will serve you in far larger projects down the road.
Understanding the Basics of Quilted Basket Construction
Before diving into specific patterns, it helps enormously to understand what goes into a quilted car trash basket structurally. Most designs consist of three primary components: an outer quilted shell, an inner lining, and some form of stabilizer or batting sandwiched between them. The outer shell is where your decorative fabric choices shine, while the lining keeps the inside clean and wipeable. The stabilizer layer is what gives the basket its body and ability to stand upright without support.
Stabilizers come in several varieties, and choosing the right one makes a noticeable difference in the finished product. Fusible fleece is a popular choice because it bonds directly to fabric with heat, making construction simpler and the result quite sturdy. Foam stabilizers like Soft and Stable or ByAnnie’s brand products create an especially rigid structure ideal for baskets that need to hold their shape under the weight of trash. Traditional cotton batting is softer and better suited to designs where a slightly more relaxed, fabric-bag feel is desired rather than a firm basket silhouette.
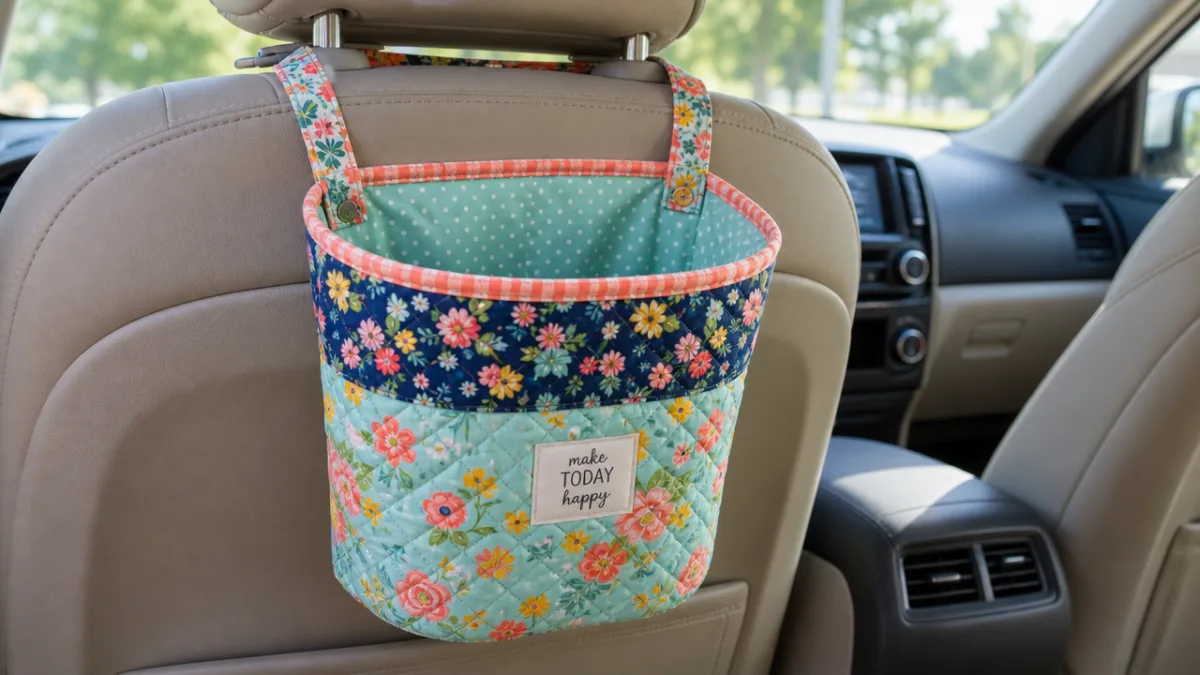
The finishing details matter just as much as the structural layers. Many patterns include a hanging loop or hook attachment so the basket can be suspended from a headrest post, keeping it accessible to backseat passengers. Others are designed to sit flat against a car door panel, secured with a hook-and-loop fastener or a tie. Understanding the intended hanging method before you begin cutting your fabric will save you from having to improvise at the final step, so always read through the complete pattern before you start.
Top Free Pattern Styles and Where to Find Them
The quilting community is extraordinarily generous when it comes to sharing free patterns, and car trash baskets are no exception. Websites like AllFreeSewing, Craftsy, and individual quilting blogs offer dozens of downloadable PDF patterns at no cost. Pinterest itself is one of the richest aggregators of these resources, pointing crafters toward patterns that range from ultra-simple beginner-friendly rectangles to sophisticated multi-pocket organizers with beautifully mitered corners and coordinating piping.
Among the most beloved free pattern styles are the following types that consistently appear across crafting communities:
- Simple Rectangle Basket: The easiest design for beginners, typically consisting of a quilted rectangle folded and seamed at the corners to create a boxy shape with optional hanging tabs. Construction time is often under two hours.
- Circular or Oval Base Basket: A slightly more advanced design featuring a flat circular or oval bottom panel with straight side walls, giving the finished basket a more traditional bucket silhouette that sits upright beautifully.
- Headrest Hanging Organizer: Designed with straps that loop over a car headrest post, this style keeps the basket in reach of back-seat passengers and often includes multiple pockets for organizing small items alongside the main trash compartment.
- Envelope-Style Flat Basket: A slim profile design that lies flat against a car door panel or the back of a front seat, ideal for compact vehicles where space between seats is limited.
- Patchwork Panel Basket: Uses pre-sewn patchwork blocks as the outer panel, making it a natural companion project for quilters who have leftover blocks from larger quilts and want to use them creatively.
Many pattern designers also offer coordinating sets, so you can make a matching set of a trash basket and a tissue box holder, or a full car organizer suite that brings a unified aesthetic to your entire vehicle interior. Searching for pattern bundles on Etsy’s free section or on dedicated quilting blogs will often turn up these coordinated sets, which are particularly appealing if you are making a set as a gift for someone who appreciates a cohesive, thoughtful presentation.
Choosing the Right Fabrics for Durability and Style
Fabric selection is where the project truly becomes personal, and it also has practical implications for how well the finished basket will hold up over time. Car interiors are subject to temperature extremes, UV exposure through windows, and the inevitable bumps and jostles of daily driving, all of which put stress on fabrics and seams. Choosing quality materials from the outset pays dividends in longevity and appearance months or years down the line.
For the outer quilted layer, quilting cotton remains the most popular choice and for good reason. It is widely available in thousands of prints and colorways, easy to cut and sew, and durable enough for everyday use inside a vehicle. Heavier fabrics like canvas, home décor fabric, or upholstery-weight cotton blends offer even greater durability and are particularly well-suited to the outer layer if you anticipate heavy use or if the basket will be used by children who may subject it to rougher handling than adults typically do.
The inner lining deserves as much thought as the outer shell. Oilcloth and laminated cotton are excellent choices for the lining because they are completely wipeable, meaning spills and crumbs clean up with a simple damp cloth rather than requiring the entire basket to be laundered. For those who prefer a fully machine-washable construction, a tightly woven quilting cotton works perfectly as lining paired with heat-resistant batting, and the entire basket can be tossed in the washing machine on a gentle cycle when it needs refreshing. Avoid polyester lining fabrics that pill or attract lint, as they will quickly make the inside of the basket look worn and unkempt.
Step-by-Step Guide to Making Your First Quilted Car Trash Basket
Starting your first quilted car trash basket is less intimidating than it might appear, especially when you approach the project in a systematic, step-by-step manner. The following guide outlines a general construction method suitable for most rectangle-style patterns, which are the most beginner-friendly and among the most functional finished products. Once you have completed this style successfully, the skills transfer directly to more complex patterns.
Begin by gathering your materials and preparing your fabric. Most rectangle basket patterns require approximately half a yard each of outer fabric, lining fabric, and stabilizer or batting. Pre-wash your fabrics if you intend the finished basket to be machine washable, since cotton shrinks significantly in the first wash and pre-washing prevents your basket from warping after the fact. Cut your pieces according to the pattern’s measurements using a rotary cutter and cutting mat for the most accurate results, as precise cuts at this stage make every subsequent step easier and produce cleaner finished seams.
The construction sequence typically follows these steps:
- Fuse or baste the stabilizer to the wrong side of the outer fabric pieces, following the manufacturer’s instructions for your chosen stabilizer type.
- Quilt the outer fabric panels using your preferred quilting design, whether straight-line quilting, free-motion patterns, or simple diagonal grids. This step adds texture and further bonds the stabilizer to the fabric.
- Sew the outer quilted panels together with right sides facing, forming the main body of the basket, then box the corners by folding and sewing the corner seams to create dimensional depth.
- Construct the lining in the same manner as the outer shell, leaving a gap in one seam for turning.
- Place the outer basket inside the lining with right sides together, align the top edges, and sew around the top opening.
- Turn the basket right side out through the gap in the lining, then slipstitch or machine sew the gap closed.
- Tuck the lining inside the basket, press the top edge neatly, and topstitch around the opening for a crisp, professional finish.
- Attach any hanging tabs, loops, or hook-and-loop fasteners as directed by your pattern.
Do not be discouraged if your first attempt is not perfect. Quilting, like most handcraft skills, improves dramatically with practice, and even a slightly imperfect handmade basket carries more charm and character than anything mass-produced. Many experienced quilters keep their first attempts as beloved reminders of where they started, and the skills gained in making that first basket make every subsequent project noticeably smoother and faster to complete.
Customization Ideas to Make Your Basket Truly Unique
One of the greatest joys of making your own quilted car trash basket is the freedom to customize every detail to reflect your personal style or to tailor the basket as a thoughtful, personalized gift. The basic structure of these baskets is highly adaptable, and even small creative additions can transform a functional object into something genuinely special that sparks joy every time you reach for it on the road.
Color and print selection is the most obvious avenue for personalization. Coordinating your basket with your car’s interior color scheme creates a pulled-together look that makes the basket feel intentional rather than afterthought. Sports team fabrics, seasonal holiday prints, novelty fabrics featuring beloved hobbies or interests, and classic quilt patterns like log cabin or flying geese blocks all translate beautifully to this small-scale project. For gifts, choosing fabrics that reflect the recipient’s personality or interests elevates the gesture considerably and shows a level of thoughtfulness that ready-made gifts rarely match.
Beyond fabric choices, consider adding functional embellishments that enhance the basket’s usefulness. A small exterior pocket sewn to the outside of the basket is perfect for storing a pen, a notepad, or a packet of wet wipes. Adding a snap closure or a drawstring top keeps contents contained during sharp turns or sudden stops. For families with young children, adding a wipe-clean laminated interior and a secure closure turns the basket into a true road-trip essential. You might also consider making the basket reversible by choosing two equally attractive fabrics for the outer and lining layers, giving you two different looks in one practical object.
Tips for Gifting Quilted Car Trash Baskets
Quilted car trash baskets have quietly become one of the most appreciated handmade gifts in sewing circles, and for very good reason. They are universally useful, genuinely personal, relatively quick to make, and small enough to package beautifully without requiring elaborate wrapping or presentation. Whether you are making a batch for a holiday craft fair, preparing teacher appreciation gifts, or looking for a thoughtful birthday present for a friend who seems to have everything, a handmade quilted basket is almost always warmly received.
When making baskets as gifts, consider the practical preferences of the recipient. Someone who drives a compact city car will appreciate a slim, lightweight design that does not crowd the interior, while a parent who drives a large SUV full of children might benefit more from an oversized, heavy-duty version with a secure closure. A teen who just received their first car would likely love a basket made from trendy, bold prints, while a colleague might prefer something sophisticated and neutral that coordinates with a professional vehicle interior. Taking these small considerations into account transforms a thoughtful gift into an exceptionally well-suited one.
Presentation adds a final layer of care that recipients always notice. Consider filling the finished basket with a few useful car essentials before gifting it, such as a small notepad, a compact hand sanitizer, a few wrapped mints, or a travel pack of tissues. This shows the recipient exactly how the basket is intended to be used while also making the gift feel immediately complete and ready to enjoy. A handwritten note explaining that it is handmade and washable, along with a simple care instruction, is a lovely touch that ensures the basket stays beautiful for years with minimal effort on the recipient’s part.
Expanding Your Skills: From Car Baskets to Larger Quilted Projects
The skills developed in making a quilted car trash basket form a genuinely solid foundation for tackling larger and more ambitious quilting and sewing projects. Many quilters who began their journey with small, functional objects like these baskets discover that the techniques feel far more approachable in the context of a miniature, manageable project than they would if learned on a full-size bed quilt where mistakes are costly in both time and materials. The car basket acts as a low-stakes classroom for some of quilting’s most fundamental skills.
Boxing corners, working with stabilizers, quilting through multiple layers, inserting hanging hardware, and achieving clean topstitching are all techniques that appear repeatedly in tote bags, storage bins, placemats, table runners, and eventually in full quilts. Once these techniques feel familiar and comfortable at the small scale of a car basket, applying them to a larger project like a quilted tote bag or a lap quilt requires far less mental energy and produces noticeably better results. Many quilting instructors specifically recommend small functional projects like car baskets or mug rugs as first projects for exactly this pedagogical reason.
The quilting community itself is another remarkable resource that opens up once you begin making projects and sharing them. Joining a local quilting guild, participating in online quilting forums, or simply sharing your finished baskets on social media connects you with thousands of fellow crafters who share free patterns, offer encouragement, suggest improvements, and celebrate your progress. Quilting has one of the most welcoming and generous creative communities of any fiber art, and even a small functional project like a car trash basket is celebrated enthusiastically when shared. Your first quilted basket may well be the beginning of a creative practice that brings you satisfaction and community for many years to come.








What do you think?
It is nice to know your opinion. Leave a comment.