










Turn an Old Plastic Crate into a Cool Stool: A Complete DIY Guide
Why Upcycling a Plastic Crate Makes Perfect Sense
In a world increasingly aware of waste and environmental impact, finding creative uses for everyday objects that might otherwise end up in a landfill has become both a passion and a practical skill. An old plastic crate sitting in your garage, basement, or shed might look like clutter, but with a little imagination and some basic materials, it can become a genuinely useful and stylish piece of furniture. This project is one of the most satisfying DIY endeavors you can take on because the transformation is so dramatic and the cost is so minimal.
Plastic crates are remarkably durable by design. They were built to hold heavy loads, stack reliably, and withstand years of rough handling. That inherent structural strength is exactly what makes them ideal candidates for conversion into stools or small side tables. You are not fighting the material — you are working with it. The rigid walls and flat base provide a ready-made frame that, with a cushioned top and some decorative treatment, becomes something you would genuinely want in your living space, workshop, or child’s bedroom.
Beyond the environmental and practical arguments, there is a real creative satisfaction in this kind of project. You get to make decisions about color, fabric, padding thickness, and finish that make the final piece uniquely yours. No two upcycled crate stools will look exactly alike, which means you end up with custom furniture at a fraction of the cost of anything you might find in a shop. That combination of personalization, sustainability, and economy is hard to beat for a weekend project.
The Environmental Case for Upcycling Plastic
Plastic takes hundreds of years to break down in a landfill, and the production of new plastic furniture consumes significant energy and resources. By giving an existing plastic crate a new purpose, you are directly reducing demand for new materials and keeping functional items out of the waste stream. Even a single project like this contributes in a small but meaningful way to a more circular approach to consumption, where objects are repaired, reimagined, and reused rather than discarded at the first sign of obsolescence.
There is also the question of microplastics. When plastic objects degrade in landfills or the natural environment, they shed tiny particles that contaminate soil and water. Extending the useful life of a plastic crate by converting it into furniture delays and reduces that process considerably. Keeping the material in active use, enclosed and protected, is genuinely better for the environment than disposal. Your stool project is therefore not just aesthetically rewarding — it is a small act of ecological responsibility that costs you almost nothing extra to perform.
Many communities have seen a surge in interest around upcycling as people look for ways to live more intentionally and spend more thoughtfully. Online communities, social media platforms like Pinterest, and local maker spaces have all contributed to a culture where creativity around reuse is celebrated and shared. Making a crate stool puts you in good company with thousands of DIY enthusiasts around the world who are finding that the most interesting furniture does not come from a flat-pack box — it comes from the materials already around you.
Materials and Tools You Will Need
One of the most appealing aspects of this project is how little you actually need to get started. Most of the materials can be sourced inexpensively from a hardware store, a fabric shop, or items you likely already have at home. The plastic crate itself is obviously the centerpiece, and the best candidates are milk crates, sturdy storage crates, or old vegetable crates with solid flat sides. Avoid crates that are cracked, warped, or have significant structural damage, as these will not support weight safely once converted.
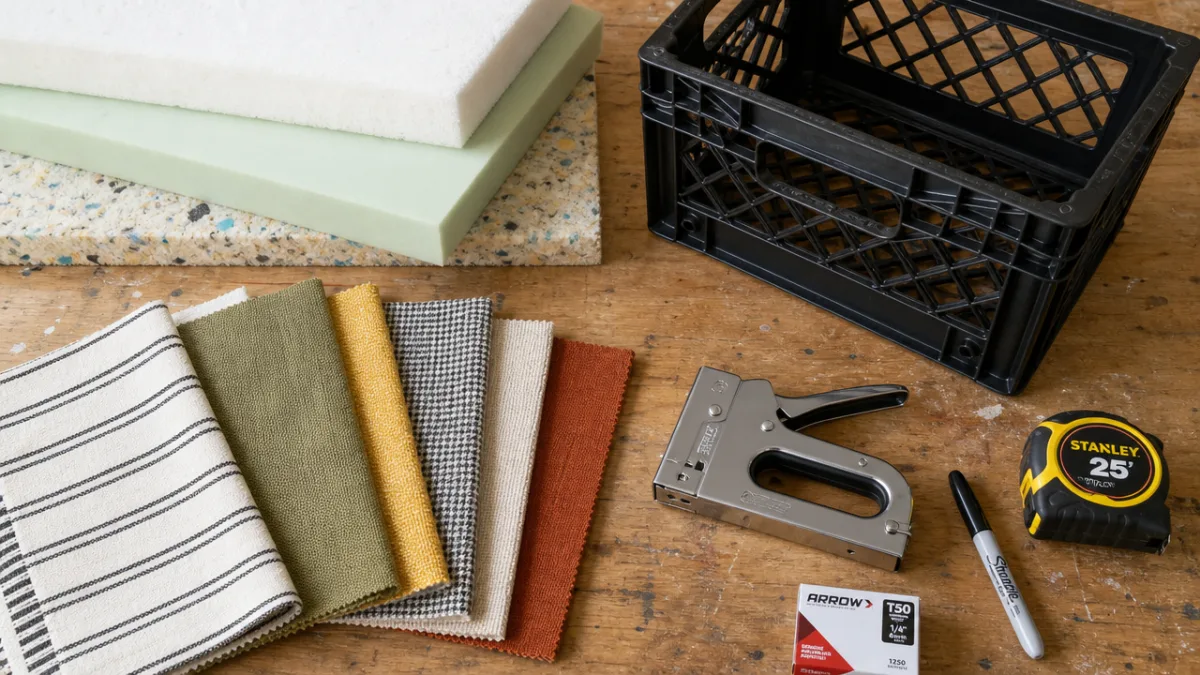
For the cushioned seat, you will need a piece of thick foam — ideally upholstery foam between two and four inches thick — cut to the dimensions of the crate’s top opening or its lid. A piece of plywood or MDF cut to the same dimensions provides a firm base for the foam and ensures the seat does not flex or sink unevenly when someone sits on it. You will also need your chosen fabric, which should be durable and cleanable, especially if the stool will see regular use. Faux leather, canvas, heavy cotton, or upholstery fabric all work beautifully and come in an enormous range of colors and patterns.
In terms of tools, the list is refreshingly short. A staple gun is the single most important tool in this project — it secures the fabric tightly to the plywood base and does so quickly and reliably. A craft knife or scissors for cutting foam and fabric, a ruler or measuring tape, a pencil for marking, and optionally a drill if you plan to attach the seat permanently to the crate are all you need. Some people also add spray paint, rope, or adhesive contact paper to decorate the crate body itself, which requires its own small set of supplies depending on the technique chosen.
Choosing the Right Crate and Fabric
Not all plastic crates are created equal when it comes to this project. The ideal crate has a relatively uniform rectangular or square shape, walls that are tall enough to create a comfortable stool height when flipped upside down or used right-side up, and a base that is solid enough to sit on or attach a board to. Milk crates, which measure roughly twelve inches square and eleven inches tall, are a classic choice. Larger storage crates from supermarkets or warehouses can work well for adult-sized stools, while smaller crates make excellent children’s furniture.
Fabric selection is where the project becomes truly personal. Consider the room where the stool will live and what colors or patterns would complement the existing décor. A neutral linen or tweed fabric suits a Scandinavian or minimalist interior beautifully, while a bold geometric print or a bright solid color can add a pop of personality to a playroom or creative studio. If the stool will be used outdoors on a covered patio, look for outdoor or water-resistant fabric that can handle moisture and UV exposure without fading or deteriorating quickly.
Foam density is another important consideration that beginners sometimes overlook. Foam is rated by density and firmness, and for a stool that will be sat on repeatedly, you want a medium-to-high density foam that will hold its shape over time rather than compressing permanently after a few uses. Many fabric and upholstery shops will cut foam to size for you if you bring your measurements, which saves you the effort of cutting it yourself. Budget for slightly more fabric than you think you need — having extra gives you room to correct mistakes and ensure clean, taut coverage.
Step-by-Step Instructions for Building Your Crate Stool
Begin by thoroughly cleaning the plastic crate. Use warm soapy water and a scrubbing brush to remove any dirt, labels, or residue, and allow it to dry completely before proceeding. If you plan to paint or decorate the crate body, this is the stage to do it. Spray paint designed for use on plastic adheres best to a clean, lightly sanded surface. Apply several thin coats rather than one heavy coat to avoid drips, allowing each coat to dry fully before adding the next. Masking tape can help you create clean lines or geometric patterns if you want a more graphic look.
While the crate dries or the paint cures, cut your plywood or MDF to size. The board should be large enough to cover the top of the crate fully, sitting either inside the rim or across the top depending on your crate’s design. Use a jigsaw or circular saw, or ask your hardware store to make the cut for you when you purchase the board. Sand the edges smooth so there are no sharp corners that might damage your fabric. Lay the foam on top of the board, trace around it if trimming is needed, and cut it to match the board’s dimensions using a sharp craft knife with a long blade, using a sawing motion rather than pressing straight down.
Now comes the upholstery stage, which is the most satisfying part of the build. Lay your fabric face-down on a clean flat surface, place the foam face-down in the center, then set the plywood board on top of the foam. Pull the fabric up over the edge of the board on one side and staple it firmly, working from the center outward and keeping the fabric taut. Move to the opposite side, pull the fabric firmly, and staple again. Repeat for the remaining two sides, then work your way around the entire perimeter, folding the corners neatly as you go, just as you would when wrapping a gift. The result should be a taut, smooth cushioned seat with no wrinkles or puckers.
Attaching the Seat and Finishing Touches
Once your cushioned seat is complete, you have a few options for attaching it to the crate. The simplest approach is to leave it unattached — the weight of a person sitting on it will hold it in place perfectly well during use, and leaving it removable means you can wash or replace the fabric cover more easily in the future. If you prefer a more permanent arrangement, you can drill small screws up through the inside of the crate into the underside of the plywood, which locks the seat in place securely without any visible hardware from the outside.
Consider adding non-slip feet to the bottom of the crate to prevent it from sliding on hard floors. Small adhesive rubber pads, available at any hardware store for just a few dollars, work extremely well for this purpose. If you are using the crate right-side up to take advantage of the interior storage space, you might also add a simple fabric lining to the inside walls using contact adhesive or hot glue, giving the storage compartment a polished, intentional look rather than the raw plastic interior of the original crate.
Finally, step back and admire what you have made. At this point, your old plastic crate has been transformed into a piece of furniture with real character and genuine usefulness. Small decorative details like a row of upholstery tacks along the edge of the cushion, a length of decorative rope wrapped around the crate body, or a coat of metallic paint can elevate the look further if you want something that feels even more finished and deliberate. The project is complete when it makes you happy every time you see it.
Creative Variations and Customization Ideas
Once you have made one crate stool and understand the basic process, the possibilities for variation are genuinely exciting. The core technique of combining a rigid base with an upholstered seat is endlessly adaptable to different aesthetics, spaces, and functions. Some makers choose to stack two crates vertically and secure them together with zip ties or bolts to create a taller bar-height stool. Others use a crate as the base of a small side table by topping it with a larger board or even a reclaimed wood slab, creating a piece that serves dual purposes as both storage and surface.
The decorative treatment of the crate body offers perhaps the richest opportunity for personalization. Woven rope or jute twine wrapped around the exterior gives the piece a natural, coastal, or bohemian character that looks expensive and intentional. A coat of chalkboard paint on the outside turns a child’s stool into an interactive surface they can draw on. Mosaic tile work, applied with tile adhesive and grout, creates a stunningly unique piece with a Mediterranean or artistic flair. Decoupage using printed maps, vintage newspaper, or decorative paper is another accessible technique that requires nothing more than craft glue and patience.
Fabric choices can completely transform the personality of the finished stool. Consider these popular approaches that makers have used to great effect across a wide range of interior styles:
- Animal print upholstery fabric for a bold, maximalist living room accent piece that draws the eye and sparks conversation.
- Neutral linen or oatmeal canvas for a clean, understated Scandinavian or farmhouse aesthetic that blends seamlessly with wooden furniture.
- Bright solid colors in primary hues for children’s bedrooms or playrooms, where fun and durability are equally important considerations.
- Vintage floral prints for a cottage or grandmillennial style that feels nostalgic and warm in a cozy reading nook or bedroom corner.
- Outdoor performance fabric in stripes or solids for covered patio or balcony use, where weather resistance and UV stability are essential.
Making a Set for Greater Impact
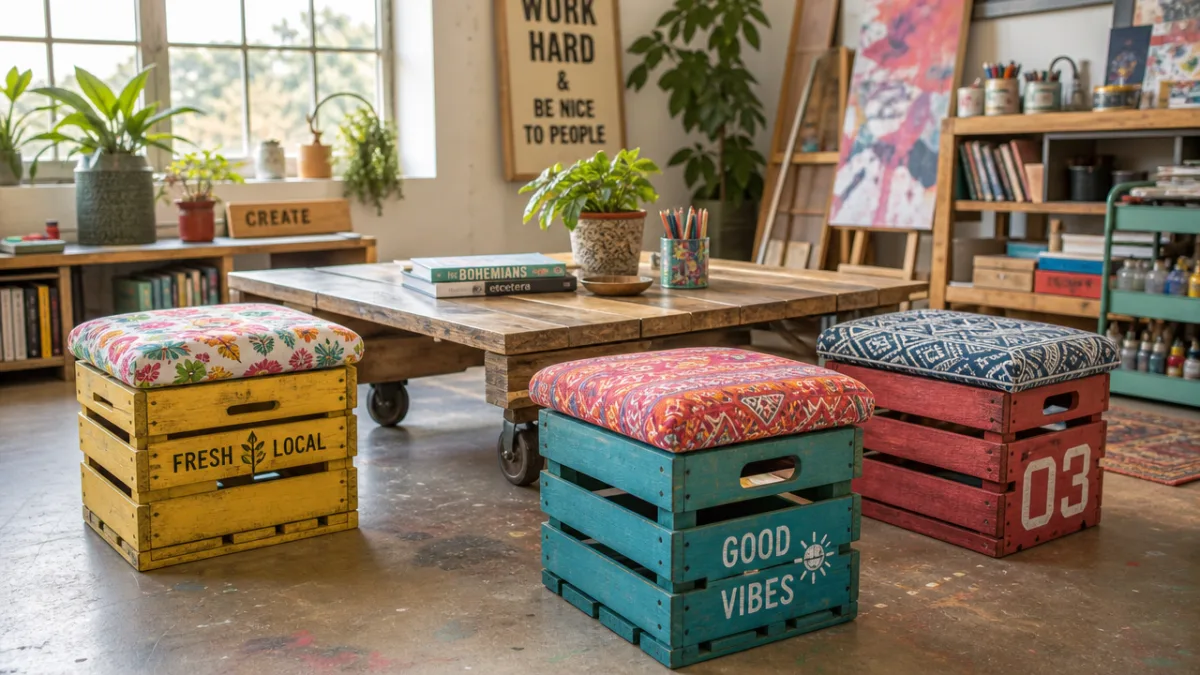
A single crate stool is charming, but a matching set of two, three, or four creates a much more intentional and designed impression. Identical crates with the same cushion fabric can be arranged around a low coffee table to create an unconventional seating arrangement in a casual living room or studio apartment. This approach is particularly popular in small spaces where traditional sofas and armchairs would be overwhelming, because the stools can be tucked away or stacked when not in use, then pulled out when guests arrive.
Alternatively, you can embrace deliberate mismatching by using the same crate color but different fabric patterns that share a common color palette. This creates a curated, eclectic look that feels intentionally collected rather than randomly assembled. A trio of stools upholstered in different patterns from the same designer fabric collection, for instance, creates a visually interesting grouping that still feels cohesive and designed. This approach also gives you the flexibility to add more stools over time without needing to find an exact match.
For the craftiest makers, consider building a small bench by securing two or three crates side by side with strong adhesive or bolts, then topping the entire row with a single long cushioned seat. This creates a bench-style piece with substantial storage inside each crate — ideal for an entryway where you need both seating and a place to store shoes, scarves, or other everyday items. Add a set of casters to the base and you have a rolling storage bench that can move wherever it is needed most in your home.

Practical Tips for Durability and Safety
A stool that wobbles, tips, or deteriorates quickly is not just frustrating — it can be a genuine safety hazard, particularly in households with children or elderly users. Taking a few extra steps during the build process to ensure structural integrity will make a significant difference to the longevity and safety of your finished piece. The most important of these is verifying that the crate you are using is genuinely sturdy and free from cracks or weak points before you invest any time or materials in the project. Sit on the bare crate before you begin to feel whether it handles weight comfortably.
Weight capacity is an important consideration that is often not discussed in beginner DIY guides. A standard milk crate is typically rated to hold around sixty to eighty pounds of static load, but dynamic loads — the kind generated when someone drops onto a seat rather than lowering themselves gently — can be significantly higher. If the stool will be used by adults, look for heavier-duty crates such as those used in agricultural or industrial settings, which are built to much higher load specifications. When in doubt, reinforce the interior of the crate with a snugly fitting wooden insert that transfers the load to the floor more effectively than the crate walls alone.
Fabric maintenance is another practical consideration worth planning for in advance. Upholstered furniture in active households will inevitably need cleaning, and the ease with which you can do that depends on both the fabric type and how the cushion was attached. Removable cushion covers with hidden zippers allow for easy washing, and some upholstery fabrics are treated with stain-resistant finishes that make spot cleaning simple. Building a removable cover rather than stapling the fabric directly to the board adds a small amount of complexity to the initial build but pays dividends in the long run when spills happen.
Caring for Your Finished Stool
Regular maintenance of your crate stool requires very little effort if you made sensible choices during construction. Vacuum the cushion periodically to remove dust and debris, address any spills immediately with a clean cloth and appropriate cleaner for your fabric type, and check the staples or screws periodically to ensure nothing has loosened over time. If the fabric begins to look tired or worn after a year or two of use, re-upholstering the cushion is a straightforward task that costs very little and gives the piece an entirely fresh appearance — one of the genuine advantages of making furniture yourself is that you know exactly how to maintain and update it.
The plastic body of the crate requires almost no maintenance beyond occasional wiping down with a damp cloth. If you painted the exterior, touch up any chips or scratches with the same paint used originally to keep it looking fresh. Painted plastic can chip over time in high-traffic areas, particularly around the edges and base, so applying a clear protective topcoat over your paint during the initial finishing stage will significantly extend how long the decorative surface holds up. This is a small extra step that most beginner guides omit but experienced makers always recommend.
Perhaps the most important long-term consideration is simply enjoying the piece you have made and sharing the process with others. Projects like this gain meaning from the stories attached to them — where you found the crate, who helped you with the build, which fabric you almost chose instead. Handmade furniture carries a history that mass-produced pieces simply cannot replicate, and that intangible quality is part of what makes upcycling so rewarding. Your crate stool is more than a place to sit. It is evidence that creativity, resourcefulness, and a little weekend effort can produce something genuinely lovely from almost nothing at all.
Inspiring Others and Building a DIY Community
One of the most powerful things you can do after completing a project like this is share it. Posting photos of your finished crate stool on platforms like Pinterest, Instagram, or dedicated DIY communities does more than invite admiration — it genuinely inspires other people to look at the ordinary objects around them with fresh eyes. The ripple effect of a single shared project can be remarkable. Someone sees your stool, makes their own, shares that, and suddenly a whole network of people has been encouraged to try something creative with materials they already had. This is how DIY culture spreads and strengthens.
Consider documenting your process as you go, not just the finished result. Step-by-step photos or short video clips of each stage of the build are enormously valuable to beginners who are intimidated by the idea of trying it themselves. Showing that the process involves normal, manageable steps — that it is not pristine or perfect at every stage — is often more encouraging than a polished final image alone. The moments where something does not go exactly to plan, and how you handled them, are often the most useful content for someone who is on the fence about starting their own project.
Local communities also offer wonderful opportunities for sharing this kind of knowledge. Maker spaces, community centers, schools, and libraries increasingly host DIY workshops where participants can learn practical upcycling skills in a social setting. Teaching a crate stool workshop is an excellent entry-level project for these contexts because the tools required are safe and accessible, the materials are inexpensive, the build time fits within a few hours, and the result is immediately useful. Participants leave with something they made themselves, which is a powerful confidence-builder for anyone who has never tried making furniture before.
The Bigger Picture of Creative Reuse
The crate stool project is a gateway. Once you have experienced the satisfaction of transforming a discarded object into something genuinely useful and attractive, you begin to see the potential in all kinds of materials that most people walk past without a second glance. Old wooden pallets become garden furniture or wall art. Vintage suitcases become side tables or shelving. Empty tin cans become planters or pendant light shades. The skill you develop in any one project — the ability to look at raw materials and visualize their potential — transfers to countless others and grows with every new attempt.
There is also a broader cultural argument worth making here. As consumers, we have been conditioned to equate value with newness and to see wear or age as indicators of failure. Upcycling projects like this one gently but persistently challenge that conditioning by demonstrating that value can be created as well as purchased, and that the things we already own often have more potential than we recognize. A culture that repairs, reimagines, and reuses is not just more environmentally responsible — it is also more creative, more resilient, and arguably more interesting than one that simply buys and discards.
Your old plastic crate stool is, in a small way, a statement about all of this. It says that you value creativity over consumption, that you are willing to invest a few hours of effort in something that will last, and that you find pleasure in making rather than just acquiring. Those are values worth expressing through the objects in your home, and this project is one of the most accessible ways to start doing exactly that. Begin with one crate, one cushion, one afternoon — and see where the habit of making takes you next.








What do you think?
It is nice to know your opinion. Leave a comment.