










The Bar Is Done: A Complete Guide to Building Your Dream Home Bar
The Vision Behind Every Great Home Bar
There’s nothing quite like the moment a big home project finally comes together. Building a home bar is one of those things that starts as a rough idea — maybe a sketch on a napkin, maybe just a vague notion that you want a real spot to entertain — and gradually turns into one of the most-loved parts of your home. The road from bare wall to fully stocked, well-built bar takes patience and planning, but if you love the idea of having a great space to host people, it’s absolutely worth it.
For most people, the decision to build a home bar comes down to wanting a dedicated space that actually feels like them — somewhere that reflects their personality and the way they like to entertain. Whether you’re going for a sleek, modern cocktail lounge vibe or something warmer and more pub-like, your bar ends up being an extension of who you are. Honestly, it starts a conversation before anyone even has a drink in hand. The choices you make during the build will shape the feel of that space for years.
What separates a truly great home bar from just a shelf of bottles is thoughtful design. Every detail plays a role — the height of the counter, the wood in the cabinetry, the backsplash tile, the warmth of the overhead lighting. When those pieces all come together, you’ve got something more than a functional corner of a room. It becomes a destination, the kind of place that makes people want to slow down, pull up a stool, and stay a while.
Planning and Design: Laying the Groundwork
Before you drive a single nail or cut a single board, the planning phase is where you set yourself up for success — or frustration. The biggest mistake first-time builders make is rushing past this part. You need to really think through the space: take precise measurements, and picture how the bar will actually function when people are using it. Will guests stand on one side while you work behind the bar? How many people do you typically have over? The answers shape every design decision that comes after.
A well-thought-out home bar has a few key zones that work together. You need enough counter space to mix drinks, prep garnishes, and stage glassware. Storage needs to account for bottles of all sizes — tall wine bottles, wide-bottomed spirits, the whole range. If you want a sink, plumbing access has to be figured out early, since running new water lines can seriously affect your timeline and budget. Same goes for refrigeration: a bar fridge, an ice maker, or a wine cooler all need electrical support, so that has to be part of the plan from the start.
Design style is another area where early decisions really pay off down the road. An industrial look with exposed brick, metal accents, and Edison bulbs feels completely different from a coastal build with white shiplap and natural wood tones. Making sure your bar fits the room it’s going in keeps the whole thing feeling intentional. Collect inspiration images early — whether you’re doing this yourself or working with a contractor, having a clear visual reference makes everything easier and helps you avoid costly mid-project changes.
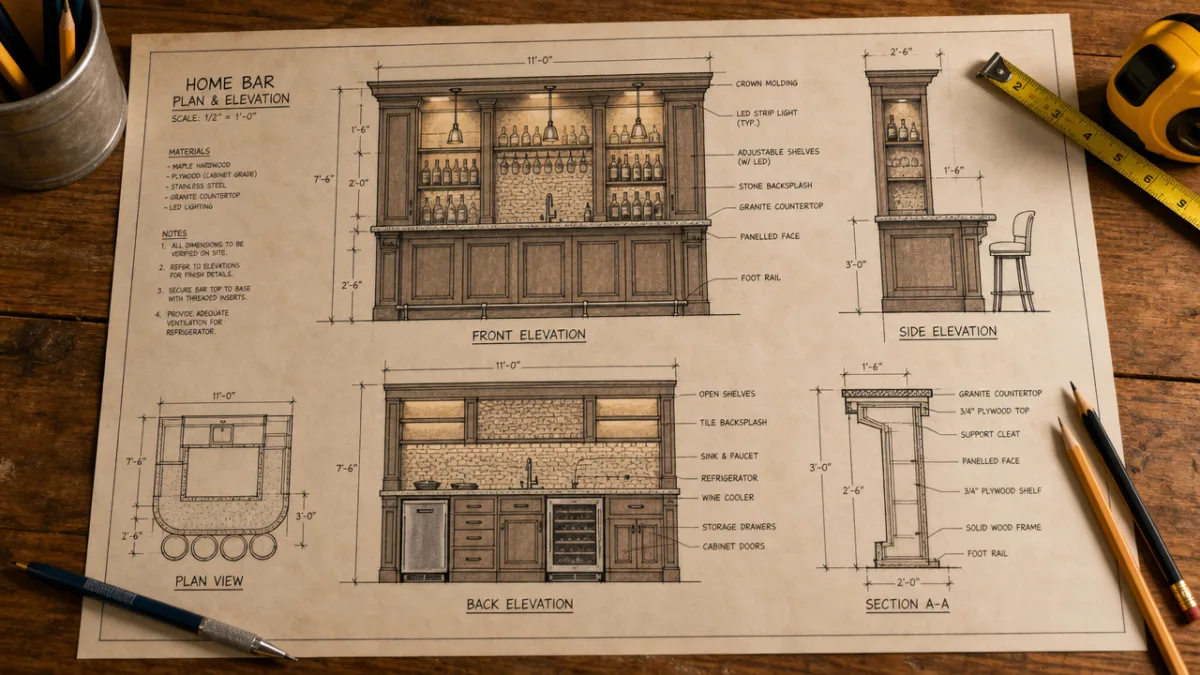
Materials and Construction: Building Something That Lasts
The materials you choose have more impact on the final result than almost anything else — both how it looks and how long it holds up. Hardwoods like oak, walnut, maple, and cherry are go-to choices for bar tops and cabinetry because they’re tough and age beautifully. Oak has that bold, pronounced grain; walnut leans darker and richer. Whichever you choose, just make sure it matches your style and that you’re willing to put in the maintenance it needs over time.
For the bar top specifically, protecting the surface isn’t optional — it’s essential. Bar tops take a beating: spills, condensation rings from cold glasses, the occasional dropped bottle. A quality finish like marine-grade polyurethane or poured epoxy resin creates a protective layer that holds up to real entertaining while still looking great. Poured epoxy has become really popular lately because it creates a glass-smooth surface and gives you the option to embed fun stuff underneath — coins, bottle caps, custom artwork — for a truly one-of-a-kind look.
Don’t neglect the cabinet construction underneath just because it’s out of sight. Solid wood or quality plywood with proper joinery — dado joints, pocket screws, good bracing — ensures everything holds up under the weight of bottles, equipment, and years of use. Soft-close hinges and drawer slides are worth the extra cost; they make the finished bar feel polished and keep things quiet during a party. Adjustable shelving inside the cabinets is smarter than fixed shelves, giving you the flexibility to reorganize as your collection grows and your setup evolves.
The Bar Back: Creating a Stunning Display
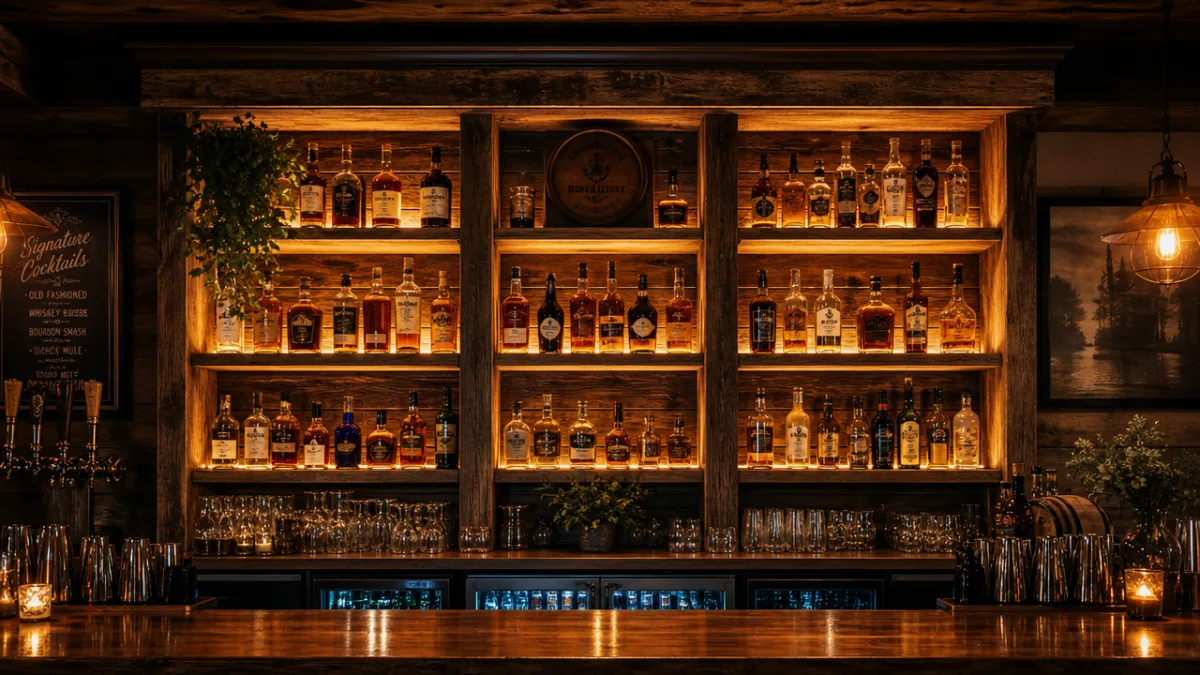
The bar back — the vertical display structure behind your working surface — is usually the first thing people notice when they walk into the space. A well-designed bar back immediately communicates the personality of your bar. It’s where your bottle collection lives, where glassware gets hung or stacked, and where lighting does its magic. Get this right and it elevates the whole project from “nice home improvement” to “genuinely impressive feature.”
Lighting is where a lot of bar backs really come alive. LED strip lights installed behind bottles create that backlit glow that makes spirits look incredible and shows off their colors. Puck lights on individual shelves add focused illumination to highlight specific bottles or decorative pieces. Go with dimmable fixtures so you can dial things up when you’re prepping and pull them back to a warm, atmospheric level once guests arrive. The interplay of light and shadow across bottles, glasses, and wood grain is a big part of what gives a home bar that professional, polished look.
Open shelving gives you easy access to the bottles and tools you use most, but mixing in some closed cabinetry at the lower levels is smart — that’s where you stash napkins, extra glassware, cocktail books, and anything else that doesn’t need to be on display. That balance between open and closed keeps the bar back looking curated instead of cluttered. A lot of builders also add a mirrored back panel behind the shelves, which is a classic move for good reason: it adds depth, bounces light around, and makes the whole space feel bigger and more dynamic.
Stocking Your Bar: Bottles, Tools, and Glassware Essentials
A beautifully built bar is only as good as what’s in it. Stocking it well means building a collection that lets you make a wide range of drinks without needing a hundred bottles. The goal is versatile spirits and mixers that work across multiple recipes — a bar that’s genuinely useful, not just decorative. Start with a solid core collection and add to it over time as you figure out what you actually make and drink. That beats impulse-buying bottles that end up gathering dust.
A good starter collection for a well-rounded home bar typically covers these bases:
- A quality bourbon or rye whiskey for Old Fashioneds, Manhattans, Whiskey Sours, and beyond
- A versatile gin that works in both classic and contemporary cocktails, from martinis to spritzes
- A blanco tequila for margaritas and palomas, plus a reposado for sipping
- A white rum and a dark rum to cover tropical and classic rum cocktails
- A bottle of vodka for simple highballs and cocktails where a neutral base works best
- Dry and sweet vermouth kept in the fridge for martinis, Negronis, and other vermouth-forward drinks
- A selection of bitters — Angostura and orange bitters are the fundamentals
- Simple syrup, honey syrup, and a flavored syrup or two for sweetness and complexity
Bar tools are just as important, and they’re the thing people most often forget about until the bar is done and the first party is a week away. You want a quality cocktail shaker set, a mixing glass with a bar spoon, a reliable jigger for measuring, a fine mesh strainer, a muddler, a channel knife and peeler for citrus garnishes, and a good ice tray or mold setup. For glassware, you need at minimum: rocks glasses, highball glasses, coupe glasses for cocktails served up, and wine glasses. Quality glassware makes drinks look better and honestly just feels better to drink from — it’s one of those upgrades that’s immediately noticeable.
The Finishing Touches: Details That Define the Space
Once construction is done and the bar is stocked, the finishing touches are what turn a well-built bar into a space people actually remember. It’s easy to let these slide when you’re tired after weeks of work, but they’re exactly what guests will notice. A bar rail along the front edge of the counter — traditionally brass tubing or polished wood — gives people somewhere comfortable to rest their arms and adds that unmistakably bar-like quality to the space. A footrail at the base serves the same purpose and is one of those small professional details that immediately reads as “real bar.”
Seating has a bigger impact on how the bar feels socially than most people expect. Stools need to match both the height of your counter and the style of the space. Standard bar height is 42 inches, which means you want stools with a seat height between 28 and 30 inches. Swivel stools are great for conversation — guests can easily turn to talk to someone across the room — while fixed stools feel a bit more intentional and focused. Upholstered seats in leather or a durable fabric add comfort for longer evenings, while wood or metal seats lean casual and work well with rustic or industrial-style builds.
Accessories are what give the bar its personality. Framed vintage cocktail posters or old spirits ads add a classic pub feel. A small chalkboard for writing up a featured cocktail is a fun, restaurant-inspired touch that guests always seem to love. A plant or two — kept away from the splash zone — softens the space and adds some life. A Bluetooth speaker system tucked in or near the bar means music is always part of the atmosphere without needing a whole separate audio setup. Every accessory should feel like it belongs there, chosen because it adds something to the experience, not just because there was an empty spot on the wall.

Maintaining Your Home Bar: Keeping It Beautiful for Years
All that pride you feel when the bar is finally done? It needs to be matched with a commitment to actually taking care of the thing. A bar that doesn’t get regular attention will show its age fast — water stains on the counter, sticky shelves, tarnished hardware. It doesn’t take much to prevent that, but it does take consistency. Setting up a simple cleaning routine before you start entertaining seriously is the best way to make sure it actually sticks.
Wood surfaces need periodic conditioning with the right oils or finishing products to keep them from drying out and cracking, especially in drier climates. Wipe down the bar top after every use with a soft, damp cloth and dry it right away — don’t let moisture sit. Deal with spills immediately; even well-sealed wood can be damaged by prolonged contact with acidic stuff like citrus juice or wine. Check the finish once a year and put down a fresh coat of sealant if you’re seeing wear, especially around the corners of the counter or directly in front of where you do most of your work.
Your bottle collection benefits from a little regular attention too. Keep older stock up front and newer purchases toward the back, same as a professional bar does. Toss anything that’s been open for more than a year — liqueurs and vermouth especially start to degrade once they’ve been exposed to air for a while. Keep a running list of what needs to be restocked so you’re never caught short before a get-together. A well-maintained home bar isn’t just something to be proud of — it’s a living, functional space that keeps doing its job beautifully, as long as you give it the same care you put into building it.








What do you think?
It is nice to know your opinion. Leave a comment.