










Cut Up a Pool Noodle and Add LED Lights: Transform Your Backyard Into a Glowing Paradise
The Magic Behind Pool Noodle LED Lighting
Few backyard DIY projects have captured the imagination of outdoor decorators quite like the pool noodle LED light hack. What began as a clever late-night craft idea shared across social media has blossomed into one of the most accessible, affordable, and visually stunning outdoor lighting projects you can tackle in a single afternoon. The concept is beautifully simple: slice foam pool noodles into sections, thread flexible LED strip lights through them, and watch your backyard transform into a softly glowing wonderland that rivals any professional landscape lighting installation.
The appeal of this project goes far beyond its low cost, though that is certainly a major draw. Pool noodles are widely available at dollar stores, discount retailers, and big-box stores, especially during summer months when they are stocked in abundance. A single noodle can cost as little as one dollar, and a basic set of LED strip lights can be found for under fifteen dollars online or at most hardware stores. The combination of these two humble materials produces a diffused, warm, ambient glow that expensive frosted glass fixtures would struggle to replicate at ten times the price.
What makes this project particularly exciting for DIY enthusiasts is the sheer versatility it offers. Pool noodles come in a wide range of colors, and when combined with color-changing RGB LED strips, the lighting possibilities become virtually endless. You can create a cool, serene blue atmosphere for a poolside lounge, a warm amber glow for a patio dining area, or a festive multicolor display for outdoor parties and celebrations. The soft foam material diffuses the LED light beautifully, eliminating harsh hotspots and spreading a smooth, even luminescence across your outdoor space.
Gathering Your Materials and Tools
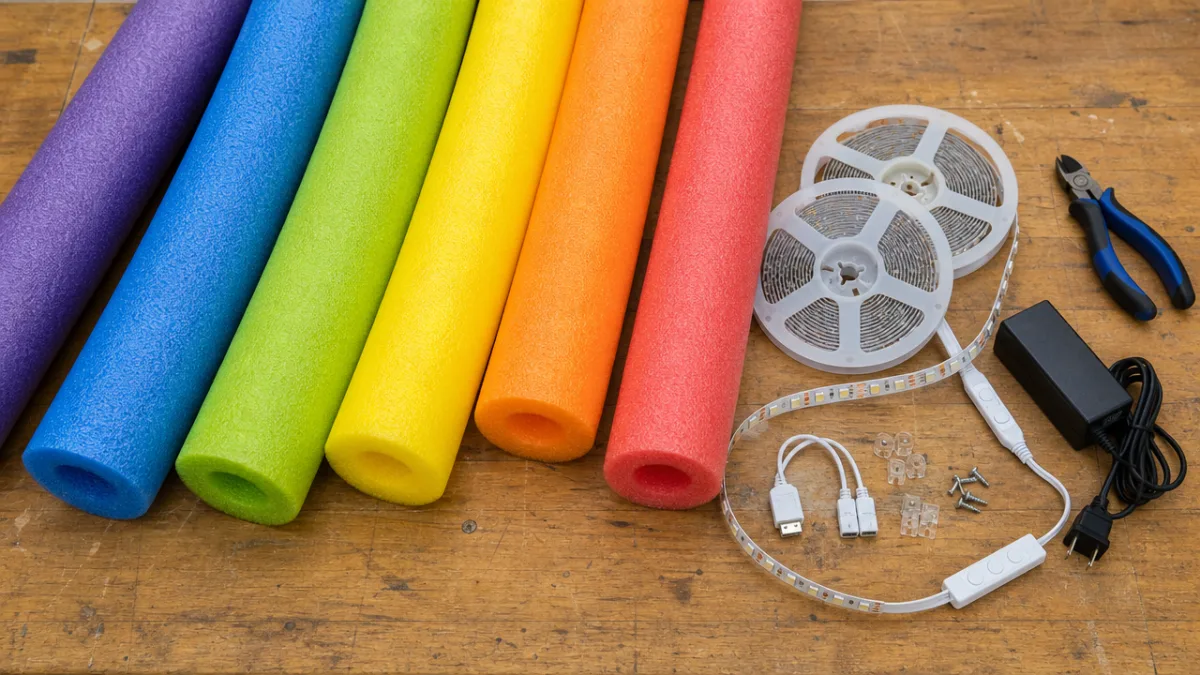
Before you dive into this project, it pays to spend a little time gathering everything you need so your build goes smoothly from start to finish. The core materials are refreshingly simple, but making smart choices at the purchasing stage will determine how durable and how visually impressive your finished product turns out to be. Start with your pool noodles — aim for the solid-core variety rather than the hollow ones, as solid noodles diffuse light more evenly and hold their shape better when cut into sections. You will need anywhere from four to ten noodles depending on the scale of your project.
For the LED lights themselves, flexible LED strip lights are the ideal choice. Look for strips with a high density of LEDs per meter, as this produces a smoother, more even glow rather than a dotted pattern that shows through the foam. Waterproof or water-resistant LED strips rated IP65 or higher are strongly recommended for outdoor use, since they will need to stand up to morning dew, rain splashes, and the general humidity of an outdoor environment. RGB strips with a wireless remote or smart home compatibility add an extra layer of fun, allowing you to change colors and brightness from your phone or a small handheld controller.
Beyond the noodles and lights, you will want a sharp serrated knife or an electric carving knife for cutting the foam cleanly, a power drill with a long bit for boring channels through noodle sections if needed, cable ties or garden stakes for positioning, and waterproof outdoor extension cords to reach your power source. A hot glue gun can be useful for sealing the ends of noodle sections and keeping the LED strips from sliding out. Gather everything in one place before you begin, and your build session will flow efficiently and enjoyably from the very first cut.
- Solid-core pool noodles in your chosen colors (4–10 pieces depending on project size)
- Waterproof LED strip lights, IP65 rated or higher, RGB or single color
- Sharp serrated knife or electric carving knife for clean foam cuts
- Power drill with a long bit for boring channels through foam sections
- Outdoor-rated waterproof extension cords and a weatherproof power strip
- Garden stakes, rebar, or tent pegs for anchoring light columns in the ground
- Hot glue gun and glue sticks for sealing and securing components
- Cable ties or zip ties for managing and routing wiring neatly
Step-by-Step Build Process
With your materials assembled and your workspace cleared, the building process begins with cutting the pool noodles to your desired length. Most decorators find that sections between eight and fourteen inches long work beautifully as standalone light pillars or as segments strung along a garden border. Use your serrated knife with a gentle sawing motion rather than pressing down hard, which would compress and tear the foam. A slow, even stroke produces a flat, clean cut that looks far more polished in the finished display. If you plan to stack multiple sections on a single stake, cut all your pieces to a uniform length for a tidy, intentional look.
Once your noodle sections are cut, the next step is threading the LED strips through them. For shorter sections, you can often push the strip through with your fingers or guide it with a thin dowel. For longer segments, use your drill to bore a clean central channel from end to end, then feed the LED strip through this tunnel. The strip should fit snugly enough that it stays in place but not so tightly that it causes the foam to bulge or distort. Leave a few inches of strip exposed at one end of each section to allow for connection between segments, and use hot glue to secure the strip at the entry and exit points.
Positioning your illuminated noodle sections is where the real creative fun begins. Push garden stakes firmly into the ground at measured intervals along your garden path, fence line, deck perimeter, or patio border. Slide the noodle sections over the tops of the stakes, and connect the LED strips between them using the connectors that typically come included with the strip light kit. Once everything is connected and routed back to your power source, take a moment before plugging in to do a final check of all your connections, making sure everything is secure and that no bare wire is exposed to potential moisture.
Design Ideas and Creative Variations
The basic pool noodle light pillar is just the starting point — once you understand the core technique, an entire world of creative variations opens up before you. One of the most popular adaptations is the pathway border arrangement, where evenly spaced noodle pillars are planted along both sides of a garden walkway, creating a softly glowing runway effect that is both practical for nighttime navigation and genuinely magical in appearance. This look is especially effective with warm white or soft amber LED strips, which evoke the look of elegant low-voltage landscape lighting at a tiny fraction of the cost.
For a more dramatic statement, consider building taller light columns by stacking multiple noodle sections on longer rebar stakes. A column of five or six sections reaching three to four feet in height creates a striking visual anchor in garden beds or at the corners of a patio. Color-changing RGB strips work particularly well in this format, since the full height of the column becomes a vivid display when you cycle through hues. You can program different zones of your yard to different colors using smart LED controllers, creating distinct atmospheric zones across your outdoor space — cooler blues near a pool, warmer tones near a seating area.
Beyond vertical pillars, pool noodles can be bent, shaped, and arranged into more sculptural forms. Bend a full-length noodle into a circle or teardrop shape and secure the ends together with a cable tie, then wrap LED strips around the outside for a glowing wreath or hoop that can be hung from a fence post or pergola beam. You can also line the inside of a planter box with noodle sections to create a softly glowing garden border, or float illuminated noodle rings in a pool or backyard water feature for a breathtaking reflection effect on warm summer evenings.
- Pathway border pillars: Plant short noodle sections along walkways for elegant, safe nighttime navigation.
- Tall stacked columns: Stack multiple sections on rebar for dramatic three-to-four-foot light towers in garden beds.
- Floating pool rings: Shape noodles into circles and float them in a pool with submersible LED lights for a stunning water reflection effect.
- Fence and pergola lining: Attach noodle sections along fence rails or pergola beams for a continuous glowing border effect.
- Glowing planter edging: Line the inside rim of large planters with illuminated noodle segments for a raised-bed glow effect.
- Party centerpieces: Arrange color-changing noodle pillars as table centerpieces for outdoor entertaining areas.

Safety, Weatherproofing, and Long-Term Durability
Creating a beautiful outdoor lighting display is only half the job — ensuring that display is safe, weather-resistant, and built to last through multiple seasons is equally important. The most critical safety consideration in any outdoor electrical project is moisture protection. All connections between LED strips, extension cords, and power supplies should be housed in weatherproof enclosures or sealed with waterproof electrical tape and liquid electrical sealant. Never use indoor-rated extension cords for outdoor projects, and always ensure your power source is connected to a GFCI-protected outlet, which will automatically cut power if moisture intrusion causes an electrical fault.
Pool foam degrades over time when exposed to continuous UV radiation, and this is worth planning for from the start. Painting your noodle sections with a UV-resistant clear acrylic sealant spray before assembly can dramatically extend their lifespan, slowing the chalking, cracking, and color fading that unprotected foam develops after prolonged sun exposure. Alternatively, many crafters store their pool noodle light installations in a dry indoor space during the off-season and simply reinstall them when the weather warms up again. Since the materials are so inexpensive, replacing a few noodle sections each year is not a significant burden even if you skip the UV protection step.
It is also wise to consider the electrical load of your installation before plugging everything in. LED strip lights are remarkably energy-efficient, but a large installation with many interconnected segments can still draw a meaningful amount of current. Always check the maximum wattage rating of your LED strips and ensure that the total load of all connected segments stays within the rated capacity of your power supply and extension cord. Using a smart plug with energy monitoring can give you real-time visibility into your display’s power consumption and allows you to schedule automatic shutoff times, saving electricity and extending the lifespan of your LED components.
Cost Breakdown and Return on Investment
One of the most compelling arguments for the pool noodle LED project is the extraordinary value it delivers per dollar spent. To fully illuminate a medium-sized backyard — say, a perimeter of sixty to eighty feet — with a professional-grade low-voltage landscape lighting system installed by a contractor, you might expect to spend anywhere from eight hundred to several thousand dollars depending on fixture quality and labor costs. The pool noodle LED approach can achieve a comparable visual impact for a total material cost of between twenty and sixty dollars, making it one of the highest return-on-investment outdoor improvement projects available to homeowners.
Breaking that budget down further, a complete build for a typical backyard might include ten pool noodles at one dollar each, two sets of LED strip lights at twelve dollars per set, a weatherproof outdoor power strip at fifteen dollars, a bag of garden stakes at eight dollars, and miscellaneous supplies like cable ties and hot glue at five dollars. That brings the total to roughly sixty dollars for a full perimeter installation. Compare this to even a basic solar garden light set, which might cost thirty to forty dollars for just six to eight small path lights of modest brightness, and the value proposition of the pool noodle approach becomes abundantly clear.
Beyond the initial build cost, the ongoing operating expenses of an LED-based outdoor lighting system are genuinely negligible. A typical residential pool noodle installation running for five hours each evening will consume only a few cents of electricity per night. Over the course of a full summer season spanning roughly ninety evenings, you might spend three to five dollars on electricity for the entire display. That kind of operational efficiency, combined with the upfront savings and the joyful experience of building something beautiful with your own hands, makes the pool noodle LED project an almost unbeatable choice for anyone looking to enhance their outdoor living space on a budget.

Hosting and Entertaining With Your New Outdoor Glow
Once your pool noodle LED installation is complete and glowing beautifully, you will quickly discover how dramatically it elevates the experience of spending time outdoors after dark. What was once a backyard that felt uninviting and dark once the sun went down becomes a warm, welcoming, visually engaging extension of your living space. Guests who visit for the first time will be genuinely surprised and delighted by the soft, colorful glow that greets them, and the inevitable questions of how you achieved the look will give you the pleasure of sharing a genuinely accessible and inspiring DIY project.
For outdoor entertaining, the ability to change the color and intensity of your LED display is a tremendous asset. Set the lights to a soft, warm white for an elegant dinner party atmosphere, switch to a cool blue-green palette for a relaxed poolside gathering, or unleash a full dynamic color-cycling mode for a backyard birthday party or holiday celebration. Many smart LED controllers allow you to sync the lights to music, creating a responsive light show that pulses and changes color in time with whatever is playing through your outdoor speakers — a feature that turns an already impressive display into a truly memorable experience for guests of all ages.
The project also opens wonderful opportunities for seasonal customization throughout the year. Swap out noodles for festive red and green sections in December and program your LED strips to cycle through holiday colors. In October, orange and purple noodles with flickering amber LEDs create a perfect Halloween atmosphere. For Fourth of July gatherings, a red, white, and blue configuration draws appreciative comments from every neighbor who walks past. Because the materials are so inexpensive and the build process is so quick, redecorating your outdoor lighting for each season or occasion becomes a fun, low-stress ritual rather than a major undertaking — and your backyard will glow beautifully through every one of them.








What do you think?
It is nice to know your opinion. Leave a comment.