










How to Tone Down Orange Cabinets with a Black Wash – Easy DIY Cabinet Update
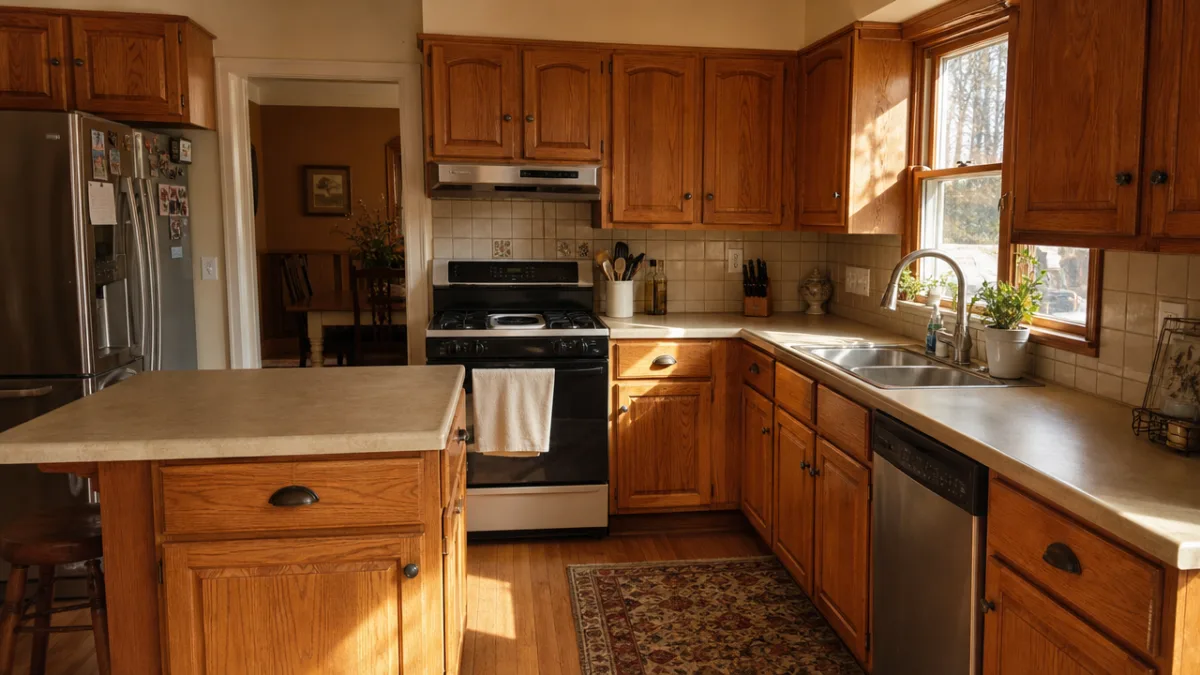
If you’ve ever walked into your kitchen and cringed at the overwhelming orange glow of your wood cabinets, you’re not alone. Many homeowners find themselves living with outdated cabinetry that reads as too warm, too brassy, or simply too orange for modern tastes. The good news is that you don’t need a full renovation or a hefty budget to fix the problem. A black wash technique is one of the most effective and approachable DIY methods for neutralizing that intense orange tone while preserving the natural wood grain beneath.
Understanding Why Wood Cabinets Turn Orange
Before you pick up a brush, it helps to understand why your cabinets look the way they do. Most orange-toned cabinets are made from oak, pine, or cherry wood, all of which contain natural tannins and pigments that oxidize over time. When these woods were originally finished with oil-based varnishes or polyurethane sealers — common choices in the 1980s and 1990s — those coatings tended to amber and yellow as they aged, intensifying the warm, orange undertone already present in the wood itself.
The problem compounds itself. As the finish yellows and the wood continues to oxidize, the cabinetry can shift from a pleasant honey tone into something that reads as orange or even brassy. Add in years of kitchen grease, steam, and sunlight exposure, and you’ve got a color that feels impossible to live with. Many homeowners assume their only option is to paint the cabinets entirely, but that eliminates the natural wood beauty that can still be salvaged with the right approach.
Understanding the source of the orange means you can treat it strategically. A black wash doesn’t cover the wood — it neutralizes the dominant warm tone by introducing its opposite on the color wheel. Black, as a neutral, absorbs and mutes warm hues without completely obscuring the grain. This is why a black wash is such an elegant solution: it corrects the color cast while maintaining the authentic character of the wood beneath, giving your kitchen a more grounded, contemporary appearance.
The Color Theory Behind a Black Wash
Color theory plays a surprisingly important role in this technique. Orange and black are not complements in the traditional sense, but black is an achromatic color that absorbs light and reduces the intensity of any hue it’s mixed or layered with. When a thin, translucent black wash is applied over orange-toned wood, it effectively grays out the surface by adding darkness and cool undertones. The result is a surface that reads as warm gray, driftwood brown, or even a soft taupe depending on the dilution of your wash.
This is distinct from painting your cabinets black. A wash is intentionally thin and watery, allowing the wood grain to remain fully visible. The wash settles into the grain lines and pores of the wood, creating depth and dimension rather than a flat, painted appearance. The surface retains its texture and character while the color shifts toward something far more neutral and modern. You’re not hiding the wood — you’re editing it, the way a photo filter adjusts an image without erasing what’s underneath.
It’s also worth knowing that you have significant control over the final result. A light dilution produces a subtle, barely-there effect that simply takes the edge off the orange without dramatically altering the look. A heavier concentration creates a more dramatic transformation, pushing the cabinets toward a charcoal or dark gray finish. Testing on a small section first allows you to dial in exactly the effect you want before committing to the full project, which is one of the major advantages of this technique over full painting.
Gathering Your Materials and Preparing the Space
One of the most appealing aspects of the black wash technique is how minimal the supply list is. You won’t need specialty products or professional equipment. The core material is simply black latex paint — flat or matte finish works best because it has less sheen and blends more naturally into the wood surface. You’ll dilute this paint with water to create your wash, so you also need a container for mixing, a measuring tool, and a supply of clean water. Beyond that, the main tools are a brush and a collection of rags or old cloths.
Here’s a basic materials checklist to get you started:
- Black latex paint (flat or matte finish, one small sample pot is often enough)
- Water for diluting the paint
- A mixing container such as a plastic bucket or old bowl
- A wide, soft-bristled brush (2 to 3 inches works well for cabinet doors)
- Clean lint-free rags or old cotton T-shirts
- Fine-grit sandpaper (220 grit) for surface preparation
- Degreaser or TSP substitute for cleaning the cabinets
- Painter’s tape to protect walls and hardware
- Clear topcoat sealer (water-based polyurethane or polycrylic) for finishing
- Drop cloths to protect countertops and flooring
Preparation is truly the most important step in any cabinet project, and the black wash is no exception. Start by removing all cabinet doors and drawer fronts if possible, as working on a flat, horizontal surface gives you far more control than trying to apply a wash vertically in place. Label each door with a piece of tape on the back indicating where it belongs — you’ll thank yourself during reassembly. Remove all hardware including hinges, handles, and knobs, placing them in labeled zip-lock bags so nothing gets lost.
Cleaning and Sanding for Best Results
A thorough cleaning is non-negotiable. Kitchen cabinets accumulate grease, cooking residue, and grime that will repel your wash and cause it to bead or absorb unevenly. Use a dedicated kitchen degreaser or a TSP (trisodium phosphate) substitute mixed with warm water. Apply it with a sponge or cloth, working in sections, and follow up with a clean damp cloth to remove any residue. Allow the surfaces to dry completely — ideally overnight — before moving on.
Light sanding comes next. Using 220-grit sandpaper, lightly scuff the entire surface of each cabinet door, going with the grain of the wood. The goal here is not to strip the existing finish but to dull its sheen and create a slightly textured surface that gives your wash something to grip. If your cabinets have a very thick, high-gloss coating, you may need to sand more aggressively or use a liquid deglosser to break it down. After sanding, wipe everything down with a tack cloth or slightly damp rag to remove all dust particles before you begin applying any product.
Mixing and Applying the Black Wash
The mixing ratio of your black wash is where personalization begins. A good starting point is a ratio of one part black latex paint to three parts water, which creates a translucent wash that is strong enough to make a visible difference but light enough to remain controllable. Pour your paint into the mixing container first, then slowly add water, stirring as you go until you achieve a smooth, even consistency that resembles thin ink or strong tea. It should run freely off your brush but not be so watery that it drips uncontrollably.
Before you commit to a full door or panel, always test your wash on an inconspicuous area or a scrap piece of similar wood. Apply the wash, let it sit for thirty seconds to a minute, then wipe it back with your rag. Observe the result once it dries, as the wet appearance can be misleading — washes always dry lighter than they look when wet. If the effect is too subtle, reduce the water ratio slightly. If it’s too dark, add more water. Finding your ideal dilution before tackling the full project saves a great deal of frustration and ensures consistent results across all your cabinet surfaces.
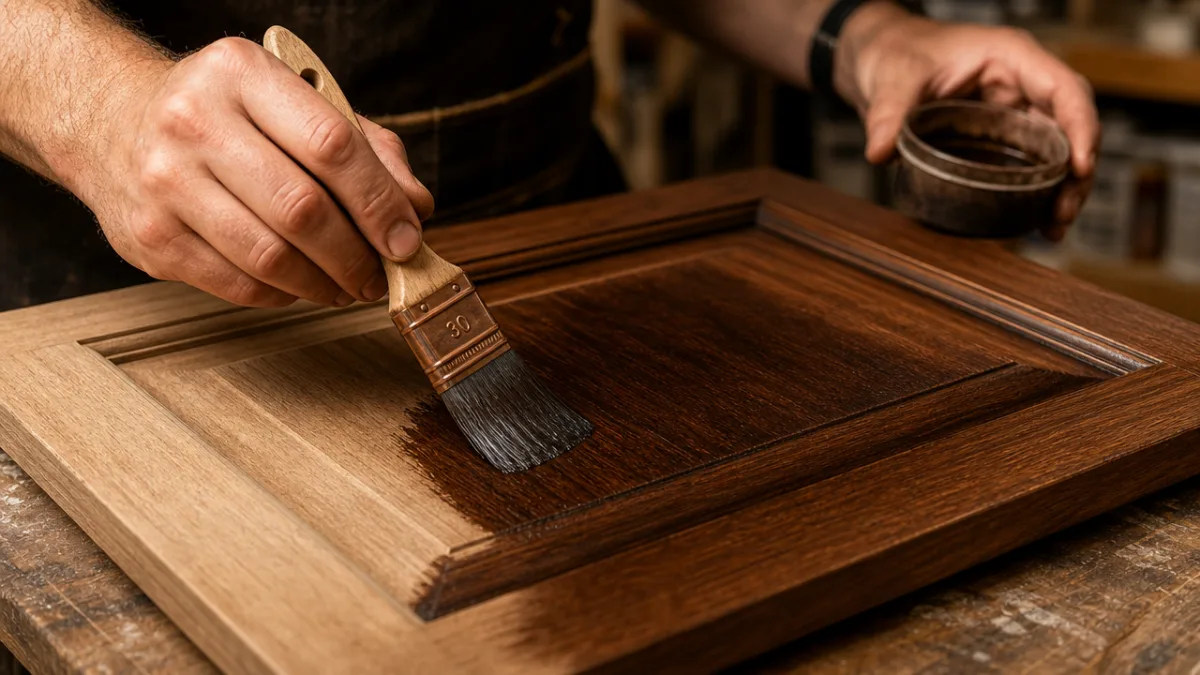
When you’re ready to begin, work in manageable sections — typically one cabinet door at a time. Dip your brush into the wash and apply it in long, even strokes following the direction of the wood grain. Don’t worry about being perfectly even at this stage; slight variations actually enhance the natural, organic look of the finished product. Work quickly but deliberately, covering the entire surface of the door before moving to the wipe-back step. Speed matters here because if the wash begins to dry before you wipe it, it becomes much harder to manipulate.
The Wipe-Back Technique for Natural Results
The wipe-back is what separates a black wash from simply painting your cabinets dark. Immediately after applying the wash to each section, take your clean rag and begin wiping the surface, again moving with the wood grain. The goal is to remove the majority of the wash from the raised areas of the wood while allowing it to remain in the grain lines, pores, and recessed areas. This differential absorption is what creates the beautiful, dimensional look that makes a washed finish so appealing and so different from a painted surface.
The pressure you use during the wipe-back controls the final depth of color. A light, swift wipe removes most of the wash and leaves a very subtle effect — ideal if you want to just take the edge off the orange rather than dramatically change the look. A slower, less aggressive wipe leaves more pigment on the surface and creates a deeper, more saturated result. You can even use a clean, dry brush after wiping to further blend the wash and soften any hard edges or streaks. Experiment on your test piece until the wipe-back technique feels natural in your hands.
One important tip: rinse your rag regularly or switch to a clean one as it becomes saturated with pigment. A rag that’s too full of paint will start depositing color back onto the surface instead of lifting it, which creates muddy, uneven results. Some DIYers prefer to use a separate dry brush for the blending step rather than relying entirely on rags. Either method works well, and many people find a combination of both gives them the most control and the most polished final appearance.
Layering for Depth and Correcting Mistakes
One of the beautiful things about the black wash technique is that it’s forgiving and buildable. Unlike paint, which can become difficult to manage once it’s on the surface, a diluted wash can be corrected, adjusted, and layered repeatedly to achieve exactly the look you want. If your first pass looks too light once it dries, simply apply a second coat using the same method. Each subsequent layer adds depth and further neutralizes the orange tone without making the surface look thick or painted over.
If a section looks too dark or uneven after drying, you have several remediation options. The gentlest approach is to lightly sand the area with 220-grit sandpaper, which removes some of the dried pigment from the surface while leaving the deeper grain lines relatively intact. After sanding, you can apply a lighter wash over the top to re-blend the area with the surrounding surfaces. This ability to sand back and re-wash makes the technique accessible even for beginners who are working through the learning curve of a new process.
Layering also allows you to create intentional variation and dimension across the cabinet surface. Some woodworkers apply a slightly heavier wash to the edges and corners of cabinet doors while keeping the center panel lighter, mimicking the natural wear patterns that develop on aged wood. This technique, sometimes called an antiquing wash, gives cabinets a custom, handcrafted appearance that simply painting could never achieve. The flexibility of the wash method is genuinely one of its greatest strengths as a DIY cabinet update strategy.
Dealing with Tricky Surfaces and Details
Raised panel doors, detailed moldings, and ornate carvings require a slightly adjusted approach. For these surfaces, apply the wash with a smaller detail brush, working the product into recessed areas and along edges. When you wipe back, use the corner of your rag or a small artist’s brush to pull excess pigment out of tight spaces before it dries. The goal is to allow the wash to naturally accumulate in shadow areas — this actually enhances the three-dimensional quality of detailed woodwork and gives it a beautifully aged, almost antique appearance.
Flat-front or slab-style cabinet doors are the easiest surfaces to work with and produce the cleanest, most contemporary results. The wash goes on evenly and wipes back smoothly without any tricky corners or recesses to navigate. For these doors, focus on applying the wash in very consistent, even strokes and wiping back with uniform pressure from top to bottom. The result is a smooth, sophisticated finish that looks intentional and professional despite being entirely achievable by a dedicated DIY homeowner working over a weekend.
Sealing and Finishing Your Cabinets for Longevity
Once you’re satisfied with the washed appearance of all your cabinet surfaces and everything has dried completely — typically at least 24 hours after the final wash application — sealing is the essential final step that protects your work and ensures it lasts for years to come. Without a protective topcoat, even dried latex paint can scratch, chip, or wipe away with regular cleaning and handling. In a kitchen environment, where cabinets are touched dozens of times per day and regularly exposed to moisture, steam, and grease, a durable sealer is non-negotiable.
Water-based polycrylic is a popular choice for this application because it dries clear without adding a yellow or amber cast, which is crucial when you’ve just worked hard to eliminate warm tones. It’s also low-odor and cleans up with soap and water, making it easy to work with in a home environment without heavy ventilation requirements. Apply the polycrylic with a good-quality synthetic brush or a foam roller designed for smooth surfaces, working in thin, even coats and always moving in the direction of the wood grain to minimize brush marks.
Plan to apply at least two to three coats of sealer, sanding lightly between each coat with 320-grit sandpaper and wiping away the dust with a tack cloth before applying the next layer. This builds a protective film that is thick enough to withstand daily use without being so heavy that it creates a plasticky, artificial appearance. The final coat should be left to cure fully — most water-based products recommend allowing 72 hours before returning hardware and rehinging doors to allow the finish to harden to its full durability.
Choosing the Right Sheen Level
The sheen level of your topcoat affects not only the appearance but also the practicality of the finished surface. Matte and flat finishes hide fingerprints and minor imperfections beautifully and maintain the natural, organic look of the washed wood — but they can be slightly harder to wipe clean than glossier options. Satin is the sweet spot for most kitchen applications, offering a low, understated sheen that is easy to clean and durable without looking overly shiny or artificial. Semigloss and gloss finishes are very durable and easy to clean but can make every brushstroke and surface imperfection highly visible.
Consider how your cabinets will interact with the rest of your kitchen’s finishes when making this decision. If your countertops, appliances, and hardware all have a matte or satin quality, matching that sheen level on your cabinets creates a cohesive, pulled-together appearance. A mix of sheen levels across different surfaces can make a space feel visually restless or unintentional. Most designers recommend limiting the variety of sheen levels within a single room to two at most — for example, satin cabinets paired with a matte painted wall.
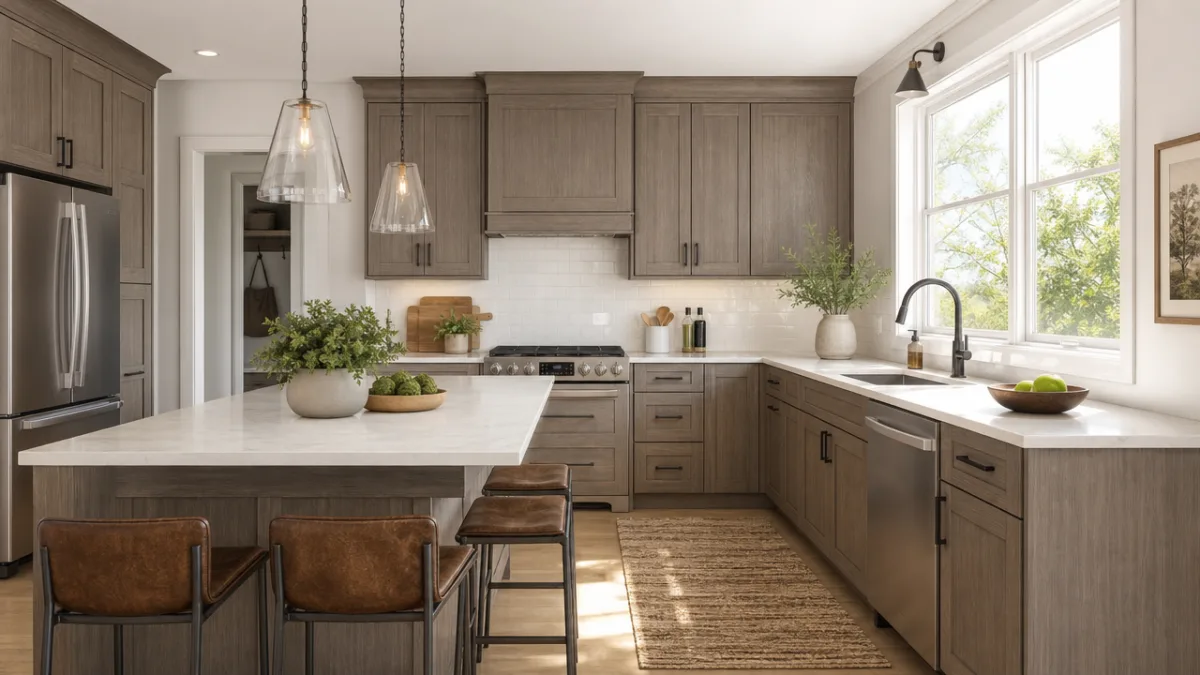
Once your sealer is fully cured and all the hardware has been reinstalled, step back and evaluate the transformation. You’ll likely be amazed at how significantly the orange tone has been neutralized and how much more contemporary and versatile the cabinets look. The black wash technique creates a finish that reads differently depending on the light throughout the day — warmer and brighter in natural daylight, deeper and moodier in evening artificial light — which gives your kitchen a dynamic, layered quality that feels genuinely high-end.
Styling Your Updated Cabinets and Making the Most of the Transformation
With your newly washed and sealed cabinets in place, you have an opportunity to rethink the entire feel of your kitchen with relatively small additional changes. The neutralized, gray-brown tone created by the black wash pairs beautifully with a wide range of countertop materials and wall colors. White marble or quartz countertops create a classic, high-contrast look that feels clean and contemporary. Concrete or soapstone countertops lean into the organic, earthy quality of the washed wood and create a more rustic, artisanal atmosphere. Even butcher block, which previously may have clashed with aggressively orange cabinets, can now coexist harmoniously.
Hardware choices also take on new importance after this kind of transformation. The black wash creates a visual anchor in the kitchen that allows you to be more adventurous with hardware finishes than you might have been before. Matte black hardware creates a monochromatic, deeply sophisticated look. Brushed brass or unlacquered brass adds warmth and contrast without tipping back into the orange territory you just corrected. Brushed nickel or stainless keeps things clean and modern. Whatever finish you choose, consistency across all cabinet pulls, knobs, and hinges creates a polished, intentional result that reads as thoughtfully designed rather than randomly assembled.
Wall color is your final major styling lever. The gray-brown tones of a black-washed cabinet work with a surprisingly wide spectrum of wall colors. Soft whites and creams keep the space light and airy, allowing the cabinets to function as a grounded neutral anchor. Warm greiges and taupes create a harmonious, enveloping atmosphere. Deep, moody tones like forest green, navy, or charcoal create dramatic contrast and make the kitchen feel bold and intentional. Even soft blush or terracotta can work beautifully, bringing warmth back into the space in a controlled, deliberate way that orange cabinets never could.
Long-Term Care and Maintenance Tips
Maintaining your newly transformed cabinets is straightforward with a few basic habits in place. For everyday cleaning, a soft cloth dampened with warm water is usually sufficient for removing fingerprints and light smudges. For grease or more stubborn residue, use a gentle dish soap solution applied with a soft cloth — avoid abrasive scrubbers, scouring pads, or harsh chemical cleaners that can damage the sealer and dull the finish over time. Always wipe in the direction of the grain when cleaning to avoid creating cross-grain scratches in the finish.
Over time, even a well-sealed surface will show signs of wear in high-traffic areas, particularly around handles and along the edges of doors and drawers where hands make contact most frequently. When this happens, light sanding with fine-grit sandpaper followed by a fresh coat of topcoat sealer can refresh the surface without requiring a full reapplication of the wash. This spot-repair approach is one of the practical advantages of a transparent washed finish over solid paint — selective touch-ups blend seamlessly rather than leaving visible patches.
The black wash technique is also one you can revisit and build upon if your tastes evolve over time. Because the finish is thin and the wood grain remains visible, future updates — whether a second, darker wash application, a different stain color layered on top, or even a full painted finish down the road — will adhere well to a properly sealed surface. You’re not locking yourself into a permanent decision; you’re making a beautiful, considered improvement that gives you a kitchen you can genuinely enjoy living with while remaining open to future creative possibilities.








What do you think?
It is nice to know your opinion. Leave a comment.