










How to Create a Driftwood Finish with Chalk Paint
What Is a Driftwood Finish and Why It’s Worth Trying
A driftwood finish is one of those techniques that looks like it happened naturally — like the piece has just always been that way — but actually takes a bit of thought and practice to get right. The whole idea is to recreate the look of wood that’s been tumbled around by saltwater, bleached by the sun, and worn smooth by sand over many years. Done well, it gives any piece of furniture that quiet, aged beauty you’d expect to find at a coastal antique market, not at a big box furniture store.
Chalk paint is the perfect medium for this because of its matte, slightly porous texture. It sticks to almost anything without primer, and its thick, mineral-rich formula naturally picks up a bit of texture that’s reminiscent of real wood grain. It also sands and distresses really easily, which matters a lot here — you’re building up layers that need to look like decades of wear, not like something that came out of a can last Tuesday.
The great thing about this technique is how many surfaces it works on. Coffee tables, dressers, picture frames, shelving, garden planters — if it’s wood (or even just wood-adjacent), it’s probably a candidate. Whether your home leans coastal, farmhouse, Scandinavian, or just generally rustic, this finish tends to fit right in. Once you get the hang of the process, you’ll start eyeing every beat-up old piece of furniture as a potential project.
Gathering Your Materials Before You Begin
Getting everything together before you start will save you a lot of frustration. For the paint, you’ll want at least two or three shades of chalk paint: a dark base like deep charcoal or dark brown, a mid-tone grey, and a very light shade — either a pale grey or near-white. Real driftwood is never just one color; it’s a mix of shadows and highlights that shift depending on how the light hits it, and that’s exactly what these layers are designed to recreate.
For brushes, a wide flat brush handles base coats well, and you’ll also need a dry brush — which just means a brush you’ve wiped almost completely clean before applying it to the surface. That near-dry application is what creates the streaky, grain-like look that makes this technique work. You’ll want fine-grit sandpaper (220-grit) for distressing between layers and something a bit coarser (120-grit) for roughing up the surface at the start. And don’t forget clear wax or dark antiquing wax to seal everything at the end.
Here’s a quick checklist of everything you’ll want to have on hand before starting:
- Chalk paint in dark charcoal or deep brown, mid-tone grey, and pale grey or off-white
- Wide flat paintbrush and a dedicated dry brush
- Fine-grit sandpaper (220-grit) and medium-grit sandpaper (120-grit)
- Clean lint-free rags or paper towels
- Clear finishing wax and optionally dark antiquing wax
- A palette or old plate for mixing and loading paint
- Painter’s tape to protect any hardware or adjacent surfaces
- Drop cloth to protect your workspace
One thing worth knowing before you go shopping: chalk paints vary quite a bit from brand to brand. Thickness and pigmentation both affect how the layering works, so it’s worth starting with something reliable. Annie Sloan, Rust-Oleum Chalked, and DecoArt Chalky Finish are all solid options. That said, plenty of crafters make their own by mixing flat latex paint with unsanded tile grout, and for this particular technique, it works just as well and costs a lot less.

Preparing Your Surface for the Best Results
Surface prep is the step people most often rush through, and it’s almost always why a finished project ends up looking off. Chalk paint is forgiving, yes — but that doesn’t mean you can skip this part. Start by giving your piece a thorough clean. Grease, dust, and old wax residue can all interfere with adhesion and cause your paint layers to peel or chip down the line, and that’s not the kind of aging you’re going for.
Once everything is clean and dry, take your 120-grit sandpaper and lightly scuff the whole surface. This is especially important if the piece has any kind of glossy or varnished coating, since chalk paint needs a little texture to grip onto. Try to sand in the direction of the wood grain where you can — it creates better adhesion and also starts building the linear, grain-like texture that will carry through the whole finish. Wipe away all the dust with a damp cloth and let it dry completely before you touch any paint.
If your piece has hardware — knobs, hinges, drawer pulls — either remove it now or tape it off carefully. Working around hardware is awkward, and messy edges around a knob can undermine an otherwise great result. This is also a good moment to look over the piece for any significant damage. Minor dents and scratches are actually a good thing here; they add character that fits the weathered look. But deeper gouges that would look more like damage than personality might be worth filling with a bit of wood filler before you proceed.
Applying the Layers: Building the Driftwood Effect Step by Step
The layering is really the heart of this whole technique, and this is where it pays to slow down and not rush. Start with your darkest color — charcoal, dark grey, or deep brown — and apply it as a base coat over the entire surface. Don’t try for a perfectly smooth, even finish here. Loose, long brushstrokes following the grain direction are exactly what you want. Let the brushstrokes show. Let some areas be a little heavier than others. That unevenness is what makes the finished piece feel like something nature created rather than something painted by hand.
Let the base coat dry fully — usually around 30 to 45 minutes with most chalk paints — then sand the whole surface lightly with your 220-grit paper. This knocks down any heavy texture and softens the color a bit. Wipe away the dust and move on to your mid-tone grey. This one goes on with the dry brush technique: dip just the very tips of your brush into the paint, wipe most of it off onto a paper towel until almost nothing is transferring, then drag the brush across the surface in long, straight strokes following the grain. What you’re after is a soft, almost ghostly layer of color that sits over the base without covering it up.
The third layer is where it all comes together. Using the same dry brush approach with your lightest color — pale grey or off-white — focus on the raised areas, the edges, and the spots that would naturally catch light on a real piece of weathered wood: tops of surfaces, outer edges of panels, any carved or routed details. Applying the highlight selectively rather than all over is what gives the illusion of real depth and dimension. It stops looking like flat paint and starts looking like actual texture.
Here’s a step-by-step breakdown of the layering sequence to keep you on track:
- Apply dark base coat with loose, grain-following brushstrokes and allow to dry fully
- Sand lightly with 220-grit sandpaper and wipe clean
- Dry brush mid-tone grey over entire surface in long, directional strokes
- Allow to dry, then sand very lightly again to blend the layers
- Dry brush pale grey or off-white selectively on raised areas and edges
- Step back and assess — add more of any layer where needed
- Allow entire piece to cure for at least two hours before sealing

Sealing and Finishing Your Driftwood Piece
Once you’re happy with how the paint layers look and everything has dried completely, you need to seal it. This isn’t optional — chalk paint on its own is quite vulnerable to moisture, scuffing, and normal daily use. But the sealer also plays a real role in how the finished piece looks, so it’s worth thinking about which product you reach for rather than just grabbing whatever’s nearby.
Clear wax is the classic choice for chalk-painted furniture, and it works really well for the driftwood look. Apply it sparingly with a lint-free cloth or a wax brush, working it in with small circular motions before buffing it out with a clean cloth in the direction of the grain. It deepens the colors slightly, adds just a hint of sheen, and creates a durable, water-resistant surface without making the piece look shiny or modern. That last point matters — any high-gloss finish will immediately break the illusion of weathered natural wood.
If you want even more depth and a genuinely aged look, try applying a thin layer of dark antiquing wax after the clear wax has been buffed out. Dark wax — which is basically clear wax tinted with brown or black pigment — settles into carved details, joints, and textured areas in a really beautiful way. Apply it sparingly with a cloth, then immediately wipe most of it back off, leaving just a shadow of color in the recessed spots. Used with a light hand, it takes a solid driftwood finish and makes it look like the real thing — the kind of piece that looks like it has genuinely spent years outside gathering a slow, natural patina.
Styling and Displaying Your Finished Driftwood Piece
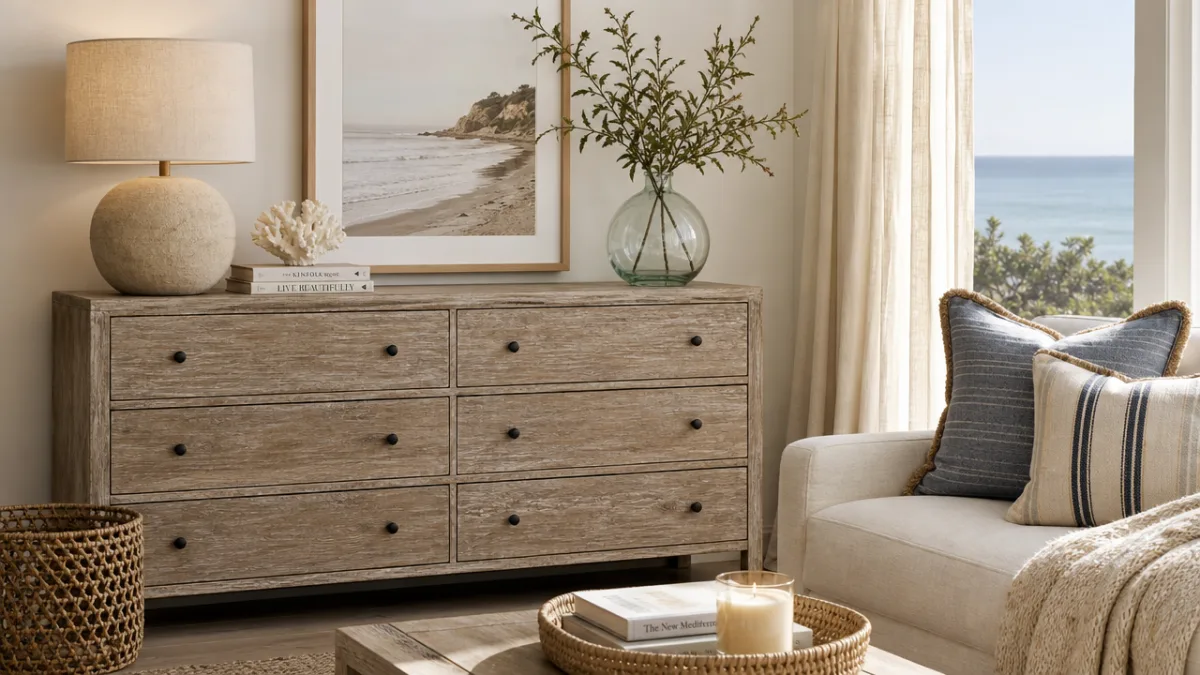
How you style the finished piece matters just as much as the finish itself. The driftwood look is versatile, but it really shines when the materials around it echo the same coastal, organic quality. Natural linen, jute, rattan, sea glass, bleached shells, weathered rope, and raw wood are all natural companions — they reinforce the aesthetic without tipping the space into themed-gift-shop territory.
Think about placement, too. A driftwood-finish side table next to a cream linen sofa brings a quiet, breezy warmth to a living room. In a bedroom, a dresser done in this finish pairs really well with woven baskets, simple white bedding, and maybe a few dried grasses or eucalyptus stems in a ceramic vase. Because the finish is calm and muted, it actually plays nicely with bolder patterned textiles rather than competing with them — which is a surprisingly useful quality if you’re layering a lot of different textures in a room.
Don’t limit yourself to furniture, either. Wooden picture frames, candle holders, trays, decorative boxes, wooden letters — all of these respond beautifully to the driftwood treatment. A grouping of objects finished in the same palette but in different sizes creates a cohesive vignette that looks thoughtfully put together. Starting with a few smaller objects is a great way to build confidence before tackling a larger piece that’s going to anchor an entire room.
A quick word on upkeep: chalk paint and wax finishes are durable, but they’re not indestructible. Wipe up spills promptly, avoid putting hot things directly on waxed surfaces, and every year or so give the piece a fresh coat of clear wax to keep the protective layer in good shape. With a little basic care, the finish will last for years — and much like real driftwood, it tends to look even better as time goes on.








What do you think?
It is nice to know your opinion. Leave a comment.