










Easy DIY Textured Wall Art Tutorial: Transform Your Space with Handcrafted Dimension
There is something deeply satisfying about hanging a piece of art on your wall and knowing that you made it yourself. Textured wall art has surged in popularity over the past few years, and for very good reason — it adds depth, character, and a tactile quality to any room that flat prints simply cannot replicate. Whether you are decorating a minimalist apartment, a cozy farmhouse-style home, or a vibrant eclectic space, DIY textured wall art can be customized to fit your exact aesthetic vision without breaking the bank.
The beauty of this particular craft is that it requires no formal artistic training whatsoever. You do not need to know how to draw, paint realistically, or work with traditional fine art materials. Instead, you will be building texture through layering, pressing, sculpting, and blending — techniques that are forgiving, intuitive, and genuinely fun to experiment with. Many people who consider themselves completely non-artistic have discovered a genuine passion for this medium because the results are so rewarding and the process is so accessible.
In this comprehensive tutorial, we will walk you through every step of creating your own stunning textured wall art piece from scratch. We will cover material selection, surface preparation, application techniques, drying and curing considerations, and finishing touches that make the difference between a good result and a truly gallery-worthy piece. By the end, you will have both the knowledge and the confidence to create something beautiful for your home.
Materials and Tools You Will Need
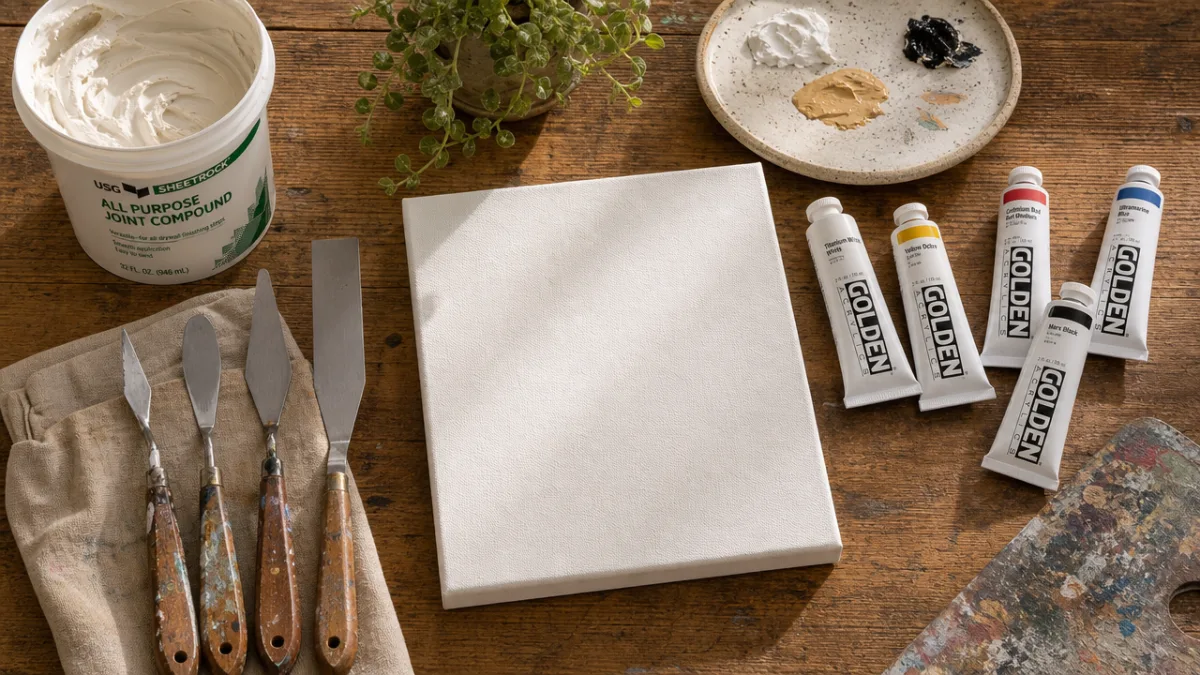
Gathering the right materials before you begin is one of the most important steps in any DIY project. For textured wall art, your core supply is joint compound, also known as drywall mud, which you can find at any hardware store for a very affordable price. A large tub will give you more than enough material for several projects. You will also need a canvas — stretched canvas works best because it is lightweight and easy to hang, though a wooden panel or even thick cardboard can work in a pinch for beginners who want to test the technique before committing to a full piece.
Beyond the base materials, you will want a selection of tools for applying and shaping the compound. A palette knife or putty knife is essential for spreading and sculpting the texture. Wider drywall knives are great for creating smooth, sweeping backgrounds, while smaller palette knives give you precision for detailed patterns and raised elements. You should also gather some interesting objects to press into the wet compound to create impressions — items like lace fabric, bubble wrap, old credit cards, combs, sponges, and even leaves or flowers all create beautifully unique textures.
For finishing and painting, you will need gesso if your canvas is not pre-primed, acrylic paint in your chosen color palette, and a selection of brushes in different sizes. Many artists doing this style of work gravitate toward neutral palettes — whites, creams, taupes, and soft grays — because these colors allow the texture itself to be the star of the show through the play of light and shadow across the surface. However, bold jewel tones and earthy terracottas are equally stunning. Finally, have a spray bottle of water nearby to keep the joint compound from drying too quickly while you work.
Optional Additions for Extra Dimension
If you want to push your textured wall art even further, consider incorporating additional materials into the compound or layering on top of it. Sand mixed directly into the joint compound creates a beautiful gritty, stone-like quality. Fine glitter or metallic pigment powder stirred into paint adds a subtle shimmer that catches light differently throughout the day, making your piece feel alive and dynamic. Some artists also embed physical objects — small pebbles, dried botanicals, or fragments of paper — into the wet compound surface to add genuine three-dimensional elements that extend beyond the canvas plane.
Preparing Your Canvas and Planning Your Design
Before you touch the joint compound, taking time to properly prepare your surface and plan your composition will dramatically improve your final result. If you are using a pre-stretched canvas from an art supply store, it is likely already primed with gesso, but adding an additional coat of gesso yourself and allowing it to dry completely will give the joint compound a better surface to adhere to. This extra step prevents cracking and peeling down the line, ensuring your artwork remains beautiful for years to come. Use a wide flat brush to apply the gesso in even strokes, and lightly sand between coats if you want an ultra-smooth base.
Planning your design does not need to be complicated or precise — in fact, the organic, imperfect nature of textured art is part of its charm. However, having a loose concept in mind before you start will help you work with more intention. Some popular design approaches include abstract swirling patterns that mimic the movement of wind or water, geometric sections with contrasting texture treatments, floral or botanical motifs built up with the compound in relief, and simple horizon or landscape abstractions. Sketch your concept lightly with a pencil on the canvas so you have a general guide to follow, knowing that you can deviate from it as the piece evolves.
Color planning is another element worth spending a few minutes on before you begin. Look at the room where the piece will hang and identify the dominant colors, the accent colors, and the overall mood of the space. Your wall art does not need to match your decor exactly — in fact, a slight contrast often looks more intentional and sophisticated — but it should harmonize. Pull out the specific paint colors you plan to use and hold them up against the wall or nearby furniture before committing. This small planning step can save a great deal of frustration and wasted materials later in the process.
Applying the Texture: Techniques and Methods
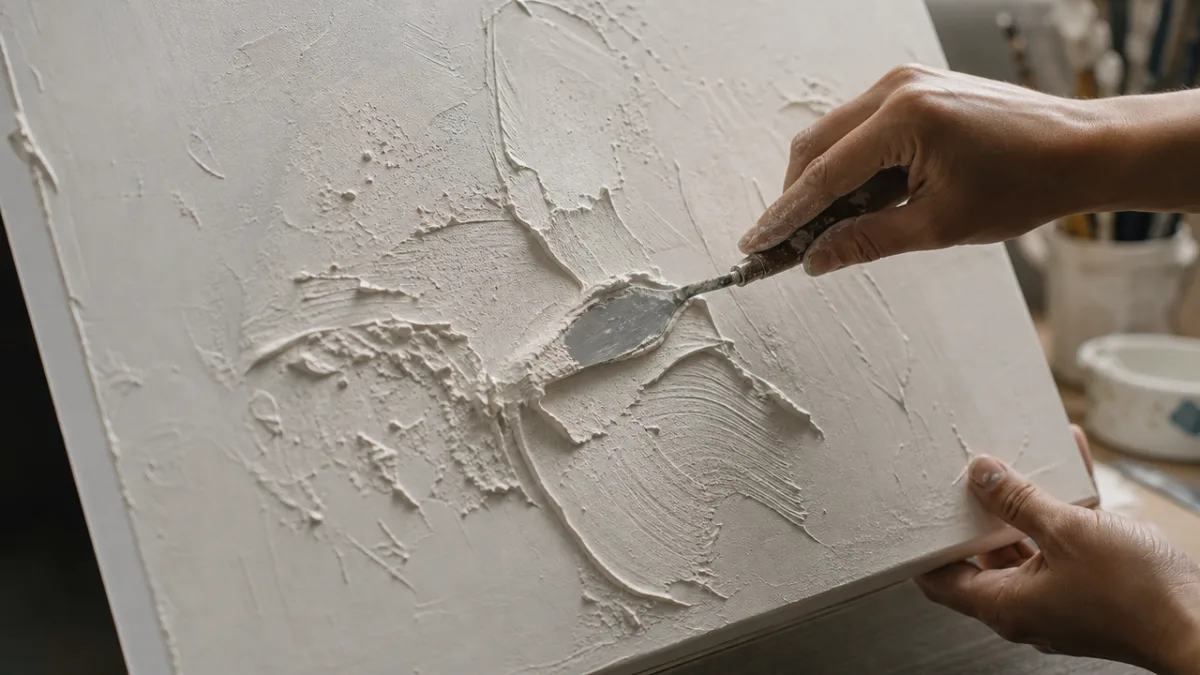
Now comes the most exciting and creative part of the entire process — actually applying the joint compound and building your texture. Begin by loading a generous amount of compound onto your palette knife or putty knife and spreading it across the canvas in the areas you have designated for texture. Do not worry about being too neat at this stage; rough, uneven application actually contributes to the organic quality of the finished piece. Work in sections rather than trying to cover the entire canvas at once, especially if you are incorporating intricate details that require the compound to still be wet and workable.
There are several distinct texture techniques worth practicing and combining in a single piece. The drag technique involves pulling a palette knife or credit card across the wet compound in long, fluid strokes to create sweeping lines and ridges. The stipple technique uses a sponge or the tip of a brush dabbed repeatedly into the surface to create a pitted, organic texture reminiscent of stone or bark. The press-and-peel technique involves pressing a textured object such as lace or bubble wrap firmly into the wet compound and then peeling it away slowly to reveal the impression it leaves behind. Each of these techniques creates a very different visual effect, and combining them thoughtfully within a single composition adds tremendous richness and visual interest.
Layering is the key to achieving depth in textured wall art. After your first layer of compound has dried completely — which typically takes four to six hours depending on the thickness of application and the humidity of your environment — you can apply a second layer on top to build additional height in certain areas. This is how you create the dramatic peaks and valleys that make textured art so visually compelling. Areas of high relief catch direct light and appear bright, while the recessed areas fall into shadow, creating a natural, ever-changing interplay across the surface. Three or four thin layers will almost always produce a more sophisticated result than one thick layer applied all at once.
Creating Specific Pattern Styles
If you are drawn to a particular aesthetic, there are specific approaches worth exploring in depth. For a Venetian plaster look, apply thin layers of compound with a wide knife, working in overlapping circular motions and burnishing the surface lightly with the flat of the blade to create a smooth yet visually layered finish. For a more rustic, rough plaster aesthetic, apply the compound thickly and then use a stiff-bristled brush to drag through it in irregular directions. For a modern geometric look, use painter’s tape to mask off crisp sections of the canvas and apply different texture treatments to each section, removing the tape while the compound is still slightly wet to achieve clean edges.
Painting and Finishing Your Textured Artwork
Once your joint compound is fully cured and completely dry — ideally left overnight to ensure no moisture remains in thicker areas — it is time to begin painting. The painting stage is where your texture truly comes to life, and the technique you use will dramatically affect the final mood of the piece. Start with a base coat applied over the entire textured surface using a wide flat brush or even a foam roller. This base coat should be one of your lighter colors if you are going for a tonal, monochromatic effect, or a dark undercolor if you want subsequent lighter layers to pop with greater contrast. Work the paint into all the crevices and recesses of the texture, making sure no white compound shows through.
The dry-brushing technique is the most transformative painting method for textured wall art and is worth mastering. Load a medium-sized stiff brush with a small amount of paint — much less than you think you need — and then wipe most of it off on a paper towel until the brush is nearly dry. Then drag or flick this almost-dry brush lightly across the raised peaks of the texture. The paint will catch only on the high points, leaving the recesses the color of your base coat. This creates instant, beautiful depth and dimension that looks incredibly professional. Repeating this process with two or three progressively lighter shades of the same color builds up a luminous, layered effect that is truly stunning.
Finishing touches can elevate your piece from handmade to heirloom quality. Once you are satisfied with the paint layers, allow the piece to dry completely and then consider applying a clear matte or satin varnish over the entire surface. This seals the joint compound, prevents future cracking from humidity changes, and gives the artwork a polished, gallery-ready appearance. Matte varnish preserves the soft, chalky quality that many people love in this style of art, while satin adds a subtle sheen that makes colors appear slightly richer and more vibrant. Apply the varnish with a soft brush in thin, even coats, and allow each coat to dry before assessing whether a second coat is needed.
Creative Variations and Design Inspiration
One of the most wonderful aspects of this art form is that it is virtually limitless in its creative possibilities. Once you have mastered the basic technique, you can begin exploring variations that reflect your personal style and complement your specific home decor. Abstract organic forms — loose, flowing shapes inspired by nature, geology, or the movement of water — are perhaps the most popular direction for contemporary DIY textured art because they work beautifully in a wide range of interior styles from boho to minimalist to mid-century modern. These designs are also the most forgiving, since there is no recognizable subject matter that needs to look accurate.
Botanical and nature-inspired textured art is another deeply satisfying direction to explore. You can create raised leaf or petal forms directly from the compound, sculpting them with a small palette knife or pressing real botanical specimens into the surface and then building up the compound around them. Delicate dried grasses pressed into the surface and then painted over with tonal washes can create strikingly beautiful, ethereal effects that bring a sense of the natural world indoors. Moon and celestial motifs are also enormously popular right now — a simple full moon shape in highly textured, raised compound surrounded by a smoother background creates a piece that is both graphic and deeply tactile.
Consider also experimenting with scale and format to create more dynamic displays. Rather than a single large piece, try creating a triptych — three canvases of the same size that work together as a cohesive composition when hung in a row. Or try a gallery wall of smaller textured pieces in different sizes and orientations, united by a consistent color palette. Unusual canvas shapes such as circles, hexagons, or arched rectangles are available from many art supply shops and online retailers, and these non-rectangular formats automatically make a textured piece feel more contemporary and design-forward when hung on the wall.
Incorporating Color Blocking and Mixed Media
For a more daring and contemporary look, color blocking — dividing the canvas into distinct sections of contrasting color while maintaining a consistent texture across the surface — can produce strikingly modern results. Try painting the upper third of a piece in deep charcoal, the middle section in warm terracotta, and the lower portion in soft cream, allowing the colors to blend slightly at their boundaries for a softer transition. The texture running continuously across all three color zones unifies the composition while the color contrast gives it powerful graphic impact. Mixed media additions such as gold leaf applied to select raised areas, or thin washes of watercolor layered over dried acrylic, can add unexpected moments of luminosity and surprise.
Hanging, Displaying, and Caring for Your Textured Wall Art
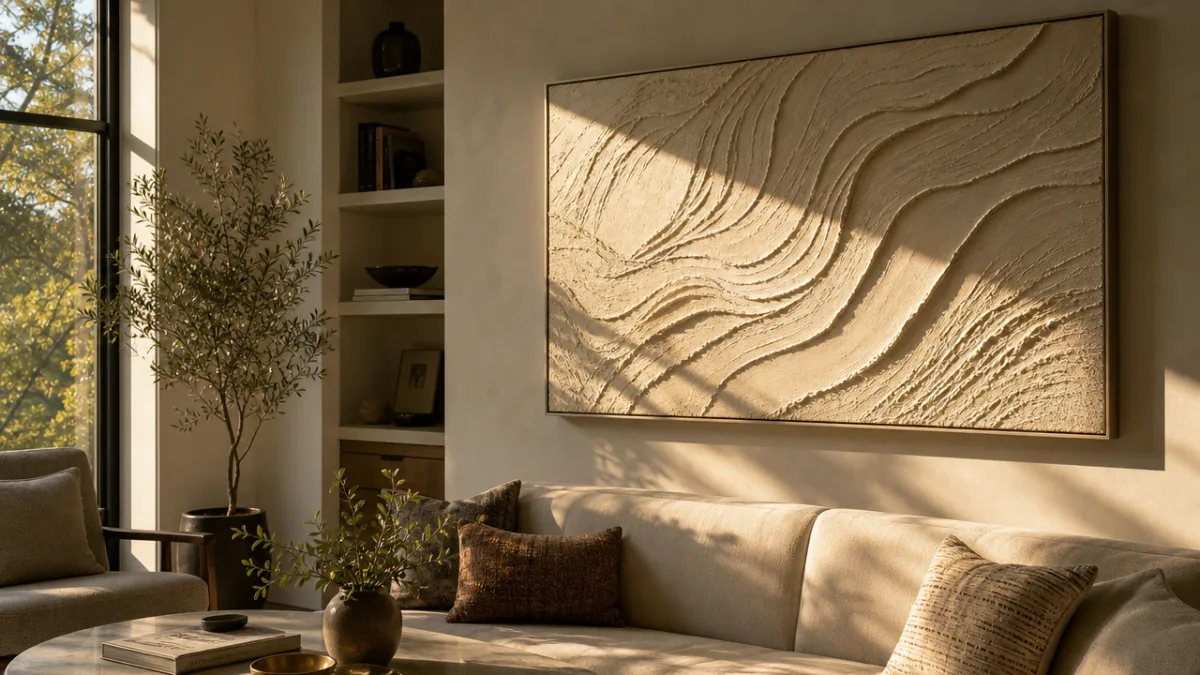
Once your masterpiece is complete and fully varnished, taking care with how you hang and display it will ensure it looks its very best and lasts for many years. The most important consideration for hanging textured wall art is lighting. Because the entire visual appeal of a textured piece relies on the play of light across its surface, the direction and quality of the light source dramatically affects how the piece looks. Directional light — whether from a window, a recessed spotlight, or a dedicated picture light mounted above the frame — creates the shadows and highlights that make the texture come alive. Flat, diffuse overhead lighting, by contrast, can flatten the texture and make the piece look far less impressive than it truly is.
When it comes to the physical hanging process, use appropriate hardware for the weight of your piece. Joint compound adds significant weight to a canvas, more than a standard painting of the same size, so always use wall anchors if you are not able to hang directly into a stud. D-ring hangers mounted on the back of the canvas frame are more stable than wire for heavier pieces, as they prevent the artwork from swaying or tilting. For very large or very heavy textured pieces — anything over twelve inches in its largest dimension — consider using two hanging points rather than one to distribute the weight more evenly and keep the piece perfectly level on the wall.
Caring for your finished textured artwork is straightforward if you have properly sealed it with varnish. Dust the surface gently with a soft, dry paintbrush or a can of compressed air to remove accumulated dust from the crevices of the texture without disturbing the paint or compound. Avoid using damp cloths directly on the surface, as moisture can potentially soften the joint compound even through a varnish layer over time. Keep the piece away from direct sunlight for extended periods to prevent the paint colors from fading, and avoid hanging it in very humid environments such as bathrooms, where moisture fluctuations over time can eventually cause the compound to crack or delaminate from the canvas.
Gifting and Selling Your Handmade Art
Textured wall art makes an extraordinarily thoughtful and personal gift for housewarmings, weddings, birthdays, and holidays. Because you can customize the size, color palette, and design to perfectly suit the recipient’s home and taste, a handmade textured piece carries an intentionality and personal touch that no store-bought gift can replicate. If you find yourself making multiple pieces and receiving enthusiastic responses from friends and family, you might also consider selling your work through platforms like Etsy, local art markets, or Instagram. Many self-taught artists have built thriving small businesses around this specific art form, pricing pieces based on size, material costs, and time invested in the work.
Troubleshooting Common Problems and Pro Tips
Even experienced artists encounter challenges when working with joint compound, so knowing how to troubleshoot common problems will save you significant frustration. The most frequently encountered issue is cracking — either small hairline cracks that appear as the compound dries, or larger fissures that develop over time after the piece is finished. Cracking during drying is most often caused by applying the compound too thickly in a single layer, so the preventative solution is always to work in multiple thinner layers with full drying time between each. If cracks appear after the piece is finished and varnished, they can often be carefully filled with a small amount of fresh compound applied with a fine palette knife, allowed to dry, painted over to match, and re-varnished.
Peeling is another common problem that occurs when the joint compound does not adhere well to the canvas surface. This is almost always a surface preparation issue — the canvas was either too smooth and non-porous, or it was not properly primed before the compound was applied. Prevention involves always applying a proper gesso base coat and allowing it to dry completely before beginning. If you are working on a non-porous surface like wood or hardboard, lightly sanding the surface and then applying a coat of PVA glue diluted with water before the gesso will create an excellent bonding layer. If peeling has already occurred on a finished piece, carefully remove the loose sections, re-apply compound and paint to those areas, and seal the repairs with extra varnish.
Working time management is a skill that develops with practice. Joint compound begins to skim over and lose workability relatively quickly, especially in warm or dry environments, which can be frustrating when you are trying to achieve precise details or blend sections together smoothly. Keeping a spray bottle of water nearby and misting the surface lightly as you work extends the workability of the compound considerably. If a section becomes too stiff to manipulate before you have finished with it, dampening it with water from the spray bottle and waiting two to three minutes will often restore enough workability to continue. Working in smaller sections rather than attempting to texture the entire canvas at once is the most reliable strategy for maintaining control throughout the process.
Quick Reference Tips for Success
- Always work in thin layers and allow full drying time between coats — patience produces better results than rushing and applying one thick layer.
- Keep all tools moist while working by resting them in a shallow dish of water between uses to prevent compound from hardening on the blades.
- Test your texture techniques on a spare piece of cardboard before committing them to your canvas, especially if you are trying a new method for the first time.
- Seal your finished piece with at least two coats of varnish to protect the compound from humidity and ensure the longevity of your artwork.
- Experiment with scale — very fine, intricate textures read beautifully up close on smaller pieces, while bold, sweeping textures have more impact on larger canvases viewed from a distance.
- Photograph your piece in raking light — a single directional light source held at a low angle to the surface — to capture how beautifully the texture photographs for social media or portfolio documentation.
The journey of creating your own textured wall art is one that rewards curiosity, patience, and a willingness to embrace happy accidents. Some of the most beautiful effects in this medium come not from rigid adherence to a plan but from noticing the unexpected beauty in an unintended mark or an accidental impression and choosing to lean into it. Every piece you create will teach you something new about the material, about your own aesthetic sensibilities, and about the particular quality of light in your home. Keep your supplies accessible, your expectations open, and your creative spirit adventurous — and you will find that this practice brings genuine joy far beyond the finished artwork itself.








What do you think?
It is nice to know your opinion. Leave a comment.