










DIY Bug Art Wall: Transform Your Space with Nature-Inspired Insect Masterpieces
Introduction: Why Bug Art is the Perfect DIY Wall Project
There is something undeniably captivating about the intricate world of insects. Their geometric wing patterns, jewel-toned bodies, and extraordinary variety have inspired artists and naturalists for centuries. Creating a DIY bug art wall brings that sense of wonder directly into your home, turning an ordinary room into a conversation-starting gallery that celebrates the beauty of the natural world. Whether you are drawn to the iridescent shimmer of a morpho butterfly or the architectural elegance of a staghorn beetle, bug art offers an endlessly versatile decorating theme that suits everything from a child’s bedroom to a sophisticated living room.
What makes bug art particularly appealing as a DIY project is its remarkable accessibility. Unlike many home decor endeavors that require specialized skills or expensive tools, insect-themed wall art can be created at virtually any skill level and budget. A beginner might start with pressed and framed butterflies, while a more experienced crafter might attempt detailed watercolor illustrations or resin-encased specimens. The range of techniques available means that every maker can find an approach that matches both their abilities and their aesthetic vision, making the process as rewarding as the finished result hanging on the wall.
Beyond the artistic appeal, a bug art wall carries meaningful depth. Insects represent themes of transformation, resilience, and interconnectedness with nature — concepts that resonate deeply in contemporary culture. Displaying thoughtfully created insect art is a way of honoring the natural world and sparking curiosity in everyone who encounters it. Whether your guests are entomology enthusiasts or simply appreciate beautiful craftsmanship, a well-curated bug art wall creates an atmosphere of intellectual warmth and creative personality that few other decorating themes can match.
Planning Your Bug Art Wall: Design, Layout, and Style Considerations
Before picking up a single paintbrush or frame, successful bug art walls begin with thoughtful planning. The most cohesive gallery walls share a unifying vision — a color palette, a consistent framing style, or a thematic thread that ties the individual pieces together into a harmonious whole. Spend some time browsing inspiration images and asking yourself what feeling you want the finished wall to evoke. Do you prefer the austere elegance of Victorian natural history specimens mounted against cream linen? Or would you rather celebrate vivid tropical colors with bold graphic prints arranged in an asymmetrical salon-style grid?
Layout planning is one of the most critical steps that many DIY decorators skip, often to their regret later. A professional trick is to trace the outlines of your frames onto kraft paper or newspaper, cut them out, and tape them to the wall with low-tack painter’s tape before committing to a single nail. This allows you to experiment freely with spacing, grouping, and balance without leaving holes in the drywall. Consider mixing frame sizes deliberately — a large anchor piece at the center or corner draws the eye first, while smaller pieces fill in around it to create movement and variety across the wall.
Style consistency matters enormously in making a gallery wall look intentional rather than haphazard. If you are mixing different artistic mediums — say, watercolor prints alongside real pinned specimens and ink drawings — unifying them through matching frames in the same metal or wood finish will make the collection feel curated rather than cobbled together. Alternatively, you can embrace eclectic frames in different finishes and sizes, but then keep the artwork itself consistent in color palette. Earthy tones with pops of deep teal and burnt gold, for instance, can make wildly different artistic styles look remarkably harmonious when displayed together.
- Choose a color scheme before starting any artwork: neutrals with jewel tones work especially well for insect subjects.
- Measure your wall space carefully and sketch a rough layout to scale on graph paper before purchasing frames.
- Decide on a dominant style — naturalist specimen, modern graphic, painterly illustration — and let that guide your media choices.
- Leave at least three to four inches of breathing room between frames for a gallery that feels spacious rather than crowded.
- Consider incorporating small shelves or ledges to add dimensional interest and allow you to lean some pieces rather than hanging everything.

DIY Techniques: Creating Your Bug Art from Scratch
One of the most popular and beginner-friendly approaches to DIY bug art is watercolor illustration. Insects lend themselves beautifully to the medium because watercolor’s translucency mimics the delicate quality of insect wings with remarkable accuracy. To begin, gather quality watercolor paper (at least 140 lb cold press), a set of watercolors with a good range of earth tones and vivid jewel colors, and fine round brushes in sizes 0, 2, and 6. Find detailed reference photographs of your chosen insects — macro photography websites offer extraordinary close-up imagery that reveals details invisible to the naked eye. Start with light pencil sketches, then build up color in transparent washes, saving the finest details for last.
For those who prefer working in three dimensions, resin art offers a stunning way to showcase insects. Ethically sourced dried insect specimens — available from specialty suppliers who work with sustainable, captive-bred populations — can be embedded in clear casting resin to create wall-mounted panels or framed pieces that look like windows into a natural history museum. The process involves mixing two-part epoxy resin according to manufacturer instructions, pouring a base layer, allowing it to partially cure, carefully placing your specimens, then pouring a final sealing layer. The results are extraordinarily dramatic, especially when backlit, though patience is essential since the process takes 24 to 48 hours to fully cure.
Digital illustration printed on high-quality paper or canvas is another excellent option, particularly for those with graphic design skills. Programs like Procreate, Adobe Illustrator, or even free tools like Canva offer ways to create bold, stylized bug art that can be printed at home or through online print services. The advantage of digital work is the ability to scale your designs to any size and create perfectly matching sets for a cohesive gallery. A series of six insects illustrated in the same graphic style, printed at matching sizes and framed identically, creates a polished, almost editorial look that is both modern and nature-inspired.
Pressed and Pinned Specimen Techniques
Authentic entomological display remains one of the most striking forms of bug art, and it is far more achievable for home crafters than most people assume. Ethically sourced insects can be purchased ready-pinned from reputable dealers, or you can work with naturally deceased specimens found in your environment. Relaxing dried specimens in a humidity chamber — a sealed container with a damp paper towel — for 24 to 48 hours makes them pliable enough to position. Pinning boards allow you to spread wings and arrange legs in naturalistic or dramatically stylized poses before the specimen dries permanently in place.
Shadow box frames are the ideal display vessels for pinned specimens. Choose frames deep enough to accommodate the thickness of your mounted insect plus the pin, typically at least one to two inches of depth. The background material inside the shadow box significantly affects the final aesthetic — white or cream linen reads as classical and scientific, while black velvet creates a jewel-box effect that makes metallic and iridescent insects absolutely spectacular. Label your specimens with small printed or hand-lettered tags in the tradition of natural history museums, including the common name, scientific name, and geographic origin for an authentically scholarly appearance.
For younger crafters or those who prefer not to work with actual specimens, hyperrealistic rubber or resin insect models available from craft suppliers make a wonderful alternative. These can be painted, customized with metallic paints, and mounted in shadow boxes using the same techniques as real specimens. Some artists go further, hand-sculpting insects from polymer clay, which allows for fantastical color combinations and sizes impossible in nature. A giant cobalt-blue beetle or a candy-pink moth, sculpted in clay and displayed dramatically in a deep frame, makes an artistic statement that is simultaneously familiar and surreal.
Sourcing Materials: Where to Find Insects, Frames, and Supplies
Gathering the right materials is essential to the success of your bug art wall, and knowing where to look saves both time and money. For artistic supplies like watercolor paper, paints, and brushes, local art supply stores offer the advantage of being able to examine materials in person, while online retailers like Blick Art Materials or Jacksons Art often have superior selection and competitive pricing. If you plan to work with resin, seek out brands specifically formulated for clear casting rather than craft resin, as optical clarity makes a significant difference in the finished appearance of embedded specimens.
Frames are often the single largest expense in a gallery wall project, but there are excellent strategies for managing costs. Thrift stores and estate sales frequently yield beautiful vintage frames at a fraction of retail prices, and a coat of spray paint in a consistent color can unify an eclectic collection of secondhand finds instantly. For new frames, IKEA’s Ribba series offers consistently good quality at accessible price points, and the standardized sizing makes it easy to mix and match. Custom framing, while expensive, is worth considering for a single large anchor piece that will define the visual center of your wall.
Sourcing insects ethically is an important consideration that responsible bug art enthusiasts take seriously. Many reputable online suppliers specialize in specimens from sustainable, captive-bred populations, particularly for popular species like morpho butterflies and rhinoceros beetles. Look for suppliers who are transparent about their sourcing practices and comply with international wildlife trade regulations. Alternatively, local nature centers, natural history museums, and university entomology departments sometimes sell or donate specimens from their collections. Some crafters prefer to source insects found naturally deceased in their local environment, which eliminates any ethical concerns entirely while also connecting the artwork to a specific place and time.
- Blick Art Materials and Jacksons Art for quality watercolor and illustration supplies at competitive prices.
- Thrift stores and estate sales for affordable vintage frames that add genuine character to your display.
- Specialty entomology suppliers like Butterfly Utopia or InsectNet for ethically sourced specimens with proper documentation.
- Hardware stores for shadow box supplies, hanging hardware, and tools for precise wall installation.
- Online marketplaces like Etsy for handmade or vintage bug art pieces that can anchor a gallery of your own work.

Step-by-Step Installation: Hanging Your Bug Art Wall Perfectly
Installation day is simultaneously the most exciting and the most nerve-wracking part of the entire bug art wall project, but with the right preparation it can be genuinely enjoyable. Begin by clearing the wall completely and cleaning the surface with a slightly damp cloth to remove dust, which can interfere with adhesive products. Gather all your tools before you start: a hammer, picture-hanging nails rated for the appropriate weight, a level, a tape measure, pencil, and a stud finder if you are hanging particularly heavy pieces. Having everything within reach before the first nail goes in prevents the frustrating mid-installation scrambles that lead to mistakes.
Using the paper template method described in the planning section, arrange your cutouts on the wall until you are completely satisfied with the composition. Take a photograph of the arrangement on the wall for reference before removing the templates one by one as you hang the actual pieces. When positioning each frame, hold it against the wall and mark the hanging hardware location precisely before picking up the hammer. A small piece of painter’s tape on the wall where you intend to drive the nail can prevent the hammer from leaving scuff marks and also makes pencil marks easier to see and remove cleanly afterward.
Level checking is non-negotiable for a professional result. Even a slight tilt on a single frame draws the eye immediately and undermines the careful work that went into creating and curating the pieces. A small torpedo level placed on top of the frame while hanging gives quick feedback, or a laser level set at a consistent height across the wall ensures a uniform horizon line for rows of frames. For salon-style arrangements where frames at various heights and sizes overlap and interact, consistency in spacing between frames — rather than consistent heights — is what creates a sense of order within intentional visual complexity.
Final Touches and Styling the Finished Wall
Once every piece is hung and leveled, step back and evaluate the composition from a distance of at least eight to ten feet, which is how most people will view the wall in a real room. Small adjustments at this stage — nudging a frame an inch to the left, swapping two pieces whose positions feel slightly off — are much easier to make now than after you have declared the project finished. Look for areas where the visual weight feels unbalanced, either too heavy on one side or with awkward gaps that break the flow. A small piece strategically placed, or even a wall-mounted shelf holding a botanical specimen jar or small sculptural object, can resolve compositional tension elegantly.
The area beneath and around your bug art wall also contributes to the overall impact. A narrow console table positioned below the display creates a layered effect and offers space for complementary objects — a potted fern, an antique magnifying glass, a stack of natural history books — that reinforce the theme and extend it into three-dimensional space. Lighting deserves particular attention because it dramatically affects how artwork reads in a room. Picture lights mounted directly on larger frames add a gallery feel, while angled ceiling-mounted track lights or adjustable wall sconces allow you to spotlight the collection from above, making specimens and painted details glow with depth and dimension.
Document your finished bug art wall thoroughly with good photographs taken in natural daylight and in the room’s artificial lighting conditions, as it will look different in each situation and you will want to remember both versions. Share your work with online communities dedicated to entomological art, DIY home decor, and natural history aesthetics — the feedback and connection with fellow enthusiasts can be enormously inspiring and might spark ideas for expanding or evolving your display over time. A bug art wall is rarely a finished thing; it tends to grow organically as you discover new techniques, add pieces from travels, or simply develop a deeper appreciation for the extraordinary world of insects that inspired the whole project in the first place.
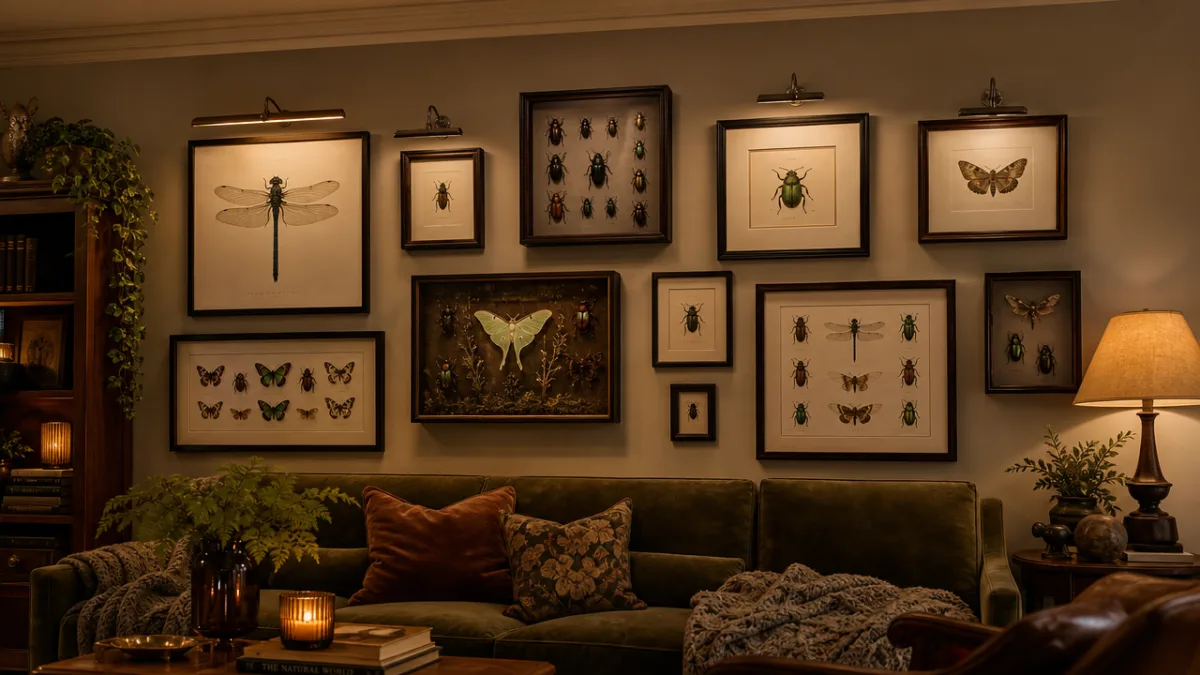
Inspiration and Variations: Taking Your Bug Art Wall Further
Once you have completed your first bug art wall, the creative possibilities that open up are genuinely exciting. One popular variation is the themed insect series — rather than mixing different species, focusing the entire wall on a single genus or family creates a remarkably powerful statement. A wall devoted entirely to beetles, for instance, showcases the astonishing morphological variety within a single insect order, from tiny iridescent weevils to enormous tropical goliath beetles, making both a visual and an educational impact. Similarly, a butterfly-focused wall can explore the range from modest local species to extraordinary exotic specimens in a way that feels both personal and encyclopedic.
Geographic storytelling offers another compelling framework for a bug art wall. Arranging insects by region — a section representing the Amazon rainforest, another the African savanna, another the temperate forests of North America — creates a kind of living map that tells the story of biodiversity across the planet. This approach pairs beautifully with travel memorabilia, vintage maps, and botanical illustrations from the same regions, creating a richly layered display that is as much a personal narrative as it is a decor statement. Each piece becomes a chapter in an ongoing story of exploration and curiosity.
For those who want to engage children with bug art, consider creating a participatory wall where artwork is added gradually over time, with kids contributing their own drawings, paintings, or found specimens. Framing a child’s careful crayon drawing of a ladybug alongside a professional watercolor illustration of the same species creates a charming, meaningful juxtaposition that honors young curiosity. This approach also makes the wall feel alive and evolving rather than static, which is arguably the most exciting quality any piece of decor can possess. A bug art wall, at its best, is not just decoration — it is a living expression of wonder, creativity, and deep appreciation for the endlessly astonishing natural world.
Seasonal and Rotating Displays
One of the underappreciated advantages of a gallery wall is the ability to rotate pieces seasonally or as your tastes and collection evolve. Consider designating two or three frames with easily removed backing hardware as rotating spots where you can swap artwork with the seasons — dragonflies and damselflies in summer, monarch butterflies in autumn, the crystalline geometries of microscopic ice-crystal-resembling snow fleas in winter. Keeping some pieces consistent while rotating others maintains the established personality of the wall while ensuring it never becomes invisible through overfamiliarity, which is a real risk with static decor.
Commissioning custom bug art from independent artists is another wonderful way to add meaning and uniqueness to your wall. Platforms like Etsy and Society6 connect buyers directly with illustrators and printmakers who specialize in natural history art, and many artists offer custom commissions where they will illustrate a specific species that holds personal significance to you. Perhaps there is a species you encountered on a meaningful trip, or an insect that your child is particularly fascinated by — having that creature rendered by a skilled artist and hung in a place of honor on your wall transforms a decoration into a genuinely personal artifact.
The educational dimension of a bug art wall should not be underestimated, particularly in homes with children. Pairing artwork with small, beautifully typeset labels containing fascinating facts about each species — lifespan, habitat, the bioluminescent signals of fireflies or the navigational sophistication of monarch migration — turns the wall into an interactive learning environment. QR codes linked to videos or detailed species profiles can deepen engagement for older children and curious adult guests alike. In this way, a DIY bug art wall becomes far more than a decorating project: it becomes a portal into one of the most diverse, ancient, and remarkable branches of life on Earth, inviting everyone who encounters it to look at the insect world with fresh eyes and genuine reverence.








What do you think?
It is nice to know your opinion. Leave a comment.