










The Ultimate Guide to Craft Room Organization: 45 Ideas for Creative Spaces
Why a Well-Organized Craft Room Changes Everything
There is something genuinely transformative about walking into a craft room where everything has a place and every tool is within reach. For creative individuals, the environment in which they work is not merely a backdrop — it is an active participant in the creative process. Clutter, misplaced supplies, and chaotic storage can stifle inspiration before a single project even begins, turning what should be a joyful pursuit into a frustrating search-and-rescue mission for the right shade of embroidery floss.
Research into creative environments consistently shows that physical organization has a measurable impact on mental clarity. When your brain is not spending energy cataloging where things are or navigating visual noise, it frees up cognitive resources for actual creativity. Craft rooms in particular benefit from intentional organization because the sheer variety of materials — fabrics, papers, tools, adhesives, paints, ribbons, and more — can quickly overwhelm even a generous amount of space if no system is in place.
Beyond productivity, an organized craft room is simply a more pleasant place to spend time. Many crafters describe their studio as a personal sanctuary, a room that reflects their aesthetic sensibilities and supports their particular workflow. Getting the organization right means getting the sanctuary right, and that investment pays dividends every single time you sit down to create. Whether you have a dedicated room or a corner of a spare bedroom, the principles in this guide apply equally well.
Assessing Your Space and Crafting Habits Before You Organize
Before purchasing a single storage bin or installing a single shelf, the most valuable thing you can do is take an honest inventory of how you actually work. Do you tend to have multiple projects on the go simultaneously, or do you work through one project fully before starting the next? Do you prefer to lay materials out across a large surface, or do you like everything tucked away and pulled out only when needed? Your genuine habits, not your idealized habits, should drive every organizational decision you make.
Walk through your current space at different times of day and pay attention to the friction points. Where do you find yourself searching most often? What piles up on your work surface without a clear home? Which supplies do you reach for constantly, and which ones get used once a year? This audit process might feel tedious, but it is the difference between an organization system that works for about three weeks and one that you maintain effortlessly for years because it mirrors your actual workflow rather than someone else’s Pinterest-perfect ideal.
It is also worth measuring your space carefully and photographing it from multiple angles before you start shopping for storage solutions. Note where the natural light falls at different hours, where the electrical outlets are, and which walls could support shelving. Consider the door swing, the traffic path through the room, and whether you need to share the space with other household members or activities. A thorough spatial audit prevents the common and costly mistake of buying beautiful storage furniture that simply does not fit the room as it actually exists.
Creating a Craft Room Inventory List
One highly effective pre-organization exercise is creating a complete inventory of everything you own. Group items into broad categories first — paper crafts, sewing and fabric, painting and drawing, tools and adhesives, embellishments, and finished or in-progress projects — and then assess the volume within each category. This exercise frequently reveals surprising imbalances: perhaps you own far more cardstock than you realized, or your ribbon collection has grown to a size that warrants dedicated storage. Knowing these proportions helps you allocate space sensibly rather than guessing.
Zone-Based Organization: The Core Strategy for Craft Rooms
The single most powerful organizational concept for any craft room is the zone system. Rather than organizing by storage type or aesthetics alone, zone-based organization groups your space by activity. A sewing zone keeps your machine, threads, scissors, and fabric together. A paper crafts zone centralizes your cardstock, stamps, dies, and ink pads. A painting zone consolidates brushes, paints, canvases, and mediums. When everything you need for a given task lives within arm’s reach in a dedicated zone, your workflow becomes seamless and intuitive.
Designing your zones begins with identifying the three to five core activities you do most often in your craft room. Place the zones for your highest-frequency activities in the prime real estate of the room — the areas with the best lighting, the most ergonomic seating positions, and the easiest access. Activities you pursue less frequently can occupy zones in corners, along secondary walls, or even in storage that requires opening a cabinet. This hierarchy of placement ensures that the things you need most are never more than a pivot and a reach away.
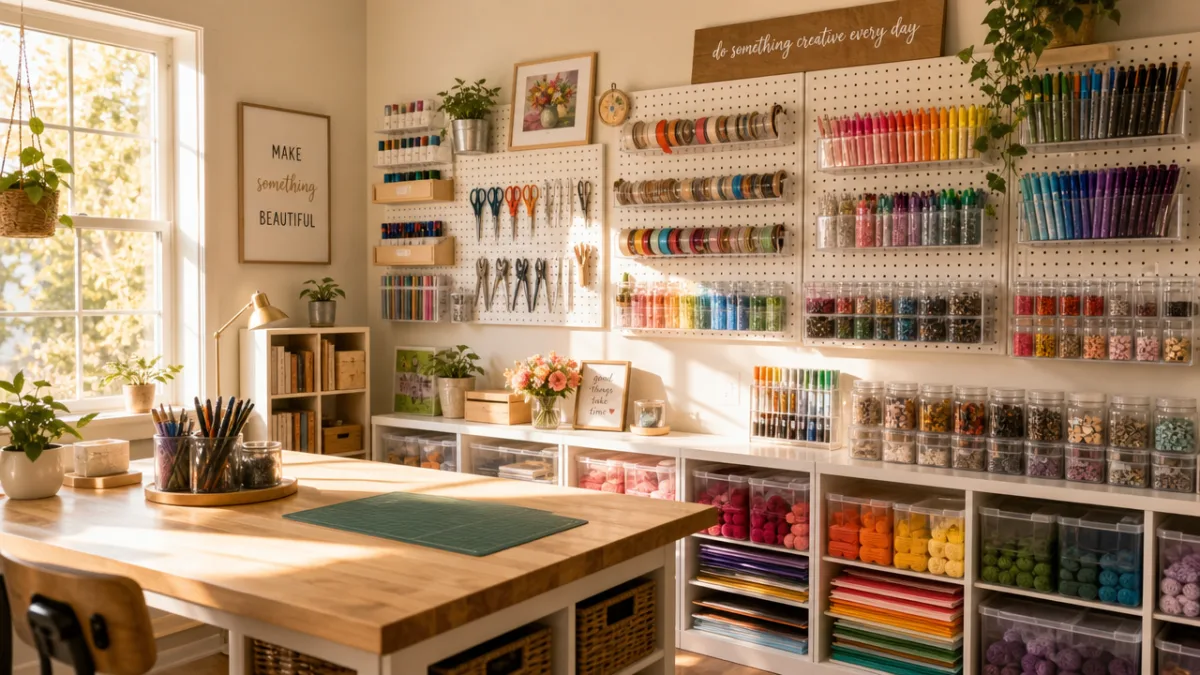
Within each zone, think carefully about vertical space. Most crafters dramatically underutilize the wall area above their work surfaces. Pegboards, wall-mounted rails, floating shelves, and magnetic strips can all bring frequently used tools up to eye level and fingertip height without consuming any floor or desk space. The vertical dimension of a craft room is often its greatest untapped storage resource, and investing in wall-mounted solutions within each zone can effectively double your usable storage capacity without requiring a larger room.
The Primary Zones Most Craft Rooms Need
While every crafter’s zones will differ based on their specific hobbies, most well-organized craft rooms benefit from establishing a few consistent areas. A dedicated cutting zone with a self-healing mat and proper lighting protects both your tools and your surfaces. A wrapping and finishing zone near the entry of the room makes it easy to package completed projects. A reference and inspiration zone — even just a small pinboard or a few magazine files — gives you a place to collect and consult ideas without them bleeding into your active workspace.
Storage Solutions That Actually Work for Craft Supplies
The market for craft storage products is enormous, and it can be genuinely overwhelming to navigate. The most reliable guiding principle when evaluating any storage solution is visibility. In a craft room, out of sight frequently means out of mind, which means supplies you cannot easily see tend to be forgotten, duplicated, or left unused. Clear containers, open shelving, transparent drawer units, and glass-fronted cabinets all support the visibility principle and consistently outperform opaque storage for active crafting supplies.
For small embellishments, findings, and notions — the category that most reliably creates chaos in craft rooms — tackle boxes and hardware organizers offer an inexpensive and highly effective solution. These grid-based, adjustable-compartment containers are designed for fishing lures and screws, but they are perfectly sized for buttons, beads, brads, eyelets, and similar tiny items. They stack compactly, travel well for crafting on the go, and their transparent lids make contents immediately identifiable without opening anything.
Fabric storage deserves special attention because fabric is bulky, easily wrinkled, and difficult to organize without a deliberate system. Many experienced sewers recommend folding fabric around comic book boards or pieces of cardboard cut to a uniform size, then standing the folded pieces vertically in a bin or on a shelf, much like records in a crate. This method makes every fabric visible at a glance without having to unstack anything, and it keeps pieces neat and wrinkle-free until they are needed. Color-coding the arrangement adds another layer of visual clarity that speeds up fabric selection considerably.
Storage Ideas Worth Trying
- Use a pegboard with hooks and small baskets to keep scissors, rulers, and frequently used tools visible and accessible without consuming counter space.
- Repurpose a spice rack or small tiered shelf for ink pads, allowing you to read the labels at a glance and keep colors organized by family.
- Hang a shoe organizer on the back of your craft room door for storing ribbon spools, washi tape rolls, or small paint bottles.
- Install a magnetic knife strip to hold metal tools, scissors, seam rippers, and even small tins of pins or needles.
- Use labeled mason jars on open shelving for buttons, sequins, pom-poms, and other embellishments — they look charming and keep contents accessible.
- Invest in a rolling cart with multiple drawers that can move between zones as your project demands shift throughout a crafting session.

Paper Craft Organization: Taming the Largest Volume Challenge
Paper is, for many crafters, the single most voluminous category of supply they own. Cardstock, patterned paper, vellum, specialty papers, die-cut sheets, and coordinating card bases can multiply rapidly, especially when bought by the pack or as part of collections. Without a deliberate system, paper stacks become precarious towers that topple, mix together, and become frustrating to sort through. The goal of any good paper organization system is to let you find the right paper quickly while protecting each sheet from bending, fading, and moisture damage.
Vertical file folders housed in a repurposed wine crate, an upright file organizer, or a dedicated paper tower are the most space-efficient solution for full sheets and half sheets of cardstock. Organizing these folders by color family first and then by pattern or texture within each color makes selection intuitive. Many crafters maintain a separate section for specialty papers — metallics, textures, vellums — that do not fit neatly into the color system. The key is consistency: once you establish your filing logic, everything should return to its designated folder after every crafting session.
Smaller paper products — sticker sheets, die-cut collections, ephemera packs, and paper pads — present a different storage challenge. These items are often sold in square or near-square formats that do not fit standard file folders well. Clear plastic sleeves in a three-ring binder work beautifully for protecting and displaying these items, allowing you to flip through your collection the way you would browse a portfolio. Binders can be organized by theme, season, brand, or color depending on how you tend to search for these materials when starting a project.
Managing the Paper Scraps Problem
Every paper crafter accumulates scraps, and without a clear system for them, scraps become the primary source of craft room disorder. The most sustainable approach is to maintain a small number of scrap bins organized by size — full sheets, half sheets, quarter sheets, and smaller pieces — and to commit to a regular purge of anything that has become too small to use practically. Some crafters find it helpful to keep a designated “destash” box where unwanted scraps go before being donated to schools, community centers, or fellow crafters, which removes the guilt of discarding materials while keeping the space under control.
Creating a Functional and Inspiring Work Surface Setup
Your primary work surface is the heart of your craft room, and its setup has more impact on your creative output than almost any other single element. The ideal craft table is large enough to spread out a current project without encroaching on your tools, positioned near natural light supplemented by strong task lighting, and kept as clear as possible of anything that does not directly serve your active work. Many experienced crafters recommend dedicating at least two-thirds of your main work surface to actual working space and using only the remaining third for frequently accessed tools.
Lighting at the work surface deserves serious investment. Crafting under poor lighting leads to color matching errors, eyestrain, and mistakes in detail work. A combination of overhead ambient lighting, a daylight-balanced LED task lamp positioned to your non-dominant side to minimize shadows, and ideally a window that brings in natural north-facing light creates an environment where colors read accurately and fine details are easy to see. Daylight bulbs rated at 5000K to 6500K most closely replicate natural daylight and are particularly important for color-sensitive work like quilting, painting, and card-making.
Consider the ergonomics of your work surface height as seriously as you consider its size and lighting. A surface that is too low causes you to hunch forward, straining your back and neck. A surface that is too high creates tension in your shoulders and arms. For seated work at a standard chair, a work surface between 28 and 30 inches high suits most adults. For standing work — increasingly popular among crafters who find it energizing and easier on their backs — a surface between 36 and 38 inches is typically ideal. Some crafters invest in adjustable-height tables that accommodate both positions, which is worth considering if your projects vary significantly in their physical demands.
Keeping the Work Surface Clear Between Sessions
One of the most effective habits you can develop as a crafter is the five-minute reset at the end of every crafting session. Before you leave the room, return every tool to its designated home, put all materials back in their storage zones, wipe down the work surface, and set up whatever you will need for the next session if you already know what it is. This small investment of time at the end of each session means that every time you return to the craft room, you are greeted by an inviting, clear space rather than the detritus of the last project, which makes it dramatically easier to sit down and begin creating without hesitation.

Maintaining Organization Over Time: Systems and Habits That Last
The graveyard of craft room organization is littered with beautiful systems that worked perfectly for a month and then gradually collapsed back into chaos. The reason most organization systems fail is not that they were poorly designed but that they did not account for the ongoing flow of new materials into the space. Every crafter acquires new supplies regularly — through purchases, gifts, subscription boxes, and accumulated scraps — and without a deliberate intake process, new arrivals pile up in undefined limbo zones that quickly become the seeds of new disorder.
Establishing a designated intake area — a single basket, tray, or shelf near the door of your craft room — gives new arrivals a temporary home while you decide where they belong in your existing system. The rule is that nothing stays in the intake area for longer than one week. This gentle urgency prevents the intake area from becoming a permanent dumping ground while giving you the breathing room to find the right home for each new item rather than making a hasty decision you will later regret. Pairing this intake discipline with a regular restocking and purge session — monthly for active crafters, quarterly for more casual ones — keeps the system fresh and relevant.
Perhaps the most underrated aspect of long-term craft room organization is the labeling system. Labels seem almost compulsively obvious to advocate for, yet many crafters skip them or apply them inconsistently, relying on memory to recall what is in each bin or drawer. Memory is unreliable, especially for containers whose contents shift over time, and the few seconds it takes to apply a clear, legible label pays for itself hundreds of times over in the time saved searching. Invest in a simple label maker or even use handwritten labels on masking tape, and commit to labeling every container, every drawer, and every shelf section consistently throughout the room.
When to Reorganize from Scratch
Even the best craft room organization systems eventually need a full reset. Signs that a complete reorganization is due include consistently finding supplies in the wrong zones, regularly discovering that you own duplicates of items because originals were not findable, or feeling a low-level resistance when you enter the room rather than the energizing welcome you once felt. A full reorganization is best approached as a seasonal project — clear the room completely, reassess your current crafting habits and priorities, and rebuild the system from the ground up with fresh eyes. Each time you do this, the result will be smarter and more tailored to how your creative practice has evolved.
Organization is never a destination you arrive at permanently; it is an ongoing, evolving practice that grows alongside your creative life. The crafters with the most functional studios are not those who set up a perfect system once and never touched it again — they are the ones who pay attention, adjust, refine, and recommit regularly to the principle that their space should serve their creativity rather than obstruct it. With the ideas and strategies in this guide, you have everything you need to create a craft room that genuinely supports the work you love to do, project after project, season after season.








What do you think?
It is nice to know your opinion. Leave a comment.