










Modern Deer Fence Gate Plans: Build a Stunning 5ft x 3ft Welded Wire Garden Gate
Introduction to Modern Hog Wire Gate Design
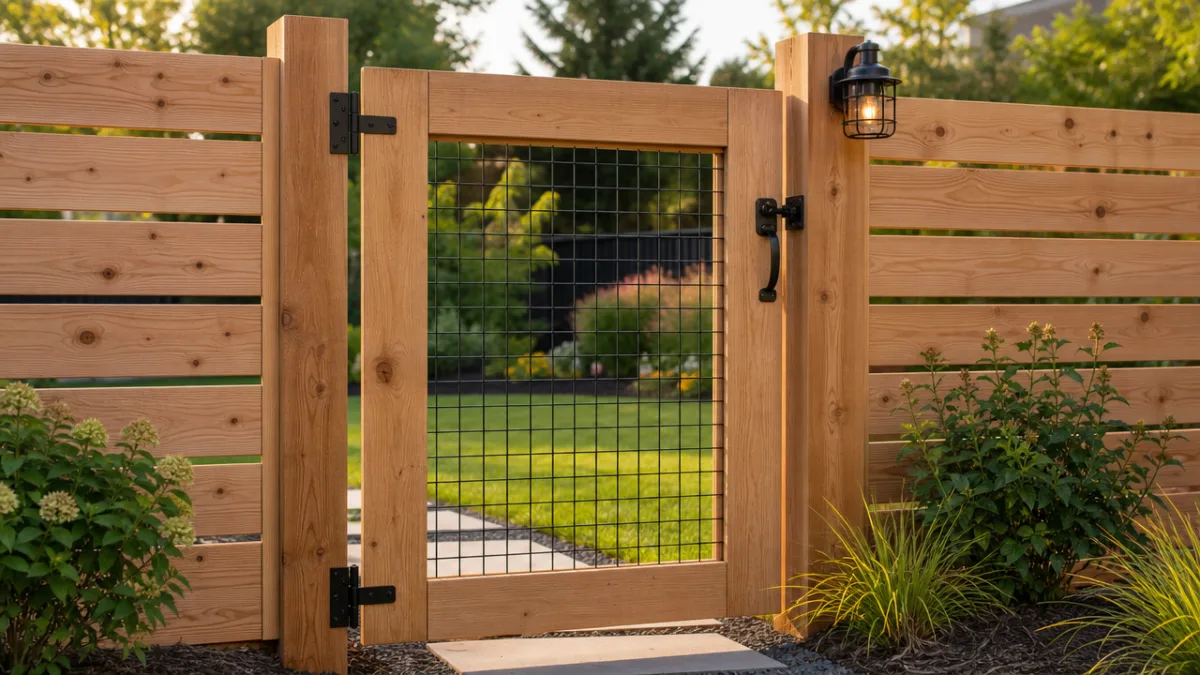
If you’ve been searching for a gate that strikes the perfect balance between rustic character and clean contemporary style, a modern deer fence gate built with welded wire or hog wire panels might be exactly what your garden needs. These gates have surged in popularity over the past several years, appearing in farmhouse landscapes, suburban backyards, and high-end residential gardens alike. The combination of natural wood framing and industrial wire infill creates a visual tension that feels both approachable and sophisticated at the same time.
The 5ft x 3ft format is one of the most practical gate sizes for residential use. At five feet tall, the gate provides a genuine deterrent to deer and other garden pests that might otherwise feast on your vegetables, flowers, or ornamental shrubs. At three feet wide, it offers comfortable passage for wheelbarrows, garden carts, and of course people moving freely in and out of the space. This proportion has been refined through generations of garden design and remains a reliable standard for good reason.
What makes the modern interpretation of this classic gate style so compelling is the emphasis on clean lines, quality materials, and thoughtful joinery. Rather than relying on rough-cut lumber nailed together haphazardly, a well-executed modern wood gate uses precise measurements, sturdy hardware, and a deliberate design language that elevates the entire fence line. Whether you’re enclosing a kitchen garden, protecting a flower bed, or defining the boundary of a play area, this gate design delivers both function and lasting aesthetic appeal.
Materials, Tools, and Planning Your Build
Before you cut a single board or drive a single screw, successful gate construction begins with careful material selection. For the frame, cedar and redwood are longtime favorites because of their natural resistance to rot, insects, and moisture. Pressure-treated lumber is another viable option, especially in wetter climates, though some gardeners prefer to avoid it near edible plants. Douglas fir, while less rot-resistant, is widely available and takes stain or paint beautifully when properly sealed. Whichever species you choose, look for straight, knot-free boards that will stay true over years of use.
The wire infill is what gives this gate its modern character and its functional strength. Welded wire panels — sometimes called hog wire, cattle panel, or livestock panel — are available in various gauges and grid sizes. For a deer fence gate, a 2×4-inch grid in 14-gauge wire provides excellent rigidity and an open, airy appearance that won’t feel visually heavy. Some builders prefer a tighter 2×2-inch grid for a finer look, or a 4×4-inch grid that feels more open and rustic. Galvanized wire resists rust in most climates, while black powder-coated panels offer a sharper, more contemporary aesthetic that contrasts beautifully with warm wood tones.
In terms of tools, this project is very manageable for an intermediate DIYer. You will need a miter saw or circular saw for clean, square cuts, a drill and driver for assembly, a staple gun or fencing staples for securing the wire, a level, measuring tape, and clamps to hold pieces in position while you work. Heavy-duty gate hinges rated for exterior use, a gate latch or handle, and rust-resistant screws or structural fasteners round out your hardware list. Spending time on a detailed cut list and materials plan before heading to the lumber yard will save trips, reduce waste, and keep the project moving efficiently.
- Cedar, redwood, or pressure-treated lumber for the frame (2×4 or 2×6 stock depending on desired weight)
- Welded wire or hog wire panel, cut to fit the interior frame opening
- Exterior-grade screws or structural screws (3-inch and 1.5-inch lengths)
- Heavy-duty galvanized or stainless gate hinges, minimum two per gate
- Gate latch, handle, or bolt lock suited to your security needs
- Wood glue rated for exterior use (optional but recommended at joints)
- Fencing staples, U-nails, or wire clips for attaching the panel
- Exterior wood stain, paint, or sealer to protect the finished gate

Step-by-Step Construction Process
Begin your build by cutting the four main frame members to length. For a 5ft tall by 3ft wide gate, you’ll cut two vertical stiles at 60 inches and two horizontal rails at 36 inches, then adjust those rail measurements to account for whether you’re using a butt joint, a dado, or a half-lap joint at the corners. Half-lap joints are particularly recommended for gate construction because they significantly increase the glued and fastened surface area at each corner, producing a frame that resists racking forces much better than simple butt joints. Mark and cut your laps carefully, test the fit dry, then glue and fasten with screws countersunk below the surface.
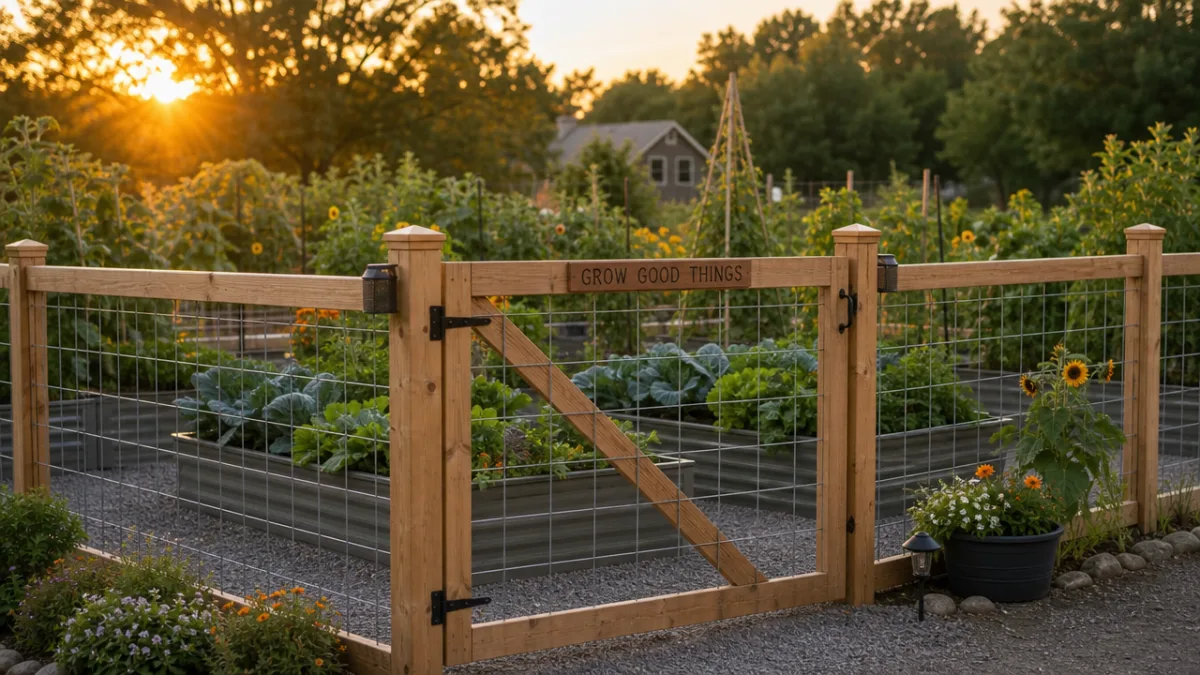
Once the four-sided frame is assembled and square — check by measuring diagonally corner to corner, both measurements should match — it’s time to add the diagonal brace. This is a non-negotiable element of gate construction that far too many first-time builders skip. Without a diagonal brace running from the bottom hinge corner to the top latch corner, even the most carefully built gate will eventually sag under its own weight. Cut the brace to fit snugly, angling the ends to sit flush against the interior of the frame, and fasten it securely. Some builders add a second decorative diagonal or even a Z-brace pattern for visual interest alongside structural reinforcement.
With the frame complete, lay the welded wire panel into position across the interior opening. You can either recess the panel into a shallow rabbet routed around the inside face of the frame for a clean, flush look, or simply staple it to the back face of the frame for a quicker build. The recessed approach takes more time and requires a router, but the finished result looks significantly more refined and professional. Work your way around the perimeter, applying fencing staples or wire clips every six to eight inches to ensure the panel remains taut and secure. Trim any sharp wire ends flush with wire cutters and file them smooth.
- Cut stiles and rails to length, mark and cut half-lap joints at each corner
- Dry-fit all frame pieces, check for square, then glue and fasten permanently
- Allow glue to cure, then cut and install the diagonal brace
- Rout a rabbet or prepare the back face for wire panel installation
- Cut the welded wire panel to size with bolt cutters or an angle grinder
- Fasten the panel securely with staples or clips every 6 to 8 inches
- Sand all exposed edges smooth, fill screw holes, and apply your chosen finish
- Install hinges on the gate, hang it on the post, then attach the latch hardware
Hardware Selection and Gate Hanging Techniques
The hardware you choose will determine whether your gate swings smoothly for decades or begins to droop and bind within a season or two. For a gate in the 5ft x 3ft range, you’ll want hinges that are rated well above the gate’s actual weight to account for the dynamic loads created each time the gate opens and closes. Strap hinges, T-hinges, and heavy-duty butt hinges are all suitable options, each with a distinct visual character. Strap hinges lend a classic blacksmith aesthetic, while matte black butt hinges nearly disappear into the frame for a cleaner contemporary look. Stainless steel hardware is the most durable choice in coastal or high-humidity environments.
Gate posts deserve as much attention as the gate itself. A beautifully built gate hung on a poorly set post will sag and fail regardless of how well-made the gate is. For a 5-foot gate, your hinge post should be set a minimum of 24 inches deep in the ground, and deeper in frost-prone climates. Use concrete to backfill around the post, crown it to shed water, and allow it to cure for at least 48 hours before hanging the gate. The post should be plumb in both directions — use a level on adjacent faces — and should be made from a wood species or material that can withstand ground contact, such as pressure-treated pine, black locust, or steel pipe.
When hanging the gate, start by temporarily attaching the hinges to the gate frame, then position the gate in the opening at the correct height with a small clearance gap at the bottom — typically half an inch to one inch depending on your ground surface. Use shims to hold the gate at the correct position while you mark and drill pilot holes in the post. Drive hinge screws into solid wood rather than near edges where splitting is more likely. Test the swing and adjust hinge positions as needed before fully tightening all fasteners. A properly hung gate should open and close with light, consistent pressure throughout the full arc of its swing.
Finishing, Sealing, and Protecting Your Gate
The finishing stage is where your gate transforms from a construction project into a genuine piece of outdoor craftsmanship. For cedar and redwood, a penetrating oil finish or a semi-transparent stain will enhance the natural grain while providing meaningful UV and moisture protection. These finishes need to be reapplied every one to three years depending on sun exposure and rainfall, but they remain easy to maintain because you simply clean the surface and apply a fresh coat without stripping the old one. For a bolder, more contemporary statement, a solid exterior paint in a deep charcoal, forest green, or classic white can define the gate as a focal point in the landscape.
Before applying any finish, make sure all surfaces are smooth and clean. Sand through grits from 80 to 150 to remove mill marks and fuzz from cut edges. Pay particular attention to end grain, which absorbs finish far more rapidly than face or edge grain and will look blotchy if not treated with a pre-conditioner or an extra coat of sealer. Wipe the entire gate with a tack cloth or damp rag to remove dust, allow it to dry completely, and then apply your first coat of finish. Thin the first coat slightly to encourage deep penetration into the wood fibers, which creates a more durable bond than a surface-only film.
The welded wire panel also benefits from attention at this stage. Galvanized panels will typically outlast the wood frame without additional treatment, but if you’ve chosen bare steel or lightly coated wire, a spray application of a rust-inhibiting primer followed by a black or dark bronze spray paint will significantly extend its life. Powder-coated panels are the most maintenance-free option and require little more than an occasional rinse. Check all wire attachment points every spring and drive in any staples that have worked loose over the winter. With modest annual maintenance, a well-built gate of this kind should provide reliable, attractive service for fifteen to twenty years or more.
Design Variations, Customization, and Inspiration
One of the most rewarding aspects of building your own gate is the freedom to adapt the basic design to your specific aesthetic and functional needs. The core structure — a rectangular wood frame with wire infill and a diagonal brace — is essentially a platform for creative expression. You might add a decorative arch to the top rail by cutting a gentle curve with a jigsaw, which softens the gate’s profile and gives it an almost garden-party feel. Alternatively, extending the stiles above the top rail to create a pair of decorative finials or pointed caps adds a more formal, architectural character that reads beautifully at the entrance to a kitchen garden or formal hedge enclosure.
Frame thickness and profile can also shift the visual weight of the gate dramatically. Building the frame from 4×4 lumber rather than 2×4 creates a more substantial, almost furniture-like presence that suits larger spaces and grander landscapes. Conversely, using 2×3 or even 1×4 material produces a lighter, more delicate gate that fits naturally into cottage gardens or intimate outdoor rooms. Adding a beveled or chamfered edge along all visible frame members takes only minutes with a router or hand plane but elevates the craftsmanship level noticeably. These small details are what separate a gate that looks homemade from one that looks designed.
For households dealing with deer pressure specifically, consider pairing this gate with matching fence panels built to the same specifications. A consistent design language throughout the fence line — same wood species, same wire panel style, same hardware finish — creates a unified, intentional landscape that increases curb appeal and property value alongside its practical function. Many homeowners find that once they’ve built the first gate, the skills and confidence gained make subsequent panels and gates progressively faster and more satisfying to build. Digital PDF plans for projects like this one provide the measured drawings, cut lists, and hardware specifications that make it straightforward to replicate the design as many times as needed across a full garden enclosure.
Using Digital PDF Plans and Taking Your Project Further
A high-quality digital PDF plan for a project like this modern deer fence gate provides far more than just a list of dimensions. The best plans include detailed exploded assembly drawings that show exactly how each joint connects, multiple elevation views so you can visualize the gate from the front, side, and back, and a complete materials list broken down by cut size to minimize waste at the lumber yard. Some plans also include notes on wood species selection, hardware substitutions, and tips for scaling the design up or down to accommodate different opening widths or height requirements. Purchasing a professionally developed plan is an investment that pays for itself in reduced material waste and avoided mistakes.
Once you’ve successfully built your first gate from a PDF plan, you’re also building a skill set that transfers naturally to related projects. The same half-lap joinery and wire panel techniques apply directly to cold frames, raised bed covers, chicken coops, compost bin enclosures, and a wide range of other garden structures. Many builders find themselves returning to the same plan set to build a second gate with small variations — different wire spacing, a different stain color, a wider opening — and each iteration deepens their understanding of how the design works and how to push it in new directions. The downloadable format also means you can print the plans at full scale in sections, tape them together, and use them as direct templates for marking out your lumber.
Sharing your finished project with the broader DIY and gardening community through platforms like Pinterest, Instagram, or garden forums is both a way to celebrate your work and a contribution to the collective knowledge base that makes these projects accessible to future builders. Detailed photos of the construction process, a list of any modifications you made, and honest notes about what you’d do differently are genuinely valuable to someone just starting out. The modern hog wire gate design has evolved through exactly this kind of open, iterative community knowledge-sharing, and every builder who documents their process adds another layer to a rich and growing tradition of thoughtful, beautiful, functional garden craftsmanship.








What do you think?
It is nice to know your opinion. Leave a comment.