










Hand Stamped Copper Garden Markers: A Complete Guide to Crafting Beautiful, Lasting Labels for Your Garden
Introduction to Hand Stamped Copper Garden Markers
Few garden accessories combine practicality and artisan beauty quite like hand stamped copper garden markers. These small but striking pieces of metalwork do the humble job of identifying your plants while simultaneously elevating the aesthetic of any garden bed, herb spiral, or container planting. Unlike plastic labels that fade, crack, and end up in landfills, copper markers develop a gorgeous patina over time, aging gracefully alongside the plants they identify. They are, in many ways, a gift to your future self — and to the environment.
Copper has been used by craftspeople for thousands of years, prized for its workability, its warm glow, and its natural resistance to corrosion. When you stamp letters into a thin sheet of copper, you create an impression that will outlast almost any other garden labeling solution on the market. The letters deepen and darken as the copper oxidizes, actually becoming more readable with age rather than less. This is a rare and wonderful quality in a garden tool, where sun, rain, and soil are constantly at work wearing things down.
Making your own copper garden markers is also a deeply satisfying craft project. It requires minimal tools, a modest budget, and virtually no prior metalworking experience. Within an afternoon, a complete beginner can produce a set of polished, professional-looking markers that will be the envy of any gardening neighbor. This guide walks you through everything you need to know — from choosing your materials and tools to stamping techniques, finishing methods, and creative variations that will make your garden markers uniquely yours.
Materials and Tools You Will Need
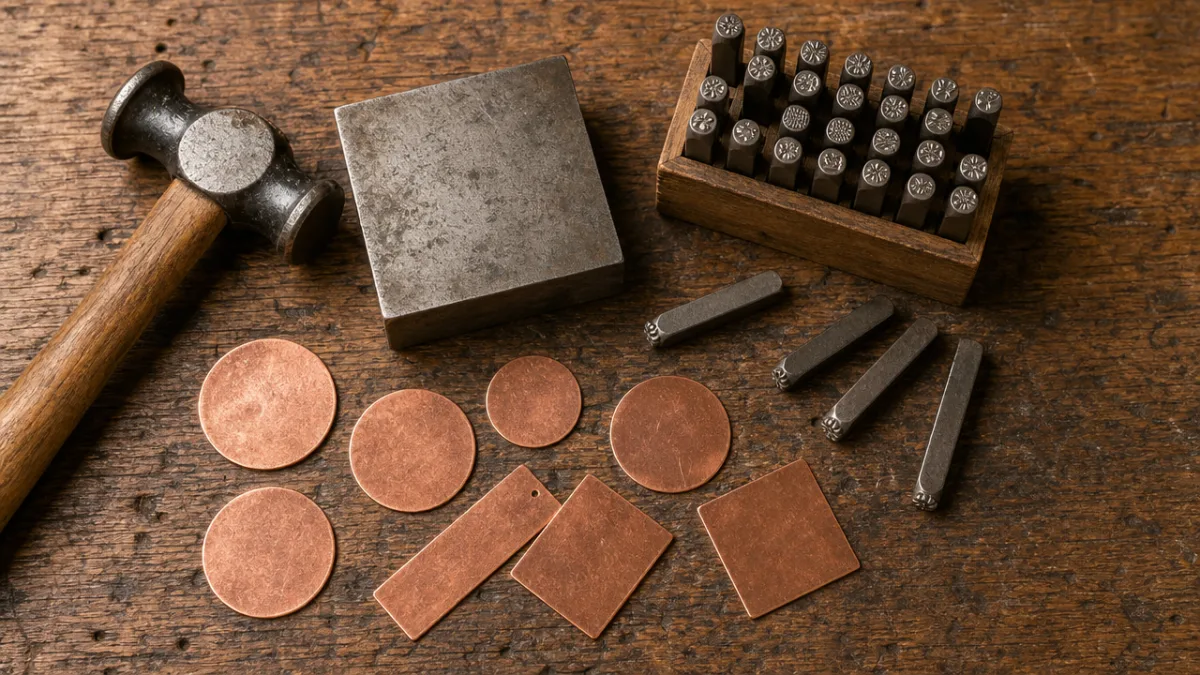
Before you begin stamping, it is worth taking the time to gather quality materials. The results you achieve are directly tied to the tools you use, and fortunately, the investment required is quite modest. The centerpiece of the project is copper sheeting or copper blanks. You can purchase pre-cut copper blanks in rectangles or tags from craft and jewelry supply stores, which saves the step of cutting sheet metal yourself. Alternatively, buying a roll of copper flashing from a hardware store and cutting it to size is a more economical option if you plan to make many markers.
The thickness of the copper matters more than many beginners realize. Copper is measured in gauges, and for garden markers, a thickness between 16 and 22 gauge strikes the ideal balance. Thinner copper is easier to stamp but may bend or curl when inserted into soil. Thicker copper holds its shape beautifully but requires a heavier hand and a sturdier hammer. A good starting point for most crafters is 18 gauge copper, which accepts impressions cleanly and is sturdy enough to stand upright in a garden bed without support stakes.
For the stamping itself, you will need a set of metal letter stamps and a solid hammer. Metal stamps are available in a wide range of fonts and sizes; a 3mm or 4mm stamp set is ideal for garden markers, large enough to read from a short distance without overwhelming the face of the marker. A 1- to 2-pound steel hammer or a brass mallet delivers the clean, decisive blow that produces sharp impressions. You will also want a steel bench block — a thick, flat piece of hardened steel that you stamp onto — as a soft surface will absorb the impact and produce shallow, unclear letters. Additional useful items include a ruler, a fine-tip permanent marker for layout lines, a hole punch for creating hanging holes, and sandpaper or a metal file for smoothing edges.
- Copper blanks or copper sheet (16–22 gauge recommended)
- Metal letter stamp set (3mm or 4mm font size)
- Steel bench block or anvil surface
- 1–2 lb steel hammer or brass mallet
- Ruler and permanent marker for alignment
- Metal hole punch or drill for hanging options
- Fine sandpaper (220–400 grit) or metal file
- Liver of sulfur solution or black patina compound (optional)
- Renaissance wax or clear sealant for finishing
Preparing Your Copper Blanks
Preparation is a step that many enthusiastic beginners rush past, only to regret it later. Taking the time to properly prepare your copper blanks before a single stamp is struck will make a significant difference in the quality of your finished markers. If you are working with pre-cut blanks, begin by inspecting each piece for burrs, sharp edges, or surface scratches that might detract from the final appearance. A few passes with 220-grit sandpaper followed by 400-grit will smooth rough edges and create a uniform surface texture that stamps more evenly and cleanly.
If you are cutting your own copper from sheet or flashing, use aviation snips or a jeweler’s saw to cut your pieces to the desired size. A typical garden marker might measure anywhere from one inch wide by four inches long to two inches wide by six inches long, depending on how many characters you need to accommodate and whether you plan to insert them directly into soil or mount them on stakes. After cutting, file all four edges carefully to eliminate sharpness, then sand the faces as described above. This is also the moment to punch any holes you want for hanging the markers from hooks, stakes, or wire hangers.
Cleaning the copper surface is equally important before stamping. Copper naturally develops a light oxide layer when exposed to air, and oils from your hands can create uneven surfaces that affect how stamps adhere. Wipe each blank with a cloth dampened with a little isopropyl alcohol or acetone to degrease the surface. Some crafters also like to lightly scuff the surface with a fine steel wool pad, which gives the copper a subtle matte texture that shows stamped impressions with greater contrast. Once cleaned, handle the blanks by their edges to avoid reintroducing fingerprints.
The Stamping Process: Technique and Tips
Stamping metal for the first time is one of those skills that feels awkward in the first five minutes and becomes instinctive shortly after. The most important concept to internalize is consistency — a consistent angle, a consistent force, and a consistent position will give you sharp, even impressions every time. Begin by planning the layout of your text on paper before touching the copper. Count the number of characters in the plant name, consider whether you want uppercase or mixed case, and mark light pencil or permanent marker guidelines on the copper blank to keep your letters in a straight line.
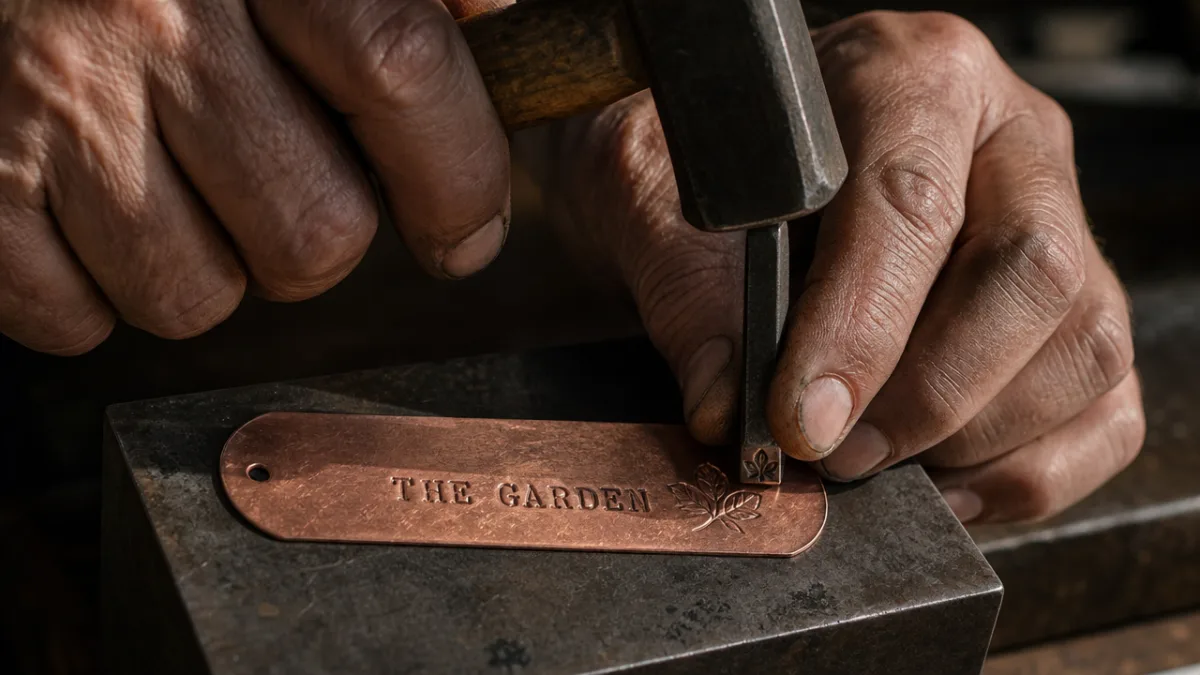
Position your bench block on a firm, level surface — a concrete floor, a heavy workbench, or even a granite countertop works well. Place your copper blank on the bench block and hold your first stamp perpendicular to the surface, pressing it firmly against the copper with one hand while you strike with the other. The strike should be confident and deliberate rather than tentative and repeated. One solid, well-aimed blow from a 1.5-pound hammer will almost always produce a cleaner impression than several lighter taps, which tend to rock the stamp slightly and create blurry or doubled impressions. Practice on scrap copper first until you find your rhythm.
Working from left to right, stamp each letter in sequence. It helps to stamp the center letter of a word first, then work outward toward each end, which makes it easier to keep text centered on the marker. If you make a mistake — a crooked letter, a double impression, or a skipped space — do not panic. Minor errors can sometimes be gently hammered flat and re-stamped, and in many cases, small imperfections add to the handmade character of the piece. Once all letters are stamped, use a soft cloth to buff away any marker lines and inspect your work in good lighting. If any impressions look shallow, a second, carefully aimed strike can deepen them.
- Plan your layout on paper and count characters before stamping.
- Mark a baseline guideline on the copper with a ruler and fine marker.
- Place the blank on a steel bench block on a firm surface.
- Hold the stamp perpendicular and strike with one confident blow per letter.
- Work from the center of the word outward to keep text centered.
- Review impressions in good light and deepen any shallow letters with a second strike.
- Buff away guidelines with a soft cloth when finished.
Finishing and Aging Your Copper Markers
Once your letters are stamped, you have a choice to make about the finish of your markers, and this is where the project becomes genuinely creative. Fresh copper has a bright, penny-like orange warmth that is beautiful in its own right. If you love that look, a simple buff with a microfiber cloth and a coat of clear Renaissance wax or paste wax will protect the surface and slow the natural oxidation process, preserving that warm glow for longer. This is a particularly lovely finish for indoor herb gardens or potted plants on a sunny windowsill.
For markers destined for an outdoor garden, many crafters prefer to deliberately age their copper using a chemical patina process. Liver of sulfur is the most commonly used compound for this purpose, available from jewelry and metalworking suppliers. When brushed or dabbed onto copper, liver of sulfur solution reacts with the metal surface and darkens it rapidly, filling the stamped impressions with rich brown and black tones that make the letters dramatically more legible. The process is quick: apply a small amount to the marker, watch the color shift, then rinse and dry the piece. You can build up layers of patina by repeating the application.
After patinating, many crafters use fine steel wool or 400-grit sandpaper to lightly buff the raised surfaces of the marker, leaving the darkened patina sitting only in the recessed stamped letters. This technique — essentially a form of antiquing — produces a striking two-tone effect where bright copper highlights play against dark, aged impressions. A final coat of clear wax or outdoor-rated sealant will stabilize the patina and protect the marker from the elements. Even without any sealant, copper is remarkably durable outdoors; it simply continues aging naturally, eventually developing the classic blue-green verdigris patina that has adorned copper rooftops and sculptures for centuries.
Mounting and Installing Your Garden Markers
A beautifully stamped and finished copper marker still needs a way to stand up in the garden, and there are several creative approaches depending on your aesthetic preferences and practical needs. The simplest and most popular method is to insert the marker directly into the soil, either by bending the bottom inch or so of the copper strip to form a spike, or by attaching the copper blank to a copper or galvanized wire stake. Wire stakes are easy to bend, available at garden centers, and can be fashioned into simple U-shapes or scrolled decorative forms that complement the handmade quality of the markers.
For raised beds and container gardens, copper markers can be attached to wooden craft sticks, bamboo skewers, or small dowels using a dab of strong waterproof adhesive or a small copper rivet for a more finished look. Vintage silverware handles — spoons and forks in particular — make wonderfully whimsical stakes for copper markers in herb gardens, giving the whole arrangement a charming kitchen-garden feeling. You can also drill or punch small holes in the top corners of rectangular markers and hang them from shepherd’s hooks or decorative garden hooks with a loop of copper wire or jute twine.
Think about placement as carefully as you think about construction. Markers are most useful when positioned at the front edge of a plant grouping, where they can be read without disturbing the planting. In a row of vegetables, placing markers at consistent heights creates a tidy, intentional look. In a cottage-style herb garden, varying the heights of markers on different-length stakes adds to the relaxed abundance of the planting. However you choose to install them, these copper markers will look more at home in the garden with each passing season, gaining color and character as they age alongside the plants they name.
- Bent copper tabs inserted directly into soil for a minimalist look
- Copper or galvanized wire U-stakes for lightweight blanks
- Wooden dowels, craft sticks, or bamboo skewers for raised beds
- Vintage spoon or fork handles for a whimsical herb garden feel
- Shepherd’s hooks with copper wire loops for hanging markers
- Small copper rivets for attaching blanks to wooden or metal stakes

Creative Variations and Personalization Ideas
One of the greatest pleasures of making your own copper garden markers is that no two need to be exactly alike. Once you are comfortable with the basic stamping technique, an entire world of creative variation opens up. Beyond plant names, consider stamping companion planting reminders, planting dates, or even short Latin botanical names for a more formal garden aesthetic. You might stamp the height a plant will reach, the days to harvest for vegetables, or the preferred sunlight conditions — sun, part shade, or full shade — directly onto each marker, making them genuinely informative as well as decorative.
Decorative stamps are a wonderful way to add personality to your markers. Many stamp sets include not only letters and numbers but also small motifs like stars, hearts, flowers, bees, and moons. A small bee stamp beside “LAVENDER” or a tiny sun beside “BASIL” adds a layer of visual delight that transforms a simple label into a miniature piece of art. You can also experiment with different fonts — mixing serif and sans-serif letter sets, using a bold blocky font for vegetable markers and a delicate script font for flower garden markers — to create a visual language across your garden.
Copper garden markers also make exceptional handmade gifts for gardening friends and family. A set of herb markers presented in a small linen bag, or a collection of vegetable markers tied with twine, costs relatively little to make but carries the warmth and thoughtfulness of a truly handcrafted present. For a wedding or housewarming gift, you might stamp the couple’s name and the date alongside a selection of herbs or flowers that hold personal significance. Personalized memorial markers for a beloved plant or garden space — stamped with a name and years — carry a quiet emotional weight that no commercially produced product could replicate.
Caring for Your Copper Markers Over Time
One of the most liberating things about copper garden markers is that they require very little ongoing care. Left to their own devices outdoors, copper will cycle through a range of colors as it oxidizes — from the original bright orange-gold, through deeper browns and reddish tones, into the eventual blue-green patina known as verdigris. This natural aging process is part of the material’s charm and does not compromise the integrity or readability of your stamped markers in any way. In fact, as noted earlier, the darkening of the metal actually enhances the contrast of the stamped letters, making older markers easier to read than new ones.
If you have applied a wax or sealant finish and notice it beginning to wear away after a season or two, simply clean the marker with a soft damp cloth, allow it to dry, and apply a fresh coat of wax. If you prefer to maintain a bright copper color rather than allowing natural aging, a gentle polish with a commercial copper cleaner and a fresh coat of protective wax each spring will keep your markers looking like new. However, many gardeners find that the aged look suits the living, organic nature of a garden far better than a perpetually shiny surface, and choose to embrace the patina entirely.
In terms of durability, well-made copper garden markers will easily outlast a decade of outdoor use and, with modest care, can last a generation or more. Unlike wood markers that rot, plastic markers that degrade in UV light, or ceramic markers that crack in frost, copper is essentially inert in a garden environment. If a marker gets bent by a wayward spade or knocked loose by wildlife, it can almost always be straightened by hand or with a pair of pliers. This resilience, combined with their natural beauty and the satisfaction of having made them yourself, makes hand stamped copper garden markers one of the most rewarding craft projects any gardener can undertake.








What do you think?
It is nice to know your opinion. Leave a comment.