










Plarn Shoes: The Ultimate Guide to Crafting Sustainable Footwear from Plastic Bags
What Is Plarn and Why It’s Perfect for Shoes
Plarn, a portmanteau of “plastic” and “yarn,” is a crafting material made by cutting plastic bags into strips and looping them together to form a continuous strand that behaves much like traditional yarn. This innovative material has been embraced by eco-conscious crafters around the world as a way to repurpose the billions of plastic bags that would otherwise end up in landfills, waterways, and oceans. The resulting material is surprisingly durable, water-resistant, and versatile, making it an exciting medium for a wide variety of projects, from bags and mats to — perhaps most impressively — wearable footwear.
When it comes to shoes specifically, plarn offers a unique combination of properties that make it well-suited to the task. Unlike natural fibers that absorb moisture and break down quickly when exposed to the elements, plarn is inherently waterproof and resistant to mildew, rot, and UV degradation. This means that a pair of plarn sandals or slip-on shoes can hold up remarkably well even in wet or outdoor conditions, outlasting many comparable handmade shoes crafted from cotton or jute. The woven or crocheted structure of plarn footwear also allows for excellent airflow, keeping feet comfortable during warm weather.
Beyond its functional benefits, choosing to make shoes from plarn carries a powerful environmental message. The average American family brings home nearly 1,500 plastic bags every year, and the vast majority of these are used only once before being discarded. By transforming these bags into plarn, crafters divert a significant volume of plastic waste from the waste stream and give it a second life as something both beautiful and practical. Every pair of plarn shoes represents dozens of plastic bags rescued from potential pollution, making this craft a small but meaningful act of environmental stewardship.
Gathering and Preparing Your Plastic Bags
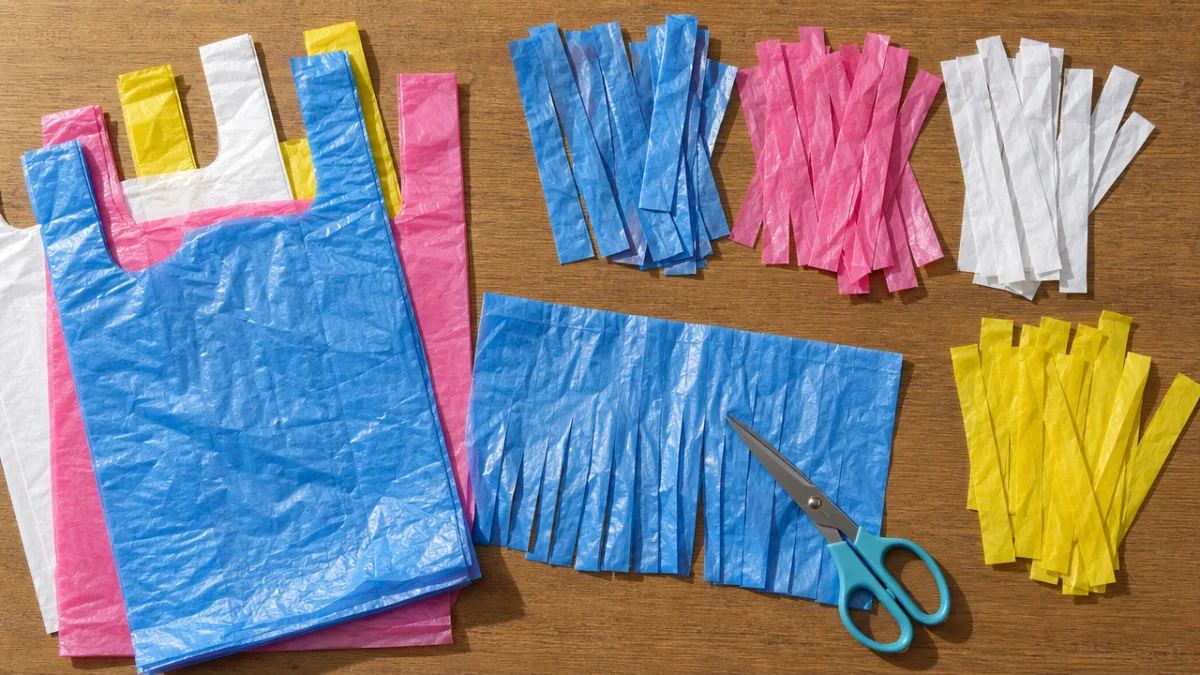
The first step in making plarn shoes is sourcing and preparing your raw material, which requires more thought than simply grabbing whatever bags are available. Not all plastic bags are created equal when it comes to plarn-making. The best choices are thin, smooth grocery bags made from high-density polyethylene (HDPE), which are the standard white or colored bags from supermarkets and big-box retailers. These bags cut cleanly, loop together smoothly, and produce a plarn with consistent weight and Texture. Avoid bags that are very thick, stretchy, or made from low-density polyethylene (LDPE), such as bread bags or produce bags, as these behave differently and can create inconsistencies in your finished fabric.
Before cutting, make sure your bags are clean and dry. Shake out any crumbs or debris, and if a bag has held food or liquid, give it a gentle rinse and allow it to air dry completely. Cleanliness is especially important for footwear, since shoes are worn close to the body and will be handled frequently during the crafting process. Once your bags are clean, flatten each one neatly, smoothing out any wrinkles or air pockets, and fold it lengthwise into a long, flat rectangle. This makes the cutting process much easier and helps ensure uniform strip widths.
To cut the bags into strips, most crafters fold the flattened bag into thirds or quarters and then cut across the width at regular intervals, typically one to two inches apart, depending on the thickness of the plastic and the weight of plarn desired for the project. For shoes, slightly narrower strips of about one inch tend to work well, producing a medium-weight plarn that is firm enough to hold structure without being too stiff to work with comfortably. After cutting, unfold the loops and connect them by threading one loop through another and pulling the tail through itself, creating a slip knot-style join that lies flat and strong. Wind the finished plarn into a ball or around a cardboard tube to keep it organized and tangle-free.
Tools and Techniques for Crocheting or Weaving Plarn Shoes
Making plarn shoes typically involves one of two main construction methods: crochet or weaving, and each produces a distinctly different look and feel. Crochet is by far the most popular approach, thanks to its flexibility in shaping and its relatively gentle learning curve for anyone already familiar with yarn crochet. For plarn crochet, you will need a large hook — usually somewhere between a size N (9mm) and a size P (11.5mm) — since plarn tends to be bulkier and less elastic than conventional yarn, requiring more space for the hook to maneuver. Aluminum or smooth plastic hooks are preferred over those with rough surfaces, which can snag or tear the plastic strips during use.
The most common stitch patterns used in plarn shoe construction are the single crochet and the slip stitch, both of which create a dense, stable fabric with minimal gaps. For the sole of the shoe, which bears the most weight and abrasion, a thick base of tightly worked single crochet stitches built up in multiple layers provides excellent durability. The upper portion of the shoe — whether a simple strap for a sandal or a more enclosed toe box for a slip-on — can incorporate more open stitch patterns for comfort and aesthetics. Working in a magic ring is a popular way to start the sole, allowing the crafter to build up from a central oval or rounded rectangle that matches the dimensions of the wearer’s foot.
For those interested in weaving, a simple loom or even a makeshift cardboard frame can be used to produce flat panels of plarn fabric that are then cut and assembled into shoe shapes. Woven plarn tends to produce a stiffer, more structured material that works especially well for the soles and sides of clogs or mules. The weaving process involves interlacing warp and weft strands of plarn in a plain or twill pattern, much like traditional basket weaving. Some crafters combine techniques, using crochet for the flexible upper and a layered woven panel for the reinforced sole, taking advantage of the strengths of each method in the appropriate part of the shoe.
Step-by-Step Guide to Making Your First Pair of Plarn Sandals
Plarn sandals are the ideal starting project for first-time plarn shoe makers because they require fewer materials and less construction complexity than a fully enclosed shoe. To begin, trace the outline of your foot on a piece of cardboard or thick paper to create a sole template, adding about half an inch of ease around the perimeter for comfort. This template will serve as your guide as you build up the sole in crochet rows. Start with a foundation chain that matches the length of your template from heel to toe, then work single crochet stitches in continuous rounds around the chain, increasing at each end as needed to shape the oval sole. Continue adding rounds until the sole is several layers thick and feels firm and supportive underfoot.
Once the sole is complete, it’s time to add the straps. For a classic thong sandal, you will need a toe post strap and two ankle straps that meet at the sides of the foot. Crochet each strap as a long, narrow rectangle of single crochet, checking the fit against your foot as you go. Attach the toe post at the point where the big toe and second toe meet, securing it firmly to the sole with a yarn needle and extra plarn. The ankle straps should be attached at the sides of the sole at roughly the widest point of the foot, and can be fastened with a simple crochet button loop and a plarn-wrapped ring or button for easy on-and-off wear.
For those who prefer more coverage, a T-strap or slide-style sandal can be constructed with a wider instep strap that connects from one side of the sole to the other across the top of the foot. Measure carefully before crocheting the strap, as this is one of the areas most likely to cause fit issues in handmade footwear. A small amount of stretch can be introduced by using a looser tension or a more open stitch pattern on the upper straps, allowing the shoe to accommodate slight variations in foot width. As a finishing touch, the underside of the sole can be reinforced with a layer of craft foam, rubber shelf liner, or even cut-up flip-flop soles to provide additional grip and padding.
- Use a sole template traced from your own foot to ensure a proper fit before you begin crocheting the base.
- Build up the sole in at least three to four layers of tightly worked single crochet for adequate thickness and support.
- Test strap placement and length against your actual foot frequently during construction rather than only at the end.
- Reinforce all strap attachment points with extra passes of plarn and tight whipstitching to prevent tearing during wear.
- Add a non-slip sole liner cut from rubber shelf liner or a recycled foam mat for safety and comfort on smooth floors.
Customizing and Decorating Your Plarn Shoes
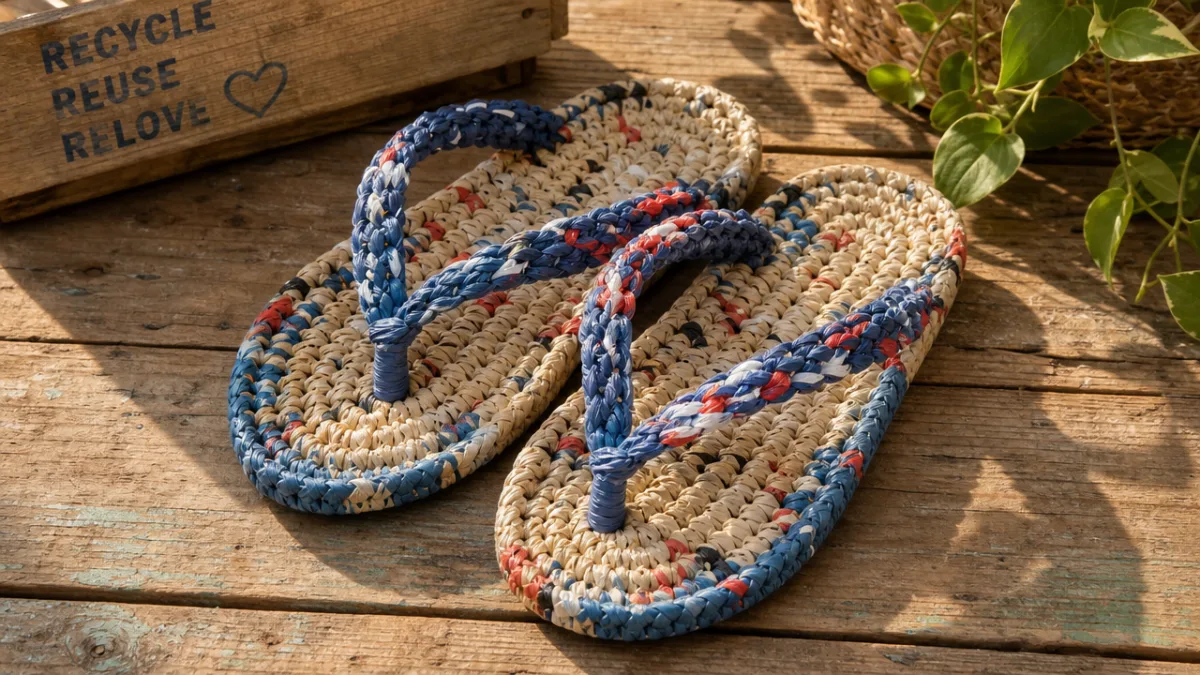
One of the most enjoyable aspects of making plarn shoes is the virtually limitless opportunity for personalization through color, texture, and decorative embellishment. Because plastic bags come in a wide range of colors — white, black, blue, red, yellow, green, and more — it is entirely possible to create striped, color-blocked, or even patterned plarn simply by switching between bags of different colors at intervals during construction. Planning a color scheme before you start cutting and joining your plarn allows you to ensure you have enough of each color to complete the design without running short mid-project. Bold, graphic color combinations can give plarn sandals a playful, summery look that is genuinely eye-catching.
Texture is another powerful design tool in plarn shoe construction. Varying the stitch pattern between sections of the upper — for example, using a tighter single crochet on the sole and a more open mesh stitch on the strap — creates visual contrast and can also improve the practical performance of the shoe. Twisted or braided plarn strands can be used as decorative trim along the edges of straps or around the perimeter of the sole, adding a finished, intentional look to the shoe. Some advanced crafters incorporate beads, shells, or fabric strips alongside the plarn to create mixed-media footwear with a distinctly artisan aesthetic.
Embellishments such as crocheted flowers, woven geometric patches, or knotted macramé-style details can be made separately and then sewn or glued onto the finished shoes as accent pieces. Fabric glue or a low-temperature hot glue gun works well for attaching flat decorative elements to plarn surfaces, while a yarn needle threaded with plarn or sturdy thread is better for three-dimensional embellishments that need a more secure attachment. Keep in mind that any decorations placed on the sole or high-contact areas will be subject to significant wear, so reserve delicate embellishments for the upper or ankle straps where they are less likely to be damaged during use.
Care, Durability, and the Environmental Impact of Plarn Footwear
One of the most common questions new plarn shoe makers have is how well these shoes will hold up over time with regular wear. The honest answer is that plarn footwear is surprisingly durable for a handmade material, but it does have its limits. The crochet or woven structure can stretch slightly with use, especially in warm temperatures, and straps may loosen at attachment points over time if not reinforced adequately during construction. With proper care and occasional maintenance, however, a well-made pair of plarn sandals can last through an entire summer season of casual wear, and some crafters report their shoes holding up for considerably longer.
Cleaning plarn shoes is refreshingly simple compared to caring for footwear made from leather or fabric. Because the material is entirely plastic, plarn shoes can be rinsed directly under running water or even submerged briefly in soapy water to remove dirt, sand, and odors. After washing, shake off excess water and allow the shoes to air dry completely before wearing them again. Avoid exposing plarn footwear to high heat sources such as direct sunlight for extended periods or clothes dryers, as the plastic can soften, warp, or melt. Storing the shoes in a cool, dry place out of direct sunlight will help preserve both the color and the structural integrity of the plarn over time.
From an environmental perspective, plarn shoes represent a compelling case study in creative upcycling. A single pair of adult sandals typically consumes between thirty and sixty plastic bags, depending on the size and style of the shoe, meaning that each pair directly prevents a significant quantity of plastic from entering the waste stream. While plarn shoes are not a solution to the global plastic crisis on their own, they embody an important principle: that the most sustainable material is often the one that already exists and would otherwise be discarded. As awareness of plastic pollution grows and more crafters discover the potential of plarn, this humble material made from grocery bags and ingenuity continues to inspire a quiet revolution in sustainable handmade fashion.
- Rinse plarn shoes with cool water and mild soap after heavy use or exposure to dirt and sand.
- Air dry completely in a shaded, well-ventilated area away from direct heat sources.
- Inspect strap attachment points periodically and reinforce any loosening seams with additional plarn stitching before they fail completely.
- Store shoes flat or stuffed lightly with paper to help them maintain their shape between wearings.
- At the end of a shoe’s useful life, consider cutting it into strips and reincorporating the plarn into a new project rather than discarding it.

Joining the Plarn Community and Finding Inspiration
The world of plarn crafting is supported by a warm and generous community of makers who share patterns, tips, and finished projects across social media platforms, crafting blogs, and video tutorial channels. Pinterest in particular has become a rich repository of plarn shoe inspiration, with boards dedicated to everything from simple beginner sandals to elaborate woven platform shoes that push the boundaries of what this material can achieve. Searching for terms like “plarn shoes,” “plastic bag crochet footwear,” or “upcycled plarn sandals” will surface dozens of free patterns and project galleries that can spark ideas and guide you through new techniques as your skills develop.
YouTube is another invaluable resource for visual learners, with many experienced plarn crafters posting detailed step-by-step tutorials covering every stage of the process from bag preparation to finished shoe. Watching someone else work through a challenging joining technique or strap construction method in real time can be far more illuminating than reading written instructions alone. Many tutorial creators also respond to questions in the comments, creating an informal mentorship network that makes it easier for beginners to troubleshoot problems and learn from the experience of more advanced crafters. Engaging with these communities not only accelerates skill development but also connects crafters with a shared commitment to sustainability and creative reuse.
Beyond the digital world, plarn shoe making can be a wonderful group activity for crafting circles, community workshops, and school sustainability projects. Teaching others to make plarn shoes is a powerful way to spread both practical skills and environmental awareness simultaneously, demonstrating in a hands-on way that beautiful, functional objects can be made from materials that most people treat as disposable. Whether you are making your first pair of sandals for personal use or teaching a classroom of students to see plastic bags as a creative resource rather than trash, plarn shoe making offers a satisfying, accessible, and genuinely meaningful craft experience that connects making with caring for the world around us.








What do you think?
It is nice to know your opinion. Leave a comment.