










Free Crochet Dickey (Turtleneck Dickey) Pattern: Your Complete Guide
What Is a Crochet Dickey and Why You Need One in Your Wardrobe
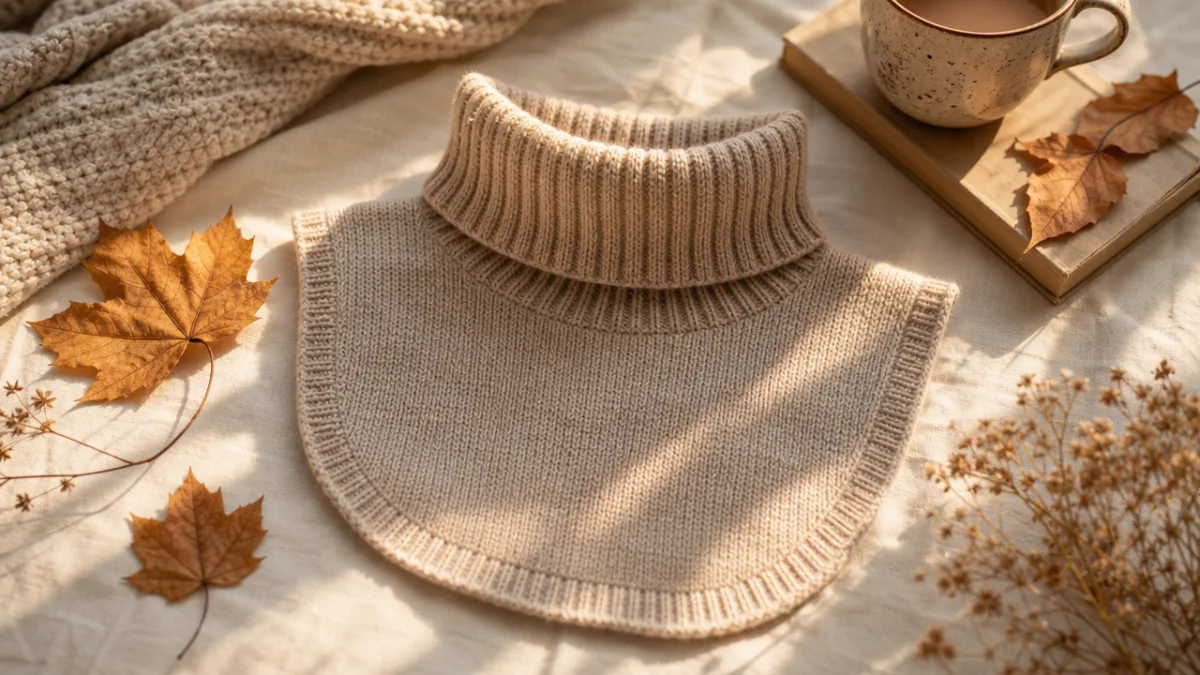
A crochet dickey, sometimes called a turtleneck dickey or false collar, is one of the most clever and practical accessories you can add to your handmade wardrobe. Unlike a full sweater or turtleneck top, a dickey covers only the neckline area — typically from the collarbone up through a snug neckband — giving the appearance of a layered turtleneck without the bulk or extra warmth of a complete garment. For crocheters of all skill levels, this makes it an ideal project that delivers maximum visual impact with minimal yarn investment.
The history of the dickey stretches back centuries, originally serving as a practical undergarment insert to make a simpler outfit appear more refined or to add warmth to the neck without a full shirt. In modern fashion, the turtleneck dickey has made a dramatic comeback, gracing runways and street style alike. Crochet versions have become especially popular because the texture of handmade fabric adds a beautiful artisan quality that elevates even the most casual outfit. Whether you pair it under a blazer, a slip dress, or a loose cardigan, it instantly adds that polished, intentional look.
Perhaps the greatest appeal of a crocheted dickey is its versatility and quick completion time. Most patterns can be finished in a single weekend, making them perfect gifts or last-minute additions to your own closet. They use relatively little yarn compared to full garments, so they’re also an excellent way to use up premium skeins you’ve been saving for a special project. Once you’ve made one, you’ll likely want to make several in different colors and textures to coordinate with various pieces in your wardrobe throughout the seasons.
Materials and Tools You Will Need
Before you begin your crochet dickey project, gathering the right materials will make the process smooth and enjoyable from start to finish. For a classic turtleneck dickey, you’ll typically need approximately 150 to 300 yards of yarn depending on the desired length and stitch pattern. A medium-weight worsted yarn (Category 4) works beautifully for beginners because it’s easy to see your stitches clearly and works up quickly. However, a DK or sport weight yarn will produce a more delicate, drapey fabric that’s especially lovely for wearing in transitional seasons like spring and fall.
When it comes to fiber content, the choice depends largely on your intended use and personal preferences. A soft merino wool or wool blend provides wonderful warmth and natural elasticity, which helps the neckband retain its shape after repeated wear and washing. Cotton or cotton-blend yarns are an excellent choice for warmer climates or if you have sensitivity to animal fibers, and they hold their structure remarkably well. Acrylic yarns are budget-friendly, widely available, and machine washable, making them a practical choice for everyday wear. Some crafters even opt for a luxurious mohair or silk blend to create a more elevated, fashion-forward piece.
In terms of tools, you will need a crochet hook sized to match your chosen yarn — typically a 5mm or 5.5mm hook for worsted weight. You’ll also want a yarn needle for weaving in ends, scissors, and a measuring tape or ruler to check your gauge swatch. Stitch markers are highly recommended, especially if you’re working in the round, as they help you track the beginning of each row or round without confusion. A blocking mat and pins are optional but can make a significant difference in the finished appearance of your dickey, helping it lie flat and look professionally made.
- Yarn: 150–300 yards of your preferred weight, in any fiber content that suits your needs and climate
- Crochet Hook: Sized appropriately for your yarn, typically 5mm–5.5mm for worsted weight
- Yarn Needle: For weaving in ends securely and neatly
- Stitch Markers: To mark the beginning of rounds and track pattern repeats
- Measuring Tape: Essential for checking gauge and body measurements
- Scissors: A sharp pair dedicated to your craft supplies
- Blocking Mat and Pins (optional): For a polished, even finish on the completed piece

Understanding Gauge and Taking Your Measurements
Gauge is one of the most important — and most frequently skipped — steps in any crochet project, and it becomes especially critical when making a garment accessory like a dickey that needs to fit snugly and comfortably around your neck. Gauge refers to the number of stitches and rows that fit within a specific measurement, usually a four-inch square. Before casting on your actual project, always crochet a gauge swatch using your chosen yarn and hook, then measure it carefully. If your swatch has more stitches per inch than the pattern calls for, try a larger hook; if it has fewer, switch to a smaller hook.
Taking accurate body measurements is equally essential. For a turtleneck dickey, the two most important measurements are your neck circumference and the desired length of the body panel. Neck circumference is typically measured at the base of your neck, right where a necklace would sit, and most adults measure somewhere between 13 and 17 inches. The body of the dickey — the panel that tucks into or drapes over your top — can vary considerably based on personal preference and intended styling. A shorter panel of around four to six inches gives a more minimalist look, while a longer panel of eight to twelve inches provides more coverage and warmth.
It’s also worth measuring the depth of your neckline on the garments you plan to pair with your dickey. If you’re planning to wear it under a V-neck or scoop-neck top, you’ll want the body panel to be long enough to stay tucked without pulling out during wear. For crewneck sweaters or blazers, a shorter dickey may actually be preferable since only the neckband will be visible. Taking a few minutes to think through these styling considerations before you begin will save you frustration later and ensure your finished dickey works seamlessly with your existing wardrobe rather than sitting unworn in a drawer.
Step-by-Step Free Crochet Dickey Pattern Instructions
This pattern is written for a standard adult size with a neck circumference of approximately 14 to 16 inches and a body panel length of approximately 8 inches. All adjustments for size are noted throughout the instructions. Begin by creating a foundation chain that matches your desired neck opening. Chain 60 stitches for a snug fit, or chain 66 to 72 for a looser neckband. Join with a slip stitch to form a ring, being careful not to twist your chain. This is your starting point for working in the round, which gives the dickey its seamless, tubular structure.
For the neckband, work in ribbing by alternating front post double crochet and back post double crochet stitches across each round. This creates a stretchy, textured ribbing that mimics the look of knitted turtleneck fabric and helps the collar grip the neck comfortably without being too tight. Work approximately 10 to 14 rounds of ribbing for a classic turtleneck fold-over, or reduce to 6 to 8 rounds for a simpler mock-neck style. The post stitches require a little practice if you’re new to them, but the resulting fabric is incredibly satisfying and well worth the effort.
Once your neckband is complete, transition to the body panel. You can continue working in the round for a seamless tube, or you can work flat in rows if you prefer the dickey to have a front and back panel that’s slightly open at the sides. For working flat, chain one and turn your work at the end of each row, continuing in your chosen body stitch — half double crochet creates a dense, warm fabric, while single crochet mesh or shell stitches add a more decorative element. Continue until your body panel reaches your desired length, then fasten off and weave in all ends securely.
- Chain your foundation: Start with 60–72 chains depending on your desired neck circumference, then join in the round.
- Work the ribbed neckband: Alternate FPDC and BPDC for 6–14 rounds to create stretchy, turtleneck-style ribbing.
- Transition to the body: Switch to your preferred body stitch, such as HDC, SC, or a decorative shell pattern.
- Work the body panel: Continue in rows or rounds until the panel measures your desired length, typically 6–10 inches.
- Fasten off and finish: Cut yarn, pull through last loop, and weave in all ends with your yarn needle.
- Block if desired: Lightly mist with water or steam block to even out stitches and set the shape.
To add a finishing touch, consider working a simple border stitch around the bottom edge of the body panel. A single crochet border or a decorative picot edge both give the dickey a neat, intentional finish that elevates it from a casual craft project to a polished accessory. You might also consider adding a subtle texture variation — such as a row of puff stitches or a bobble accent — along the transition between the neckband and the body panel to create visual interest. These small details take only a few minutes but make a noticeable difference in the overall look and feel of the finished piece.

Customization Ideas and Stylish Variations
One of the most delightful aspects of making your own crochet dickey is the endless potential for customization. Because the pattern is relatively simple at its core, it becomes a wonderful canvas for experimenting with different stitches, yarn textures, and design elements. Try working the body panel in a lace stitch for a romantic, feminine version that peeks beautifully from beneath a structured jacket or coat. Alternatively, a dense moss stitch or waffle stitch creates a rustic, cozy texture that pairs perfectly with chunky knitwear and outerwear during the colder months of the year.
Color is another powerful tool for personalization. A classic ivory or cream dickey is endlessly wearable and versatile, but don’t be afraid to experiment with bold jewel tones, earthy neutrals, or even variegated yarn that shifts through multiple colors as you crochet. Color-blocking is a particularly fun option — work the neckband in one color and the body panel in a complementary or contrasting shade for a modern, graphic look. You can also add embellishments after the fact, such as small crocheted flowers or leaves worked separately and sewn on, or even beads threaded onto the yarn before crocheting for a subtle shimmer effect.
Size variations are just as easy to implement. For children, simply reduce the foundation chain count and the number of body rows proportionally. A mini dickey for a toddler makes an incredibly charming gift and works up in under an hour. On the other end of the spectrum, you can extend the body panel significantly — to 14 or even 18 inches — to create more of a faux turtleneck bib that provides coverage comparable to a full blouse front. This longer variation is especially useful for wearing under low-cut tops when you want more modest coverage without adding a full layer of clothing beneath.
Care Instructions and Styling Tips for Your Finished Dickey
Proper care of your finished crochet dickey will ensure it stays beautiful and holds its shape for years of regular wear. The care routine largely depends on the fiber content of your chosen yarn, so always refer to the yarn label for specific washing instructions before you begin. Most wool and wool-blend dickeys benefit from hand washing in cool water with a gentle, pH-neutral detergent. Avoid wringing or twisting the fabric, which can distort the stitches and cause felting in wool fibers. Instead, gently press out excess water and lay the dickey flat on a clean towel to dry away from direct heat or sunlight.
For acrylic or cotton dickeys, machine washing is generally safe on a gentle or delicate cycle inside a mesh laundry bag. However, always avoid high heat in the dryer, which can warp or distort crocheted fabric regardless of fiber content. Laying flat to dry is the safest option for all crochet garments and accessories. If your dickey loses its shape over time or the neckband starts to stretch out, a light steam blocking session can restore its original dimensions and give the stitches a fresh, even appearance. Use a pressing cloth between the iron and your crochet fabric if you choose to steam it directly.
When it comes to styling your crochet dickey, the possibilities are truly exciting and span every aesthetic from casual to polished. For a relaxed everyday look, wear it under an oversized denim jacket or a chunky oversized sweater, letting just the ribbed neckband show above the collar. For a more office-appropriate ensemble, tuck it beneath a fitted blazer or structured coat and let the turtleneck fold stand in for a blouse. In warmer seasons, pair a lightweight lace or cotton dickey with a sundress or slip dress for an unexpectedly charming layered look that adds texture without adding warmth.
- With a blazer: Tuck the body panel inside and wear the neckband as a classic turtleneck for a polished, professional look.
- Under a chunky sweater: Layer the dickey beneath a crewneck for visible ribbing that adds dimension and warmth at the neckline.
- With a slip dress: Choose a lace or lightweight version for a romantic, feminine contrast between soft and structured fabrics.
- Under a coat: Wear as a standalone top layer beneath your outerwear for warmth and style without bulk.
- With a denim jacket: Pop the collar for a casual, artisanal look that highlights the handmade texture of the crochet fabric.
Troubleshooting Common Crochet Dickey Problems
Even experienced crocheters occasionally run into challenges when working on wearable accessories, and a dickey is no exception. One of the most common issues is a neckband that turns out too tight or too loose despite careful gauge swatching. If your neckband is uncomfortably tight, you likely need to switch to a hook one size larger, or increase your foundation chain count by six to ten stitches. Conversely, if the neckband is floppy and loose rather than snugly hugging the neck, drop down a hook size or reduce your chain count. The ribbing pattern itself also plays a big role — denser ribbing with taller stitches like double crochet post stitches will create more stretch than a ribbing built from single crochet.
Another frequent challenge is uneven tension throughout the body panel, which can result in a piece that looks wavy or puckered rather than smooth and consistent. Tension naturally varies between crafters and can even shift within a single session depending on fatigue or stress. If you notice your tension changing, take a short break, relax your grip on the hook, and make a conscious effort to keep your yarn feed consistent. Working a few extra practice rows on scrap yarn before returning to your project can help reset your muscle memory and even out your stitches before the inconsistency becomes too noticeable in the finished fabric.
Finally, if your finished dickey doesn’t sit flat against your body and instead flares outward at the bottom, the body panel likely has too many stitches relative to the neckband, creating a flared or A-line silhouette. To correct this in future projects, either maintain the same stitch count throughout the entire body panel or use strategic decrease rows near the bottom edge to pull the fabric slightly inward. Conversely, if you want a deliberately flared look — which can be quite stylish — intentionally increase stitches every few rows to create a graceful, bell-shaped drape. Understanding how stitch count affects fabric silhouette is one of the most valuable skills you can develop as a crocheter, and a simple dickey project is a wonderful low-stakes way to experiment with these fundamentals.








What do you think?
It is nice to know your opinion. Leave a comment.