










Tropical Tote Bags: The Ultimate Summer Camp Craft Guide with Stencil Revolution
Introduction: Why Tropical Tote Bags Are the Perfect Summer Camp Craft
Summer camp is one of the most memorable experiences a child can have, and the crafts they create during those sun-drenched weeks often become treasured keepsakes for years to come. Tropical tote bags combine the vibrant energy of summer with a practical, wearable art project that campers of all ages can truly enjoy making. With the help of Stencil Revolution’s beautifully designed stencil collection, even beginners can create professional-looking results that they’ll be proud to show off long after the last campfire has burned out.
What makes this particular craft so special is the way it bridges creativity and functionality. Unlike a painting that hangs on a wall or a friendship bracelet that eventually frays, a tote bag becomes part of everyday life. Campers can use their finished creations to carry books, beach gear, or supplies back home, turning every errand into a small celebration of their artistic achievement. The tropical theme adds an exotic, joyful quality that perfectly captures the spirit of summer adventure and exploration.
Stencil Revolution has long been a trusted name in the crafting community, offering precision-cut stencils that make intricate designs accessible to everyone. Their tropical collection includes everything from lush palm fronds and hibiscus flowers to playful flamingos and bold pineapple motifs. By pairing these high-quality stencils with plain canvas tote bags and vibrant fabric paint, camp counselors and craft coordinators can set up an activity station that practically runs itself, producing stunning results with minimal frustration and maximum fun for every participant.
Materials and Supplies You’ll Need to Get Started
Preparation is everything when running a successful craft session at summer camp, and gathering the right materials in advance makes the entire experience smoother and more enjoyable for everyone involved. For this project, the foundational supply is a plain canvas tote bag for each camper, ideally in a natural or white color that will allow the paint colors to appear bright and true. Canvas tote bags are widely available in bulk from craft suppliers, making them an economical choice even for large groups of twenty or thirty campers.
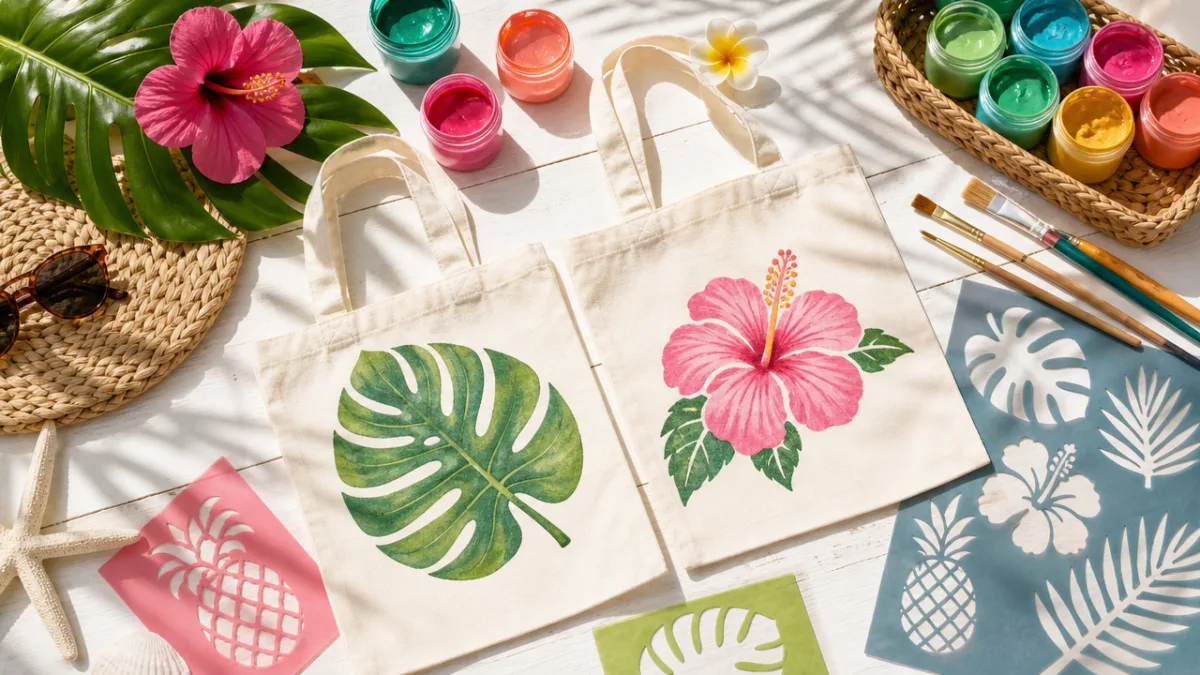
Beyond the bags themselves, you will need a selection of fabric paints in colors that evoke the tropics — think vivid turquoise, coral pink, sunny yellow, lush green, and deep ocean blue. Fabric paint is specifically formulated to bond with textile fibers, meaning the finished design will survive repeated washing without cracking or fading. Stencil Revolution offers their stencils in a range of sizes, so consider ordering both medium and large versions to give campers flexibility in composing their designs across the surface of their bags.
Additional supplies that will make the session run efficiently include foam brushes or stencil brushes for applying paint, painter’s tape to secure the stencils in place, a piece of cardboard to insert inside the bag and prevent bleed-through, paper towels for quick cleanups, and a palette or paper plate for mixing colors. It is also worth having a few cups of water on hand for rinsing brushes between color changes. Setting out these materials in organized stations before campers arrive will keep energy focused on the creative process rather than logistics.
- Plain white or natural canvas tote bags (one per camper, plus a few extras)
- Stencil Revolution tropical stencil set (palm leaves, hibiscus, flamingo, pineapple options)
- Fabric paint in tropical colors: turquoise, coral, yellow, green, orange, and pink
- Foam brushes and stencil brushes in assorted sizes
- Painter’s tape or stencil adhesive spray
- Cardboard inserts to place inside the bags
- Paper plates for paint mixing and palettes
- Paper towels and a water source for cleanup
- Clothespins or a drying rack to hang finished bags
Step-by-Step Instructions for Creating Your Tropical Tote
Begin the project by preparing each tote bag with a cardboard insert slipped firmly between the front and back panels. This simple step is critically important because it prevents paint from bleeding through to the back side of the bag, which would ruin the clean look of the finished piece and could also stick the two layers together while drying. Smooth the front panel flat against a work surface and take a moment to plan the design before touching any paint to fabric, since deliberate placement always produces more satisfying results than a rushed approach.
Next, position your chosen Stencil Revolution stencil on the front of the bag and secure it firmly with painter’s tape around all edges. Press the tape down carefully, paying special attention to the detailed interior cuts of the stencil, where paint is most likely to seep underneath if any gap remains. For added security, some crafters prefer to use a light misting of stencil adhesive spray on the back of the stencil, which holds it flat against the fabric without leaving any residue and is especially helpful when working with younger campers who may be less precise in their brush technique.
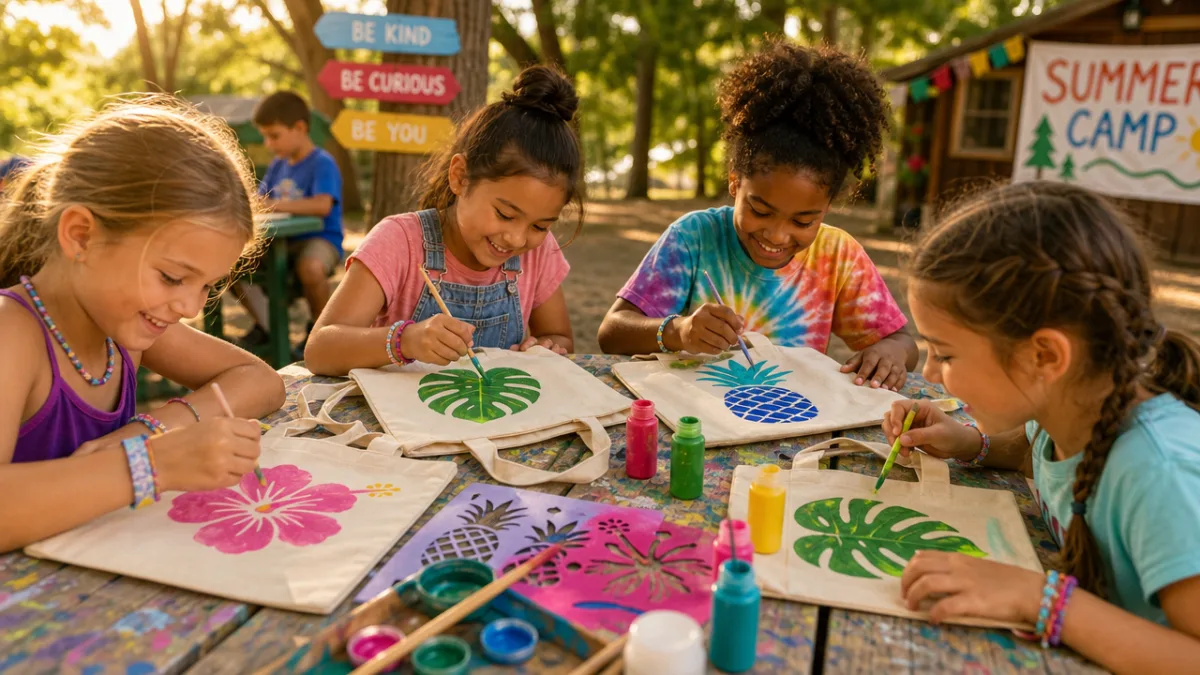
Load a foam brush or stencil brush lightly with fabric paint — far less paint than you think you need is almost always the right amount. Using a stippling or pouncing motion rather than brushing strokes, dab the paint through the openings of the stencil in thin, even layers. This technique prevents the paint from being pushed underneath the stencil edges, preserving the crisp lines that make stencil work look polished and professional. Build up color gradually with two or three thin coats, allowing a minute or two of partial drying between layers, until you achieve the vibrant, solid coverage that makes tropical colors truly sing.
Adding Details and Layering Multiple Stencils
One of the most exciting aspects of working with Stencil Revolution’s collection is the ability to layer multiple stencils to build complex, richly detailed compositions. Once your primary design has dried to a tacky consistency, you can carefully reposition a second stencil nearby or even overlapping the first to add depth and visual interest to the overall image. For example, a large palm leaf stencil in deep green could be complemented by a smaller hibiscus flower in coral or pink layered in front, instantly creating the feeling of a lush tropical garden right on the surface of a simple canvas bag.
Background textures and color washes can also transform a simple stenciled image into something truly extraordinary. Before applying any stencils, some campers may want to apply a loose, watercolor-effect wash of diluted paint across the entire front panel of the bag, letting colors bleed into one another to suggest a tropical sunset or ocean horizon. Once that base layer dries fully, the stenciled motifs placed on top will appear to float against a dreamy, painted landscape, giving the finished tote a sophisticated artistic quality that looks far more complex than it actually is to achieve.
Encourage campers to sign their work, either with a fabric paint marker along the bottom edge of the bag or on the interior, once all the decorative elements are complete. Personalizing their creation with their name and the year reinforces ownership and pride in the finished piece. Some camp programs even create a collective identity by having all campers incorporate a shared element — perhaps a small star or a specific color — so that looking at the bags together tells the story of an entire group’s summer experience, creating a sense of community woven right into the fabric of each individual creation.
Drying and Heat-Setting for Long-Lasting Results
Proper drying and heat-setting are the final steps that transform a freshly painted bag into a durable, washable finished product that will last for years. Most fabric paints require a minimum of twenty-four hours of air drying before they reach their full initial cure, so plan your craft session timing accordingly — ideally scheduling it the day before a rest day or near the end of a camp session so bags have adequate time to dry before being packed for home. Arrange finished bags on a drying rack or hang them by their handles from a clothesline in a well-ventilated area out of direct harsh sunlight, which can cause some paint colors to shift slightly while still wet.
Once the paint has air-dried completely, heat-setting locks the color molecules permanently into the fabric fibers, dramatically increasing the paint’s resistance to washing and wear. This is typically done by placing a piece of parchment paper or a thin cloth over the painted design and pressing it firmly with a dry iron set to the appropriate temperature for cotton fabric, usually a medium-high setting. Move the iron slowly and deliberately over the design for approximately thirty seconds per section, applying steady pressure. Most fabric paint manufacturers recommend this process, and following it faithfully makes the difference between a craft that lasts one wash and one that survives an entire school year of regular use.
Creative Design Variations and Tropical Theme Ideas
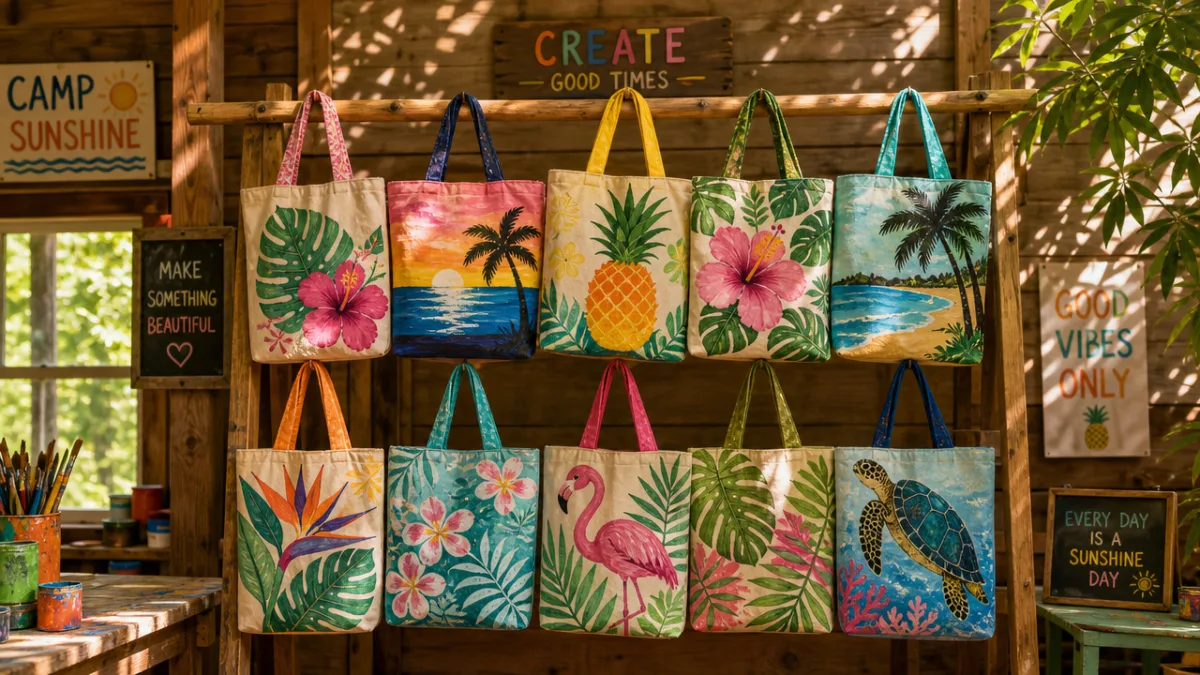
One of the greatest strengths of using Stencil Revolution’s tropical collection is the sheer variety of design directions campers can explore within a cohesive theme. The tropical aesthetic is broad and forgiving, encompassing everything from the geometric elegance of pineapple patterns to the flowing organic curves of monstera leaves and the playful whimsy of flamingos striking their iconic one-legged pose. Counselors can display a board of inspiration images showing different completed bags to spark ideas and help campers who feel uncertain about where to begin, while still leaving plenty of room for individual creative choices.
Color palette selection is perhaps the most powerful tool campers have for expressing their personality within the tropical theme. A bag painted in classic tropical brights — hot pink, electric turquoise, banana yellow — will look entirely different from the same stencil rendered in sunset tones of peach, burnt orange, and deep rose, or in an unexpected moody palette of deep navy, gold, and forest green. Encouraging campers to think about their color choices before they begin, and even to do a quick test on a scrap piece of fabric, helps them feel more confident in their decisions and often leads to more thoughtful, harmonious finished results.
For older campers or those with more crafting experience, the tropical tote project can be elevated with additional embellishment techniques layered on top of the stenciled design. Iron-on rhinestones or fabric glitter glue can add sparkle to the center of a stenciled flower. Fabric markers can be used to add fine-line details like leaf veins, feather textures on flamingos, or the cross-hatching pattern of a pineapple skin that the stencil alone might not fully capture. Embroidery floss can even be hand-stitched along the edges of a stenciled motif to create a charming mixed-media effect that blurs the line between painting and textile art.
Group Projects and Collaborative Tote Designs
While the tropical tote bag is primarily designed as an individual project, it also adapts beautifully into collaborative group experiences that build teamwork and create a powerful sense of shared accomplishment. One popular variation is the “cabin tote,” in which every member of a cabin group contributes one stenciled element to a single large bag that will belong to the group collectively, perhaps hanging in the cabin as a decorative memento throughout the session. Each camper chooses a different tropical motif, and the counselor helps arrange the elements into a cohesive composition that tells the story of the whole group.
Another engaging collaborative approach is the color relay, in which campers work on their own bags but pass a shared color palette around the table, using whatever paint colors are in front of them at a given moment rather than hoarding their favorites. This constraint often produces surprisingly harmonious results because every bag in the group ends up sharing some of the same hues, creating visual unity when the finished bags are displayed together at a closing ceremony or parent showcase. The shared palette approach also teaches campers a gentle lesson about adaptability and finding creative solutions within limitations, a valuable life skill dressed up in the language of art.
Benefits of Stencil Crafts for Child Development at Summer Camp
Beyond the obvious joy of creating something beautiful with one’s own hands, stencil-based crafts offer a remarkable range of developmental benefits that make them an exceptionally worthwhile addition to any summer camp curriculum. The act of carefully positioning a stencil, securing it precisely, and applying paint with controlled, deliberate brush strokes builds fine motor skills and hand-eye coordination in ways that translate directly into improved performance in writing, drawing, and other detailed tasks. These benefits accrue even for older children and teenagers, for whom the physical precision of stencil work continues to reinforce neuromotor development.
Stencil crafts are also profoundly inclusive, which is one of their most important qualities in a summer camp setting where participants come with wildly varying levels of artistic experience and confidence. A child who believes they “can’t draw” can produce a stunning tropical tote bag using a Stencil Revolution stencil, because the complex design work has already been done for them — their role is to bring color, care, and creative decision-making to the process. This experience of succeeding at something they expected to fail can be genuinely transformative, rebuilding a child’s relationship with creative activity and opening doors to artistic exploration they might never have entered otherwise.
The planning and sequencing involved in executing a multi-element stencil design also engages important executive function skills including working memory, cognitive flexibility, and the ability to delay gratification while waiting for layers to dry before proceeding. Campers must think ahead, anticipate outcomes, and make decisions that will affect later steps — all while regulating the excitement and impatience that naturally accompany a fun, highly motivating activity. These cognitive demands are embedded so naturally in the craft experience that campers rarely notice they are exercising them, which is precisely what makes hands-on making such a powerful vehicle for learning and growth.
Tips for Camp Counselors and Craft Coordinators
Running a successful craft session for a large group of energetic campers requires thoughtful preparation and a few strategic decisions that can make the difference between a smooth, joyful experience and a chaotic one. Start by ordering more supplies than you think you need — extra tote bags for mistakes, extra paint in the most popular colors, and extra stencils in case any get damaged during the session. Stencil Revolution stencils are made from durable mylar that can be cleaned and reused many times, but heavy handling by enthusiastic young crafters does occasionally result in tears or bends that compromise precision.
Organize the workspace into clearly defined zones before campers arrive: a supply station where paint, brushes, and stencils are distributed, a work zone where the actual painting happens, and a drying zone where finished bags can be set aside safely without being disturbed. Clear visual signage at each station reduces the need for repeated verbal instructions and helps campers navigate the process more independently, freeing counselors to focus on providing individualized creative encouragement rather than constant logistical management. Consider laminating a simple illustrated instruction sheet that shows the key steps, which campers can reference on their own when they have questions.
Finally, build in buffer time at both ends of the session. Setting up takes longer than expected, and the end of a craft session is inevitably consumed by cleanup, name-labeling of finished pieces, and the social energy of campers sharing and admiring each other’s work. Rushing these final moments cheats campers out of the full satisfaction of the experience, because the opportunity to show and celebrate one’s finished creation is itself an important part of the creative process. Plan for the craft to take fifteen or twenty minutes longer than you think it will, and you will consistently deliver a calmer, more complete, and more joyful experience for everyone involved in your tropical tote bag making adventure.
- Order twenty percent more supplies than your headcount to account for mistakes and extras
- Pre-insert cardboard into tote bags before the session to save time
- Set up an inspiration board with photos of completed designs in various styles
- Use labeled bins to organize stencils by motif type for easy browsing
- Assign a cleanup helper role to rotate among campers throughout the session
- Photograph every finished bag before distribution for your program portfolio
- Plan a brief show-and-tell circle at the end where each camper shares their design choice
- Send home a card with care instructions for washing the finished tote bag
The tropical tote bag craft with Stencil Revolution is far more than a simple art project — it is an opportunity to give campers a lasting, tangible memory of their summer experience, a boost to their creative confidence, and a genuinely useful object they will reach for again and again in the months and years ahead. With quality materials, thoughtful preparation, and the guidance in this article, any camp program can deliver this project with confidence and create moments of creative joy that campers will talk about long after summer has faded into autumn.








What do you think?
It is nice to know your opinion. Leave a comment.