










Mosaic Storage Box DIY Kit: Your Complete Guide to Crafting a Beautiful Decorative Keepsake Box
Introduction to Mosaic Storage Box DIY Kits
Mosaic storage box DIY kits have emerged as one of the most satisfying and rewarding craft projects available to both beginners and experienced artisans alike. These thoughtfully curated kits bring together everything you need to transform a plain wooden or cardboard box into a stunning piece of handmade home décor that serves both a functional and aesthetic purpose. Whether you are looking for a creative weekend activity, a meaningful handmade gift, or simply a way to add a personal touch to your living space, a mosaic keepsake box project delivers on every level.
The appeal of mosaic crafting lies in its deep historical roots and timeless beauty. Mosaic art has been practiced for thousands of years, with ancient civilizations using tesserae — small tiles of glass, stone, or ceramic — to create intricate patterns on floors, walls, and decorative objects. Today, this ancient art form has been reimagined in a modern, accessible format through DIY kits that make it easy for anyone to participate in this rich artistic tradition. When applied to a storage box, the result is a functional object elevated into genuine art.
A quality mosaic storage box DIY kit typically includes pre-cut mosaic tiles in a coordinated color palette, a base box in wood or sturdy material, adhesive suitable for bonding tiles to the surface, grout to fill the gaps between tiles, and a set of easy-to-follow instructions. Many kits also include tools such as tile nippers for custom shaping, a spreader for grout application, and finishing sealant to protect your completed work. Having all these components bundled together removes the guesswork and shopping effort that can otherwise discourage first-time crafters from getting started.
Why Choose a Mosaic Keepsake Box as Your Next DIY Project
Among the many DIY craft options available today, mosaic keepsake boxes stand out for their combination of accessibility, creativity, and lasting value. Unlike some craft projects that result in items you may not know what to do with, a decorated storage box serves an immediate and ongoing practical purpose. You can use it to store jewelry, letters, photographs, small keepsakes, or any collection of meaningful objects — making it a piece that integrates naturally into daily life while constantly reminding you of the joy you felt creating it.
From a creative perspective, mosaic box projects offer a uniquely satisfying experience because the process itself is meditative and rewarding at every stage. Selecting your tile colors and planning your design, carefully placing each piece, waiting for the adhesive to cure, and then applying grout to reveal the finished pattern — each step builds anticipation and provides a distinct sense of accomplishment. Many crafters report that mosaic work helps reduce stress and encourages mindfulness in a way that few other hobbies can match, making it a genuinely therapeutic activity as well as a creative one.
The finished mosaic keepsake box also carries a personal significance that no mass-produced item can replicate. When you give a handmade mosaic box as a gift — perhaps for a birthday, anniversary, wedding, or holiday — the recipient understands that real time, care, and creativity went into creating it. This makes it far more meaningful than a store-bought alternative. Alternatively, when you keep your own completed box, it becomes a tangible record of your creative journey and a lasting piece of home décor that you can be genuinely proud of every time you see it.
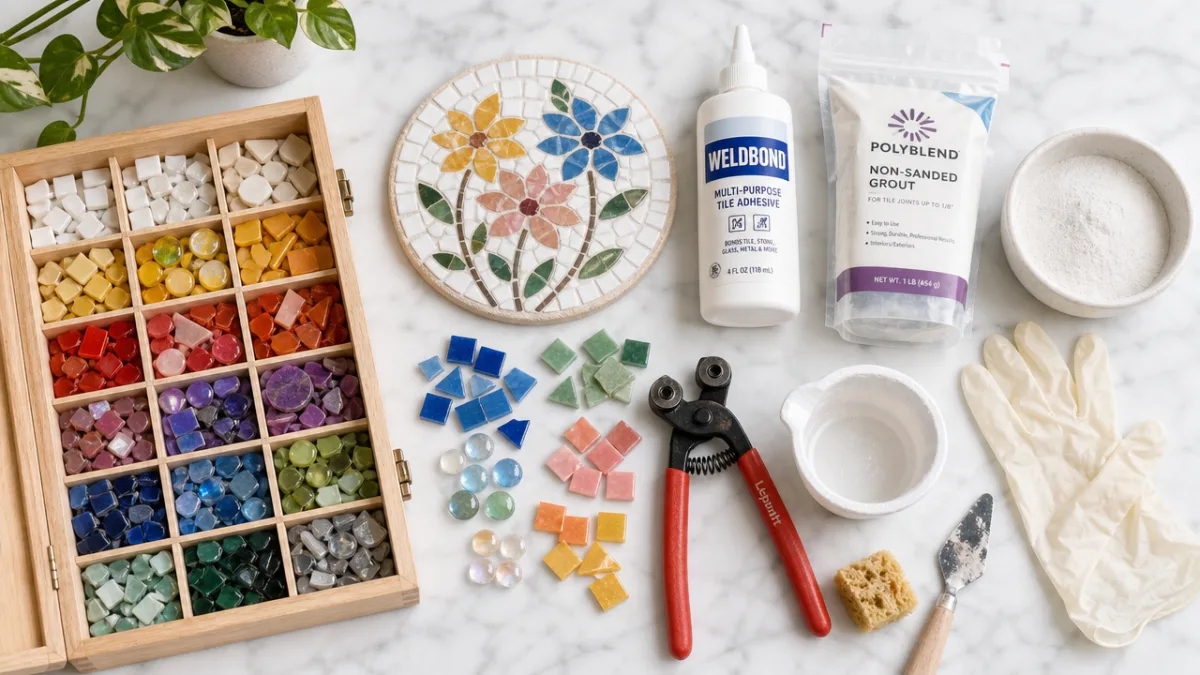
Materials Included in a Typical Mosaic Storage Box DIY Kit
Understanding exactly what comes inside a mosaic storage box DIY kit helps you set realistic expectations and plan your crafting session effectively. Most well-designed kits are assembled with care to ensure that everything you need is included, reducing the frustration of mid-project supply runs. The foundation of any kit is the base box itself, which is usually constructed from medium-density fiberboard, solid wood, or thick cardboard. Each material has its own characteristics, but all are designed to provide a stable, flat surface that bonds well with tile adhesive and supports the weight of the completed mosaic.
The mosaic tiles included in these kits come in several different forms depending on the design aesthetic of the specific product. Glass tiles offer a jewel-like luminosity that catches light beautifully and gives a finished box an almost stained-glass quality. Ceramic tiles provide a more matte, earthy appearance that suits rustic or Mediterranean-inspired designs. Mirrored tiles add glamour and visual depth, while natural stone pieces create a grounded, organic look. Many kits combine two or more tile types to add textural variety and visual interest to the finished piece.
Beyond the tiles and base box, a complete kit should include the following essential supplies to ensure a successful result:
- Tile adhesive or mosaic glue: A strong, flexible adhesive formulated specifically for bonding tiles to non-porous and semi-porous surfaces, ensuring tiles stay securely in place even with daily handling.
- Pre-mixed or powdered grout: Used to fill the gaps between tiles, grout gives the mosaic its finished, cohesive appearance and comes in colors chosen to complement the tile palette.
- Applicator tools: Spreading tools, wooden sticks, or small palette knives allow precise adhesive and grout application without creating a mess.
- Finishing sealant: A protective coat applied after grouting that prevents staining, moisture damage, and wear, significantly extending the life of your completed piece.
- Design template or guide sheet: A printed or digital pattern showing suggested tile placement to help beginners achieve a professional-looking result with confidence.
High-quality kits may also include extras such as tile nippers for cutting custom shapes, sponges for grout cleanup, protective gloves, and accent embellishments like small gems or metallic tiles to add special detail to your design. When evaluating different kits, it is worth checking the quantity of tiles supplied against the size of the box, since running short of a particular color mid-project can be frustrating. Generous kits include approximately ten to fifteen percent extra tiles to account for breakage and design adjustments.
Step-by-Step Guide to Completing Your Mosaic Keepsake Box
Completing a mosaic keepsake box is a multi-stage process that unfolds over one to two sessions depending on your pace and the complexity of your design. The first and perhaps most enjoyable stage is planning your design. Lay all your tiles out on a flat surface beside your box and experiment with different color arrangements and patterns before committing to any placement. Consider whether you want a geometric pattern, a floral motif, a gradient color wash, or a completely abstract arrangement. Sketching your design lightly in pencil on the box surface can help you stay on track once you begin applying adhesive.
Once your design is planned, the application process begins. Apply a small amount of tile adhesive to the back of each tile or to the box surface in small sections, then press tiles firmly into position. Work methodically from one corner or the center outward to maintain consistency. Leave small, even gaps between tiles — typically around two to three millimeters — to allow grout to fill in cleanly later. Avoid placing tiles too close together, as this makes grouting difficult and can cause tiles to shift before the adhesive sets. Allow the adhesive to cure fully, usually for twelve to twenty-four hours, before proceeding.
After the adhesive has cured, grouting transforms the project dramatically. Mix your grout according to the instructions until it reaches a smooth, peanut butter-like consistency, then spread it generously over the tiled surface using a spreader or your gloved fingers, working it firmly into all the gaps. Allow the grout to sit for ten to fifteen minutes until it becomes slightly firm, then use a damp sponge to wipe away the excess from the tile surfaces in gentle circular motions. Rinse your sponge frequently and repeat the wiping process until the tiles are clean and the grout lines are neat and even. A final polish with a dry cloth removes any remaining haze.
The finishing steps are what separate a good mosaic from a truly professional-looking one. After the grout has dried completely — usually twenty-four hours — inspect the surface carefully for any cracked or hollow-sounding grout lines and fill them with a small amount of fresh grout if needed. Once you are satisfied, apply a coat of finishing sealant over the entire mosaic surface to protect the grout from staining and moisture. Some crafters also finish the interior and underside of the box with paint or decorative paper to give it a polished, complete look that enhances the overall presentation of the finished piece.

Creative Design Ideas for Your Mosaic Storage Box
One of the greatest joys of working with a mosaic storage box DIY kit is the creative freedom it offers. While following the suggested design in your kit’s instructions is a perfectly valid approach — especially for beginners building confidence — the real magic happens when you begin to personalize your design and make choices that reflect your own aesthetic sensibility. The tiles, the box, and the grout color all interact to create an infinite number of possible outcomes, meaning that no two completed boxes will ever look exactly alike, even when crafted from the same kit.
Color is the most powerful design tool at your disposal. A monochromatic palette using different shades of a single color creates a sophisticated, gallery-worthy look that photographs beautifully and complements modern interior styles. A contrasting palette using two complementary colors — such as deep teal and warm gold, or rich burgundy and soft cream — creates bold visual impact and makes an excellent statement piece. A rainbow or gradient arrangement using multiple colors in a flowing, transitional sequence has a joyful, expressive energy that works wonderfully for children’s rooms or creative spaces. Experimenting with your tile colors before committing to a design costs nothing and can lead to unexpected and delightful combinations.
Beyond color, the patterns and motifs you create with your tiles offer another layer of creative expression. Consider these popular design approaches that work especially well for mosaic keepsake boxes:
- Geometric patterns: Chevrons, herringbone, diamonds, and concentric borders are classic mosaic motifs that are achievable even for beginners and give a finished box a timeless, architectural quality.
- Nature-inspired designs: Flowers, leaves, vines, and animal silhouettes connect your box to the natural world and suit a wide variety of interior styles from bohemian to cottage.
- Abstract arrangements: Free-form placement with no predetermined pattern creates a one-of-a-kind result that is uniquely expressive and often surprisingly beautiful.
- Pictorial designs: More advanced crafters may wish to create a simple landscape, portrait, or symbolic image using the tiles as a pixel-like medium.
- Mixed media: Incorporating non-tile elements such as buttons, beads, shells, or small pebbles alongside your mosaic tiles adds texture and personal meaning to the design.
The grout color you choose also significantly shapes the final appearance of your box. White or cream grout keeps colors bright and makes the overall design feel light and airy. Dark gray or black grout adds drama and definition, making each tile pop individually and giving the piece a more bold, graphic quality. Tinted grout in a color that complements or contrasts the tiles can tie the whole design together in an unexpected way. Before grouting your actual project, it is worth testing your chosen grout color on a small scrap tile arrangement if possible, since grout can look very different once dried compared to how it appears when wet.
Mosaic Storage Boxes as Handmade Home Décor and Gifts
A completed mosaic storage box occupies a rare and valuable space in the world of home décor — it is simultaneously beautiful and useful, handmade and durable, personal and universally appealing. In a home setting, a mosaic keepsake box can serve as a jewelry organizer on a dresser, a trinket holder on a coffee table, a desk accessory in a home office, or a decorative accent on a bookshelf. Because the mosaic surface is striking and visually distinctive, the box draws the eye and elevates the overall aesthetic of any surface it rests on, contributing meaningfully to the character and personality of a room.
As a gift, a handmade mosaic box communicates thoughtfulness and genuine creative investment in a way that very few purchased gifts can match. The recipient knows that you spent time, effort, and creative energy making something specifically for them, which gives the gift an emotional weight that goes far beyond its monetary value. A mosaic box makes a particularly memorable gift for milestone occasions such as weddings, housewarmings, milestone birthdays, graduations, and anniversaries. For extra personalization, you can incorporate the recipient’s favorite colors into your design, or use tiles to create a small initial, date, or symbol that holds special significance for them.
The sustainability angle of handmade home décor gifts is also worth considering in a contemporary context. Mass-produced decorative items contribute to excessive resource consumption, fast-fashion-style turnover in home goods, and significant waste. A handmade mosaic box, by contrast, is crafted to be kept and cherished for decades. The materials in quality kits are durable — glass, ceramic, and properly sealed grout will maintain their appearance for many years with minimal care — and the emotional value attached to a handmade piece makes it far less likely to be discarded than a cheap, mass-produced alternative. Choosing to make and give handmade gifts is a small but meaningful act of sustainable consumption.

Tips for Success and Common Mistakes to Avoid
Even with a well-designed kit and careful preparation, first-time mosaic crafters occasionally encounter challenges that can affect the quality of their finished work. Being aware of the most common pitfalls before you begin gives you a significant advantage and helps ensure your project turns out as beautifully as you envision. The single most common mistake beginners make is rushing the adhesive curing stage. It can be tempting to move straight to grouting once your tiles are placed and looking good, but if the adhesive has not fully cured, the weight and pressure of the grouting process can shift tiles out of position and ruin your carefully planned design.
Grout application is another stage where attention to detail pays significant dividends. Applying grout too sparingly means gaps between tiles will not fill completely, leaving weak spots that may crack or crumble over time. Applying too much grout and not cleaning it promptly while it is still workable can result in a stubborn haze on your tile surfaces that is extremely difficult to remove once dry. Working in manageable sections, maintaining the right grout consistency, and cleaning as you go are the key habits that distinguish a clean, professional result from a cloudy, uneven one.
Here are several additional practical tips that will help you achieve the best possible result with your mosaic keepsake box kit:
- Work in a well-ventilated space when using adhesive, grout, and sealant, as these products can emit fumes that cause irritation with prolonged exposure in enclosed environments.
- Protect your work surface with newspaper, a plastic sheet, or a silicone mat before beginning — mosaic projects are inherently messy at certain stages, and preparation saves significant cleanup time.
- Keep a damp cloth nearby throughout the tile placement stage so you can immediately clean any adhesive squeeze-up from tile surfaces before it dries and becomes difficult to remove.
- Allow extra drying time in humid or cold conditions, since both adhesive and grout take longer to cure when temperature and humidity fall outside the ideal ranges stated on product instructions.
- Photograph your progress at each stage so you have a record of the process to look back on, share with others, and learn from when planning your next mosaic project.
Finally, approach the entire project with patience and a spirit of creative exploration rather than rigid perfectionism. Mosaic art has an inherent organic quality that comes partly from the small imperfections and unique characteristics of hand-placed tiles. A slightly irregular grout line or a tile that sits fractionally higher than its neighbor does not diminish the beauty of the finished piece — in many cases, it enhances it by reinforcing that this is genuinely handmade work rather than a factory-produced imitation. Trust the process, enjoy each stage, and allow yourself to take pride in the remarkable object you are creating with your own hands.








What do you think?
It is nice to know your opinion. Leave a comment.