










How to Set Up a Craft Room That Feels Calm and Organized
There is something deeply satisfying about walking into a craft room that feels like it was made just for you — a space where everything has a place, the light is good, and creativity flows naturally the moment you sit down. For many crafters, however, the reality looks quite different: piles of fabric, tangled ribbon, mismatched storage bins, and a general sense of overwhelm that makes it hard to even begin a project. Setting up a craft room that genuinely feels calm and organized is not about achieving Instagram perfection. It is about building a functional, personal space that supports the way you actually work and create.
This guide will walk you through every stage of the process, from assessing your space and decluttering ruthlessly, to choosing the right furniture, storage systems, and lighting that will make your craft room a place you actually want to spend time in. Whether you are starting from scratch in a dedicated room or carving out a corner in a spare bedroom, the principles here will help you create a space that works beautifully for you.
Start With a Clear Vision for Your Space
Before you buy a single shelf or storage bin, take time to think carefully about what you actually need your craft room to do. This step is one that most people skip entirely, and it is precisely why so many craft rooms end up feeling chaotic within a few months. Ask yourself what types of crafts you do most regularly, whether you tend to work on one project at a time or juggle several, and whether you need space for a sewing machine, a cutting mat, a paint table, or all three. The answers will shape every decision that follows, from the size of your work surface to the number of drawers you need.
Think also about the mood you want the room to create. A calm craft room is not just a matter of tidiness — it has a lot to do with color, light, and the overall visual atmosphere. Some people work best surrounded by soft neutrals: white walls, natural wood tones, and linen storage baskets. Others thrive in a room with personality and color, where bright walls and patterned fabrics feel energizing rather than chaotic. Neither approach is wrong. What matters is that the space reflects your genuine aesthetic preferences, because a room you love to look at is a room you will be motivated to keep tidy.
Spend a few days collecting inspiration before you commit to anything. Save images that appeal to you — not just beautiful craft rooms, but any spaces that give you that calm, organized feeling you are after. Look for common threads in the images you gravitate toward. Is it the way light fills the room? The consistent use of one or two storage materials? The absence of visual clutter on the main work surface? Identifying these patterns will give you a clear design direction that feels coherent rather than cobbled together from too many different ideas.
It is also worth thinking practically about the flow of your workflow. Where do you start a project? Where does it live while it is in progress? Where do finished pieces go? Mapping out this sequence will help you arrange your room so that the things you reach for most often are closest to hand, and the items you use rarely are stored further away. A well-thought-out workflow is the invisible backbone of every great craft room.
Declutter Before You Organize
This cannot be overstated: organizing clutter is not the same as getting organized. If you try to create a calm, ordered craft room without first going through everything you own and making deliberate decisions about what stays, you will simply be rearranging the chaos into prettier containers. The decluttering stage is uncomfortable, but it is also transformative. Set aside a full day — or two, if your collection is substantial — and commit to going through every single item in your current craft space.
Sort your supplies into clear categories as you go: things you use regularly and love, things you use occasionally, things you have not touched in over a year, and things you have been keeping out of guilt or vague future intention. Be honest with yourself about that last category. Craft supplies have a particular emotional weight because they often represent projects you meant to start, skills you planned to develop, or gifts that felt too precious to use. Letting go of these items is not a failure — it is an act of self-knowledge that makes room for the crafting life you are actually living.
Once you have your keep pile, sort it by category rather than by project. Fabric goes with fabric, adhesives with adhesives, cutting tools with cutting tools. This sounds obvious, but many crafters organize by project instead, keeping all the supplies for a specific kit together. The problem with this approach is that it makes it very hard to see what you actually own across categories, which leads to buying duplicates and running out of things you thought you had. Category-based organization gives you a clear, honest inventory of your supplies at a glance.
Donate generously from your discard pile. Art and craft supply donations are warmly welcomed by schools, community centers, libraries, and youth programs. Knowing that your unwanted supplies will be used and enjoyed by someone else makes it much easier to let them go. You might also consider selling higher-value items online — specialty tools, unopened kits, or premium materials can recoup some of your investment and fund better storage solutions for the room you are building.
Choose Furniture That Works as Hard as You Do
The furniture in your craft room is doing a lot of heavy lifting, both literally and figuratively. A strong, spacious work surface is the foundation of everything else. Look for a table or desk that gives you enough room to spread out a full project without things falling off the edges. Ideally your main work surface should be large enough to accommodate your biggest regular task — whether that is cutting fabric, laying out a scrapbook spread, or assembling a large wreath — with additional space to keep your current tools close at hand without crowding the work itself.
Height is something crafters often overlook when choosing furniture. If you do a lot of cutting or detailed hand work, sitting at standard desk height for hours can put significant strain on your neck, shoulders, and wrists. Some crafters prefer a counter-height table that allows them to stand or use a tall stool, which naturally encourages better posture and reduces fatigue over long sessions. If you can, choose furniture that can be adjusted, or at least think carefully about the height that will work best for your specific crafts before committing to a piece.
Storage furniture should be chosen with the same care and specificity. Resist the temptation to fill your room with a mismatched collection of whatever shelves, drawers, and bins you can find cheaply or quickly. A more intentional approach — choosing two or three complementary storage systems and sticking with them — will create a much calmer visual environment. Cube storage units with a mix of open cubbies and drawer inserts are an excellent choice for many craft rooms because they are modular, adaptable, and can hold an enormous variety of supplies. Pegboards mounted on walls are another versatile and visually satisfying option.
Consider also whether you need any furniture specifically designed for the crafts you do. Quilters often benefit from a dedicated cutting table at standing height. Sewers need a space configured to accommodate the machine, a foot pedal, and enough room to feed fabric through without it bunching. Paper crafters often want flat storage for large sheets and a light-bright surface for tracing and die cutting. Investing in purpose-built or thoughtfully adapted furniture for your specific needs will pay dividends in comfort and efficiency every single time you sit down to create.
Build a Storage System That Actually Makes Sense
Good storage in a craft room is not about buying the most beautiful containers or filling every inch of wall space with shelving. It is about creating a system where every item has a logical home, where you can find what you need in seconds, and where putting things away is easy enough that you will actually do it at the end of every session. These three qualities — findability, accessibility, and easy return — are the hallmarks of a storage system that will stay organized over months and years rather than collapsing into chaos within weeks.
Begin by thinking in zones. Divide your room mentally into areas based on activity: a main work zone at your primary table, a cutting zone, a painting or messy-media zone if applicable, a sewing zone, and a storage zone for supplies not in active use. Arrange your storage so that supplies live near the zone where they will be used. Thread and bobbins live near the sewing machine. Adhesives and cutting tools live near the cutting mat. Paints and brushes live near the painting surface. This zoning approach dramatically reduces the friction of getting started on a project because you never have to cross the room to gather your supplies.
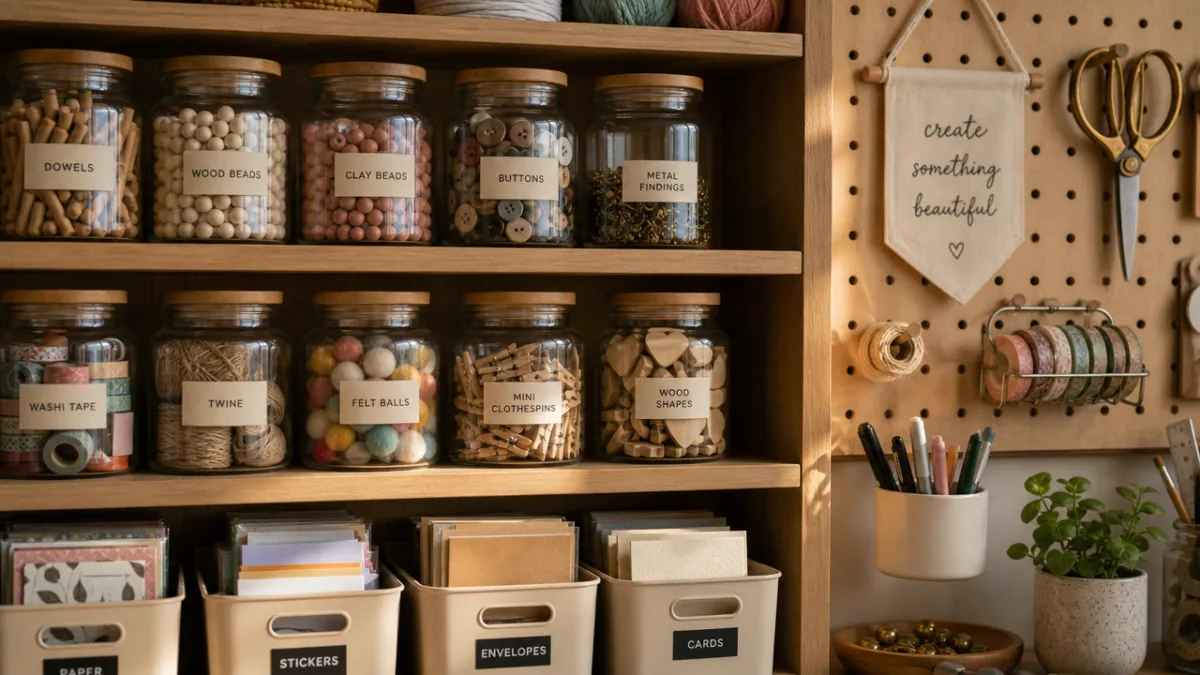
Within each zone, think carefully about visibility. Opaque storage looks tidy, but it can make it hard to find things without opening every drawer and box. A good craft room storage system usually combines clear containers for supplies you need to identify at a glance — beads, buttons, small tools, embellishments — with opaque storage for items you know well by their container’s label alone. Label everything without exception, even the things that seem obvious now. Six months from now, when you are in the middle of a project and your mind is elsewhere, those labels will save you enormous amounts of time and frustration.
Here are some storage solutions that work particularly well in craft rooms:
- Clear stackable bins with secure lids for fabric, yarn, and ribbon organized by color or fiber type, allowing you to see your collection at a glance without unfolding anything
- Lazy Susans on shelves or inside deep cabinets for paint bottles, adhesive tubes, and other tall or round items that tend to get lost at the back of shelves
- Pegboards with hooks, baskets, and small shelves for frequently used tools, keeping your work surface clear while keeping essentials within easy reach
- Deep, wide flat drawers for paper, cardstock, foam sheets, and large flat materials that become damaged when stored vertically or in cramped conditions
- Glass jars in a range of sizes for pens, markers, pencils, scissors, brushes, and other upright tools, which are easy to find and pleasingly visible on a shelf or worktop
- Over-the-door organizers with clear pockets for small notions, stickers, washi tape, and embellishments that tend to get lost in drawers
Whatever storage solutions you choose, build in a little extra capacity in each area. A storage system that is completely full has no room to absorb new supplies, and a system under that kind of pressure will collapse into disorder the moment you acquire anything new. Aim to keep each storage zone about seventy to eighty percent full, leaving room to breathe and to accommodate the natural growth of your collection over time without triggering a full reorganization.
Get Your Lighting Right
Lighting is the single most underestimated element of a functional craft room, and it is also one of the elements that most directly affects how calm and pleasant the space feels to work in. Poor lighting — whether it is too dim, too harsh, or simply the wrong color temperature — creates eye strain, makes colors look different than they actually are, and produces a low-level fatigue that can make even an hour of crafting feel exhausting. Good lighting, by contrast, makes the room feel inviting the moment you turn it on, makes detailed work easier and more accurate, and simply makes you want to stay and create.
Craft rooms ideally benefit from multiple types of lighting working together. Ambient lighting provides the general illumination for the whole room — ideally from overhead fixtures that distribute light evenly without creating harsh shadows. Task lighting provides focused, bright illumination exactly where you need it: above your main work surface, beside your sewing machine, and over any area where you do close-up detail work. Accent lighting is optional but can contribute significantly to the calm atmosphere of the space — a warm lamp in a corner, under-shelf lighting, or LED strips behind open shelving all add a sense of warmth and dimension that makes the room feel designed rather than merely functional.
Color temperature matters enormously in a craft space. Bulbs are rated on a scale from warm (around 2700K, which produces a yellow-orange glow similar to incandescent light) to cool (5000K and above, which produces a bright, bluish light similar to daylight). For most craft work, a color temperature in the range of 4000K to 5000K — often labeled as “cool white” or “daylight” — is ideal because it renders colors accurately and reduces eye strain during detailed work. However, for a warm, relaxing atmosphere in the parts of the room where you are not working directly, warmer bulbs or a combination of temperature zones can make the space feel more comfortable and less clinical.
If your craft room has a window, protect and maximize that natural light as thoughtfully as you can. Position your main work surface to take advantage of it, ideally so that the light falls from the side rather than directly in your eyes or behind you creating glare on your work. Use window treatments that can be adjusted rather than heavy curtains that block the light entirely — sheer roman shades, linen panels, or light-filtering roller blinds all diffuse and soften the light beautifully while still letting it fill the room. Natural light not only makes colors truest, it genuinely makes people feel better, more focused, and more energized during long creative sessions.
Maintain the Calm With Simple Daily Habits
A beautifully organized craft room will not stay that way on its own. The systems you put in place are only as effective as the habits you build around them, and the good news is that the habits required to maintain a calm craft room are simpler than most people expect. The most important one is also the most unglamorous: put things away when you finish using them. Not at the end of the week. Not when the room starts to bother you. At the end of each session. This single practice, repeated consistently, does more for the long-term organization of a craft space than any storage system or beautiful bin ever could.
Make the end-of-session tidy-up feel less like a chore by building it into the rhythm of your creative practice. Treat it as the closing ritual of each crafting session rather than as a penalty for making a mess. Set a timer for ten or fifteen minutes at the end of your work time, put on a podcast or some music, and make it pleasant. When putting things away is easy — because everything has a clear home and the storage system is logical — this closing ritual will take far less time than you expect and the room will reward you with its calm the next time you walk in.
Schedule a slightly deeper tidy-up once a month. During this session, look for supplies that have drifted away from their zones, labels that have fallen off, containers that have become overfilled, and any new supplies that have not yet been assigned a home. This monthly reset keeps small organizational drift from accumulating into a bigger problem, and it also gives you the chance to notice things that are not working as well as they should and adjust your system accordingly. Good organization is not a one-time event — it is an ongoing, gentle process of refinement.
Finally, be thoughtful about what you bring into the space. One of the most effective ways to keep a craft room calm and organized is to shop with intention rather than impulse. Before you buy new supplies, check what you already have. Ask yourself where the new item will live and whether you have the storage for it. Consider whether it serves a project you are genuinely planning to make in the near future, or whether it is wishful thinking in the form of a shopping cart. Building this kind of mindfulness around acquisition is not about restriction — it is about protecting the calm, functional space you have worked hard to create so that it continues to serve you beautifully for years to come.
A craft room that feels calm and organized is ultimately not a destination you arrive at once and maintain effortlessly forever. It is a practice, a relationship with your space that you tend over time. It is the pleasure of knowing where your scissors are. The ease of starting a project without first having to locate your supplies. The quiet satisfaction of a room that reflects your taste, respects your time, and makes room for the creativity that is, after all, the whole point.








What do you think?
It is nice to know your opinion. Leave a comment.