










15 Book Art DIY Ideas: Creative Ways to Transform Old Books into Beautiful Decor
Why Upcycling Old Books Is a Craft Worth Exploring
There’s something genuinely satisfying about rescuing a worn, forgotten book from the back of a shelf and turning it into something beautiful. Instead of letting old paperbacks and hardcovers collect dust or end up in a landfill, book art gives them a whole new purpose — as conversation pieces, decorative objects, and little reflections of your own creativity. This crafting world has really taken off in recent years, and it makes sense: it sits right at the intersection of a love for books, a desire for handmade decor, and a growing interest in sustainability.
The good news is that book art is genuinely accessible, no matter where you’re starting from. Whether you’ve been crafting for years or you’ve never touched a glue gun in your life, there are projects in this space that fit your skill level and will push you just enough to keep things interesting. Materials are often inexpensive or completely free — think thrift store finds, library sales, or that stack of books you’ve been meaning to clear out for three years. That’s a big part of why book art is such a great way to freshen up your home without spending much at all.
There’s also something a little deeper going on with this craft that I think is worth mentioning. Books carry so much with them — stories, ideas, the sense of all the hands that held them before yours. When you fold or carve or paint their pages into something new, you’re not destroying any of that. You’re just adding to it. A lot of people find that working with books this way actually makes them more appreciative of physical books in general. There’s a mindfulness to it that you don’t always get from other crafts, and that’s part of what makes it stick.
Folded Page Art: The Classic Book Sculpture Technique
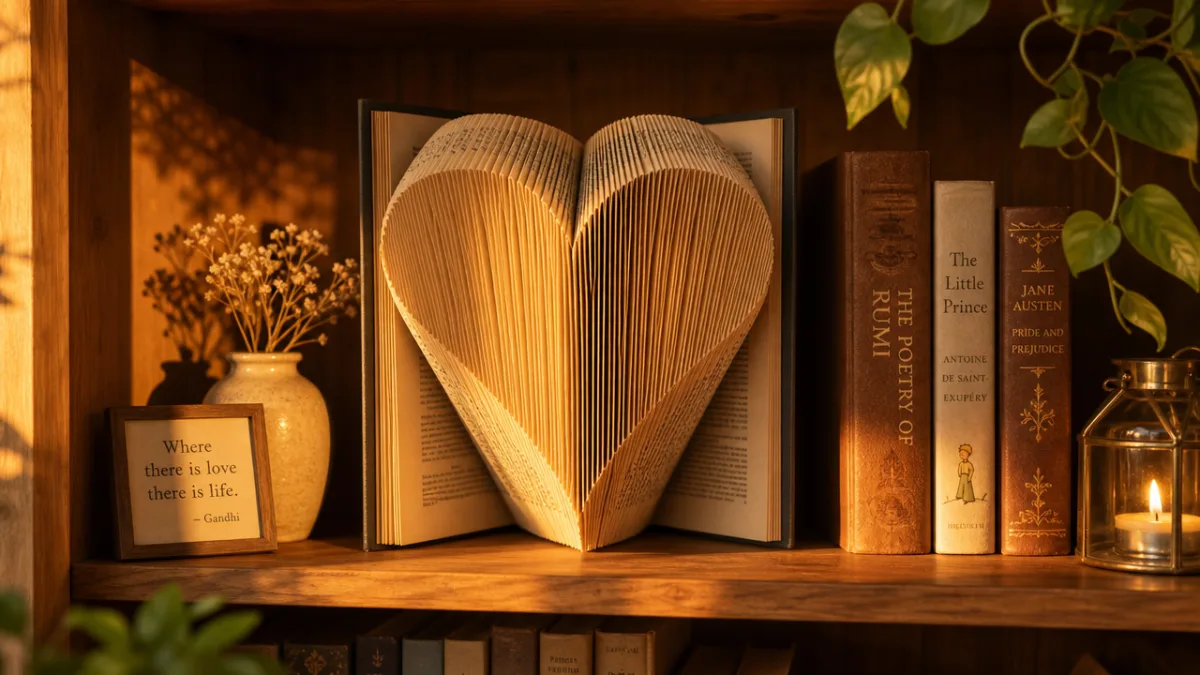
If book art has a signature technique, it’s probably book folding. The idea is simple to grasp but genuinely impressive in practice: you fold the individual pages of a hardcover book in precise, repeating patterns until a three-dimensional shape, word, or image appears from the spine. Stand one of these finished pieces upright on a shelf and it has an almost architectural quality — geometric, clean, and somehow elegant for something made entirely out of paper folds.
To get started, you’ll want a book with a good page count, since more pages give you more to work with and open up more complex designs. Beginners typically start with hearts, Christmas trees, or a meaningful year in numbers. More experienced folders move on to full words, animal silhouettes, and intricate geometric mandalas. You can find downloadable templates all over the internet that tell you exactly which pages to fold and at what measurements, which makes the learning curve a lot friendlier than the finished results might lead you to believe.
What a lot of people love about this technique is how meditative it feels. Each fold is small and deliberate, and after you’ve done dozens or even hundreds of them, something remarkable has taken shape in front of you. You can leave the finished sculpture in its natural cream and ivory tones for a clean, minimalist look, or hit it with a wash of watercolor or a quick coat of spray paint if you want more color and drama. Display it on a floating shelf, inside a shadow box, or as the centerpiece of a coffee table arrangement — it tends to stop people in their tracks.
Book Page Wreaths and Wall Hangings
Book pages — with their warm cream color and the visual texture of printed text — are surprisingly versatile crafting material. One of the most popular things you can make with them is a book page wreath, built by rolling, folding, or fanning individual pages into flower shapes and then gluing those flowers onto a wire or foam wreath frame. The finished result looks intricate and expensive, and it costs almost nothing. These wreaths photograph beautifully and make genuinely thoughtful gifts, the kind that people can immediately tell took real time and care.
Making the basic book page flower is pretty straightforward. You’ll need scissors, a hot glue gun, a pencil or skewer for rolling, and a circular template for cutting your page rounds. Roll each circle from the outer edge toward the center to create a cone-like petal shape, glue the base, and then cluster several together into a full bloom. Varying the size of your circles gives you flowers at different scales, which adds depth and a more natural, garden-y look to the finished wreath.
But wreaths are just the beginning when it comes to book page wall art. You could frame pages stamped with botanical prints, string origami cranes folded from pages on a length of thread, or decoupage pages directly onto canvas to create layered abstract backgrounds. You can even tear pages into irregular strips and collage them over a painted canvas for a mixed-media piece that really does feel like it bridges literature and visual art. The text of the pages becomes part of the visual, adding a kind of quiet intimacy — like your wall decor is always whispering something.
Carved Book Sculptures: Turning Pages Into Three-Dimensional Art
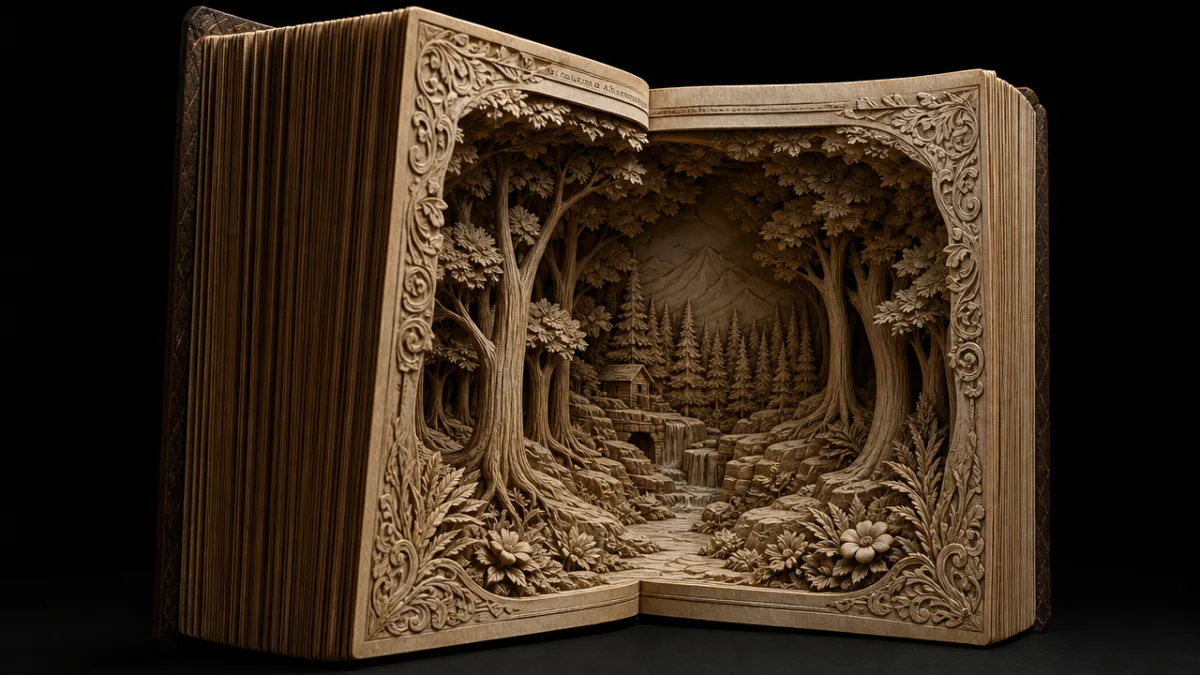
Carved book art is where things get genuinely breathtaking. The technique involves carefully cutting through the pages of a book with a craft knife to reveal a three-dimensional scene, landscape, or form hidden within its depth. It’s slow, precise work that demands a steady hand and real patience — but when it comes together, the effect is extraordinary. Miniature worlds seem to emerge from the book as though the story inside has physically broken free from the page. These pieces are some of the most striking literary-inspired art you can make or display.
Common subjects include forests with layered trees receding into the distance, architectural elements like arches and staircases, animals in profile, and natural forms like mountains or waves. The basic process works by drawing your design onto the top page and then cutting through successive layers, removing a little more material with each one to build up depth and perspective. A lot of crafters trace the design using a light box or a sunny window before they start cutting, which helps keep things consistent as you work down through the pages.
If full carving feels like too much to take on right away, there’s a gentler variation called tunnel book art that gives you a similar feeling of depth with a lot less cutting involved. Instead of carving individual pages, you cut progressively smaller windows through sections of pages to create a layered diorama effect when the book is propped open at an angle. Either way, both techniques produce work that deserves to be displayed properly — inside a shadow box or under a glass dome to protect the delicate paper, and ideally lit from behind or below with a small LED light, which makes them look genuinely magical in the dark.
Book Decoupage and Painted Book Projects
Decoupage and paint open up a lot of creative territory when it comes to old books. Decoupage — layering cut paper or images onto a surface and sealing everything with varnish — works beautifully on book covers. A battered, outdated hardcover decoupaged with botanical illustrations, map fragments, or vintage sheet music becomes something entirely new: an object that feels curated and intentional rather than just salvaged. Stack three or five of them on a coffee table or bookshelf and you’ve got a display that looks like it took real thought to put together.
Painted books offer even more expressive freedom. You might paint a cover in a rich jewel tone — deep emerald, cobalt blue, burgundy — to pull together a room’s color palette. You might paint the closed page edges in metallic gold or silver, a technique called fore-edge decoration that actually has a long history in traditional bookbinding. Or you might do something more playful, like painting a continuous watercolor landscape across dozens of sequential pages so that the full image only appears when the book is fanned open, creating a piece that genuinely invites interaction.
If you’re drawn to words and typography, stenciling quotes, numbers, or letters across a series of books is a great way to create a cohesive, personal display. Arrange them spine-out with the text painted on the page edges, or face them outward on a floating shelf like a gallery installation. Black and white reads as graphic and modern; pastels with hand-painted lettering feel more romantic and cottagecore. Either way, there’s something conceptually satisfying about using a book — already a vehicle for language — as a canvas for more words.
Functional Book Art: Hollow Book Safes, Planters, and More
Some of the most rewarding book art projects are the ones that actually do something. The hollow book safe is the classic example — a hardcover with its pages glued together and a cavity cut into the center, creating a hidden compartment for small valuables, jewelry, or keepsakes. These make wonderful gifts, especially when you pick a book whose title or subject means something to the person receiving it. Sitting on a shelf among real books, a hollow book safe is completely undetectable, which is honestly a big part of its charm.
Book planters have also become a real favorite, riding alongside the broader houseplant obsession of recent years. You hollow out a hardcover the same way you would for a safe, seal the interior with waterproof varnish or a plastic liner, and plant a small succulent, air plant, or trailing vine inside. The contrast between the living plant and its literary vessel is visually striking, and these planters look great on desks, windowsills, and bookshelves. They do take a bit of care to keep moisture from damaging the paper, but the look is worth it.
Beyond safes and planters, there are quite a few functional objects you can build from old books. Here are some popular ones that crafters have figured out over the years:
- Book lamp bases: Stack and glue a column of hardcovers, thread a lamp kit through the center, and you’ve got a table lamp that’s equal parts functional and sculptural — the kind of thing people ask about immediately when they see it.
- Book clock: Mount a clock mechanism through the center of a hardcover and hang it on the wall. It keeps time and doubles as a conversation piece that’ll confuse people until they look closer.
- Book box with lid: Hollow out two matching books and connect them with a hinge to create a keepsake box that looks, at a glance, like a stacked pair of books sitting on a shelf.
- Bookend sculptures: Fix a pair of hardcovers in interesting open positions using wire and adhesive to create sculptural bookends with real personality — far more interesting than anything you’d buy at a store.
- Page garland: Fold or roll individual pages into pennant shapes and string them on twine for a whimsical garland that works in a nursery, home office, or party setting.
What makes functional book art so satisfying is that it democratizes the idea of bespoke, handcrafted home furnishings. A book lamp or clock doesn’t require woodworking skills or expensive equipment — just patience, some basic craft supplies, and a willingness to look at familiar materials differently. These are true conversation starters: the kind of objects that make visitors stop, lean in, and ask “wait, is that a book?” And in that moment, the book is still doing what it was always meant to do — pulling people in and making them want to know more.
Tips for Sourcing Books and Getting Started with Your First Project
Finding books for art projects is easier and cheaper than most beginners expect. Thrift stores, garage sales, library book sales, and secondhand shops are all great options, and you’ll typically pay anywhere from twenty-five cents to a couple of dollars per book. For carving or folding projects, look for hardcovers with at least two hundred pages and paper that isn’t too thin or brittle. Books from the mid-twentieth century are often ideal — the pages tend to have a warm, aged tone that adds character, and the covers are usually solid and well-made.
Before you dive in, it’s worth taking a few minutes to set up your workspace and gather your supplies so the actual creative process isn’t interrupted by scrambling for tools. The basics you’ll want on hand include a self-healing cutting mat, a sharp craft knife with spare blades, a metal ruler for clean straight cuts, a good hot glue gun, Mod Podge or a similar decoupage medium, and some watercolor or acrylic paints for finishing. Having these things ready from the start makes the whole experience smoother and the results more polished.
If this is your first time trying book art, start with a simple folded page heart or a small book page wreath. These projects get you comfortable with the core skills — folding, gluing, working with pages as a medium — without asking too much of you in terms of precision or time. From there, you can build toward more ambitious things like carved sculptures or functional hollow books as your confidence grows. The most important thing, honestly, is just to start. Handle the materials with curiosity, let yourself experiment, and don’t worry too much about perfection. Even a slightly imperfect folded book sculpture or lopsided paper wreath carries something a store-bought object never could — the warmth of having been made by hand, by you, for your space.








What do you think?
It is nice to know your opinion. Leave a comment.