










Quick Crochet Wine Bottle Cover: A Complete Guide to Creating Beautiful Handmade Bottle Wraps
Introduction to Crochet Wine Bottle Covers
Crochet wine bottle covers are one of the most satisfying and practical projects a crafter can take on, whether you are a complete beginner picking up a hook for the first time or a seasoned artisan looking for a quick weekend project. These charming textile wraps transform an ordinary bottle of wine into a thoughtful, personalized gift that recipients will treasure long after the bottle is empty. Unlike many crochet endeavors that can take weeks to complete, a wine bottle cover can often be finished in just a single evening, making it the perfect solution when you need a handcrafted present in a hurry.
The appeal of crocheted bottle covers extends far beyond their speed of construction. They serve a genuinely functional purpose, providing insulation that helps keep chilled wines at their ideal temperature for longer periods during transport or outdoor entertaining. The textured fabric also offers a comfortable grip on what can otherwise be a slippery glass surface, reducing the risk of accidental drops at parties and gatherings. From a purely aesthetic standpoint, a beautifully crafted cover elevates the presentation of any bottle, signaling to the recipient that genuine care and effort went into their gift.
What makes these projects especially accessible is the minimal investment required to get started. A single skein of bulky yarn, one crochet hook, a pair of scissors, and a yarn needle are essentially all the tools you need to produce a finished cover. This low barrier to entry means that even crafters on tight budgets can create gifts that look and feel luxurious. As you grow more confident, you can experiment with more expensive specialty yarns, decorative embellishments, and intricate stitch patterns that push the humble bottle cover into the realm of genuine wearable art.
Materials and Tools You Will Need
Selecting the right yarn is the single most important decision you will make when beginning a wine bottle cover project. For quick projects, bulky or super bulky weight yarns are your best friends, as their generous thickness means fewer stitches are required to cover the same surface area compared to lighter weights. Acrylic yarns are a popular first choice because they are affordable, machine washable, and available in an enormous range of colors. However, cotton yarns deserve serious consideration for bottle covers because they are naturally moisture-wicking and have a beautiful drape that showcases stitch definition exceptionally well.
Your hook size should be chosen to match your yarn weight and achieve the correct gauge for your pattern. For bulky yarns, hooks in the range of 5mm to 6.5mm are typical, while super bulky projects might call for anything from 8mm to 10mm or even larger. Using a hook that is slightly larger than recommended by the yarn label is a common technique among experienced crafters, as it creates a more relaxed, open fabric with a softer hand. Always make a small gauge swatch before beginning your actual project if sizing is important, especially if you plan to use the cover as a fitted sleeve rather than a decorative wrap.
Beyond yarn and hooks, a few additional tools will make your project go more smoothly from start to finish. A yarn needle with a large eye is essential for weaving in your ends neatly and invisibly, which is the hallmark of a professionally finished piece. Stitch markers help you keep track of round beginnings when working in the round, preventing the gradual drift that can cause your cover to spiral unattractively. Scissors with sharp, pointed tips allow you to cut yarn cleanly close to your work. Optional but helpful additions include a tape measure for checking dimensions against your bottle, and locking stitch markers for counting rows in complex stitch patterns.
- Yarn: Bulky or super bulky weight in your preferred fiber, approximately 50 to 100 yards depending on pattern complexity
- Crochet hook: Size 5mm to 9mm depending on yarn weight and desired drape
- Yarn needle: Large-eye tapestry needle for finishing ends
- Stitch markers: Locking type preferred for working in the round
- Scissors: Sharp embroidery or craft scissors
- Tape measure: For checking sizing against your bottle

Understanding Basic Stitches for Bottle Covers
The foundation of virtually every wine bottle cover pattern is a small collection of fundamental crochet stitches that every crafter should feel comfortable executing before beginning. The single crochet is the most basic of all stitches, creating a tight, dense fabric that works beautifully for structured covers that hold their shape well against the bottle. Double crochet stitches work up significantly faster because of their greater height, making them the go-to choice when speed is a priority. Understanding how these two stitches behave and interact will allow you to make intelligent decisions about which to use in any given project.
Working in the round is the technique most commonly used for bottle covers, since a wine bottle is essentially a cylindrical shape. Beginning with a magic ring or a foundation chain joined into a circle, you will build upward in continuous rounds that naturally form a tube of fabric. The key challenge when working in the round is maintaining consistent tension, as inconsistencies become visible when the fabric is stretched around a smooth, round surface. Many experienced crafters recommend using a slightly tighter grip than you might use for flat projects, which helps create a cover that snugly hugs the bottle rather than bagging loosely around it.
Several decorative stitch patterns add texture and visual interest without significantly increasing the difficulty level of a beginner project. The shell stitch, formed by working multiple double crochets into a single stitch, creates a beautiful fan-like motif that repeats rhythmically around the bottle. The moss stitch alternates single crochet and chain stitches to produce a woven, linen-like texture that looks remarkably sophisticated for the minimal effort involved. Bobble stitches create three-dimensional raised bumps across the surface of the fabric, adding tactile interest that makes the finished cover irresistible to touch. Even a simple ribbed pattern created by working into the back loop only of each stitch gives your cover a structured, elastic quality.
Step-by-Step Pattern Instructions
Before casting on a single stitch, take a moment to measure the wine bottle you intend to cover. A standard 750ml wine bottle has a circumference of approximately 10 to 11 inches at its widest point and stands about 12 inches tall. The body of the bottle from base to where the neck begins is typically around 8 to 9 inches. These measurements will guide how many foundation stitches to chain and how many rounds to work before you begin the decreases that shape the cover around the narrowing shoulder of the bottle. If you are working with a non-standard bottle such as a Champagne magnum or a squat Burgundy-style bottle, adjust your measurements accordingly.
To begin a basic cylindrical cover, create a magic ring and work 8 single crochets into the ring, then pull the tail to close the center opening tightly. In the second round, work 2 single crochets into each stitch for a total of 16 stitches, which begins to form the flat circular base of your cover. Continue increasing in every other stitch in the third round to reach 24 stitches, then work one round even without increases to consolidate your base. At this point your circle should measure approximately 3.5 to 4 inches in diameter, closely matching the bottom of a standard wine bottle. From here, you will work even rounds straight upward to form the cylindrical body of the cover.
Once your cover reaches the desired height for the body of the bottle, you will work a series of graduated decrease rounds to shape the fabric around the shoulder where the bottle narrows toward the neck. Decrease rounds typically involve working single crochet 2 together stitches at regular intervals, reducing your stitch count by a controlled amount each round. After completing the shoulder shaping, many patterns end with a simple border of single crochet or slip stitches around the opening, which creates a clean finished edge. Alternatively, you can add a decorative picot border, a row of shell stitches, or attach a ribbon tie to give your cover a more polished, gift-ready appearance.
- Create a magic ring and work 8 single crochets into the ring, then pull tight to close the center.
- Round 2: Work 2 single crochets into each stitch to reach 16 total stitches.
- Round 3: Alternate between 1 single crochet and 2 single crochets in same stitch to reach 24 stitches.
- Round 4: Work one even round without increases to set the base shape.
- Rounds 5 through 18: Work even rounds of single crochet straight upward to form the body.
- Rounds 19 through 22: Begin decrease rounds to shape the shoulder, reducing stitch count gradually.
- Final round: Add a decorative border stitch or slip stitch edge to finish the opening neatly.
- Weave in all ends securely using your yarn needle and block lightly if needed.
Creative Variations and Personalization Ideas
One of the greatest joys of making crochet wine bottle covers is the nearly limitless scope for personalization and creative expression. Color is the most immediately impactful variable you can play with, and the range of possibilities extends far beyond simply choosing a favorite shade. Striped covers made by changing yarn colors at regular intervals produce a crisp, graphic look that appeals to modern sensibilities. Gradient or ombre effects, achieved by gradually transitioning from one color to another using carefully planned yarn changes or specially dyed gradient skeins, create a softer, more romantic aesthetic. For holiday-themed gifts, consider classic combinations like red and white for Valentine’s Day, orange and black for Halloween, or cream and gold for elegant winter celebrations.
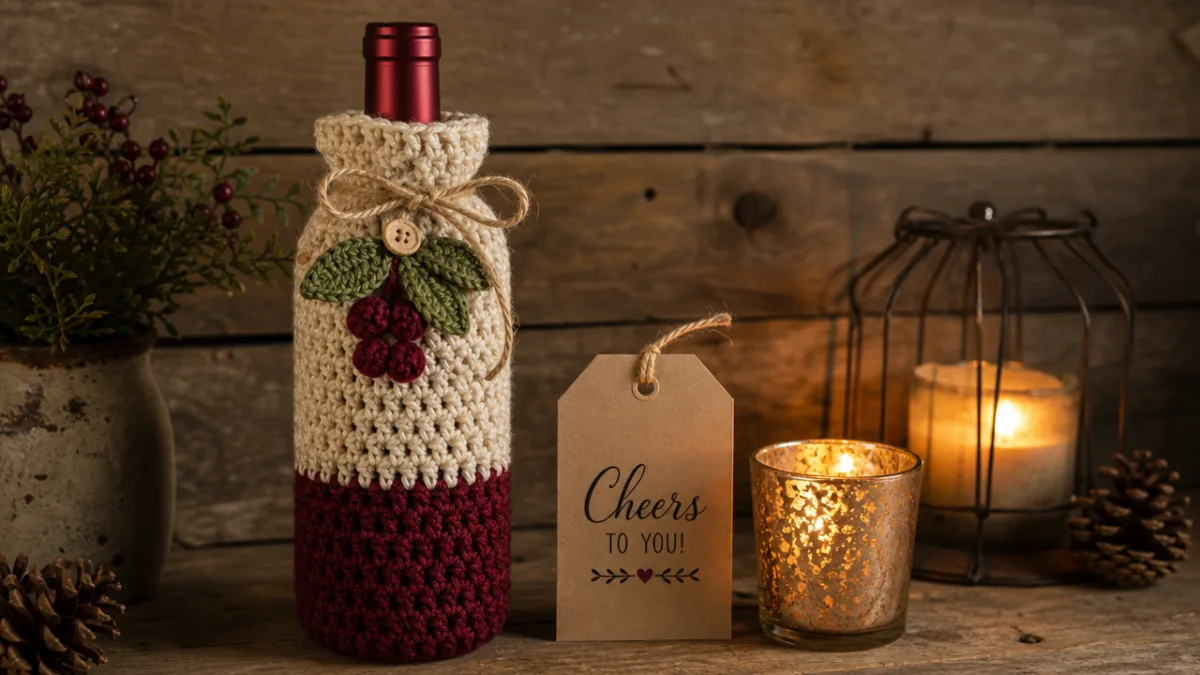
Embellishments attached after the main body is complete offer another dimension of creative opportunity. Crocheted flowers worked separately and then stitched onto the surface of the cover add a charming botanical quality that is enormously popular for wedding and baby shower gifts. Buttons sourced from vintage shops or specialty craft stores can be used both decoratively and functionally, serving as closures for covers with a button-loop opening at the top. Satin ribbon woven through a row of chain-stitch eyelets near the top of the cover creates a drawstring closure that also serves as a decorative bow when the cover is in use. For a rustic or farmhouse aesthetic, lengths of jute twine or leather cord work beautifully as an alternative to ribbon.
Texture modifications can transform the same basic pattern into something that looks entirely different. Switching from single crochet to a combination of front and back post double crochets creates a deeply ribbed, cable-adjacent texture with remarkable depth and dimension. Surface slip stitching, a technique where you add decorative lines of stitching onto a finished fabric, allows you to draw geometric patterns, leaf shapes, or even simple pictograms onto the surface of your cover without requiring any advanced colorwork skills. For crafters comfortable with tapestry crochet techniques, simple geometric patterns like chevrons, diamonds, or Scandinavian-inspired folk motifs worked in two contrasting colors add a sophisticated artisanal quality to the finished piece.
Gifting, Packaging, and Presentation Tips
A handmade crochet wine bottle cover already transforms a simple bottle of wine into something genuinely special, but thoughtful presentation can elevate the gift even further. Sliding the cover onto the bottle and tying a length of ribbon or twine around the neck of the bottle just above where the cover ends creates a cohesive, intentional look. Adding a handwritten gift tag that includes a note about the cover being handmade, the fiber content of the yarn, and any care instructions makes the gift feel more personal and practical. Some crafters include a small card with the pattern name and a suggestion that the recipient reuse the cover for future gifting, extending the life and meaning of the piece.
Pairing your covered bottle with complementary items creates a truly impressive gift basket experience. A bottle wrapped in a richly textured cover looks beautiful nestled alongside a set of wine glasses, a quality corkscrew, a packet of artisan crackers, or a small selection of chocolates. For more intimate or romantic occasions, adding a tea light candle and a small bouquet of dried flowers ties the whole presentation together with a cohesive color palette and aesthetic sensibility. The cover itself can double as the wrapping, eliminating the need for tissue paper or gift bags and making your present both beautiful and environmentally conscious.
If you enjoy making these covers regularly, consider producing them in small batches so you always have a handmade gift ready when an unexpected occasion arises. A stash of five or six finished covers in neutral colors like ivory, gray, and navy means you are never caught without something thoughtful to give at a dinner party, a housewarming, or a holiday gathering. Storing finished covers flat in a drawer or hanging them from a hook in your craft room keeps them accessible and serves as an attractive display of your work in progress. Over time, developing a signature style or a recognizable stitch pattern that you consistently use across your covers creates a cohesive personal brand that friends and family will come to associate specifically with your handcraft.
- Attach a handwritten tag with fiber content, care instructions, and a personal note from the maker
- Pair with complementary accessories such as wine glasses, chocolates, or artisan crackers for a complete gift basket
- Use the cover itself as eco-friendly gift wrap, eliminating the need for paper or plastic packaging
- Produce covers in small batches to maintain a ready supply for spontaneous gifting occasions
- Develop a signature stitch or color combination that becomes your recognizable personal style
Troubleshooting Common Problems and Helpful Tips
Even experienced crocheters encounter challenges when working on bottle covers, and knowing how to diagnose and correct common issues will save you considerable frustration. One of the most frequently encountered problems is a cover that comes out too large and loose, drooping off the bottle rather than fitting snugly. This usually results from working with too large a hook relative to your yarn weight, or from maintaining looser tension than the pattern assumes. The easiest fix is to go down one or two hook sizes and work another swatch to check the fit before committing to the full project. If you have already completed the cover, washing and drying it according to the yarn’s care instructions will often cause slight shrinkage that improves the fit.
The opposite problem, a cover that is too tight to slide onto the bottle, typically results from overly tight tension or using a hook that is too small. Crochet fabric has natural stretch, but if you are fighting to get the cover over the widest part of the bottle, you risk distorting the stitches and misshaping the piece. Going up a hook size is the most straightforward solution, but you can also try working your stitches more loosely by consciously relaxing your grip on both the hook and the yarn. If your gauge is significantly off in both directions at different points in the same piece, inconsistent tension is the likely culprit, and the solution is simply more practice and conscious attention to maintaining evenness throughout.
Twisted or spiraling covers are another common frustration when working in continuous rounds. This twisting occurs when the beginning and end of each round drift slightly, creating a visible diagonal line that spirals around the body of the cover. Using a stitch marker to clearly identify the first stitch of each round is the primary preventive measure, and some patterns suggest joining each round with a slip stitch and turning the work to create a seam rather than working in a continuous spiral. Blocking the finished cover by wetting it thoroughly, shaping it around the actual bottle, and allowing it to dry completely resolves minor distortions and is an excellent finishing step for any crochet project intended as a gift.
For crafters who want to progress beyond basic patterns, there is a wealth of learning resources available in multiple formats to support continued skill development. Video tutorials on platforms like YouTube allow you to watch a stitch being executed in real time, pausing and rewinding as needed, which is often more helpful than written instructions alone for visual learners. Crochet communities on social media platforms and dedicated fiber arts websites offer pattern libraries, user-submitted modifications, and active forums where you can ask questions and receive advice from more experienced crafters. Investing in one or two quality reference books on crochet techniques will give you a reliable, authoritative resource to consult whenever you encounter an unfamiliar stitch or construction method. With patience, practice, and the support of the broader crochet community, you will quickly find that what once seemed like a challenging technical skill becomes second nature, opening up an entire world of creative possibilities limited only by your imagination and the depth of your yarn stash.








What do you think?
It is nice to know your opinion. Leave a comment.