










Introduction to Crochet Charts: Understanding the Visual Language of Crochet
Crochet charts are a universal visual language that transcends written pattern instructions, allowing crafters from any country or language background to follow the same design with confidence. Unlike written patterns that describe each stitch in words, charts use symbols arranged on a grid to show exactly where and how each stitch is worked. For beginners and experienced crocheters alike, learning to read these charts opens up an entirely new world of patterns, textures, and creative possibilities that might otherwise feel inaccessible or intimidating.
The beauty of crochet charts lies in their visual nature. When you look at a well-drawn chart, you can often see the shape of the finished fabric taking form right before your eyes. Each symbol corresponds to a specific stitch, and together those symbols create a map of your project. Whether you are working flat in rows or in the round, whether you are making a delicate doily or a textured blanket, charts give you a bird’s-eye view of the entire construction process that a written pattern simply cannot replicate with the same clarity.
Getting comfortable with crochet charts does require some initial investment of time and attention, but the effort pays enormous dividends. Once you understand the logic behind chart symbols, reading them becomes second nature, almost like reading musical notation. In this article, we will focus specifically on one of the most beloved and visually striking stitches in the crochet world: the bobble stitch. By the end, you will know exactly how to identify it on a chart and how to execute it with confidence in your own projects.
What Are Crochet Chart Symbols?
Chart symbols are standardized icons that represent individual stitches or stitch combinations. International bodies and publishers have worked to align these symbols over the decades, though slight variations still exist between American and European conventions. The most commonly used symbols follow guidelines set by the Craft Yarn Council, and most modern patterns published in English adhere closely to these standards. When you pick up a pattern book or download a chart online, a symbol key is almost always included nearby to help you decode any unfamiliar icons.
The chain stitch, for example, is typically shown as a small oval or oblong shape. A single crochet appears as a short cross or plus sign. A double crochet is depicted as a taller symbol with a horizontal bar through its stem, representing the yarn-over that differentiates it from a single crochet. As stitches become more complex, their symbols become more elaborate, but they are always designed to give a visual hint of what the stitch looks like when worked in real yarn. This intuitive design philosophy makes charts remarkably learnable even without a teacher.
Cluster stitches, shells, and specialty stitches like the bobble all have their own distinctive symbols. These are often shown as fan shapes, grouped lines, or puffed icons that echo the physical appearance of the stitch when crocheted. Learning to associate these symbols with their physical counterparts in your crocheted fabric is the key to fluency. Keep a symbol key or a reference card nearby as you practice, and do not be discouraged if it takes a few sessions before recognition becomes automatic and effortless.
What Is the Bobble Stitch and Why Does It Matter?
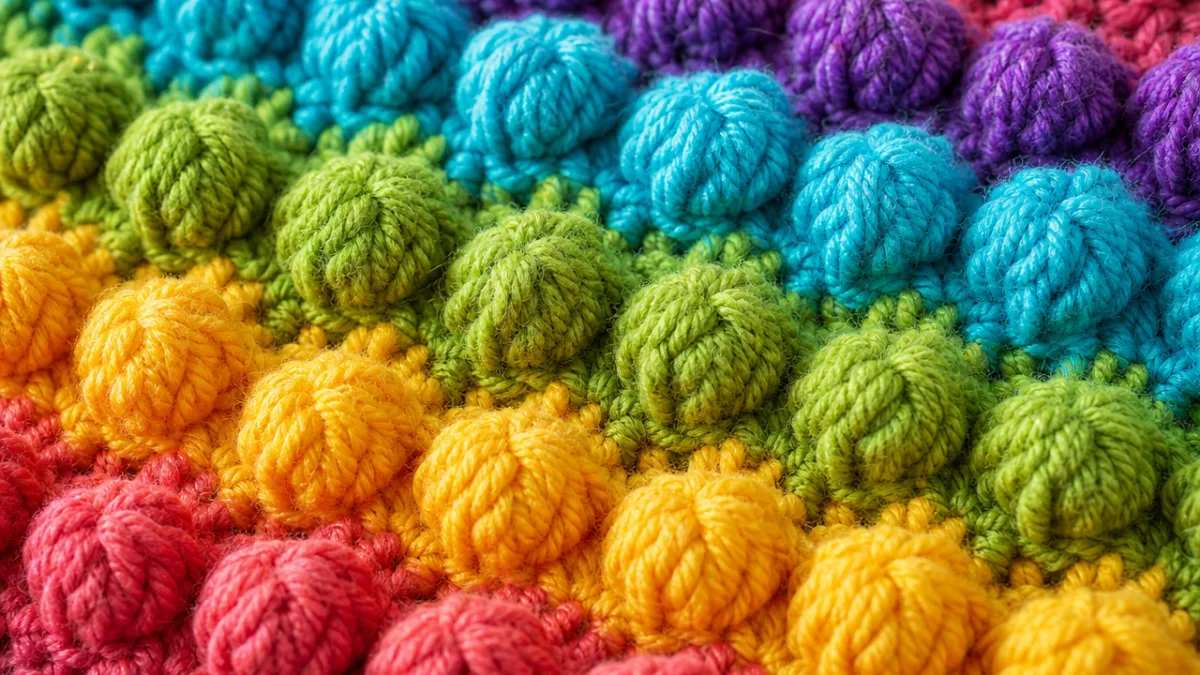
The bobble stitch is one of the most satisfying texture stitches in all of crochet. It creates a raised, rounded bump on the surface of the fabric, resembling a small three-dimensional ball or bubble sitting proudly on an otherwise flat field of stitches. This three-dimensional quality makes it extraordinarily popular for blankets, bags, cushion covers, baby items, and any project where visual interest and tactile texture are desired. The bobble adds depth and dimension that flat stitches simply cannot achieve on their own.
A standard bobble stitch is made by working several incomplete double crochets into the same stitch or space and then drawing the yarn through all remaining loops on the hook at once. The number of double crochets used can vary between three and five depending on the pattern, with five being the most common for a full, rounded bobble. When you complete that final yarn-through, all the partially worked stitches collapse together at their tops, creating that characteristic rounded bump that pops forward from the fabric. It is one of those stitches that feels almost magical the first time you make it.
The bobble stitch is closely related to other cluster-type stitches such as the puff stitch and the popcorn stitch, and beginners sometimes confuse them. The key distinction is technique: a puff stitch uses half double crochets with a yarn over pull-up method, while a popcorn is worked as complete double crochets that are then folded and joined. The bobble uses incomplete double crochets all joined at the top, giving it a slightly firmer, more compressed profile than a puff but a flatter silhouette than a popcorn. Understanding these differences helps you read charts more precisely and execute each stitch correctly.
Common Uses for the Bobble Stitch in Projects
Crocheters reach for the bobble stitch whenever they want to add serious visual texture to a project. It appears in allover bobble blankets where every other stitch or every alternate row is a bobble, creating a richly patterned surface that looks impressively complex but is surprisingly achievable once the stitch is mastered. Baby blankets especially benefit from the bobble’s soft, rounded texture, which is gentle against delicate skin and visually adorable in pastel or neutral color palettes.
Market bags and tote bags made in the bobble stitch have become a staple of craft fairs and handmade gift culture. The texture created by rows of bobbles gives these bags structural interest and a professional, boutique appearance that stands out from simpler mesh or single-crochet designs. The stitch also appears in decorative pillowcase fronts, where the three-dimensional texture creates a luxurious, artisan quality. Hat patterns sometimes incorporate bobbles as focal accents or all-over texture, adding personality and dimension to an otherwise simple construction.
Beyond home décor and accessories, the bobble stitch has found a place in garment construction, particularly in boho-style cardigans, vests, and crop tops. When worked in a fine cotton or bamboo yarn, bobbles add interest without excessive bulk, making them wearable and elegant rather than chunky. Seasonal decorations like pumpkins, Christmas ornaments, and Easter eggs can be crocheted almost entirely in bobble stitches to mimic a textured, artisan look. The versatility of this single stitch across so many project categories is a testament to its enduring popularity.
How to Read the Bobble Stitch on a Crochet Chart
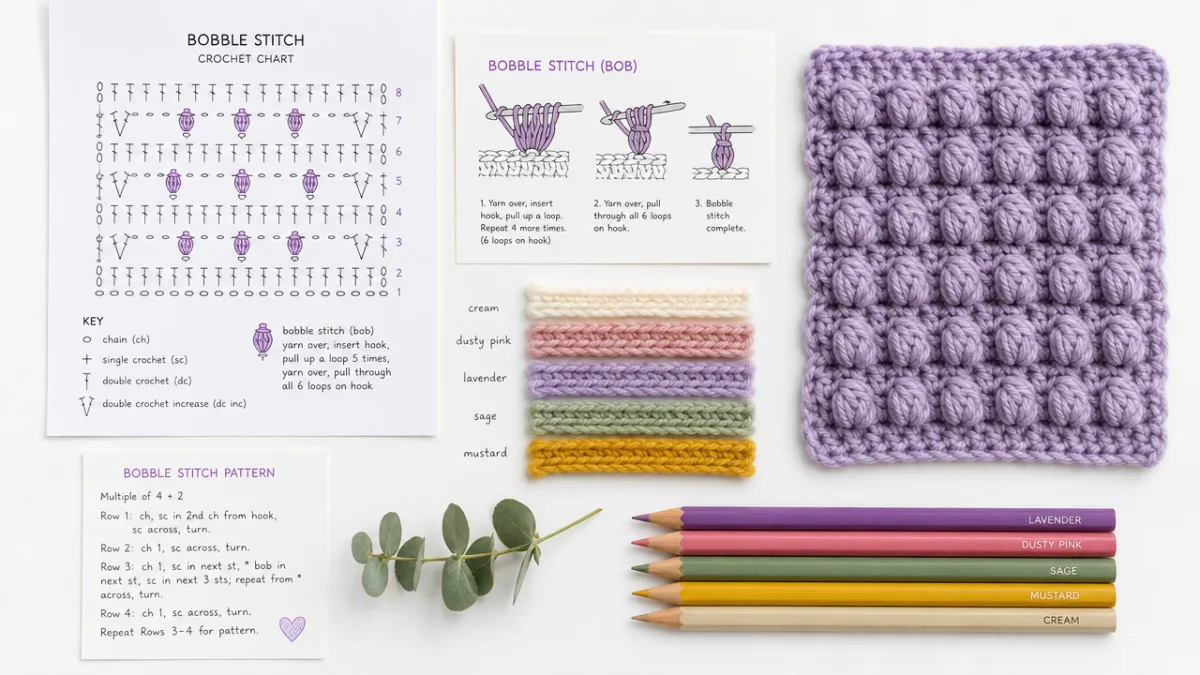
On a crochet chart, the bobble stitch is typically represented by a symbol that visually suggests the rounded, clustered nature of the stitch itself. The most common representation is a series of vertical lines or teardrop shapes that fan out from a shared base and converge at a shared top, enclosed within a shape that mimics the rounded bubble form. Some publishers use a simple filled oval or a petal-like cluster symbol, and the exact appearance can vary, which is why always consulting the pattern’s symbol key is an essential habit every crocheter should develop.
When you locate a bobble symbol on a chart, pay attention to where it sits in relation to the stitches around it. The base of the bobble symbol will be anchored to the stitch or chain space below it, indicating exactly where to insert your hook to begin working. The top of the symbol will connect to the chain or stitch above it, showing how the completed bobble integrates into the flow of the row or round. Charts are typically read from bottom to top and from right to left for right-handed crocheters working flat rows, which means each row alternates its reading direction.
It is important to note that bobble stitches often lean to one side slightly due to the tension of closing multiple loops together. On a chart, this may be indicated by a slight diagonal tilt in the symbol, or by a notation in the pattern instructions. When working from a chart with bobbles, always cross-reference with any written notes or stitch counts provided alongside the chart. Experienced pattern designers include these checks to help you confirm that your stitch count remains correct after each bobble row, since it is easy to accidentally add or skip stitches while managing the multiple loops involved in a bobble.
Step-by-Step: Working a Bobble Stitch
Before attempting to follow a bobble chart at speed, it is wise to practice the physical technique until it feels comfortable in your hands. Begin by setting up a simple foundation chain of about twenty stitches in a smooth, light-colored worsted weight yarn on an appropriately sized hook. Work a couple of rows of plain double crochet first so you have a stable fabric to work the bobbles into. This practice approach lets you focus entirely on the bobble motion without the added complexity of starting a new project from scratch at the same time.
To work a five-double-crochet bobble, follow these steps:
- Yarn over and insert your hook into the designated stitch or space below.
- Yarn over again and pull up a loop so you have three loops on your hook.
- Yarn over and draw through only the first two loops, leaving two loops remaining on the hook. This is one incomplete double crochet.
- Repeat steps one through three four more times into the same stitch, adding one incomplete double crochet each time. After five repetitions, you will have six loops on your hook.
- Yarn over one final time and draw through all six loops at once. This closes the bobble and creates the rounded bump.
- Chain one to secure the bobble and help it sit upright on the right side of the fabric.
The closing chain in step six is a point of variation between patterns. Some designers omit it, particularly when working tight gauge fabric where the bobble naturally holds its shape. Others insist on it for a more pronounced, rounded profile. When reading a chart, look at the symbol carefully: if a small oval or chain symbol is shown directly above the bobble symbol, you should work that securing chain. If the next stitch symbol follows immediately, you likely skip the chain. This small detail makes a noticeable difference in the appearance of your finished bobbles, so attention to the chart pays off here.
Tips for Successfully Reading and Following Bobble Stitch Charts
One of the most effective strategies for reading any crochet chart is to use a printed copy whenever possible rather than working from a screen. Printed charts allow you to mark your progress with a pencil, highlight completed rows, and make notes directly on the page without risk of losing your place. Use a magnetic board with a movable line guide if you are working a complex chart with many rows, as this keeps your eye focused on the current row while the completed rows remain visible below for reference. This small investment in organization saves enormous frustration in the long run.
Color coding is another powerful technique for navigating charts that include bobbles alongside other stitch types. Use a set of colored highlighters to mark different stitch symbols in distinct colors before you begin crocheting. Highlight all bobble symbols in one color, all plain double crochets in another, and chain spaces in a third. This visual differentiation trains your eye to spot the bobble locations at a glance without having to re-read the symbol key every time. After a few rows of highlighted chart-reading, you will find that your recognition speed increases dramatically and your confidence grows correspondingly.
Counting stitches after each row is a discipline that prevents small errors from compounding into large problems. Bobble stitches can alter the stitch count if you forget whether the bobble counts as one stitch or multiple. In most patterns, each bobble occupies the same space as a single stitch in the stitch count, but this should always be confirmed in the pattern notes. Keep a stitch counter or a simple tally on paper, and compare your count to the number shown on the chart or stated in the written pattern notes after every completed row. Catching a miscounted stitch early is always preferable to unraveling many rows later.
Troubleshooting Common Bobble Chart Mistakes
One of the most common mistakes beginners make when following a bobble chart is working the bobble into the wrong stitch. Because the bobble symbol is larger and more visually dominant than surrounding stitch symbols, it is easy for the eye to misjudge its exact position along the row. Always trace the base of the bobble symbol down to the stitch below it before inserting your hook, and count the stitches from the edge of the row if necessary to confirm you are in the correct position. A placed ruler or straightedge on the chart can help align the symbol with the correct base stitch.
Another frequent issue is inconsistent bobble size. If some of your bobbles look flatter or smaller than others, the culprit is usually inconsistent tension when pulling up the initial loops or when drawing through all loops to close. Practising with a smooth, grippy cotton yarn can help you develop a more consistent feel for the required tension. Some crocheters find that going up one hook size specifically for bobble rows and down again for plain rows creates a more even, balanced fabric without tension-related distortion. This is a legitimate technique and worth experimenting with if you find your tension challenging to control.
Finally, some charts show bobbles on every row while others alternate bobble rows with plain rows. Beginning crocheters sometimes mistakenly try to follow a bobble-on-every-row chart as if it were an alternating pattern, which throws off the stitch placement completely. Read the chart from the very first row carefully, noting whether the bobble row is an odd-numbered or even-numbered row, and establish the correct rhythm from the start. Once you have the pattern locked in, the bobble chart becomes almost rhythmic and enjoyable to follow, with your hands beginning to anticipate each bobble position before your eyes have fully finished reading the next symbol.
Expanding Your Chart-Reading Skills Beyond the Bobble Stitch
Mastering the bobble stitch on a crochet chart is a genuinely significant milestone in your development as a crocheter, but it is really just the beginning of what chart literacy can offer you. The same principles and habits you develop reading bobble charts apply directly to other complex stitches and motifs. Cables, crossed stitches, Tunisian mesh patterns, and intricate Bavarian crochet motifs all use chart representations that follow the same underlying logic you have practiced with bobbles. Every new stitch symbol you learn is a key that unlocks additional patterns from around the world.
Japanese and other Asian crochet patterns, in particular, are almost exclusively presented in chart form, and they often include spectacular stitch combinations that have no equivalent in English-language written patterns. Many of these patterns use the same internationally standardized symbols you have already encountered in Western charts, meaning your chart-reading skills transfer directly without any language barrier. This opens up a vast library of design possibilities. Entire books of Japanese crochet motifs, lace patterns, and amigurumi designs become accessible once you are comfortable navigating a chart confidently.
The more charts you read, the faster your visual recognition becomes, and eventually you will be able to glance at a chart and understand the overall structure of a pattern within seconds. You will start to recognize recurring motifs, predict how a stitch combination will look in finished fabric, and even identify potential errors or inconsistencies in a chart before you begin crocheting. This level of fluency transforms chart reading from a skill into a superpower, giving you creative freedom that written-pattern-only crocheters simply do not possess. The investment in learning is modest; the returns are lifelong.
Resources for Continued Learning
Building chart-reading fluency is easiest when you have access to good reference materials. A crochet stitch dictionary that includes both written instructions and chart representations side by side is an invaluable resource, because you can practice reading the chart while confirming your interpretation against the written description. Several excellent books focus specifically on crochet charts and symbols, including titles dedicated to Bavarian crochet, Japanese motifs, and traditional lace. Investing in two or three of these reference books gives you a well-rounded library that covers both American and international symbol conventions.
Online communities and video tutorials provide another layer of support that books alone cannot offer. Video walkthroughs of chart-reading, particularly those that move symbol by symbol through a sample chart, allow you to watch the translation from chart to hook in real time. Many crochet content creators on YouTube and social media platforms regularly post chart-reading tutorials specifically aimed at intermediate crocheters who want to move beyond written patterns. Joining a crochet-along that uses charts is also an excellent structured way to develop your skills with the support of a community working through the same challenges simultaneously.
Above all, the most effective learning resource is regular practice. Choose one new chart-based pattern each month, even a small one like a single motif or a coaster, and commit to working through it using only the chart. Resist the urge to seek out a written version and instead challenge yourself to decode the visual language directly. Over time you will notice your chart reading becoming faster, more confident, and more intuitive. The bobble stitch, with its distinctive and recognizable symbol, is a wonderful stitch to start this practice with, and the beautiful, textured fabric it produces will keep you motivated every step of the way.








What do you think?
It is nice to know your opinion. Leave a comment.