










The Complete Guide to Candle Making: From Beginner to Artisan
Candle making is one of the most rewarding and accessible crafts you can take up, whether as a relaxing hobby or the foundation of a small business. There is something deeply satisfying about transforming raw wax, fragrance, and a simple wick into a beautiful object that fills a room with warmth and scent. This guide will walk you through everything you need to know, from understanding the materials involved to hosting your very own candle making workshop for friends and family.
Understanding the Basics of Candle Making
Before you light your first pour, it is essential to understand what goes into a candle and why each component matters. At its most fundamental level, a candle consists of three elements: a fuel source (the wax), a delivery mechanism (the wick), and often a fragrance or colorant to make it appealing. The relationship between these three elements determines how your candle will burn, how long it will last, and how well it will throw scent into a room. Getting this balance right is both a science and an art, and it is what separates a mediocre candle from an exceptional one.
Wax is the heart of any candle, and the type you choose will dramatically affect the final product. Paraffin wax has been the industry standard for decades due to its affordability and excellent scent throw, but soy wax has surged in popularity among hobbyists and artisan makers for its cleaner burn, longer-lasting qualities, and eco-friendly sourcing from soybean oil. Beeswax is another beloved option, prized for its natural honey scent, beautiful golden hue, and the way it purifies the air as it burns. Coconut wax, blended waxes, and palm wax each offer their own unique characteristics, and many experienced makers settle on a custom blend that combines the best properties of several wax types.
The wick is just as critical as the wax and is often underestimated by beginners. A wick that is too small for the diameter of your container will cause tunneling, where the wax melts only in a narrow column down the center, leaving wasted wax on the sides. A wick that is too large will create an oversized flame, produce soot, and burn through your candle far too quickly. Wick sizing is typically guided by the diameter of your vessel, the type of wax you are using, and the fragrance load. Cotton wicks are the most common, but wooden wicks have become increasingly popular for their soft crackling sound and wide, even melt pool.
Choosing Your Fragrance Oils and Colorants
Fragrance oils are what give candles their personality, and the options available to modern makers are practically limitless. You can work with single-note fragrances like pure lavender or vanilla, or you can experiment with complex blends that layer top, middle, and base notes the way a perfumer would. Most waxes can hold between six and twelve percent fragrance oil by weight, though this varies depending on the wax type and the specific oil. It is always worth testing your fragrance load carefully, because adding too much can cause the oil to separate from the wax, leading to wet spots on the surface or a burning issue known as fragrance flooding.
Colorants for candles come in several forms, including liquid dyes, dye blocks, dye chips, and powdered pigments. Liquid dyes are easy to mix and great for achieving vibrant, consistent colors, while dye blocks allow you to shave off precise amounts for more controlled coloring. Powdered pigments can be tricky because some do not bind well with wax and can clog the wick over time, so it is important to use pigments specifically designed for candle making. Mica powder, beloved in the cosmetics world, is generally considered safe for the outer surface of candles but is not recommended in the wax itself for the same reason. Natural colorants like paprika, turmeric, and spirulina are sometimes used for a botanical look, though they tend to fade over time.
Essential Tools and Equipment for Your Workshop
Setting up a functional candle making workspace does not require a large investment, but having the right tools from the beginning will save you a great deal of frustration. The most important piece of equipment is a reliable double boiler or a dedicated wax melting pot, because melting wax directly over an open flame is a significant fire hazard. A digital thermometer is equally non-negotiable, as different waxes require pouring at specific temperatures to achieve the best results — pouring too hot or too cold can lead to sinkholes, frosting, or poor scent retention. A kitchen scale that measures in grams is far more accurate than measuring by volume, and precision in candle making makes a substantial difference in consistency.
Beyond the fundamentals, there are several additional tools that will make your process smoother and more enjoyable. Wick centering tools, sometimes called wick bars or wick holders, sit across the top of your container and keep the wick perfectly centered while the wax cools, preventing it from drifting to one side during the setting process. A heat gun or embossing tool is useful for smoothing out any uneven surfaces or sinkholes after the initial pour. Silicone molds come in an extraordinary range of shapes and are ideal for pillar candles, novelty shapes, and decorative votives, while glass containers like mason jars, tumblers, and apothecary jars are perennial favorites for container candles.
Organization is just as important as having the right tools. Dedicate specific containers to your fragrance oils and label them clearly so that you never accidentally mix scents or confuse one for another during a busy pour session. Keep a dedicated notebook or spreadsheet to record every batch you make, including the type and weight of wax, the fragrance percentage, the wick size, the pour temperature, and any observations about the finished candle after testing. This log becomes invaluable over time, allowing you to replicate successful batches and troubleshoot problems with precision rather than guesswork.
Safety Protocols Every Maker Must Follow
Candle making involves working with hot liquid wax, flammable materials, and concentrated fragrance oils, so safety should always be your top priority in the workshop. Never leave melting wax unattended on the stove, and always keep a fire extinguisher within easy reach of your workspace. Wax has a flash point, which is the temperature at which it can ignite, and most fragrance oils lower the flash point of the finished candle, so it is critical to understand the materials you are working with and never overheat your wax. Burns from hot wax can be serious, so wearing long sleeves, heat-resistant gloves, and closed-toe shoes is strongly recommended during pouring sessions.
Ventilation is another key safety consideration that beginners often overlook. Heating wax and fragrance oils releases volatile organic compounds into the air, and while occasional exposure is unlikely to cause harm, working in a well-ventilated space or wearing a respirator during long production sessions is wise practice. Some fragrance oils are more potent than others, and certain synthetic ingredients can cause headaches or respiratory irritation with prolonged inhalation. Always review the safety data sheets provided by your fragrance oil supplier to understand any specific handling precautions, particularly if you plan to sell your candles, as many jurisdictions require you to have this documentation on file.
The Step-by-Step Candle Making Process
Once your workspace is set up and your materials are gathered, the actual process of making a candle is surprisingly straightforward, though it rewards patience and attention to detail. Begin by calculating your recipe using the weight of your chosen container as a guide. Fill your empty vessel with water and pour that water into a measuring cup to determine the volume, then use a standard conversion to estimate how much wax you will need. For most container candles, you will use approximately eighty percent of that volume in wax. Weigh out your wax using your kitchen scale, then calculate the appropriate amount of fragrance oil based on your desired load percentage, typically between eight and ten percent for a balanced result.
Melt your wax slowly in your double boiler, monitoring the temperature with your thermometer and never allowing it to exceed the recommended maximum for your specific wax type. While the wax is melting, prepare your containers by placing pre-tabbed wicks at the center of each vessel, securing the wick tab to the bottom with a dab of wick sticker or a small amount of hot glue. Thread the wick through your centering tool and lay it across the top of the container. When your wax reaches the recommended fragrance adding temperature, which is typically around 185 degrees Fahrenheit for soy wax, remove it from the heat and add your fragrance oil, stirring slowly and consistently for at least two full minutes to ensure thorough integration.
Allow the wax to cool to your desired pour temperature, which for most soy waxes falls between 120 and 140 degrees Fahrenheit. Pour slowly and steadily into your prepared containers, leaving a small amount of wax in reserve for a second pour to fill in any sinkholes that develop as the candle cools. Allow your candles to cure at room temperature, away from drafts or direct sunlight, for a minimum of 24 hours before trimming the wick to approximately one quarter of an inch. For the best scent throw and burn quality, soy candles in particular benefit from a full cure period of 48 to 72 hours before their first burn.
Troubleshooting Common Candle Making Problems
Even experienced candle makers encounter problems, and knowing how to diagnose and fix them is part of mastering the craft. Sinkholes, which appear as deep craters in the center of the candle after cooling, are caused by the wax contracting as it solidifies and are easily remedied with a second pour of slightly warmer wax. Frosting, which appears as a white, powdery bloom on the surface or sides of the candle, is a natural characteristic of soy and other vegetable waxes and is caused by the wax recrystallizing over time. While frosting does not affect the performance of the candle, it can be minimized by pouring at a lower temperature and keeping curing candles away from fluctuating temperatures.
Wet spots are another common frustration for container candle makers, appearing as cloudy or separated patches where the wax has pulled away from the glass. These are caused by the wax shrinking during cooling and can be reduced by prewarming your containers in an oven set to a low temperature before pouring. Tunneling, as mentioned earlier, is almost always a wick-sizing issue, but it can also result from not allowing the candle to achieve a full melt pool on its first burn. It is important to educate customers or recipients of your candles about proper burning practices, specifically that the first burn should last long enough for the entire surface to liquefy, typically two to four hours depending on the diameter of the vessel.
Designing and Branding Your Candle Collection
One of the most exciting aspects of candle making, especially for those who dream of turning their hobby into a business, is the creative freedom involved in designing a cohesive product line. Your candles can reflect a specific aesthetic, a seasonal theme, a geographical inspiration, or even a personal narrative, and the visual identity of your brand should communicate all of this at a glance. Start by thinking about your target audience and what draws them to artisan candles. Are they looking for minimalist, neutral-toned home goods that blend into a Scandinavian interior? Are they collectors of bold, maximalist objects that celebrate color and whimsy? Your answer to this question should inform every creative decision you make, from vessel selection to label typography.
Labels and packaging are often where small candle brands either distinguish themselves or blend into the crowd. A beautifully designed label that clearly communicates the scent name, the wax type, the burn time, and any safety warnings goes a long way toward establishing professionalism and trust with customers. Many indie makers work with graphic designers to create a brand identity that includes a logo, a consistent color palette, and a label template that can be adapted across their product range. For those on a tighter budget, design platforms like Canva offer professional-quality templates that can be customized with your own fonts, colors, and imagery, and home printing or local print shops make label production accessible even at small volumes.
The vessel itself is one of the most powerful branding tools at your disposal, and the market for unique, aesthetically pleasing containers has never been more diverse. Beyond the classic clear glass tumbler, candle makers are pouring into terracotta pots, ceramic vessels, vintage teacups, concrete containers, hand-thrown pottery, and even hollowed-out fruit rinds for a dramatic editorial effect. The vessel you choose communicates something about your brand’s values and aesthetic, so it is worth investing time in sourcing containers that feel distinctive and align with your creative vision. Many makers also offer refill services, inviting customers to return their empty vessels for a discounted refill, which is both an environmentally conscious practice and a clever customer retention strategy.
Building a Signature Scent Profile
Developing a signature collection of scents is one of the most personally expressive parts of running a candle brand. While it can be tempting to offer as many fragrances as possible, many successful artisan makers find that a tight, carefully curated range of eight to twelve scents is more compelling to customers than an overwhelming catalogue. Think of your scent collection the way a chef thinks about a restaurant menu: every item should be exceptional, and the overall selection should tell a coherent story. Seasonal rotations are a popular strategy, with a core range available year-round supplemented by limited-edition scents tied to specific times of year, holidays, or cultural moments.
When blending your own signature fragrances, it helps to think in terms of fragrance families and how different notes interact. Earthy, woody bases like sandalwood, cedarwood, and vetiver provide depth and longevity. Floral mid-notes like jasmine, rose, and ylang-ylang add complexity and warmth. Fresh top notes like citrus, eucalyptus, and mint provide the initial impression that draws people in before the fuller body of the scent develops. Experimenting with these layers and keeping detailed notes about your experiments will gradually build you an intuitive understanding of how fragrances behave, both in the bottle and in the finished candle.
Hosting Your Own Candle Making Workshop
Teaching others the art of candle making is one of the most joyful ways to share your passion and can also serve as a meaningful revenue stream for established makers. Candle making workshops have surged in popularity as a social activity, appealing to bachelorette parties, corporate team-building events, birthday celebrations, and date nights alike. The workshop format allows participants to take home a tangible, beautiful product they made with their own hands, which makes the experience feel both creative and deeply satisfying. If you are considering hosting workshops, start small with intimate groups of four to eight people to refine your teaching style and logistics before scaling up.
Planning a great workshop begins with curating a seamless participant experience from arrival to departure. Prepare individual workstations in advance, with each station stocked with a pre-measured kit of wax, fragrance oil samples, a prepared container with a centered wick, and basic tools. This preparation ensures that participants spend their time on the enjoyable, creative parts of the process rather than wrestling with logistics. Offer a selection of five to eight fragrance oils so that guests can personalize their candle without feeling overwhelmed by too many choices. Walk the group through each step together, pausing to explain the why behind each action so that participants leave with genuine understanding, not just a finished product.
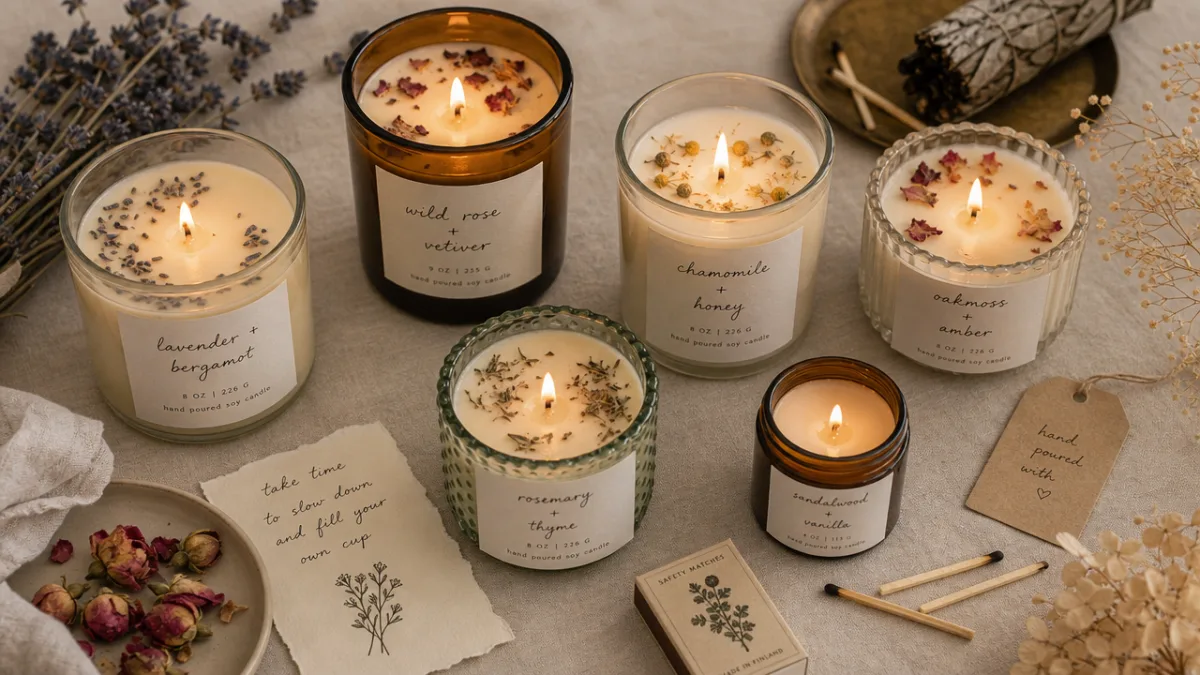
The atmosphere of your workshop matters enormously and can elevate the experience from functional to truly memorable. Playing soft background music, offering refreshments, and decorating your space with beautiful candles, botanical elements, and thoughtful lighting all contribute to a sensory environment that participants will associate with your brand and be eager to share on social media. Consider creating a branded hashtag for workshop participants to use when posting their finished candles online, as this organic word-of-mouth marketing is among the most powerful promotional tools available to small businesses. Personal touches, like a hand-written thank-you card tucked into each participant’s take-home bag, reinforce the artisan spirit that distinguishes your workshop from a generic craft class.
Pricing and Promoting Your Workshop
Pricing a candle making workshop requires balancing the cost of materials, the value of your time and expertise, your venue costs if applicable, and what the local market will bear. A typical two-hour workshop that produces one eight-ounce candle per participant might be priced anywhere from forty-five to one hundred and twenty dollars per person, depending on the quality of materials used, the location, and whether refreshments are included. Research what similar experiences in your area charge to establish a competitive baseline, then consider whether your offering has premium elements that justify a higher price point. Private bookings for parties or corporate events typically command a higher per-person rate than open public workshops.
Promoting your workshops effectively involves building a presence across the channels where your ideal participants spend their time. Instagram and Pinterest are natural homes for candle content because they are visually driven platforms, and high-quality photographs of your workshop space, finished candles, and happy participants are the most effective content you can share. Local Facebook groups, neighborhood apps like Nextdoor, and community bulletin boards are excellent for reaching people who are actively looking for local experiences and activities. Collaborating with complementary local businesses — a wine bar, a yoga studio, a pottery shop — on joint events is a creative way to reach new audiences while sharing the promotional workload and potentially splitting venue costs.
Turning Your Passion into a Sustainable Business
For many people, candle making begins as a hobby and quietly evolves into something more. The leap from passionate hobbyist to small business owner is both thrilling and demanding, and it requires shifting your mindset from creative practice to entrepreneurial thinking without losing the love for the craft that started everything. The candle market is genuinely competitive, with thousands of independent makers operating alongside large commercial brands, but there is consistent and growing demand for handmade, thoughtfully designed candles made with quality ingredients. The key to standing out is not competing on price, which is a race to the bottom, but rather building a brand with a distinct identity, a compelling story, and a loyal community.
Before you begin selling, it is important to understand the legal and regulatory landscape for candle businesses in your region. In many countries, candles sold commercially must comply with specific labeling requirements, including warnings about keeping flames away from children and pets, instructions for safe burning, and information about the manufacturer. If you plan to sell in the European Union or the United Kingdom, you will need to comply with fragrance allergen labeling regulations, which require you to list any of the 26 designated allergens present above a specific threshold directly on the label. Registering your business, understanding your tax obligations, and obtaining appropriate product liability insurance are all steps that protect both you and your customers and establish your operation as legitimate and professional.
Scaling a candle business sustainably means building systems that allow you to maintain quality as volume increases. This might involve investing in a larger wax melter, developing a production schedule that batches similar products together to minimize changeover time, or bringing in a part-time helper for busy periods like the lead-up to the winter holidays. Many candle makers find that focusing on wholesale relationships with boutique retailers, gift shops, and lifestyle stores provides a more stable revenue base than relying entirely on direct-to-consumer sales, while an active online shop provides a higher-margin channel for customers who discover the brand through social media or word of mouth. The combination of multiple sales channels, a strong brand identity, and an unwavering commitment to quality is the foundation of a candle business that endures.
Growing Your Community and Finding Inspiration
One of the greatest gifts of the candle making world is the community that surrounds it. Online forums, social media groups, and in-person maker markets bring together people at every stage of the journey, from curious beginners to seasoned professionals, and the culture is overwhelmingly generous and collaborative. Engaging with this community by sharing your processes, asking questions, celebrating others’ work, and participating in collaborative events will enrich your practice enormously and introduce you to people whose creativity and knowledge will inspire you in unexpected ways. Attending craft fairs and artisan markets, even just as a visitor, exposes you to an incredible diversity of approaches, aesthetics, and business models that can spark new ideas for your own work.
Inspiration for new candles can come from virtually anywhere: a walk through a forest, a piece of music, a childhood memory, a trip to a foreign city, or the scent of a stranger’s perfume on a crowded street. The most memorable candle collections tend to be those rooted in genuine personal experience and told with authenticity, because customers respond to the human story behind a product as much as they respond to the product itself. Keep a notebook dedicated to ideas, observations, and sensory impressions that might one day become a candle, a collection, or a workshop theme. The practice of paying attention to the world around you with a maker’s curiosity is what keeps a creative business feeling alive and evolving rather than stagnant and formulaic.









What do you think?
It is nice to know your opinion. Leave a comment.