









Sowing Poppy Seeds Outdoors: A Complete Guide to Growing Beautiful Poppies
Understanding Poppies and Why They Thrive When Directly Sown
Poppies are among the most beloved flowering plants in the garden, celebrated for their delicate, tissue-paper petals and striking color range spanning from pure white to deep burgundy. Unlike many other garden flowers, poppies have a particular relationship with the soil and environment that makes outdoor direct sowing not just preferable but often essential for success. Understanding this fundamental characteristic is the first step toward growing a spectacular poppy display that returns your effort many times over.
The reason poppies resist transplanting so strongly lies in their root system. They develop a long, slender taproot very early in their growth cycle, and any disturbance to this root during transplanting typically causes the plant to fail or at minimum suffer significant setback. When seeds are sown directly where they will grow and flower, the taproot extends downward without interruption, anchoring the plant firmly and allowing it to draw moisture and nutrients efficiently from deep within the soil profile. This undisturbed growth is what produces the robust, self-sufficient plants that poppies are known for.
There are several popular species worth growing in the home garden, each with its own charm and growing characteristics. Oriental poppies (Papaver orientale) produce enormous blooms in late spring and are perennial in most climates. Icelandic poppies (Papaver nudicaule) offer a wide palette of soft pastel and warm tones, thriving in cool weather. Annual bread poppies (Papaver somniferum) self-seed prolifically and create the kind of naturalized, cottage garden effect that many gardeners dream of. California poppies (Eschscholzia californica), while technically not true poppies, share similar sowing requirements and look beautiful grown alongside their botanical cousins.
Choosing the Right Time to Sow Poppy Seeds Outdoors
Timing is perhaps the single most important factor in successfully sowing poppy seeds outdoors. Most poppy species are cool-season plants that prefer to germinate in cool, moist conditions. This makes them ideal candidates for either late autumn sowing or very early spring sowing, depending on your climate and the specific species you are growing. Getting the timing right means your seeds will experience exactly the conditions they need to break dormancy and establish quickly before summer heat arrives and compromises their growth.
For gardeners in temperate climates, autumn sowing is often the most rewarding approach. By scattering seeds in late September through November, you allow them to stratify naturally over winter, a cold moist period that many poppy species require to germinate reliably. The seeds will lie dormant through the coldest months and then burst into growth as soil temperatures warm in early spring, often resulting in earlier and more robust plants than those sown in spring. This mimics exactly what happens when poppies self-seed in the garden, which is why self-sown plants frequently outperform deliberately planted ones.
Spring sowing is equally viable and often more practical for gardeners who do not plan that far ahead. As soon as the soil can be worked in late winter or very early spring, poppy seeds can be scattered. In many regions this means sowing while there is still a chance of light frost, which is perfectly acceptable. Poppies are remarkably frost hardy as seedlings and will not be damaged by temperatures that would kill warm-season annuals. The key is to avoid sowing in summer heat, as germination rates drop significantly above soil temperatures of around 65°F (18°C), and seedlings that do emerge in heat tend to be weak and short-lived.
Gardeners in warmer climates with mild winters have a particular advantage when it comes to growing poppies. In USDA zones 8 through 10, autumn sowing produces plants that grow through winter and bloom in late winter to early spring, essentially treating poppies as a winter annual. This is how poppies are grown commercially in parts of California and the Mediterranean, where winter rains and mild temperatures create ideal conditions. If you live in a warm climate and have previously struggled with poppies, shifting your sowing window to autumn rather than spring may be the change that transforms your results entirely.

Preparing Your Soil and Choosing the Perfect Location
Poppies are wonderfully undemanding plants when it comes to soil fertility, but they do have specific requirements regarding drainage and soil structure that must be met for healthy growth. The ideal poppy soil is loose, well-drained, and moderately fertile. Heavy clay soils that become waterlogged in winter will cause poppy seeds and seedlings to rot before they have a chance to establish. Sandy soils, on the other hand, drain well and warm quickly, making them naturally suited to poppies as long as they retain some organic matter to hold a little moisture during dry spells in late spring.
Preparing the seedbed is a simple but important process. Begin by removing all weeds from the sowing area, taking care to extract the roots of perennial weeds entirely. Poppies are small-seeded plants with delicate seedlings, and competition from weeds in the early weeks after germination can be fatal. Once the area is cleared, lightly fork or rake the top two to three inches of soil to create a fine, crumbly texture. Avoid deep cultivation, which can bring weed seeds to the surface and create more competition problems down the line. A light surface raking is all that is truly necessary.
When it comes to choosing a location, sunlight is the primary consideration. Poppies require full sun, defined as at least six hours of direct sunlight daily, to flower well and maintain strong, upright stems. Plants grown in too much shade produce elongated, floppy stems, fewer flowers, and are more susceptible to disease. However, in climates where summer heat arrives suddenly and intensely, a location with light afternoon shade can extend the blooming season slightly by keeping temperatures cooler during the hottest part of the day. On balance, prioritize full sun, particularly morning sun, which dries dew from foliage and reduces fungal disease risk.
Soil amendment should be approached with restraint when growing poppies. Unlike heavy-feeding vegetables or roses, poppies do not benefit from rich, heavily amended soil. In fact, overly fertile soil encourages lush, leafy growth at the expense of flowers, and can cause plants to lodge or fall over under their own weight. If your soil is reasonably good garden soil, no amendment may be needed at all. If it is very poor or compacted, working in a modest amount of well-rotted garden compost before sowing will provide sufficient improvement without creating the nitrogen-rich conditions that reduce flowering.
The Sowing Process: Techniques for Success
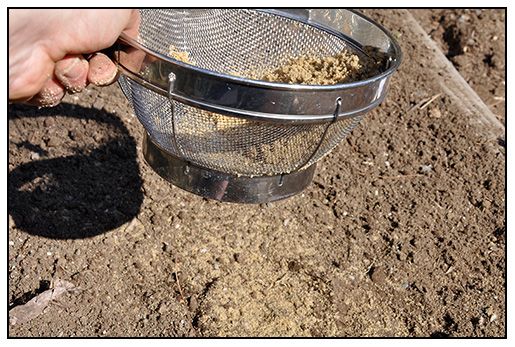
Sowing poppy seeds successfully is largely a matter of understanding just how tiny these seeds are and adjusting your technique accordingly. Poppy seeds are extraordinarily small, so small that mixing them with fine sand or dry horticultural grit before sowing is a practice that many experienced growers recommend strongly. Using a ratio of roughly one part seed to five or ten parts sand, you can distribute the seeds far more evenly across your prepared seedbed, reducing the dense clumping that occurs when seeds are broadcast directly from the packet. This leads to better air circulation, more even germination, and less thinning work later.
The actual sowing technique is beautifully simple. Take your seed and sand mixture in the palm of your hand or in a small cup and scatter it over the prepared soil surface using a gentle, sweeping motion. Poppies require light to germinate, which means the seeds must not be buried. After scattering, simply press the seeds gently into contact with the soil using the flat of your hand or by walking gently across the area on a board to distribute weight evenly. This contact between seed and soil surface is essential for moisture uptake and germination, but any covering of soil will prevent the light from reaching the seeds and suppress germination rates significantly.
Watering immediately after sowing requires care. A heavy stream of water from a hose will wash the seeds into clumps, undoing all the effort made to distribute them evenly. Instead, use a fine rose on a watering can or a misting nozzle on a hose to apply a gentle, even moisture to the surface. If rain is forecast within a day or two of sowing, you may choose to hold off on watering entirely and let nature do the work. In dry autumn conditions, keep the seedbed gently moist until germination occurs, usually within ten to twenty-one days depending on temperature and the specific species being grown.
- Mix seeds with dry sand or horticultural grit for even distribution across the seedbed.
- Never bury poppy seeds; they need light contact with the soil surface to germinate reliably.
- Use a fine-rose watering can to avoid washing seeds into uneven clumps after sowing.
- Mark sowing areas clearly so you can identify seedlings and distinguish them from weeds.
- Sow slightly more thickly than needed, as you can always thin seedlings once established.

Thinning, Weeding, and Early Care of Poppy Seedlings
Once your poppy seeds have germinated and small seedlings begin to appear, one of the most important tasks in their early care is thinning. This is a step that many new gardeners resist, finding it difficult to remove what appear to be healthy young plants. However, overcrowded poppies compete intensely with one another for light, water, and nutrients, and the result is almost always a group of weak, spindly plants that produce fewer and smaller flowers than properly spaced ones would. Thinning is not failure; it is an essential refinement that dramatically improves the quality of your final display.
Thin poppy seedlings progressively rather than all at once. When seedlings reach about an inch tall, reduce the densest patches to leave plants roughly two inches apart. When they reach three to four inches, thin again to their final spacing, which varies by species. Smaller annual poppies like Papaver rhoeas, the common field poppy, can be left at around four to six inches apart. Larger bread poppies benefit from six to eight inches of space, while the grand Oriental poppy varieties need at least a foot between plants to develop their full, impressive rosettes before flowering. When thinning, do not pull plants as this disturbs the roots of neighboring seedlings; instead, use small scissors to snip unwanted seedlings at soil level.
Weeding during the early stages of poppy growth requires patience and a good eye, because young poppy seedlings can be difficult to distinguish from some common weeds. The seedlings appear as small, slightly waxy, blue-green rosettes with gently lobed or toothed leaf margins depending on the species. Taking time to identify your seedlings before weeding begins will prevent the disheartening experience of accidentally removing the very plants you are trying to nurture. One helpful technique is to sow a few seeds in a labeled pot as a reference, so you always have a comparison plant available when you are uncertain about what is growing in the border.
Poppies generally require little in the way of feeding during their growing season. If you have prepared the soil well and it is of reasonable quality, no supplemental fertilizer will be needed. In genuinely poor soil where plants appear pale and slow-growing, a single application of a balanced, low-nitrogen liquid fertilizer in early spring can be beneficial. Avoid high-nitrogen formulations entirely, as these promote leafy growth at the expense of flowers, which is the opposite of what poppy growers are seeking to achieve. The plant’s energy should be directed toward forming buds and flowers rather than producing excessive foliage.
Encouraging Natural Self-Seeding and Long-Term Garden Establishment
One of the greatest joys of growing annual and biennial poppies is their ability to self-seed freely, establishing a naturalized colony that returns year after year without any effort on the gardener’s part. To encourage self-seeding, it is important to resist the urge to deadhead spent flowers after they have finished blooming. Instead, allow at least a portion of the seed pods to mature fully on the plant. These pods, which are themselves ornamentally attractive with their crown of dark-rimmed segments, will eventually dry and develop small holes through which the seeds are dispersed with every gust of wind or brush of a passing person or animal.
The timing of seed pod maturation and dispersal is elegantly matched to the natural sowing calendar. Annual poppies typically finish blooming in early to midsummer, and their seeds ripen and fall in late summer and autumn, exactly the season when sowing produces the best results for spring germination. If you collect the dry pods before they disperse naturally, you can keep the seeds for deliberate sowing or for sharing with other gardeners. Store collected seeds in a labeled paper envelope in a cool, dry place, and they will remain viable for at least two to three years, though germination rates do decline with age.
Over time, self-seeding poppies will migrate around the garden, appearing in unexpected spots that often turn out to be aesthetically pleasing combinations with neighboring plants. This element of happy accident is part of what makes poppy growing so delightful and why poppies are so beloved in naturalistic and cottage garden styles. You can guide the naturalization process to some degree by collecting seeds from plants growing in undesirable locations and sowing them where you would like to build up a colony. However, the self-determined spread of poppies through a garden often produces compositions that no deliberate planting plan would have conceived.
- Leave seed pods on at least some plants after flowering to allow natural seed dispersal in late summer.
- Collect ripe seed pods from plants you wish to propagate and store seeds in labeled paper envelopes.
- Allow self-sown seedlings to grow where they appear unless they are in a genuinely inconvenient location.
- Thin self-sown seedlings just as you would deliberately sown ones to prevent overcrowding.
- Over time, reduce the number of intentionally sown plants as the self-seeding colony becomes established.
Perennial species such as Oriental poppies require a different long-term management approach. Unlike their annual cousins, these plants die back completely after flowering, leaving a gap in the border that can look untidy for several weeks. Plan for this by placing late-emerging perennials such as hostas, hardy geraniums, or asters nearby, which will grow out and fill the space as the poppies fade. Oriental poppies can be propagated through root cuttings taken in late summer when the plant is dormant, offering a reliable way to increase your stock of a particularly beautiful named variety without the variability that comes with seed-raised plants.

Troubleshooting Common Problems When Sowing and Growing Poppies
Even with the best preparation and care, poppy growers occasionally encounter problems that prevent seeds from germinating or that cause established plants to underperform. The most common cause of germination failure is sowing at the wrong time of year when soil temperatures are too high. If you sow in late spring or summer and receive no germination, do not assume the seed is bad. Allow the bed to remain undisturbed and water it occasionally; dormant seeds may well germinate when temperatures drop in autumn. Alternatively, try sowing in a different location that receives more shade during the hottest part of the day.
Slugs and snails represent one of the most serious threats to poppy seedlings, particularly in mild, damp conditions. Young seedlings can be completely consumed overnight, leaving no trace that anything was ever growing in the bed. If you are gardening in an area with high slug pressure, consider sowing a proportion of your seeds in modules or small pots kept in a protected environment such as a cold frame or greenhouse, then transplanting the young plants when they are large enough to withstand some damage. While poppies dislike transplanting, moving them at a young stage with minimal root disturbance can be successful if absolutely necessary and represents a reasonable compromise where slug pressure is severe.
Downy mildew and other fungal diseases can affect poppies, particularly in conditions of poor air circulation and prolonged wet weather. Prevention is far more effective than cure in this regard. Adequate spacing between plants to allow air movement, avoiding overhead watering in favor of watering at soil level, and removing and disposing of any diseased plant material promptly will prevent most fungal problems from developing into serious infections. Growing poppies in full sun rather than shade also significantly reduces disease risk by keeping foliage drier throughout the day. Chemical fungicide treatments are rarely necessary and are generally not justified for an ornamental annual or perennial grown primarily for aesthetic pleasure.
If your poppies are producing abundant lush foliage but few or no flowers, the most likely cause is excess nitrogen in the soil, either from over-fertilization or from growing in freshly manured ground. There is no quick fix for this condition, but you can avoid repeating it the following year by sowing in a different location or allowing the excess fertility to be used up by other crops in rotation. Inadequate sunlight is the second most common cause of poor flowering; poppies in shaded sites consistently underperform those grown in full sun, no matter how well every other aspect of their care is managed. Relocating your sowing site to a sunnier spot is often the simplest solution to disappointing results.








What do you think?
It is nice to know your opinion. Leave a comment.