










Transform Your Space with a DIY Flower Fairy Light Jar
There is something undeniably magical about soft, glowing light filtered through delicate petals and warm glass. A DIY flower fairy light jar captures that enchanting quality and brings it right into your home, sitting quietly on a shelf or nightstand like a tiny lantern from another world. Whether you are looking for a weekend craft project, a heartfelt handmade gift, or simply a way to add warmth and personality to a room, this project delivers on every front. It is approachable for beginners, satisfying for experienced crafters, and endlessly customizable to match any aesthetic or occasion.
Fairy light jars have surged in popularity over the past several years, and it is easy to understand why. They sit at a perfect intersection of rustic charm and modern whimsy, appealing to cottagecore enthusiasts, boho decorators, and minimalists who want just a single thoughtful accent piece. Adding dried or artificial flowers to the mix elevates the concept further, introducing color, texture, and a sense of organic beauty that plain light-filled jars simply cannot match. The result feels simultaneously handcrafted and professionally styled.
In this guide, you will find everything you need to bring your own flower fairy light jar to life, from choosing the right materials and preparing your workspace to assembling the final piece and styling it within your home. You will also discover creative variations and gift-giving ideas that make this project far more versatile than it might first appear. By the time you finish reading, you will be genuinely excited to gather your supplies and get started on one of the most rewarding and visually stunning DIY projects in home décor.
Gathering Your Materials: Everything You Need Before You Begin
Before you dive into crafting, taking time to gather all your materials is one of the most important steps you can take. Nothing disrupts creative flow quite like discovering midway through a project that you are missing a key component. For this particular craft, the supply list is refreshingly short and affordable, meaning you can likely source everything from a single trip to a craft store or even pull several items from around your home. Planning ahead also gives you the chance to think about color schemes and jar sizes before committing to any one direction.
The centerpiece of your project is, of course, the jar itself. Mason jars are the most popular choice because they are widely available, come in multiple sizes, and have a classic, timeless look that pairs beautifully with florals. However, do not overlook other options such as apothecary jars, vintage pickle jars, or even repurposed pasta sauce containers. The key qualities you want are clear glass, a wide enough mouth to fit your hand or a dowel for arranging the flowers, and a shape that pleases you aesthetically. Taller jars create a more dramatic silhouette, while shorter, wider jars feel cozy and cottage-like.
For the lights themselves, a battery-operated LED fairy light string is strongly recommended over a plug-in version. Battery packs allow you to position the jar anywhere in your home without worrying about proximity to an outlet, and LED bulbs generate very little heat, making them safe to use inside a sealed glass container for extended periods. Warm white lights tend to complement florals most beautifully, casting a honeyed glow that enhances pinks, creams, yellows, and oranges. Cool white lights work well with blue and purple palettes or for a more modern, crisp look.
Your flower selection is where the real personality of your jar comes through. Dried flowers are an excellent choice because they are long-lasting, lightweight, and come in an extraordinary range of colors and textures. Dried lavender, eucalyptus, baby’s breath, rose buds, and pampas grass are all stunning options. Artificial silk flowers offer even more color consistency and longevity, and the quality of artificial blooms available today is remarkably lifelike. You will also want a hot glue gun, scissors, wire cutters if working with stemmed flowers, and optionally some moss, twine, or ribbon for finishing touches.
- Clear glass jar of your chosen size and shape
- Battery-operated LED fairy light string, preferably warm white
- Dried or high-quality artificial flowers in complementary colors
- Hot glue gun and glue sticks
- Wire cutters or sturdy scissors for trimming stems
- Optional: decorative moss, twine, ribbon, lace, or burlap for embellishment
- Optional: a wooden lid or cork stopper for a finished, sealed look
Preparing Your Flowers and Jar: Laying the Foundation for Beauty
Preparation is where the magic of this project truly begins, because the choices you make at this stage will shape the entire look and feel of your finished jar. Start by cleaning your glass jar thoroughly, removing any labels and residue with warm soapy water and a little rubbing alcohol if needed. A spotlessly clean jar will allow the light to shine through clearly without any cloudy patches or sticky spots that catch the eye for all the wrong reasons. Dry it completely before moving forward, since moisture inside the jar can damage dried flowers over time.
Next, plan your floral arrangement before committing anything to glue. Lay your flowers out on a flat surface and experiment with combinations of colors, sizes, and textures. A successful arrangement typically includes a mix of focal flowers, which are larger and more visually prominent, along with filler flowers that add softness and volume, and accent greenery or grasses that introduce movement and depth. Think about how these elements will look when viewed through glass from multiple angles, since unlike a traditional vase arrangement, your jar will likely be seen from all sides.
Trim your flower stems to the appropriate length based on where you plan to place them inside the jar. If you intend to have flowers cascading over the rim and down the outside of the jar, leave longer stems and gently curve them around the outside of the glass, securing them with a dab of hot glue. For flowers positioned inside the jar, shorter stems work better. You can also remove the stems entirely from some blooms and simply nestle the flower heads directly against the glass interior, where they will catch the light most dramatically and create a pressed-flower effect that looks absolutely gorgeous when illuminated.

Assembling Your Fairy Light Jar: Step-by-Step Instructions
With your materials gathered and your flowers prepped, it is time to bring the project together. Begin by gently feeding your fairy light string into the jar, starting from the end opposite the battery pack. Coil the lights loosely inside the jar rather than packing them tightly, because a loose coil creates natural air pockets that allow the light to diffuse beautifully in multiple directions. Leave the battery pack and its switch hanging over the rim of the jar so you can easily access it to turn the lights on and off without unscrewing a lid or reaching inside.
Once your lights are nestled inside, begin placing your flowers. If you are adding blooms to the interior of the jar, use a thin skewer, chopstick, or the eraser end of a pencil to position flower heads between the coils of light. Press them gently against the glass wall where they will be most visible and where the light will illuminate them from behind. A small dot of hot glue applied carefully with the tip of the glue gun can help secure interior flowers in place, though for many arrangements the snugness of the coiled lights is enough to hold everything without adhesive.
For flowers on the exterior of the jar, apply a thin bead of hot glue directly to the glass and press each stem or flower head firmly into place, holding for ten to fifteen seconds until the bond sets. Work in small sections, building your arrangement gradually rather than trying to glue everything at once. Step back periodically to assess the overall composition from a distance, because it is much easier to adjust elements before everything is fully set than after. Layer your flowers so that some overlap others slightly, creating a sense of depth and lushness rather than a flat, one-dimensional look.
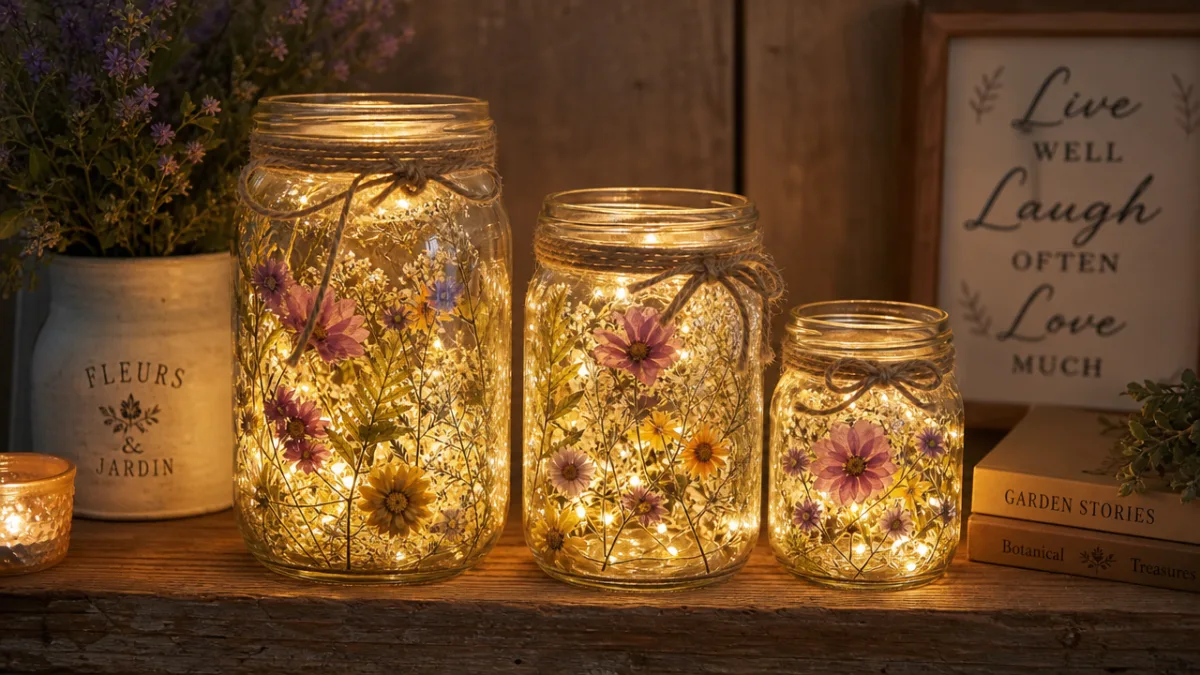
Once your flowers are in place, add any finishing touches that will elevate the piece from lovely to truly special. Wrapping the neck of the jar with a length of rustic twine and finishing it with a simple bow adds a charming artisan quality. A strip of lace or velvet ribbon in a complementary color lends a more romantic, vintage feel. You might also press a few small flower heads flat against the base of the jar exterior, or add a handful of decorative moss to the interior before inserting the lights for an enchanted forest aesthetic. These small details make an enormous difference in the finished piece.
- Clean and dry your jar completely before beginning any assembly.
- Coil fairy lights loosely inside the jar, leaving the battery pack accessible over the rim.
- Position interior flowers between the light coils, pressing them against the glass.
- Glue exterior flowers in layers, building from the base of the jar upward.
- Add finishing embellishments such as twine, ribbon, or moss to complete the look.
- Test your lights before calling the project finished to ensure everything is working.

Styling Your Finished Jar: Incorporating It Beautifully Into Your Home
A finished flower fairy light jar is a genuinely versatile décor object that can find a home in virtually any room of the house, and thinking thoughtfully about placement will help you get the most enjoyment from your creation. On a bedroom nightstand, it functions as a soft, dreamy alternative to a traditional lamp, casting just enough warm light to read by or wind down without overwhelming the senses before sleep. It creates an atmosphere of gentle romance that is deeply conducive to rest and relaxation, and many people find that the soft flicker of LED fairy lights mimics the soothing quality of candlelight without any of the fire risk.
In a living room, a fairy light jar works beautifully as part of a styled vignette on a bookshelf, coffee table, or fireplace mantel. Group it with other objects of varying heights, such as a stack of books, a small potted succulent, or a framed photograph, to create a cohesive and visually interesting display. The glowing jar will naturally draw the eye and anchor the arrangement, making everything around it feel more curated and intentional. For maximum impact in a living space, consider making two or three jars of varying sizes in the same color palette and grouping them together as a trio.
Bathrooms are another surprisingly effective location for a flower fairy light jar, particularly in spaces that lean toward a spa-like or botanical aesthetic. Positioned on a windowsill, the edge of a bathtub, or a vanity shelf, the jar adds an instantly luxurious and calming quality. It transforms an ordinary bathroom into a retreat-like space without any significant investment or renovation. The enclosed nature of the glass jar also means it is not affected by the humidity of a bathroom environment, making it a practical as well as beautiful addition to this often-overlooked room in terms of décor opportunities.
Outdoor and semi-outdoor spaces offer yet another dimension of possibility for your fairy light jar. On a covered patio, a screened porch, or even a sheltered garden table, a glowing floral jar becomes a stunning centerpiece for outdoor entertaining. The combination of natural surroundings, soft artificial light, and the organic beauty of the flowers creates an almost theatrical ambiance that guests will inevitably comment on. If you do place your jar outdoors, bring it inside during rain or heavy moisture to protect the dried florals and electronic components from water damage.
Creative Variations and Gift Ideas: Taking the Concept Further
One of the most wonderful aspects of the flower fairy light jar project is its incredible adaptability. The basic formula of glass, light, and florals serves as a launching pad for countless personalized variations that can be tailored to specific seasons, occasions, color palettes, or personal tastes. Once you have mastered the foundational technique, experimenting with different interpretations becomes a genuinely exciting creative pursuit. Each variation has its own distinct character and mood, ensuring that the project never becomes repetitive no matter how many times you revisit it.
Seasonal adaptations are a particularly enjoyable way to keep the concept fresh throughout the year. In autumn, fill your jar with dried orange marigolds, miniature pinecones, and sprigs of preserved autumn leaves in russet and gold tones for a harvest-inspired piece that pairs perfectly with the season’s warm color palette. For winter and the holiday season, swap in white or silver artificial flowers, small sprigs of holly or evergreen, and consider using cool white or even multicolored fairy lights for a festive touch. Spring calls for pastel blooms like dried cherry blossoms and soft lavender, while summer invites bold sunflowers and vibrant tropical flowers.
The flower fairy light jar also makes an exceptional handmade gift for a wide range of occasions. For a wedding, create a cohesive set of jars in the couple’s chosen colors and present them as a centerpiece or a romantic keepsake. A new homeowner will treasure a thoughtfully crafted jar that brings warmth and personality to their new space. For a birthday, Mother’s Day, or just-because gift, a fairy light jar communicates care, creativity, and thoughtfulness in a way that a store-bought item simply cannot replicate. Including a handwritten note explaining how you made it and what flowers you chose adds another deeply personal layer to the gift.
For those interested in taking their craftsmanship to the next level, consider incorporating additional elements such as small crystals or gemstones tucked among the flowers, strips of translucent colored cellophane layered inside the jar to tint the light, or even tiny paper butterflies and birds folded from decorative origami paper. Personalized labels printed or handwritten with names, dates, or meaningful quotes can be adhered to the outside of the jar for custom gifting purposes. The more you experiment and personalize, the more this simple craft begins to feel like genuine artistry, and the results will reflect exactly that elevated intention.
Tips for Longevity and Maintenance: Keeping Your Jar Looking Beautiful
Once you have invested time and creativity into your flower fairy light jar, you will naturally want it to look its best for as long as possible. Fortunately, with a few simple care practices, your jar can remain a beautiful and functional piece of décor for months or even years. The biggest threat to dried flower arrangements is direct sunlight, which causes colors to fade significantly and rapidly. Position your jar in a spot where it receives ambient light rather than harsh, direct sun exposure, and the flowers will retain their color and texture far longer than they otherwise would.
Dust is the other primary maintenance concern for any decorative object in the home, and flower fairy light jars are no exception. A jar with exterior flowers will accumulate dust on the petals and stems over time, which can make even the most beautiful arrangement look tired and neglected. Gently dust the flowers using a soft artist’s paintbrush or a can of compressed air every few weeks to keep everything looking fresh and vibrant. For jars with only interior flowers, simply wiping the outside of the glass with a soft, damp cloth periodically is usually sufficient to maintain its clarity and sparkle.
Battery replacement is a practical consideration that is easy to overlook until the lights begin to dim. Keeping a small supply of the appropriate battery size on hand means you will never have to go without your jar’s glow at an inconvenient moment. Many battery-operated fairy light strings now include a timer function that automatically turns the lights on and off at set intervals, which is an excellent feature both for convenience and for extending battery life. If your lights have this feature, using it regularly will dramatically reduce how often you need to replace batteries and will protect the longevity of the LED components themselves.
Should any of the exterior flowers become damaged, loose, or simply need refreshing over time, do not hesitate to carefully remove them and replace them with new blooms. This ability to update and refresh the floral elements means your jar can evolve with changing seasons or personal preferences rather than being a fixed object that must eventually be discarded. Think of the fairy light jar as a living piece of décor that you can tend to and update over time, much like a garden in miniature. This ongoing relationship with the object makes it all the more meaningful and enduring as a part of your home.
The DIY flower fairy light jar is, at its heart, a celebration of the idea that beautiful things do not have to be complicated or expensive to create. With a handful of affordable materials, a bit of time, and a genuine willingness to play and experiment, you can craft something that genuinely transforms the atmosphere of a space. It glows with warmth, blooms with natural beauty, and carries the quiet satisfaction of having been made by your own hands. Whether you make one for yourself or give a dozen as gifts, each jar carries a piece of that handmade magic that mass-produced décor can simply never replicate.








What do you think?
It is nice to know your opinion. Leave a comment.