










“`html
How To Make a Wine Cork Dartboard: A Complete DIY Guide
If you’ve been hoarding wine corks for years and genuinely don’t know what to do with them, making a dartboard might be the best idea you haven’t tried yet. It sounds a little unconventional, but wine corks are actually a great material for catching and holding darts — and the finished product has this warm, rustic look that feels right at home in a game room, home bar, or any space where you want a bit of personality on the wall. The best part? You don’t need to be a skilled woodworker. A free afternoon and a modest budget are pretty much all it takes.
There’s also something really satisfying about building a functional game piece entirely out of stuff that would have otherwise ended up in the trash. Every cork in that collection has a little story behind it — a dinner party, a random Tuesday night, a bottle you cracked open with your best friend. Turning all of that into something you can actually play with is genuinely fun, and it tends to be the kind of thing guests notice and want to talk about.
This guide covers everything from gathering your materials and prepping your corks, all the way through assembly, finishing, and getting it up on the wall. Whether you’ve done a hundred craft projects or this is your first, the steps are straightforward and easy to follow. By the time you’re done, you’ll have a dartboard that’s actually yours — one nobody else has.
Materials and Tools You Will Need
Before you dive in, it’s worth taking a few minutes to gather everything you’ll need. The obvious starting point is corks — and you’re going to need quite a few of them. For a standard dartboard around 18 inches in diameter, plan on somewhere between 150 and 200 corks depending on their size and how tightly you pack them together. Natural corks are worth seeking out over synthetic ones because they grip darts noticeably better. If your own collection comes up short, friends, local restaurants, and wine bars are usually happy to save corks for you.
For the backing, a round wooden plaque or a circular piece of plywood works great. You want something solid enough to hold the weight of all those corks without warping — at least half an inch thick is a good rule of thumb. As for adhesive, construction-grade contact cement and heavy-duty wood glue both do the job well, but a lot of people reach for a hot glue gun simply because it’s faster and more forgiving to work with during assembly.
Beyond that, you’ll want a circular saw or jigsaw if you’re cutting your own backing, sandpaper in medium and fine grits, a tape measure, a pencil or chalk for marking your layout, a level for hanging, and some D-ring or sawtooth picture-hanging hardware. A few extras that are worth having on hand: clamps or rubber bands to hold corks steady while the glue sets, a damp cloth for wiping up stray adhesive, and some painter’s tape to keep things tidy during the glue-up. Getting it all laid out before you start will save you a surprising amount of running around later.
Preparing Your Wine Corks
This is the step a lot of beginners skip, and they almost always wish they hadn’t. Fresh-out-of-the-bottle corks are often stained, a little smelly, and inconsistent in size and shape. Spending 30 to 60 minutes cleaning and sorting them upfront makes a real difference — your finished board will look cleaner, lie flatter, and hold darts better. It’s a bit tedious, but worth every minute.
Start with a warm, soapy wash, then let the corks dry completely — overnight in a ventilated spot is ideal. Once they’re dry, sort them by size. Standard wine corks and the larger champagne corks play nicely together if you plan your layout to use each type strategically (champagne corks work especially well in the center or outer ring). Now’s also a good time to decide whether you want to stand the corks on their flat ends or lay them on their sides. Standing them upright gives the board a totally different look — more like a mosaic or honeycomb — and that choice will affect how many corks you need and how the whole thing comes together.
One trick that makes a noticeable difference: briefly boil any corks that are tapered or misshapen. Corks that spent years compressed in a bottle neck often lose their cylindrical shape, which makes tight alignment a headache. Two or three minutes in boiling water softens them up, and pressing them flat under a heavy book while they dry can bring them back to a much more usable shape. It’s a small extra step, but evenly shaped corks pack together tighter and leave fewer gaps — and that’s what makes the difference between a board that looks handmade and one that looks intentional.
Designing Your Layout and Pattern
This is where things get fun. Unlike a store-bought bristle board with its fixed black and red segments, a cork dartboard is basically a blank canvas. You can keep it simple with a clean, functional layout, or get creative with color — dark wine-stained corks next to pale barely-used ones, corks from favorite wineries, initials worked into the pattern, geometric shapes. Whatever direction appeals to you, it’s worth sketching it out on paper before you commit to anything with glue.
Mark the exact center of your backing board first, then use a compass or a string-and-pencil setup to draw a circle at your target diameter — 17 to 18 inches covers regulation size. From there, you can subdivide the surface into the traditional scoring segments if you want to keep the game fully functional, or just fill it with a concentric ring pattern if you prefer the look of that over strict regulation layout. If scoring matters to you, numbers can always be painted or stenciled onto the frame later.
Before you glue anything, do a full dry run — lay all your corks out on the board exactly as you plan to place them, without any adhesive. This lets you test the pattern, count corks, spot gaps, and fix anything that’s not working before it becomes permanent. Take a photo when you’re happy with it. Once you introduce glue and start working against the clock, it’s remarkably easy to lose track of where everything was supposed to go, and that photo will save you from a lot of second-guessing.
Assembling the Dartboard Step by Step
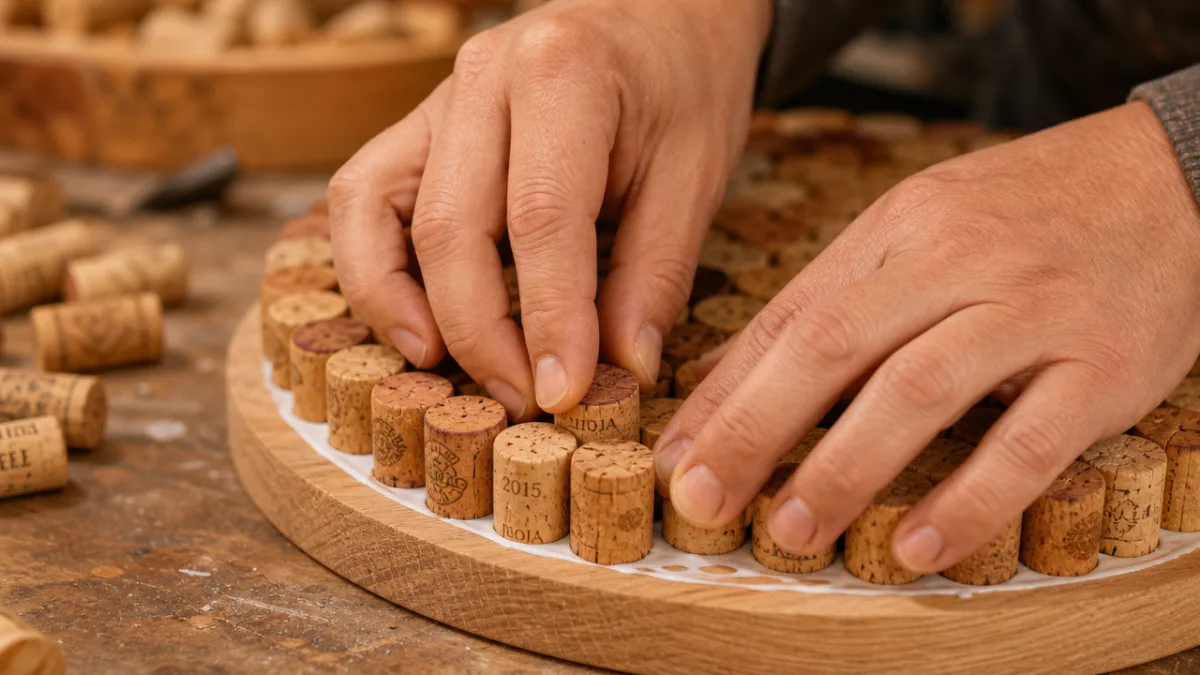
With your layout planned and your corks ready, it’s time to start building. Work from the center outward in concentric rings — starting in the middle ensures that the most visible part of the board is properly aligned, and any minor fit adjustments can happen at the outer edges where they’re less obvious. Apply adhesive in small sections rather than coating the whole board at once; otherwise you’ll be racing against drying glue and making hasty decisions you’ll regret.
If you’re using a hot glue gun, work in batches of five to ten corks at a time. Press each one firmly into place and hold it for ten to fifteen seconds. Get each cork as close to its neighbors as possible, rotating it slightly if that helps find a tighter fit. You probably won’t get a perfectly gap-free surface — natural corks are irregular, and that’s part of their charm — but careful positioning gets you pretty close. The goal is a surface that’s flat and tight, not one that looks machine-made.
When you reach the outer edge of your circle, you’ll need to trim the corks that extend past the boundary. A sharp serrated knife or a fine-tooth handsaw cuts through cork cleanly without crumbling it. Cut each border cork a little long, glue it in place, then sand the whole outer edge smooth once everything has fully cured. Trying to pre-cut each border cork to a precise angle before gluing is a frustrating guessing game — small shifts during assembly change the angle you actually need, so trimming after the fact is much cleaner.
Tips for Getting a Tight, Even Surface
- Always start from the center and work outward, checking alignment every few rows.
- Use a rubber mallet or firm hand pressure to seat each cork fully against the backing board before the adhesive sets.
- Keep a damp cloth nearby to wipe excess glue from cork surfaces immediately, as dried glue is much harder to remove and affects the board’s appearance.
- Alternate the orientation of corks slightly between rows to create a staggered brick-like pattern that is both stronger and more visually dynamic than a straight grid.
- Allow at least 24 hours of cure time before sanding or mounting the finished board.
Finishing and Sealing the Board
Once the glue has fully cured, the finishing stage is what takes it from “pile of corks on a board” to something you’d actually want to hang on your wall. Start by going over the surface with medium-grit sandpaper to level out any corks that are sitting a little higher than their neighbors. Follow up with fine-grit to smooth things out. Keep your pressure light — you’re evening out the surface, not grinding down the corks, and removing too much material can mess with the texture and dart-catching quality you’re counting on.
A light coat of matte or satin sealant is worth considering, especially if you’re planning to add painted scoring segments or a decorative border. Water-based polyurethane or a spray-on matte varnish both do the job without dramatically changing how the cork feels. That said, go light — a heavy sealant can make the surface too slick for darts to grip properly. When in doubt, test on a spare piece of cork before committing to the whole board.
If you want to add traditional dartboard markings — the numbered wedges, bullseye ring, double and triple scoring bands — now is the time. A fine-tipped permanent marker works for clean lines, or you can use acrylic paint and a thin brush, or vinyl decals if you want an especially crisp finish. A protractor and ruler are essential here: the 20 scoring segments each occupy exactly 18 degrees of the circle, so precision matters. Take your time with this part. Accurate, clean markings are what elevate the whole thing from a cute craft project to something that actually looks and plays like a real dartboard.
Mounting and Displaying Your Finished Dartboard
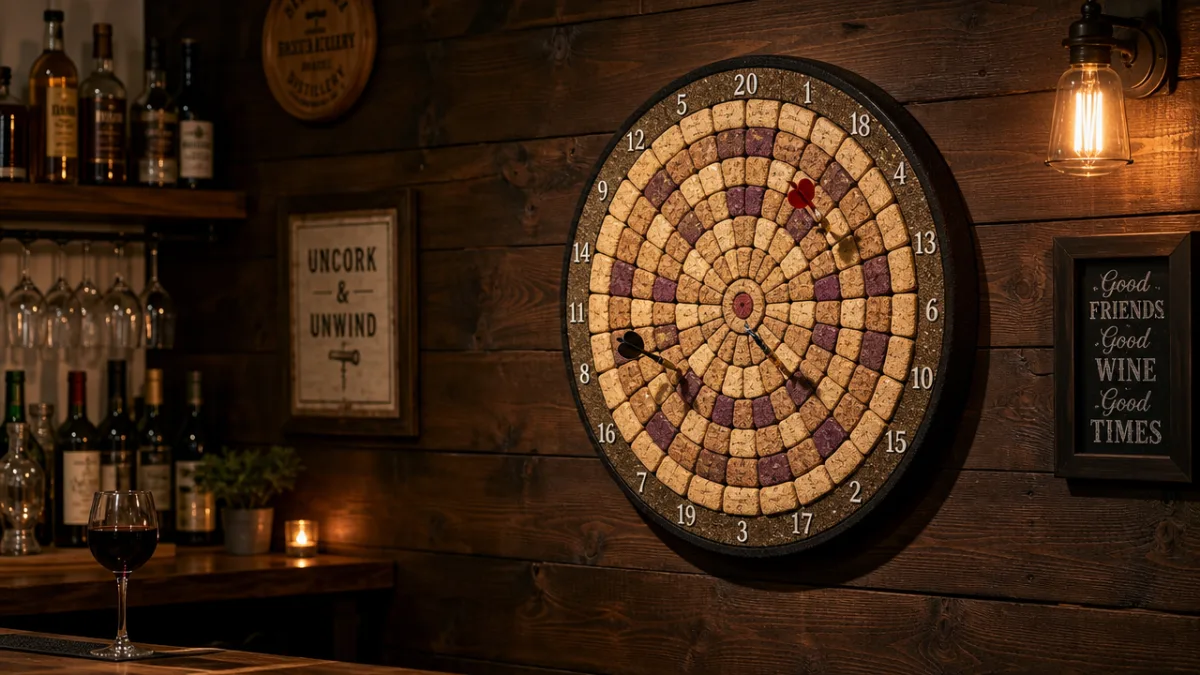
Hanging the board correctly matters more than most people think — both for safety and for a good playing experience. Official dart regulations put the bullseye at exactly 5 feet 8 inches from the floor, which lines up with average adult eye level. The throwing line (called the oche) sits 7 feet 9.25 inches from the face of the board. Your homemade board probably isn’t headed for tournament play, but following these measurements means the game will actually feel right, and it’ll be a comfortable height for everyone who plays.
For the mounting hardware, two sturdy D-rings or a French cleat system on the back will hold the board securely. Use screws that bite well into the backing material — a fully assembled cork board can weigh five to seven pounds or more, so standard picture hooks probably won’t cut it, especially in drywall. Wall anchors rated for at least twice the board’s weight are a safe bet, or find a wall stud if you can. A board that falls off the wall mid-game is both a hazard and a heartbreak after everything you’ve put into it.
Give some thought to the space around the board too. A dart that misses its mark moves fast and can do real damage to walls, furniture, and anyone standing nearby. A cork or felt surround — a padded frame around the board that catches wild throws — is a genuinely smart addition, and it makes the whole installation look intentional and finished. You can buy premade surrounds online, or make one from foam pipe insulation wrapped in felt or burlap. Add a small chalkboard for scoring and somewhere to rest your darts, and you’ve got a complete little game station that looks like it belongs there.
Caring for Your Cork Dartboard Over Time
A well-made cork dartboard can hold up for years if you treat it reasonably well. The single most useful maintenance habit is rotating the board every week or two — just like with commercial bristle boards, rotating distributes dart wear across the whole surface instead of letting the 20 and bullseye segments take all the abuse. If your board has fixed markings, you can still rotate it a few degrees and just adjust your mental map of the scoring layout, or set up your mounting system so rotation is easy without pulling the whole thing off the wall.
When individual corks get too chewed up to hold darts reliably, you can swap them out without rebuilding the whole board. Pry the damaged cork out carefully with a flathead screwdriver or thin chisel, scrape off the old adhesive, and glue a fresh one in. Try to match the color reasonably well and it’ll blend in fine — honestly, over time the natural wear of the board tends to pull everything together anyway. Keep a small jar of spare corks somewhere near your game station so you’re never hunting for one when you need it.
The other things to watch out for are moisture and direct sunlight. Cork is a natural material and it doesn’t love humidity — if it absorbs too much, your backing board can warp and your carefully arranged surface can start to buckle. Skip damp spots like poorly ventilated basements for mounting. Prolonged sun exposure is also hard on cork, bleaching and drying it out until it gets brittle and crumbly under dart impact. A wall with indirect, ambient light is the sweet spot — and as a bonus, that kind of soft light tends to show off the warm tones of the cork beautifully anyway.
“`








What do you think?
It is nice to know your opinion. Leave a comment.