










Pallet Home Bar: Build Your Own Rustic Entertainment Space on a Budget
Introduction to Pallet Home Bars
There is something undeniably satisfying about crafting your own home bar from reclaimed materials, and pallet wood offers one of the most accessible and rewarding paths to that goal. Wooden pallets, those humble workhorses of the shipping and logistics industry, have found a second life as the building blocks of some genuinely stunning home entertainment spaces. Whether you envision a cozy corner in your basement, a statement piece in your living room, or an outdoor entertaining hub on your patio, a pallet home bar can be tailored to fit virtually any vision or space.
The appeal of pallet furniture goes far beyond cost savings, though the economics are certainly compelling. Pallets carry with them a weathered, authentic character that simply cannot be replicated by factory-made furniture. The grain variations, the nail holes, the slight discolorations from years of use — all of these imperfections become design features in the hands of a creative builder. A pallet home bar tells a story, and it invites conversation in a way that a flat-pack alternative never could.
This guide will walk you through everything you need to know to plan, build, and finish a pallet home bar that you will be genuinely proud to show off. From sourcing the right materials and understanding safety considerations, to construction techniques and final styling touches, you will come away with a complete roadmap for one of the most rewarding DIY projects a home enthusiast can undertake. Even if you have limited woodworking experience, the forgiving nature of pallet construction means this project is well within reach.
Sourcing and Preparing Your Pallets
Finding pallets is remarkably easy once you know where to look. Garden centers, hardware stores, furniture retailers, grocery wholesalers, and manufacturing facilities all receive regular shipments on pallets, and many are eager to give them away rather than pay for disposal. It is worth calling ahead to ask, as many businesses set pallets aside for regular collectors. Online marketplaces and community boards are also excellent sources, with free or low-cost pallets listed frequently in most areas. The key is to seek out pallets in good structural condition, avoiding those with broken boards, deep staining, or signs of pest infestation.
Not all pallets are created equal, and safety is a genuine consideration when sourcing wood for furniture you will use indoors. Always look for the IPPC (International Plant Protection Convention) stamp on the pallet. Pallets marked with HT have been heat-treated and are considered safe for home use and indoor projects. Avoid any pallet marked MB, which indicates methyl bromide treatment — a chemical fumigation process that renders the wood unsuitable for furniture making. Pallets without any markings should be treated with caution and are generally best avoided for projects where food, drinks, or close human contact are involved.
Once you have sourced suitable pallets, preparation is the next critical step. Begin by cleaning each pallet thoroughly with a stiff brush to remove dirt, debris, and any loose material. Sand all surfaces with progressively finer grits of sandpaper, starting around 80-grit to remove splinters and rough patches, then moving to 120-grit and finally 220-grit for a smooth finish. Pay particular attention to any boards that will be at counter height or face level. After sanding, wipe down the wood with a damp cloth and allow it to dry completely before proceeding to any finishing or construction work.

Planning Your Design and Layout
Before you pick up a single tool, investing time in thoughtful planning will save you considerable effort and expense down the line. Begin by measuring the space where your bar will live. Consider the flow of the room — you will want enough clearance for people to move comfortably around the bar, and if it is an outdoor installation, think about sun exposure, proximity to the house, and access to power if you plan to include lighting. Sketch out your design on paper or use a free online planning tool to visualize proportions before committing to any cuts.
Standard bar counter height is typically around 42 inches from the floor, which accommodates bar stools comfortably. If you are building a lower counter more suited to standard seating, aim for around 36 inches. The depth of your counter surface should be at least 16 inches to provide a usable work area, though 24 inches is more comfortable if space allows. Think about how many shelves you want for bottle storage, whether you need a lower cabinet section for concealed storage, and whether you want an overhanging counter that guests can sit at. All of these decisions will influence how many pallets you need and how they are arranged.
A practical planning checklist for your pallet bar project should include the following considerations:
- Total dimensions: height, width, and depth of the finished bar
- Number of pallet units required and how they will be oriented
- Counter surface material — additional plywood, reclaimed wood planks, or tile
- Shelf configuration and spacing for bottles, glasses, and accessories
- Electrical needs: LED strip lights, a mini refrigerator, or a blender outlet
- Finish type: paint, stain, varnish, or a combination approach
- Anchoring method, especially important for freestanding outdoor installations
With your design locked in, create a materials list before you begin building. Knowing exactly what you need prevents multiple trips to the hardware store and keeps the project momentum going. Beyond the pallets themselves, you will likely need wood screws, metal L-brackets for reinforcement, sandpaper in multiple grits, wood filler for gaps or blemishes, your chosen finish products, and potentially plywood or MDF for the bar top. Having everything on hand before you begin makes for a smoother, more enjoyable build process.
Construction: Step-by-Step Building Process
The construction phase is where your vision begins to take physical form, and with pallets, the process is more accessible than you might expect. Start by deciding on the base structure. For a standard L-shaped or straight bar, pallets are typically stacked vertically two or three high to achieve bar counter height. The key structural principle is to ensure that every pallet is securely fastened to its neighbors using wood screws driven through the frame members, supplemented by metal L-brackets at critical joints. Do not rely on the pallet boards themselves to bear structural loads — always drive fasteners into the thicker frame timbers.
For the back of the bar, which will serve as your bottle and glass shelving display, additional pallet sections can be mounted vertically against a wall or to a freestanding frame. Remove individual boards from spare pallets to create custom shelf spacings that suit your bottle and glass sizes. A good rule of thumb is to allow at least 13 inches of vertical clearance for wine bottles laid horizontally, and at least 10 inches for standard spirit bottles standing upright. Install a dedicated glass rack section with tighter board spacing so that inverted glasses can rest securely between the slats.
The bar top is arguably the most important surface in the entire build, as it will receive the most use and scrutiny. Several attractive options are worth considering depending on your budget and aesthetic goals:
- Plywood with edge trim: A cost-effective solution that provides a smooth, level surface. Router a decorative edge profile and finish with multiple coats of polyurethane for durability.
- Reclaimed wood planks: Boards removed from pallets can be planed, edge-glued, and finished to create a beautiful solid-wood counter top with genuine character.
- Ceramic or porcelain tile: Offers excellent durability and water resistance, with an enormous range of aesthetic options from rustic stone-look tiles to sleek modern finishes.
- Poured epoxy resin: A more advanced option that allows you to embed decorative elements like bottle caps, coins, or wood slices in a clear, glossy, highly durable surface.
- Concrete overlay: An industrial-modern look that pairs beautifully with raw pallet wood and can be sealed for excellent stain resistance.
Once the main structure is complete and the bar top is installed, turn your attention to the finer details of the build. Fill any gaps between pallet boards with flexible wood filler to create cleaner lines and prevent items from slipping between boards. Sand the entire structure one final time with 220-grit paper to ensure a smooth, consistent surface for your finish. Check every joint for tightness and drive additional screws anywhere that feels even slightly loose. A bar that wobbles or creaks will undermine confidence in the entire project, so take the time to make the structure genuinely solid before moving on to finishing.

Finishing, Staining, and Sealing Your Pallet Bar
The finishing stage is where your pallet bar transforms from a construction project into a piece of furniture, and the choices you make here will define the character and longevity of the final piece. Begin by applying a wood conditioner if you are planning to use a stain — pallet wood is often a mix of different species and porosity levels, and a conditioner helps ensure an even absorption of stain across the entire surface. Without conditioning, you may end up with blotchy, uneven color that detracts from the overall appearance.
In terms of color direction, the most popular choices for pallet bars reflect the material’s inherent rustic character. A dark walnut or ebony stain creates a dramatic, sophisticated look that pairs beautifully with brass hardware and pendant lighting. A medium-toned honey oak or golden pecan stain preserves the warmth of the wood while giving it a more refined appearance. For a beachside or farmhouse aesthetic, a weathered grey stain or a white-wash technique can create a beautifully relaxed atmosphere. Alternatively, a bold painted finish — deep navy, forest green, or classic black — can give the bar a more contemporary or dramatic personality while concealing the varied grain of the pallet wood underneath.
Sealing is non-negotiable for a bar surface that will be exposed to spills, moisture, and regular wiping. For the bar top specifically, apply a minimum of three coats of a water-based polyurethane, lightly sanding between each coat with 400-grit paper for maximum adhesion and smoothness. Water-based polyurethane is preferable to oil-based for most indoor applications because it dries clear without yellowing, cures faster, and has significantly lower VOC emissions. For the sides and shelving, two coats of a satin or semi-gloss polyurethane will provide adequate protection while being easier to touch up if needed in the future.
Styling, Accessories, and Final Touches
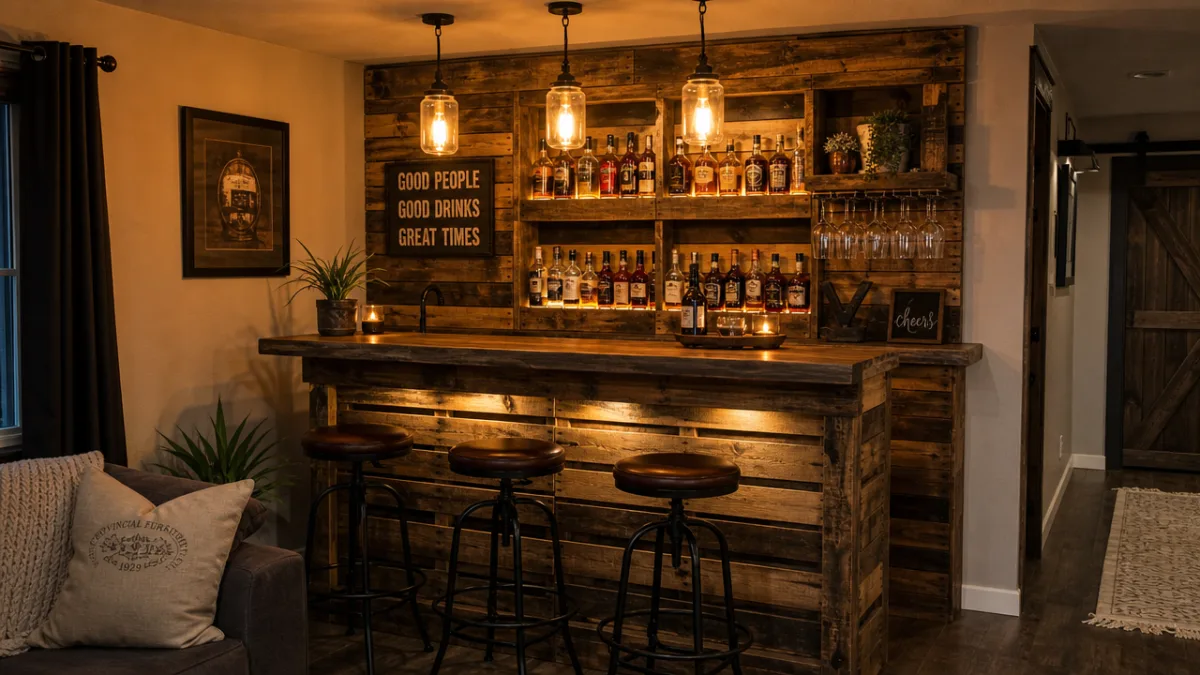
With the construction and finishing complete, the styling phase is your opportunity to give the bar its personality and make it genuinely functional for entertaining. Lighting is perhaps the single most impactful finishing touch you can add to a home bar, and LED strip lights installed along the underside of shelves or behind the back bar create an atmospheric glow that transforms the space, especially in the evening. Warm white LEDs in the 2700K to 3000K range give the most flattering, welcoming ambiance, while RGB strips allow you to change the mood for different occasions.
Hardware choices play a significant role in tying the aesthetic together. For a rustic or industrial look, seek out cast-iron or raw-steel drawer pulls, pipe-style towel bars, and Edison-bulb pendant lights. For a more polished rustic-chic appearance, brushed brass or antique bronze hardware strikes a beautiful balance with the warmth of the wood. Install a few hooks beneath the counter overhang for hanging bar towels, and consider a simple rail system on the back bar for hanging wine glasses within easy reach. These functional accessories also double as decorative elements that signal the space as a genuine, well-considered home bar.
The organization of your bottles, glasses, and bar accessories contributes enormously to both the functionality and the visual appeal of your finished bar. A well-curated arrangement of spirits with a few decorative elements interspersed — a small potted succulent, a vintage cocktail book, a handsome ice bucket — transforms the back bar from simple storage into a display worth admiring. Consider these organizing principles to get the most from your shelf space:
- Group spirits by category: whiskeys together, gins together, and so on, for easy navigation during cocktail making
- Place your most-used bottles at the most accessible height, typically eye level or just below
- Invest in a small, dedicated wine rack section if you regularly entertain with wine
- Use a shallow tray or small cutting board to corral frequently used tools like the jigger, bar spoon, and strainer
- Keep a hidden lower shelf or cabinet section for bulk supplies, spare bottles, and less attractive necessities
Do not underestimate the impact of the surrounding environment on how your pallet bar is perceived and enjoyed. A bar stool selection that complements the aesthetic of the bar — industrial metal stools for a raw look, upholstered counter stools for a more sophisticated feel — will frame the entire installation beautifully. If the bar is outdoors, consider adding a pergola or sail shade overhead, a string of festoon lights, and some weather-resistant planters with herbs or greenery to create a complete outdoor entertaining destination rather than simply a standalone piece of furniture.
Maintenance, Longevity, and Upgrading Over Time
A well-built and properly finished pallet bar is a surprisingly durable piece of furniture, but like any wood installation, it benefits from regular care and attention. Wipe down the bar top after every use to prevent liquid from sitting on the surface, which can eventually work its way into the sealant and cause discoloration or swelling. Use a pH-neutral wood cleaner or simply a damp cloth with a mild dish soap solution for routine cleaning. Avoid harsh chemical cleaners, bleach-based products, or abrasive scrubbing pads, all of which can dull or damage the polyurethane finish over time.
Every year or two, inspect the bar top finish carefully for signs of wear — small scratches, areas of dullness, or spots where the sealant has worn thin. These areas are best addressed promptly before moisture has a chance to penetrate the wood beneath. Light scuffs can often be buffed out with a fine-grit sanding sponge and a fresh coat of polyurethane, while deeper scratches may require a more thorough sand and recoat. If the bar is located outdoors or in a high-humidity environment like a basement, inspect the structural joints annually and re-tighten any fasteners that have loosened as the wood expands and contracts with seasonal moisture changes.
One of the great joys of a pallet bar is that it invites ongoing evolution and personalization. As your taste develops and your entertaining style changes, the bar can grow with you. Adding a mini refrigerator requires simply cutting an opening in the lower cabinet section and ensuring adequate ventilation — a modification that dramatically increases the bar’s functionality for entertaining. New shelving can be added to accommodate a growing collection, a tap system for draft beer can be incorporated with some planning, and the finish can be refreshed or changed entirely to suit a room redecoration. Unlike mass-produced furniture, your pallet bar is fully understood by its builder, making every future modification straightforward and satisfying to undertake.








What do you think?
It is nice to know your opinion. Leave a comment.