










Home Gym Storage Wall Ideas: Garage Gym Organisation Inspiration
Why a Well-Organised Gym Wall Changes Everything
There’s something instantly deflating about walking into a garage gym that looks like a yard sale. Resistance bands in a knotted heap, dumbbells scattered across the floor, a kettlebell slowly rolling toward your car — none of that puts you in the headspace to train hard. A proper storage wall fixes all of that. When every piece of equipment has a place it actually lives, the space stops feeling like an obstacle course and starts feeling like somewhere you actually want to be.
And it’s not just a practical thing — the psychology of it is real. Research in environmental psychology has shown fairly consistently that cluttered spaces raise cortisol and make it harder to focus, while tidy, ordered ones give you a sense of control and competence. A well-organised gym wall isn’t just solving a storage problem; it’s quietly making it easier to show up and train consistently. That motivation, compounded over months, is worth more than almost any piece of kit you could add to the space.
There’s also a genuine safety argument here. Free weights left on the floor are a trip hazard, especially when you’re mid-lunge or coming off a box jump. A barbell leaning against a wall can come down without much warning. Even something as innocent as a stray jump rope handle becomes a problem when you’re moving fast in a small space. A well-designed storage wall keeps everything mounted, racked, and out of the way — so you can train without one part of your brain constantly monitoring where you’re stepping.
Planning Your Storage Wall: Measuring, Budgeting, and Prioritising
Before you order a single hook or bracket, take the time to actually measure your wall and make a list of everything you own. One useful trick is to stick painter’s tape on the wall to mark out your planned zones, then leave it there for a couple of days before you commit to drilling anything. It’s also worth figuring out early what your wall is actually made of — stud-mounted systems can hold serious weight without complaint, but drywall anchors alone won’t cut it for anything heavy. Understanding your wall’s construction now saves you from an expensive headache later.
The good news is that you don’t need to spend a lot to get a solid result. A basic setup using pegboard and steel hooks can come together for well under a hundred pounds or dollars, while premium modular systems from brands like Titan Fitness, Rogue, or PRx will set you back several hundred. The smart approach is to start with the things that cause the most floor clutter — usually a barbell holder, some form of plate storage, and a dumbbell rack — and layer in the smaller stuff like band hooks and foam roller storage as you go.
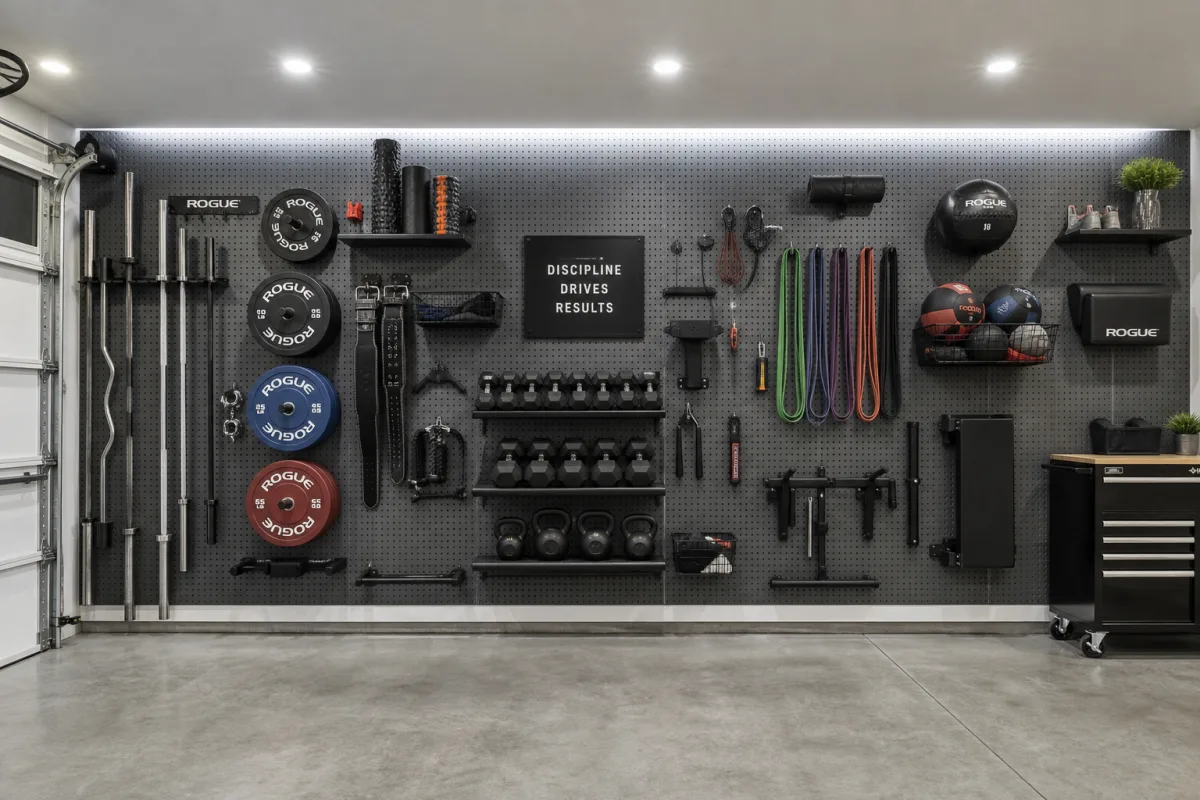
When you’re thinking about layout, work in vertical zones. Heavier items like plates and kettlebells should live at a lower height where you can get a solid grip on them without hauling them down from above. Dumbbells and medicine balls sit naturally at mid-wall. Lighter accessories — resistance bands, jump ropes, lifting belts, chalk — can go higher up where they’re easy to spot and grab without much effort. Once you internalise that logic, the whole wall becomes intuitive to use even when you’re halfway through a tough session and not really thinking about it.
Essential Storage Systems for Every Home Gym
A reliable barbell holder is the foundation of any serious gym wall. Getting your bars off the floor protects the knurling, frees up a surprising amount of usable space, and just makes the whole room feel more intentional. Most good horizontal holders are designed for two to four bars and mount straight into studs. If you’re tight on horizontal space, vertical holders that store bars upright in a column are a solid alternative — they tuck neatly into a corner without eating into your training area at all.
Weight plate storage is probably the single most impactful upgrade you can make to a garage gym. Plates stacked on the floor or leaned against a wall look chaotic, can damage your flooring, and are genuinely awkward to sort through. A wall-mounted plate tree or a row of horizontal pegs keeps everything visible and sorted. A lot of experienced home gym owners mirror their plate pegs — one on each side of the wall — so that loading a bar for any given lift is automatic. When the setup removes friction from that process, your rest periods stay cleaner and your focus stays where it belongs.
Dumbbell storage is worth thinking about properly rather than just finding a spare shelf. Wall-mounted horizontal holders that attach to a French cleat system are popular for good reason — you can reposition them without any new drilling whenever your needs change. Angled wall-mounted racks are another great option, keeping pairs compact and easy to grab mid-set. If you have a wide range of weights, it’s worth labelling each storage position. It sounds like overkill until you’re exhausted at the end of a superset and can’t remember where the 20kg pair lives.
For smaller accessories, a mix of pegboard, slat wall panels, and purpose-made hooks gives you a lot of flexibility. The following items all benefit from having a proper dedicated spot on the wall:
- Resistance bands sorted by resistance level and hung individually on labelled hooks
- Jump ropes coiled and hung on single pegs to prevent tangling
- Lifting belts hung flat or on wide hooks to preserve their shape
- Foam rollers and massage balls stored in angled holders or open-front bins
- Chalk blocks or loose chalk in a sealed wall-mounted container
- Gloves, straps, and wrist wraps in a small open bin or hanging bag
French Cleat Systems: The Most Flexible Gym Wall Solution
If there’s one storage system the home gym community keeps coming back to above everything else, it’s the French cleat wall. The concept is beautifully simple: lengths of plywood or MDF with a 45-degree angled cut along one edge, mounted horizontally across the wall. Any holder, hook, shelf, or bracket with a matching 45-degree cut on the back just drops onto the cleat and locks in place under its own weight. No additional fixing required. You can pull something off and move it somewhere else in seconds, without touching a drill.
What makes French cleats so well-suited to a gym wall is how well they handle change. As your equipment collection grows, your storage wall grows with it. Buy a new set of kettlebells and slide a new holder into an open section. Switch from a fixed barbell to adjustable dumbbells and reallocate the space the same afternoon. For anyone still building out their home gym — which is most of us, really — that kind of adaptability is invaluable. You’re not locked into a layout that might not make sense in six months’ time.
And building one is genuinely approachable as a DIY project, even if you haven’t done much woodworking. The materials are straightforward: 18mm or 3/4-inch plywood, a table saw or circular saw with a guide rail, and long screws that can reach the studs. Covering a full garage wall floor-to-ceiling with French cleats typically costs a fraction of what you’d spend on commercial storage systems, and the result looks clean and completely custom. If you paint the cleats a dark colour — charcoal, black, or deep navy — the finished wall looks genuinely premium, the kind of thing you’d see in a well-kitted commercial facility.
Aesthetic Considerations: Making Your Gym Wall Look as Good as It Functions
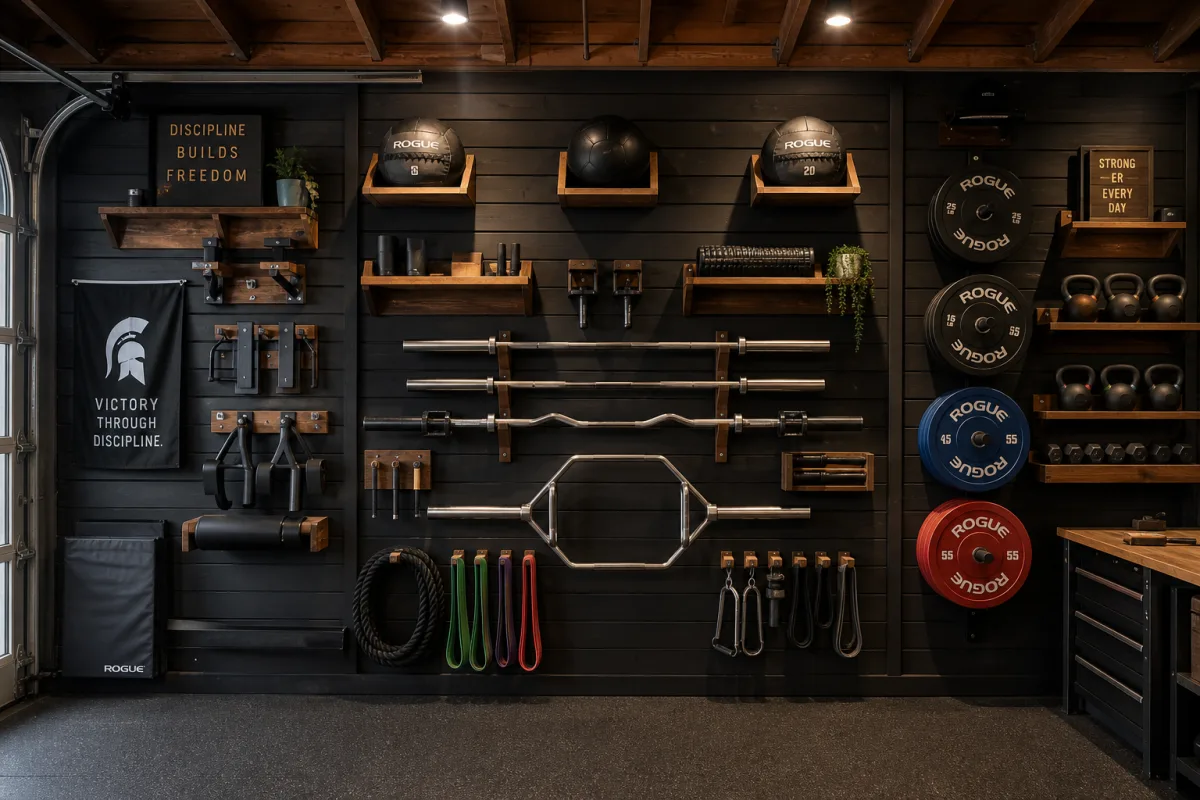
A storage wall doesn’t have to feel purely utilitarian. The best home gyms out there manage to be both highly functional and genuinely good-looking, and that starts with making a few deliberate choices about appearance. Picking a consistent colour palette — one that ties in with your flooring or equipment — immediately lifts the space from “functional storage” to “actual design feature.” Lots of gym owners go dark on the background wall specifically because it makes the equipment pop visually, creates a strong focal point, and is much more forgiving of the inevitable scuffs and chalk marks.
Lighting is one of those things people consistently underinvest in, and it makes a bigger difference than you’d expect. A well-lit storage wall doesn’t just look better — it’s more useful. You can see exactly what you’re reaching for without squinting into shadow. LED strip lights along the top edge of the wall are a clean, modern choice that throws even light across everything below. Under-shelf puck lights add depth and a bit of drama to the display. Good lighting signals that the space was thought through, not just thrown together.
Signage, numbering, and labelling might feel like minor finishing touches, but they do a lot for both the look and the daily usability of your wall. Vinyl cut labels on holders look sharp and last well. A section of chalkboard paint gives you space for programming notes, PR records, or a quote you keep coming back to — and it can be wiped clean whenever you want. Some people integrate a full whiteboard panel into the wall, which doubles as a planning and tracking tool built right into the structure of the space. These kinds of personal details are what turn a generic storage setup into something that actually feels like yours.
Maintaining Your Storage Wall: Systems for Long-Term Organisation
The most common way gym storage systems fail isn’t in the build — it’s in the slow drift that happens over weeks of heavy use. Something gets hung on the nearest hook after a rushed session. A few accessories end up on the floor “just for now.” A few weeks of that and you’re back where you started. The most effective way to prevent it is to make putting something away correctly easier than putting it away incorrectly — which is exactly what a well-designed storage wall does when every item has an obvious, dedicated home.
A quick monthly audit takes less than ten minutes and stops small slip-ups from compounding into a real mess. Walk the wall, check that everything is where it belongs, and deal with anything that’s accumulated without a proper place. It’s also a good prompt to ask whether your current layout still fits how you’re actually training — if your programming has shifted or you’ve added new equipment, the wall should reflect that. Think of it as a living system that you tweak over time rather than a one-time install you never revisit.
Regular cleaning is another habit that’s easy to skip and worth building in. Gym equipment picks up chalk dust, sweat, and general grime, and it transfers to holders and hooks over time. A monthly wipe-down with a damp microfibre cloth keeps things looking good and also gives you the chance to check that mounting hardware is still tight, nothing has shifted, and there are no early signs of rust or wear. You don’t need to turn it into a major inspection — a methodical visual check combined with a quick squeeze-test on load-bearing brackets takes only a few minutes and keeps the whole setup as reliable as the day you built it.
Finally, consider sharing what you’ve built with the wider home gym community. The garage gym world online is genuinely generous — post your setup and you’ll almost certainly get useful suggestions you hadn’t thought of. A well-documented build with a materials list, rough costs, and an honest account of what you’d do differently is exactly the kind of content that helps other people get their own space sorted. Contributing to that pool of shared knowledge is worthwhile in its own right, and the encouragement you get back turns out to be a surprisingly effective reason to keep the space maintained and keep improving it.








What do you think?
It is nice to know your opinion. Leave a comment.