










Hand-Painted Floral Mason Jar Candle Lantern for Rustic Home Decor
The Timeless Charm of Mason Jar Crafting
There is something deeply satisfying about transforming an everyday object into a piece of home decor that radiates warmth and personality. Mason jars have long been a staple of American kitchens and pantries, but over the past decade they have emerged as one of the most beloved canvases for DIY artistry. Their simple, honest glass construction lends itself beautifully to painting, etching, and decorating, making them the ideal starting point for anyone who wants to bring a handmade touch into their living space without investing in expensive materials or professional skills.
The hand-painted floral mason jar candle lantern represents this tradition at its finest. By combining the soft glow of candlelight with delicate botanical brushwork, crafters can create pieces that evoke the gentle aesthetic of a countryside cottage, a farmhouse dining table, or a sun-drenched garden porch. Whether you prefer wildflowers, roses, lavender sprigs, or abstract petal designs, the mason jar becomes a vessel not just for light but for personal expression and creative storytelling.
What makes this particular craft so appealing is its accessibility. You do not need to be a trained artist to achieve beautiful results. With the right materials, a little patience, and a willingness to experiment, even complete beginners can produce lanterns that look thoughtful, intentional, and genuinely lovely. The finished pieces make wonderful gifts, centerpieces for weddings and events, and everyday accents that bring a sense of handmade warmth to any room in the home.
Why Rustic Decor Continues to Captivate
Rustic home decor has maintained its popularity for years because it speaks to a desire for authenticity in an increasingly digital and mass-produced world. The aesthetic celebrates imperfection, natural materials, and the visible hand of the maker. Unlike sleek, minimalist interiors that can feel cold or impersonal, rustic spaces invite you to slow down, breathe deeply, and feel genuinely at home. Handmade elements like painted mason jars are a perfect expression of this philosophy, carrying the energy of the person who created them.
Floral motifs are a cornerstone of rustic and farmhouse-style decor because they connect the indoor environment to the natural world outside. Whether rendered in muted earthy tones or soft watercolor-inspired hues, painted flowers on a glass jar catch the light in ways that printed or manufactured decor simply cannot replicate. Each brushstroke carries a subtle irregularity that makes the piece feel alive and one-of-a-kind, reinforcing the rustic ideal that beauty is found in the handcrafted and the genuine.
Beyond aesthetics, rustic decor has practical staying power. It layers beautifully with other styles, complementing modern farmhouse interiors, boho-eclectic spaces, vintage collections, and traditional country kitchens alike. A cluster of hand-painted floral mason jar lanterns on a wooden mantelpiece, a windowsill, or a dining table creates an instant focal point that feels curated without looking overdone. This versatility is one of the key reasons so many home decorators and craft enthusiasts continue to return to this style season after season.
Materials You Will Need
Gathering the right materials before you begin is essential to ensuring a smooth and enjoyable crafting experience. The quality of your supplies will directly influence the final result, so it is worth taking a little time to source items thoughtfully. Fortunately, most of what you need is widely available at craft stores, hardware shops, or online retailers, and the total investment is quite modest compared to the decorative value of the finished lanterns.
For the jars themselves, standard wide-mouth mason jars in quart or pint sizes work exceptionally well. The wider mouth makes it easier to insert a tea light or small pillar candle, and the broader surface area gives you more room to paint. Look for jars with smooth sides rather than heavily embossed text, as a smooth surface takes paint more evenly and provides a cleaner background for your floral designs. Clear glass is the classic choice, but lightly tinted vintage-style jars in pale blue or green can add a lovely subtle color to the lantern’s glow.
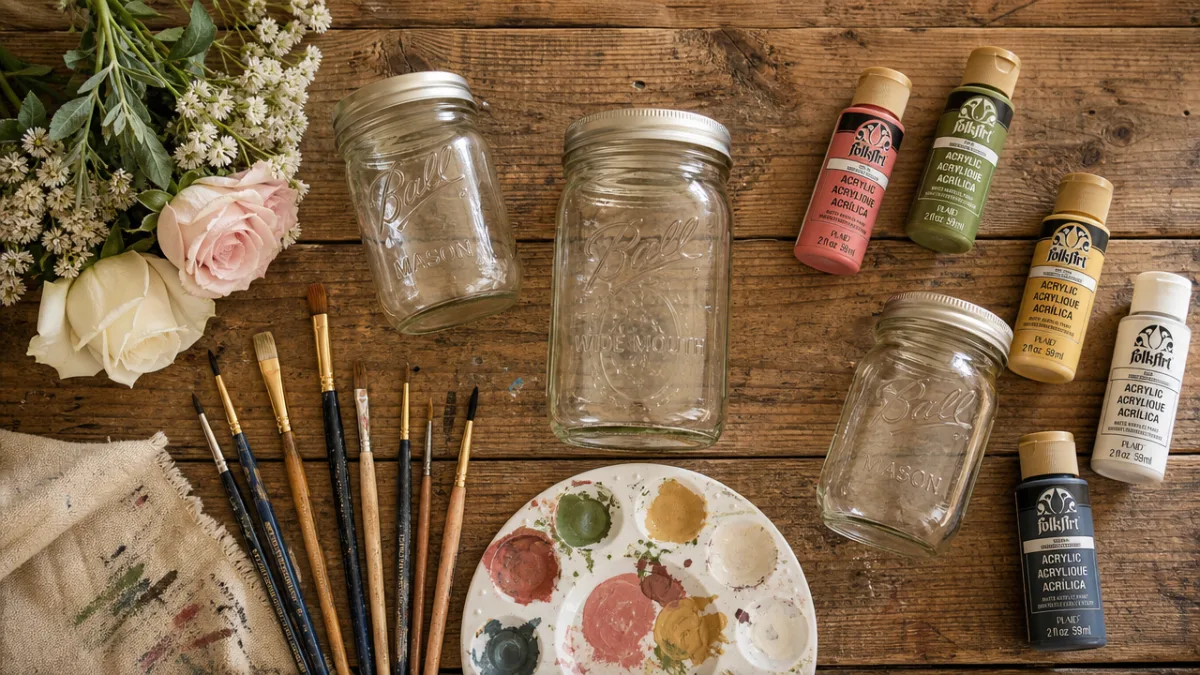
Paint selection is particularly important. Acrylic enamel paints formulated specifically for glass surfaces are strongly recommended, as they adhere well, dry to a durable finish, and can be set with heat to improve longevity. Folk Art Enamel and DecoArt Glass Paint are both popular choices among crafters. You will also want a selection of fine-tipped paintbrushes for detail work, a medium round brush for petals and leaves, and a flat brush for background washes if you choose to add one. Additional supplies include painter’s tape for clean edges, rubbing alcohol for surface preparation, and a liner or stylus tool for dotting flower centers.
- Wide-mouth mason jars (quart or pint size, smooth-sided)
- Acrylic enamel glass paint in floral colors (white, pink, sage green, yellow, lavender)
- Fine-tip and round paintbrushes in multiple sizes
- Rubbing alcohol and lint-free cloth for surface prep
- Painter’s tape or masking tape
- Dotting tool or stylus for flower centers
- Foam brush for sealing or background washes
- Tea light candles or battery-operated LED tea lights
- Optional: chalk paint for a matte, vintage finish
- Optional: twine, ribbon, or wire for hanging or embellishment
Step-by-Step Painting Technique
Preparation is the foundation of a successful painted glass project. Before you apply a single brushstroke, clean each jar thoroughly with rubbing alcohol on a lint-free cloth. This removes any oils, fingerprints, or residue from the glass surface that would prevent the paint from adhering properly. Allow the jar to dry completely before touching the surface with your bare hands again. Some crafters wear lightweight cotton gloves during the painting process to avoid transferring oils from their fingertips, which is a habit worth adopting if you plan to make multiple jars.
Begin with a light pencil sketch directly on the glass if you are new to freehand painting. A white chalk pencil works beautifully on glass and can be wiped away easily with a damp cloth if you make an error. Plan the placement of your floral elements loosely, considering how the design will look when candlelight glows from inside the jar. Flowers positioned toward the lower half of the jar will be especially striking when lit from below, while designs scattered across the entire surface create a more whimsical, all-over pattern. There is no single correct approach, so trust your instincts and let the design evolve organically.
When painting, work from background elements to foreground details. Begin with leaves and stems using a sage green or olive tone, then add your largest flower shapes, and finally layer in smaller accent blooms and fine details. Allow each layer to dry before adding the next to prevent colors from mudding together. Most glass enamel paints dry to the touch within fifteen to thirty minutes, though full curing takes longer. Using a hair dryer on a low, cool setting can speed up drying time between layers without affecting the paint quality.
Flower Painting Techniques for Beginners
One of the most encouraging aspects of painting flowers on glass is that simple techniques can yield remarkably beautiful results. The humble dot flower, made by pressing the rounded end of a stylus or the wooden handle of a paintbrush into the paint and then onto the glass, creates charming five-petal blossoms that are nearly foolproof. Group several of these in a loose cluster with tiny green leaves, and you have an instantly appealing wildflower motif that looks intentional and skilled even if you have never painted before.
For roses, try the spiral stroke technique: load a small round brush with paint and, starting at the center of the flower, make a tight circular motion that gradually widens outward, releasing pressure as you go. The result is a loose, impressionistic rose shape that looks painterly and romantic. Varying the pressure on your brush as you stroke gives petals a natural sense of dimension without requiring you to paint shadows or highlights separately. Practice this stroke on a piece of paper before committing it to the glass, and within just a few attempts you will find a rhythm that feels natural and produces consistent results.
Lavender and wildflower sprigs are another excellent choice for beginners because they are forgiving and highly textural. Use a fine-tip brush loaded with purple or lilac paint to make tiny upward flicks along a central stem, building density at the top and tapering toward the bottom. Add a few wispy stems in varied heights around your main sprig to create a sense of movement and natural growth. Pair lavender with white daisies and soft yellow centers for a classic meadow-inspired composition that works beautifully in any rustic or farmhouse-style interior.
Curing, Finishing, and Safety Considerations
Once your painted design is complete and fully dry to the touch, the paint needs to be cured to achieve maximum durability and water resistance. Most glass enamel paints can be heat-set in a standard home oven. Place your painted jars on a baking sheet lined with a silicone mat or parchment paper, then put them in a cold oven. Set the temperature to 350 degrees Fahrenheit and allow the oven to come to temperature with the jars inside, which helps prevent thermal shock to the glass. Bake for thirty minutes, then turn the oven off and allow the jars to cool completely inside before removing them. This process bonds the paint to the glass at a molecular level, dramatically improving its longevity.
After curing, your lanterns should be handled with reasonable care. While heat-set enamel paint is significantly more durable than uncured acrylic, these pieces are still best treated as decorative rather than functional dishware. Wipe them clean with a damp cloth rather than submerging them in water or placing them in a dishwasher. If you plan to display the lanterns outdoors occasionally, consider applying a clear outdoor-formulated glass sealer over the top of the paint for added weather resistance, allowing it to dry fully before placing any candle inside.
Candle safety is an important consideration for any lantern project. Always use tea lights in metal cups rather than bare candles placed directly on the bottom of the jar, as the metal cup contains any dripping wax and distributes heat more evenly. Battery-operated LED tea lights are an excellent alternative, especially in homes with children or pets, as they produce the same warm flickering glow as a real flame without any fire risk. Never leave burning candles unattended, and ensure that the jar is placed on a heat-resistant surface when in use. These simple precautions allow you to enjoy your beautiful lanterns with complete peace of mind.

Sealing and Embellishing Your Lantern
Beyond the paint itself, there are many ways to add finishing touches that elevate your lantern from a simple painted jar to a truly polished decorative piece. Natural twine tied in a bow around the neck of the jar adds an immediate rustic character and can be adorned with a small sprig of dried lavender, a vintage-style button, or a tiny gift tag if you are giving the lantern as a present. Burlap ribbon is another popular choice that complements the floral painting beautifully and reinforces the farmhouse aesthetic without competing with the artwork.
Wire-wrapped handles allow mason jar lanterns to be hung from shepherd’s hooks, tree branches, or curtain rods, which dramatically expands their decorative possibilities. To create a simple handle, cut a length of eighteen-gauge craft wire, wrap it twice around the neck of the jar just below the threading, twist the ends together to secure, then shape the remaining wire into an arch handle above the jar. This takes only a few minutes and transforms a tabletop lantern into a hanging accent that catches the light from all angles as it gently moves in a breeze.
Consider also the possibility of creating coordinated sets of lanterns in varying sizes and slightly different floral designs. A grouping of three jars in quart, pint, and half-pint sizes, each painted with a different flower but in the same color palette, creates a cohesive vignette with a collected, layered feel. This approach works particularly well as a wedding centerpiece, a mantelpiece display, or a tablescape for a garden party or seasonal celebration. The slight variation between pieces reinforces the handmade quality that makes these lanterns so appealing in the first place.
Creative Display Ideas and Seasonal Variations
One of the greatest pleasures of making hand-painted floral mason jar lanterns is discovering how many different ways they can be displayed and enjoyed throughout your home and across the changing seasons. In spring and summer, a cluster of lanterns painted with cheerful sunflowers, daisies, and poppies looks stunning on an outdoor patio table or a porch railing, especially when lit at dusk as the garden settles into the evening. Pair them with potted herbs, linen napkins, and wooden serving boards for a casual alfresco dining setup that feels effortlessly welcoming.
As autumn arrives, shift your palette toward warm ochres, burnt oranges, deep burgundies, and golden yellows to paint sunflowers in their late-season glory, or simple leaf and berry motifs that echo the colors of the changing landscape outside. These warmer tones glow magnificently when candlelit and pair beautifully with pumpkins, dried corn, pinecones, and other seasonal naturals. Group several lanterns at different heights on your fireplace mantel or dining table for an autumn centerpiece that is both atmospheric and entirely personal.
Winter and the holiday season offer yet another opportunity to reimagine your lanterns. While the rustic floral theme can remain, adding touches of white paint to suggest frost or snow on the petals, or incorporating small holly berry clusters and pine branch details, brings the design in line with the colder months. Paired with cinnamon-scented candles and draped with a garland of dried orange slices and cloves, these lanterns become part of a fully realized seasonal tablescape that fills the home with warmth, scent, and handmade beauty during the darkest months of the year.
Gifting Your Handmade Lanterns
A hand-painted floral mason jar candle lantern makes one of the most thoughtful and genuinely personal gifts you can give. Unlike mass-produced items, a handmade piece carries the invisible but deeply felt energy of time, care, and creative intention. Whether you are looking for a housewarming gift, a birthday present, a thank-you token, or a wedding favor, these lanterns communicate a level of thoughtfulness that no store-bought item can quite replicate. Customizing the floral design to reflect the recipient’s favorite flower or color palette makes the gift even more meaningful and memorable.
Packaging your lanterns beautifully requires only a little additional effort. Nest the jar inside a small basket or wooden crate lined with shredded kraft paper or dried moss. Tuck in a few complementary items such as a packet of herbal tea, a small candle, a bundle of dried lavender, or a handwritten note explaining the painting technique and suggesting how to care for the piece. Tie the whole arrangement with a length of natural twine and a sprig of fresh or dried herbs. The result is a gift that feels abundant and curated without requiring a large budget.
If you enjoy crafting and find yourself making multiple lanterns, consider offering them at local craft fairs, farmers’ markets, or through an online shop. Handmade floral lanterns consistently attract buyers who appreciate artisanal quality and the story behind a handcrafted object. Photographing your pieces in natural light against rustic backdrops will showcase their warmth and beauty most effectively, and offering customization options — specific flowers, color palettes, or added text — can help your work stand out in a crowded marketplace. What begins as a personal hobby has the very real potential to grow into a small creative business rooted in something you genuinely love to make.

Building a Sustainable and Joyful Crafting Practice
One of the most rewarding aspects of making hand-painted floral mason jar lanterns is that the practice itself, not just the finished product, brings genuine joy and creative fulfillment. Carving out time in a busy week to sit quietly at a table with paints, brushes, and glass jars is a form of mindful creative practice that many crafters describe as deeply restorative. The focused attention required for fine brushwork quiets the mental chatter of daily life, and the tangible, visual progress of a design emerging on the glass provides a satisfying sense of accomplishment that is increasingly rare in our screen-saturated world.
Sustaining a crafting practice over time means building simple habits that support your creative momentum. Keep a dedicated crafting space, even if it is just a corner of a kitchen table, where your materials are organized and accessible. This reduces the friction of getting started and makes it easier to pick up a project for even twenty or thirty minutes at a time. Maintaining a small sketchbook where you collect floral references, color palette ideas, and rough design sketches will fuel your creative inspiration between painting sessions and give you a running library of ideas to draw from whenever you sit down to work.
Community is another powerful sustainer of creative practice. Connecting with other crafters through local workshops, online forums, or social media groups provides encouragement, accountability, and an endless stream of fresh inspiration. Sharing photographs of your finished lanterns, asking for feedback, and celebrating the work of others creates a positive creative culture that motivates you to keep experimenting and growing. Whether you craft purely for personal enjoyment, to decorate your home, to give meaningful gifts, or to eventually share your work with a wider audience, the hand-painted floral mason jar lantern is a beautiful entry point into a world of creative possibility that is entirely your own to explore and enjoy.








What do you think?
It is nice to know your opinion. Leave a comment.