










“`html
DIY Countertops for Under $60: Transform Your Kitchen on a Budget
If you want a home improvement project that makes a big visual impact without gutting your savings, countertop refinishing might be exactly what you’re looking for. Professional installations can run into the thousands, which puts that dream kitchen firmly in the “someday maybe” category for a lot of us. But here’s the thing — with the right materials and a little patience, you can completely change the look of your kitchen for less than you’d spend on a decent dinner out. And honestly? The results can be pretty hard to tell apart from professional work.
DIY countertop makeovers have absolutely taken off in recent years, and a big part of that is thanks to home improvement creators who’ve shown the world what’s actually possible on a shoestring budget. Pinterest alone is packed with tutorials covering everything from concrete overlays to painted faux-marble finishes that look genuinely stunning. And it’s not just about the money, though saving a few thousand dollars is obviously a nice bonus. There’s something really satisfying about stepping back and looking at a kitchen you transformed with your own hands.
This guide covers everything you need to pull off a DIY countertop project for under $60 — from picking your method to prepping your surface and nailing the final finish. Whether you’ve done a dozen home projects or you’re just now buying your first foam roller, these techniques are approachable and forgiving. By the time you finish reading, you’ll have a solid plan for your own budget-friendly kitchen refresh.
Understanding Your DIY Countertop Options
Before you head to the hardware store, it’s worth taking a few minutes to understand what’s actually out there so you can pick the right approach for your situation. The most popular and well-tested method is using a countertop paint or refinishing kit — the kind that comes with a base coat, some decorative chips or stone-effect paint, and a topcoat sealer. These are specifically formulated to stick to laminate, tile, or wood surfaces, and when applied correctly they can do a convincing impression of granite, marble, or quartz.
Another option that’s been gaining a lot of fans is the concrete overlay method, where you spread a thin layer of a cement-based product directly over your existing countertop. It takes a bit more skill and prep work, but the result has that modern, industrial look that’s genuinely hard to distinguish from poured concrete — which can cost ten times as much. The natural texture and organic variation you get from a concrete overlay actually adds character in a way that factory surfaces can’t replicate. And with a good sealer on top, it holds up better than you might expect.
If you want to keep things even simpler, solid-color countertop paints have gotten much better in recent years. Products made specifically for kitchen surfaces can handle heat, moisture, and everyday wear in a way that standard wall paint just can’t. You can also experiment with techniques like color washing or sponging, or even use contact paper if you want something completely temporary and commitment-free. Each approach has its trade-offs, and knowing them upfront will save you from making a choice you’ll regret once you’re halfway through the project.
Gathering Your Materials and Tools
One of the best parts of this type of project is how short the supply list is. For the stone-finish paint method, your biggest expense will be the countertop refinishing kit itself, which typically runs between $25 and $40 at most hardware stores or online. These kits usually cover a standard kitchen countertop, and some brands offer larger sizes or include enough product to tackle the backsplash too. Add in a few supplemental supplies and you’ll still come in comfortably under $60.
Beyond the kit, you’ll need some basic tools — many of which you might already own. Medium-grit sandpaper (around 120 to 150 grit) is essential for scuffing up the surface so the new paint has something to grab onto. A foam roller gives you a smooth, even base coat without brush marks. Painter’s tape is a must for protecting your cabinets, walls, and appliances, and a drop cloth or plastic sheeting will save your floor and lower cabinets from drips. A sea sponge comes into play during the decorative step, where you’ll use it to build up that natural stone variation.
Here is a basic materials checklist to help you prepare before starting your project:
- Countertop refinishing kit or stone-finish paint system ($25–$40)
- Medium-grit sandpaper (120–150 grit)
- Foam paint roller and tray
- Painter’s tape (2-inch width recommended)
- Drop cloth or plastic sheeting
- Degreaser or TSP substitute cleaner
- Clean rags or microfiber cloths
- Natural sea sponge for texture application
- Clear polyurethane or epoxy topcoat sealer (if not included in kit)
Getting everything together before you start isn’t just about convenience — it actually matters quite a bit for the outcome. A lot of countertop refinishing products have specific working windows, and if you have to run to the store mid-project, you risk your base coat curing unevenly or your decorative layer drying before you’ve gotten the look you’re going for. Lay everything out in the order you’ll use it, read through the whole process once before you touch anything, and you’ll be in great shape.

Preparing Your Existing Surface
Prep work is honestly the make-or-break step of this whole project. It doesn’t matter how good your paint or kit is — if the surface underneath is dirty, greasy, or too slick for the coating to bond to, you’re going to be disappointed with the results. Most people who end up with peeling, bubbling, or patchy finishes can trace the problem right back to rushing through prep. So yes, this part is less exciting than the actual painting, but give it the attention it deserves and everything else will go much more smoothly.
Start by clearing the countertop completely and scrubbing it down with a degreaser or TSP substitute. Kitchen countertops collect years of cooking grease, soap film, and food residue that you genuinely cannot see but that will absolutely wreck your paint adhesion. Hit every inch of the surface, paying extra attention to the areas around the sink, the stove, and along the backsplash edge. Rinse it well, then let it dry completely — and this might take a few hours, so plan accordingly. Moisture trapped under a new coating leads to bubbling and peeling, so don’t rush it.
Once the surface is fully clean and dry, it’s time to sand. Go over the entire countertop with medium-grit sandpaper, working in even strokes to create a slightly rough texture that the new paint can grip. You’re not trying to strip anything or reshape the surface — just scratching it up enough to give the coating something to hold onto. Pay extra attention to any especially shiny spots, since high-gloss laminate can be stubborn about bonding. After sanding, wipe off all the dust with a damp microfiber cloth, follow up with a dry wipe, and let it dry completely again.
Before you sand, fill any chips, cracks, or damaged spots with a two-part epoxy wood filler or a countertop repair compound. This matters for durability, not just looks — any gap or damage left unsealed is an entry point for moisture that will eventually undermine your whole finish. Let the repairs cure fully per the manufacturer’s instructions, then sand those areas flush with the rest of the surface. When you’re done with prep, you should have a surface that’s clean, dull, smooth, and completely solid. It’s worth snapping a photo at this stage so you can really appreciate the before-and-after later.
Applying the Base Coat and Decorative Finish
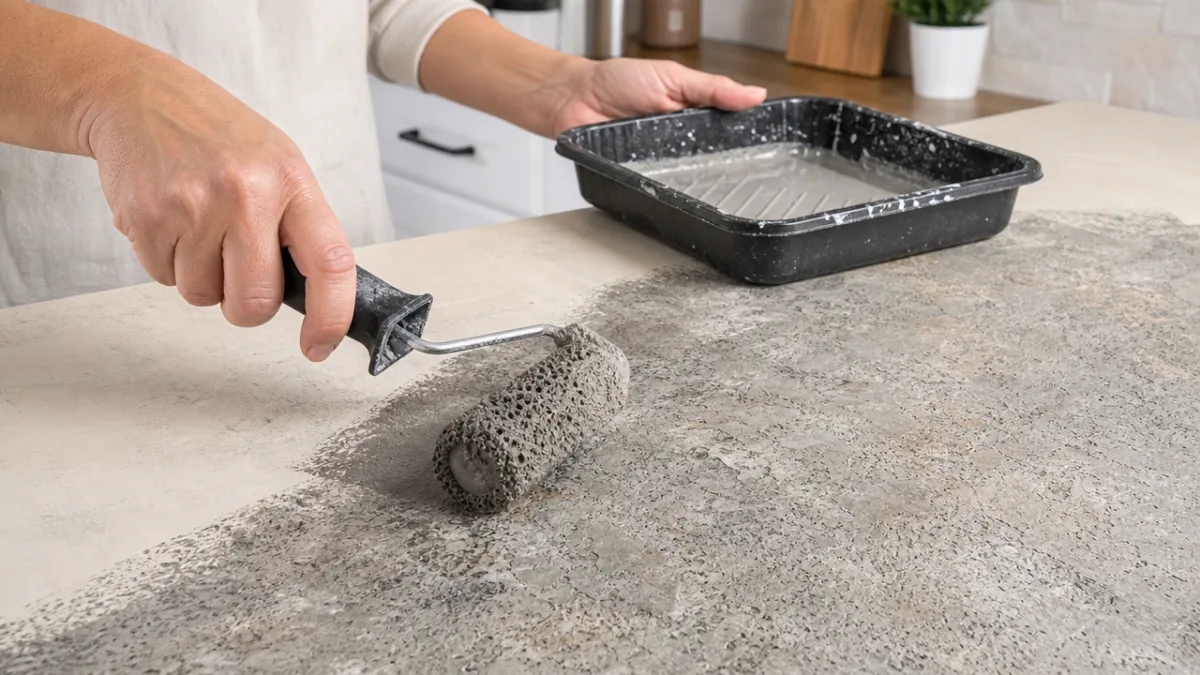
Now for the fun part. Most refinishing kits start with a base coat — a solid, opaque paint that lays down the foundation color for your finished look. For stone-effect finishes, this is usually a neutral gray, white, or cream meant to mimic the background tone of natural stone. Roll it on in long, even strokes from one end of the countertop to the other, and use a small foam brush to cut in around the edges, near the sink, and anywhere the roller can’t quite reach.
Let the base coat dry completely before moving on — most water-based countertop products need somewhere between two and four hours. Even if it feels dry to the touch after an hour, hold off. The coating needs to reach the right level of hardness before you add layers on top. While you’re waiting, clean your roller and brush and get your sponge and accent colors ready to go. Some kits come with pre-colored chips or metallic flakes for dimension, while others rely on sponging multiple paint colors to build up the stone effect.
The decorative step is where the countertop really starts to look like something special — and where you get to have a bit of fun with it. Using a damp sea sponge, dab your accent colors onto the cured base coat in irregular, overlapping patterns. Work in small sections and step back every so often to see how it reads from a normal viewing distance. You want natural-looking variation: denser in some spots, lighter in others, the way real granite or marble actually looks. There’s no single right way to do this, which is actually one of the most freeing parts of the whole project, especially if this is your first time.
Sealing and Curing Your New Countertop
The sealer is what takes your painted surface from “pretty art project” to “actual functioning kitchen countertop.” It’s the layer that protects everything underneath from daily use, moisture, heat, and the inevitable cutting board that lands a little too hard. How well you seal, and what you seal with, will largely determine how long your finish holds up. Many refinishing kits include a sealer, but if yours doesn’t, a water-based polyurethane formulated for high-traffic surfaces works great.
Apply the sealer in thin, even coats with a clean foam roller, working your way systematically across the entire surface without stopping in the middle of a section. Thin coats really do matter here — thick applications are prone to runs, drips, and uneven curing that can leave a cloudy or streaky finish. Plan on two to three coats for solid protection, with a very light sanding between coats using fine-grit sandpaper (220 grit or higher) to knock down any dust or minor imperfections that settled in while it dried. You’re not trying to remove the sealer — just smooth it out.
After the final coat goes on, the hardest part of the whole project begins: waiting. Most countertop refinishing products need a full 24 to 72 hours before the surface can handle regular use, and some need up to a week to reach full hardness. During that window, don’t put anything on it, don’t get it wet, and keep it away from heat. Even light contact during the cure period can leave marks or impressions in the still-softening coating. Set up a temporary kitchen spot somewhere else in your home, and use the downtime to clean your appliances and cabinet fronts so everything looks great together once the countertop is ready.
Maintenance, Longevity, and When to Refresh
A well-applied DIY countertop finish can look great and hold up for two to five years with the right care — and some people get even longer out of theirs. The key is understanding what the finish can and can’t handle and treating it accordingly. Unlike natural stone or solid surface countertops, painted and coated surfaces are a bit more vulnerable to scratching from abrasive cleaners, chipping from heavy impacts, and heat damage from hot pans set directly on the surface. A little mindfulness in your daily routine goes a long way toward keeping it looking fresh.
For everyday cleaning, mild dish soap and a soft cloth or non-abrasive sponge is all you need. Steer clear of anything with bleach, ammonia, or scrubbing particles — those will break down the sealer over time and dull the finish. Always use a cutting board, never cut directly on the surface, and keep a few trivets or heat-resistant pads handy for hot pots and pans. Wipe up spills quickly, especially anything acidic like lemon juice, vinegar, or tomato sauce, since prolonged contact with acids can etch or discolor even a well-sealed surface. These habits are pretty easy to build, and they’ll noticeably extend the life of your finish.
When the finish eventually starts showing its age — a bit of dulling, some light scratches, wear near the sink — the good news is that a refresh is completely within your reach. You’ve already done this once, so you know what you’re doing. In a lot of cases, a light scuff-sanding and a fresh coat of topcoat sealer is all it takes to restore the shine and protection without redoing the decorative layers. For more significant wear, a full refinishing project is still a very affordable weekend job, especially now that you’ve already got the skills and most of the tools.
Here are some key maintenance tips to help your DIY countertop last as long as possible:
- Clean only with mild soap and a soft cloth, avoiding abrasive or chemical cleaners.
- Always use cutting boards to prevent scratches in the coating.
- Use trivets or hot pads to protect the surface from heat damage.
- Wipe up acidic spills immediately to prevent etching.
- Reapply a coat of sealer annually or whenever the surface begins to look dull.
- Address any chips or cracks promptly to prevent moisture from getting underneath.

The bigger takeaway from a project like this is something that applies to home improvement at every level: what something costs and what it looks like don’t have to be related, as long as you’re willing to put in the time. For under $60 and a weekend of work, you can walk into a kitchen that genuinely impresses people, makes cooking feel better, and reminds you every single day that you actually did that. No contractor can give you that last part, and honestly, it might be worth more than all the rest of it combined.
“`








What do you think?
It is nice to know your opinion. Leave a comment.