










Make Garden Glass Sculptures and Solar Fountains with Doug: A Complete Guide to Outdoor Art
Introduction to Garden Glass Art and Solar Water Features
Creating handcrafted glass sculptures and solar-powered fountains for your garden is one of the most rewarding artistic pursuits a home crafter or outdoor enthusiast can undertake. Doug’s approach to garden art blends technical glasswork with sustainable solar energy, resulting in pieces that are not only visually stunning but also environmentally conscious. Whether you are a seasoned crafter or a curious beginner, this creative discipline offers something meaningful for every skill level.
Garden glass sculptures have a long and storied history, drawing from centuries of glassblowing tradition while adapting those techniques for outdoor decorative purposes. Modern artists like Doug have found ways to make these techniques more accessible, using materials and tools that do not require a full glassblowing studio. Fused glass, mosaic glass, and repurposed glass bottles and vessels can all be transformed into breathtaking garden centerpieces that catch sunlight and scatter color throughout your outdoor space.
Solar fountains add a completely different dimension to garden artistry. By harnessing the power of the sun through photovoltaic panels, these water features operate without any electrical wiring or ongoing energy costs. When combined with decorative glass elements, a solar fountain becomes a living sculpture — one that moves, shimmers, and changes character throughout the day as the light shifts. Doug’s methods bring these two art forms together in a way that is practical, beautiful, and deeply satisfying to create.
Materials and Tools You Will Need
Before you begin any garden glass project, assembling the right materials is essential to your success. For glass sculptures, you will need safety equipment including thick leather gloves, safety goggles, and a dust mask rated for fine particulate matter. The glass itself can come from many sources — recycled wine bottles, craft store glass sheets, broken stained glass pieces, or purpose-cut glass blanks. Each type of glass has different properties when it comes to cutting, shaping, and how it interacts with light outdoors.
For solar fountain projects, the core components include a submersible solar pump kit, a watertight basin or container, tubing, and your decorative glass elements. Solar pump kits are widely available at garden centers and online retailers, and they typically include the pump, solar panel, and basic connectors. You will also want waterproof adhesive suitable for glass and stone, aquatic-grade sealant, and wire or cable clips to manage the panel’s positioning. Doug recommends sourcing a pump with a built-in battery backup so the fountain continues flowing even on overcast days.
Beyond the basics, a few specialty tools will dramatically expand what you can create. A glass cutter and running pliers allow you to score and snap glass into precise shapes. A grinder smooths sharp edges and lets you fit pieces together with tight tolerances. For more ambitious sculptures, a kiln allows glass fusion — permanently bonding multiple pieces into a single unified form. If you do not own a kiln, many local pottery studios and maker spaces offer open kiln time for a modest hourly fee, making this option accessible even without a major equipment investment.
- Safety goggles and leather gloves — non-negotiable for all glass cutting work
- Glass cutter, running pliers, and a wet grinder for shaping and finishing
- Submersible solar pump kit with tubing and a photovoltaic panel
- Watertight basin, pond liner, or decorative container for the fountain reservoir
- Waterproof and UV-resistant adhesive designed for outdoor glass applications
- Copper wire, steel rods, or rebar stakes for supporting freestanding sculptures
- Glass paint or leading strips for adding color and definition to finished pieces

Designing Your Garden Glass Sculpture
Good design is the foundation of any successful garden glass project, and Doug emphasizes spending as much time planning as you do building. Start by considering the environment where your sculpture will live. Take note of how sunlight moves through the space at different times of day, because the angle and intensity of light will dramatically affect how your glass catches and refracts color. A piece positioned to catch the low golden light of late afternoon will perform very differently than one placed in full midday sun or dappled shade.
Sketch out your ideas on paper before touching a single piece of glass. Think about the overall silhouette — will your sculpture be a tall vertical form that draws the eye upward, or a low horizontal arrangement that creates a sense of groundedness? Consider the palette of glass colors and how they will interact with the surrounding plants, hardscape, and sky. Cooler blues and greens tend to recede visually and blend beautifully with foliage, while warm ambers, reds, and oranges create striking focal points that pop against a green background.
Doug’s signature approach involves building sculptural armatures from copper pipe or steel rebar that anchor into the ground, then attaching finished glass pieces at various heights and angles along the structure. This technique creates movement and visual interest at multiple levels, from ground-hugging elements that catch low light to higher pieces that sway gently in a breeze. Designing for durability is equally important — outdoor sculptures must withstand rain, frost, UV exposure, and wind, so every material choice and attachment method should be made with long-term resilience in mind.
Color theory plays a surprisingly important role in garden glass design. Complementary colors — those opposite each other on the color wheel, like purple and yellow, or blue and orange — create vibrant, energetic effects when placed together. Analogous colors, which sit adjacent on the wheel, produce harmonious and soothing combinations. Doug often advises beginners to start with a limited palette of two or three colors and master how they interact before expanding to more complex arrangements. This restraint typically results in more cohesive and visually powerful finished pieces.
Step-by-Step: Building Your First Glass Garden Sculpture
Begin by cutting or selecting your glass pieces according to your design sketch. If you are working with sheet glass, use your glass cutter and a straightedge to score clean lines, then use running pliers to apply pressure along the score and snap the glass cleanly. Always work on a clean, padded surface and wear your safety gear throughout this process. Take your time with each cut — rushing leads to jagged edges and wasted material, and sharp glass fragments pose a real safety risk.
Once your pieces are cut, take each one to the wet grinder and smooth all exposed edges. This step is not optional — even if the edges will eventually be hidden by adhesive or leading, unground edges can cause small cracks to propagate over time, especially during freeze-thaw cycles. After grinding, thoroughly clean each piece with glass cleaner and a lint-free cloth to remove oil, dust, and debris. Contaminants on glass surfaces will prevent adhesive from bonding properly and can create cloudy spots that dull the visual impact of your finished work.
If you are using a kiln to fuse pieces together, arrange your cleaned glass on a kiln shelf lined with kiln wash, layer colors according to your design, and fire according to the schedule appropriate for your glass type. Most art glass suitable for fusing fires to full fuse around 1450–1500°F and should be cooled slowly in a process called annealing to prevent thermal stress cracking. For those working without a kiln, assembling pieces with UV-curing glass adhesive or two-part epoxy rated for outdoor use provides a strong and weatherproof bond without any firing required.
- Sketch your design, noting dimensions, color placement, and the intended viewing angle.
- Cut or select your glass pieces and grind all edges smooth on a wet grinder.
- Clean all glass surfaces thoroughly with glass cleaner and a lint-free cloth.
- Fuse pieces in a kiln or bond them with outdoor-rated glass adhesive.
- Prepare your armature — drill, bend, or weld copper or steel supports as needed.
- Attach finished glass panels or elements to the armature using wire, clips, or adhesive.
- Seal any joints with UV-stable silicone to prevent moisture infiltration.
- Install the sculpture in your garden and adjust the orientation for optimal light interaction.

Building a Solar-Powered Glass Fountain
A solar fountain incorporating glass elements represents the pinnacle of Doug’s outdoor art philosophy — combining kinetic water movement, light-catching glass, and clean solar energy into a single unified installation. The starting point is your water reservoir, which can be as simple as a large glazed ceramic pot, a pre-formed pond basin, a half barrel lined with a flexible pond liner, or even a custom concrete or resin container. Whatever you choose, it must hold water reliably, resist UV degradation, and be deep enough to fully submerge your pump — typically at least ten to twelve inches.
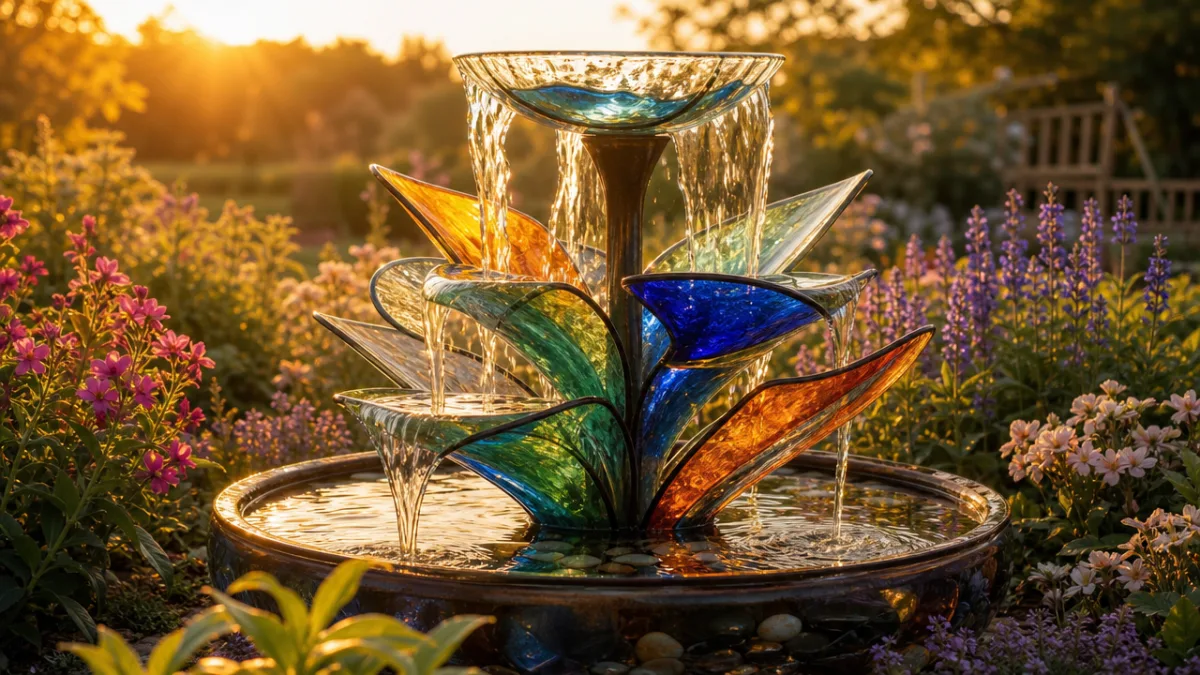
Position your reservoir in its final location before filling it, because moving a water-filled container is impractical and potentially damaging. Set your submersible solar pump in the bottom of the basin and route the tubing up through whatever decorative glass structure you have designed to top the fountain. Doug often creates glass towers or stacked glass disk arrangements through which the water tube passes, so water emerges from the top of a sculptural glass column and cascades down over the glass surfaces before returning to the reservoir. This design maximizes the visual impact of both the water and the glass simultaneously.
Attaching glass decorative elements around and within the fountain requires materials specifically rated for continuous wet environments. Standard craft adhesives will fail when submerged or repeatedly wetted and dried. Look for two-part epoxy formulations designed for aquatic use, or use stainless steel wire to mechanically secure glass pieces to a structural framework within the fountain. Silicone sealant rated for aquariums and ponds is excellent for filling gaps and creating watertight joints between glass elements. Avoid any adhesive containing solvents that could leach into the water and harm surrounding plants or visiting wildlife.
The solar panel should be positioned separately from the fountain itself, angled toward the sun at roughly the angle of your geographic latitude for optimal energy capture. Most solar pump kits include fifteen to twenty feet of cable between the panel and the pump, which gives you flexibility in panel placement without disrupting your fountain’s aesthetic. Doug recommends mounting the panel on a dedicated adjustable stake rather than laying it flat on the ground, as an angled panel captures significantly more energy and is less likely to be shaded by surrounding plants. Connect the panel to the pump according to the kit’s instructions, fill your reservoir, and watch your solar fountain come to life.
Maintenance, Care, and Seasonal Considerations
Keeping your garden glass sculptures and solar fountains looking their best requires a modest but consistent maintenance routine. For sculptures, a gentle rinse with a garden hose every few weeks removes dirt, pollen, and bird droppings that can dull the glass surface. Twice a year, apply a thin coat of car wax or glass sealant to outdoor-facing surfaces to protect against weathering and make future cleaning easier. Inspect all adhesive joints, wire attachments, and armature connections seasonally, and address any signs of loosening or corrosion promptly before they lead to larger structural failures.
Solar fountains require additional attention because of the biological and mechanical realities of a water feature. Algae growth is the most common maintenance challenge — it clouds the water, coats glass surfaces, and can clog pump intakes. Doug recommends adding a small amount of barley straw extract to the water monthly, as this natural treatment inhibits algae growth without harming plants, birds, or beneficial insects. A small amount of aquatic-safe enzyme treatment can also help break down organic debris. Clean the pump’s intake filter every two to four weeks during active season by removing the pump and rinsing the filter under running water.
In climates where temperatures drop below freezing, winterizing your fountain is critical to protecting both the pump and any glass elements. Drain the reservoir completely before the first hard frost, as expanding ice can crack ceramic pots, warp flexible liners, and shatter decorative glass that was not designed to withstand freeze-thaw stress. Store the solar pump indoors in a dry location. For sculptures that cannot be easily moved, consider wrapping them in frost cloth or bubble wrap for the coldest months, or choose only kiln-fired, fully annealed glass in your outdoor installations, as properly annealed glass is significantly more resistant to thermal shock than unannealed or standard window glass.
Inspiration, Community, and Taking Your Skills Further
One of the most joyful aspects of garden glass art is the vibrant community of makers who share techniques, trade materials, and celebrate each other’s work. Online communities on platforms like Pinterest, Instagram, and dedicated glass art forums provide endless visual inspiration and practical advice from artists at every skill level. Searching for terms like fused glass garden art, garden glass sculpture DIY, and solar fountain garden features will surface thousands of projects ranging from simple beginner pieces to highly complex professional installations that will stretch your imagination and ambition.
Local opportunities for learning are often more plentiful than beginners expect. Community colleges, art centers, maker spaces, and botanical gardens frequently offer workshops in basic glasswork, mosaic techniques, and water feature construction. Taking even a single hands-on class with an experienced instructor accelerates your learning dramatically compared to self-teaching alone, because the subtleties of glass handling — how it scores, how it breaks, how it behaves in a kiln — are difficult to fully convey through text or video. Doug himself teaches workshops through garden festivals and art centers, and many participants describe his sessions as transformative starting points for a lasting creative practice.
As your confidence and skill grow, consider incorporating other natural and reclaimed materials alongside glass in your garden sculptures. Polished river stones, ceramic shards, driftwood, copper tubing, and cast concrete all pair beautifully with glass and open up new design possibilities. Mixed-media garden art often achieves a richness and complexity that single-material work cannot match, and the process of experimenting with material combinations is itself deeply satisfying. Doug encourages his students to keep a sketchbook of ideas encountered in daily life — a particular play of light on water, a color combination spotted in a flower market, a structural form observed in architecture — as raw material for future creative work.
Ultimately, making garden glass sculptures and solar fountains with Doug is about much more than craft technique. It is about learning to see your outdoor space as a canvas, developing a relationship with light, water, and color that changes how you experience your garden every single day. The pieces you create will evolve visually across the hours, seasons, and years — catching morning mist differently than afternoon sun, glowing with warm amber tones in autumn rather than the cool greens of summer. Few creative pursuits offer such an intimate, ongoing conversation between the work of your hands and the living world around it.








What do you think?
It is nice to know your opinion. Leave a comment.