










12×12 Garden Office Plans: Your Complete Guide to Building a DIY Backyard Barnhouse
The dream of having a dedicated workspace just steps from your back door has never been more achievable than it is today. A 12×12 garden office — particularly one designed in the charming barnhouse style — offers the perfect balance between functional square footage and manageable DIY construction complexity. Whether you are a remote worker craving separation from household distractions, a creative professional needing a quiet studio, or simply someone who wants a versatile backyard retreat, this compact structure delivers exceptional value for the investment of time and materials you put into it.
Why a 12×12 Footprint is the Perfect Garden Office Size
At 144 square feet, a 12×12 garden office sits in a sweet spot that experienced builders and backyard enthusiasts have long recognized as ideal for single-occupancy workspaces. The dimensions are large enough to comfortably accommodate a full-sized desk, a comfortable chair, shelving units, and even a small sofa or daybed for reading breaks, yet compact enough that most municipalities consider it an accessory structure not requiring the same permitting scrutiny as a full addition to your home. This regulatory advantage alone can save you thousands of dollars and months of bureaucratic navigation.
From a practical construction standpoint, a 12×12 structure aligns beautifully with standard lumber dimensions, meaning you will generate minimal waste when cutting framing members and sheathing panels. A single sheet of plywood measures 4×8 feet, so your 12-foot walls and floor can be planned around three-sheet increments without awkward offcuts piling up at your build site. This kind of material efficiency directly translates to cost savings and a cleaner, more organized construction process that even first-time builders can manage with confidence.
The psychological dimension of a 12×12 space is equally worth considering. Research in environmental psychology consistently shows that smaller, well-designed rooms promote focus and creative thinking more effectively than large open-plan environments. When every element of your workspace — your desk position, your lighting, your storage — has been deliberately chosen to fit within a defined footprint, the result is an environment that feels intentional and purpose-built rather than improvised. Your 12×12 barnhouse office becomes a sanctuary for deep work precisely because its boundaries are clear and meaningful.
- Fits comfortably on most standard suburban lots without dominating the yard
- Below the threshold for major permits in many jurisdictions (always verify locally)
- Aligns with standard lumber and panel dimensions for minimal material waste
- Large enough for a full ergonomic workstation, storage, and a small seating area
- Small enough for one or two determined DIYers to complete without professional contractors
Designing Your Barnhouse Aesthetic: Form Meets Function
The barnhouse design language has experienced a remarkable renaissance in contemporary architecture, and for good reason. Its defining characteristics — steep gabled rooflines, board-and-batten or vertical-plank siding, large sliding or barn-door hardware, and a restrained color palette of blacks, deep charcoals, whites, and natural wood tones — project a timeless quality that feels simultaneously rustic and modern. For a garden office specifically, the barnhouse aesthetic communicates seriousness of purpose while avoiding the sterile corporate look that can make working from a backyard shed feel uninspiring.
When adapting barn architecture to a 12×12 footprint, the roofline becomes your most powerful design tool. A simple gable roof with a 6:12 or 8:12 pitch gives your structure that iconic barn silhouette while also creating a loft void above the ceiling that can serve as passive ventilation space or, with careful framing, a small storage loft accessible by a simple ship’s ladder. The overhang at each gable end should extend at least 18 inches to shed rain away from your walls and, critically, to shade the interior from high summer sun when windows are placed thoughtfully beneath those overhangs.
Exterior cladding choices define the character of your barnhouse more than almost any other material decision. Traditional board-and-batten siding, where wide vertical boards are overlapped by narrower battens covering the seams, is not only visually authentic but also surprisingly forgiving to install. The vertical orientation naturally channels rainwater downward without trapping moisture behind horizontal laps the way traditional lap siding can. For a low-maintenance option that still reads as authentic, fiber cement board-and-batten has become a popular choice among backyard builders who want the look without the ongoing painting and sealing demands of real wood.
- Sketch your floor plan first, then work outward to determine window placement and door positioning
- Choose your roof pitch before ordering lumber, as it determines your rafter lengths and ridge height
- Select your exterior cladding material early so that your sheathing and weather barrier choices align
- Decide on electrical needs before framing so conduit pathways can be built into the walls
- Plan your foundation type based on local frost depth requirements and soil conditions
Foundation Options and Site Preparation for Your Garden Office
The foundation you choose for your 12×12 garden office will depend on a combination of factors including your local climate, soil type, budget, and whether you want the structure to be technically movable. The three most common approaches for structures of this size are a concrete slab, a treated-lumber skid foundation, and a deck-block or concrete pier system. Each has genuine merits and real trade-offs, and understanding them clearly before you break ground will prevent the kind of costly mid-project regrets that plague many DIY builds.
A poured concrete slab offers the most permanent and level foundation surface, and if you have any concerns about moisture wicking up into your floor system, a properly sealed slab with a vapor barrier is the gold standard solution. For a 12×12 structure, a 4-inch slab with a thickened perimeter edge and a grid of rebar or fiber reinforcement will comfortably support your building through decades of seasonal change. The trade-off is cost and the need for formwork, concrete delivery, and either professional finishing expertise or a willingness to learn the physically demanding craft of screeding and floating concrete on a deadline before it sets.
Skid foundations, made from two or more pressure-treated 4×6 or 6×6 timbers running parallel beneath your floor frame, represent the fastest and most DIY-accessible option for a 12×12 project. The skids rest directly on compacted gravel, which provides both drainage and a degree of frost protection. In many localities, a skid foundation keeps your structure classified as a temporary or movable accessory building, which can have permitting advantages worth investigating with your local building department. The critical preparation step is excavating and compacting a bed of crushed stone at least 4 inches deep and extending a foot beyond your footprint on all sides to control vegetation and manage drainage effectively.
Regardless of which foundation you choose, site preparation deserves more attention than many first-time builders give it. Start by calling your utility locating service to mark underground lines, then assess drainage patterns on your property during a heavy rainstorm. Situating your garden office in a natural low point, no matter how convenient the location might otherwise be, is an invitation to perpetual moisture problems that no amount of waterproofing membrane can fully remedy. A gentle grade that carries water away from the structure on all sides, combined with your gravel bed or concrete slab, creates a drainage system that will protect your investment for decades.
Framing, Insulation, and Making Your Garden Office Year-Round Ready
Standard platform framing with 2×4 studs on 16-inch centers is the tried-and-true approach for a structure of this scale, and it gives you a wall assembly that is straightforward to build, easy to insulate, and compatible with every standard finish material from drywall to shiplap paneling. Begin with your pressure-treated bottom plates secured to your foundation, then build your wall sections flat on the ground before tilting them up and bracing them plumb — a technique that makes it possible for two people to frame the entire structure in a single productive weekend. Your four walls, once plumbed, squared, and temporarily braced, create a rigid box that will feel surprisingly substantial even before the roof goes on.
For a garden office to serve you through a full four-season year without becoming a sweltering box in summer or a refrigerator in winter, insulation choices deserve serious thought. In the walls of a 2×4 frame, standard R-13 fiberglass batts are the minimum you should consider, but upgrading to R-15 high-density batts or closed-cell spray foam fills the cavity more completely and reduces thermal bridging through the studs. In the ceiling, which is where the greatest heat loss and gain occurs, target at least R-30 and preferably R-38 if your climate includes significant heating or cooling seasons. Continuous rigid foam insulation on the exterior of your sheathing, sometimes called a continuous insulation layer or ci, dramatically reduces thermal bridging and is worth serious consideration if you plan to heat and cool the space regularly.
Windows and doors are the weak links in any building envelope, and in a garden office they also serve as your primary connection to the backyard landscape that makes working in this space so restorative. For a 12×12 barnhouse office, a single larger window on the wall facing the most appealing garden view — typically the south or east for morning light — combined with a smaller operable window on an adjacent wall for cross-ventilation, strikes the right balance between views, natural light, and thermal performance. Double-pane low-E glazing is a non-negotiable choice if you want your heating and cooling costs to remain manageable, and proper installation with flexible flashing tape at all four sides of the rough opening is equally critical for long-term water tightness.
- Frame walls with 2×4 studs at 16 inches on center for strength and material efficiency
- Use pressure-treated lumber for all plates and framing members in contact with concrete or masonry
- Install a continuous weather-resistant barrier over exterior sheathing before cladding
- Insulate walls to at least R-15 and ceiling to R-30 for year-round comfort
- Specify double-pane low-E windows with proper flashing installation
- Include at least one operable window per wall for cross-ventilation in warm months
Electrical, HVAC, and Connecting Your Backyard Office to Your Home
A 12×12 garden office without reliable power and climate control is ultimately just a fancy storage shed. Planning your electrical service carefully from the start is one of the highest-leverage decisions you will make in this entire project, because retrofitting conduit runs through finished walls and underground trenches after the fact is both expensive and disruptive. Work with a licensed electrician to run a dedicated sub-panel from your main house panel to your garden office — a 60-amp service is typically sufficient for a single-occupancy workspace running a computer, monitors, task lighting, a mini-split heat pump, and occasional tools, but sizing up to 100 amps is inexpensive insurance against future needs.
The underground run from your house to the garden office should be buried in conduit at the appropriate depth for your jurisdiction — typically 18 to 24 inches for conduit-protected conductors — and the trench path should be documented with photographs and a simple sketch so you never accidentally dig into it during future landscaping projects. Inside the office, plan for at least two circuits: one dedicated to your HVAC equipment and one for general receptacles and lighting. Code requires GFCI protection for outdoor structures, and arc-fault protection is increasingly required for all branch circuits in living and working spaces. Getting these details right during rough-in makes your finished office both safe and inspectable.
For climate control in a well-insulated 12×12 space, a single mini-split heat pump unit is the elegant, efficient solution that professional builders consistently recommend for garden offices and ADUs. A 9,000 BTU mini-split provides more than sufficient heating and cooling for this footprint in most North American climates, and modern units achieve coefficient of performance ratings that make them far more economical to operate than electric resistance baseboard heaters or window air conditioners. The outdoor condenser unit can be mounted on a small concrete pad near your structure, the refrigerant lines run through a 3-inch penetration in your wall, and the indoor air handler mounted high on a wall to distribute conditioned air evenly across the entire space.
Internet connectivity deserves equal planning attention to power, because a garden office without a fast, reliable connection defeats much of its professional purpose. Rather than relying on WiFi range from your home router — which can be unreliable at distances of 50 feet or more, especially through walls and trees — consider running a CAT6 Ethernet cable in the same conduit trench as your electrical service. A simple network switch in your office then gives you both wired Ethernet at your desk and the ability to mount a dedicated access point that delivers strong, consistent WiFi throughout the structure. This straightforward infrastructure investment costs very little at the time of installation and eliminates one of the most frustrating problems that backyard office users commonly report.
Interior Design and Finishing Your Garden Office for Peak Productivity
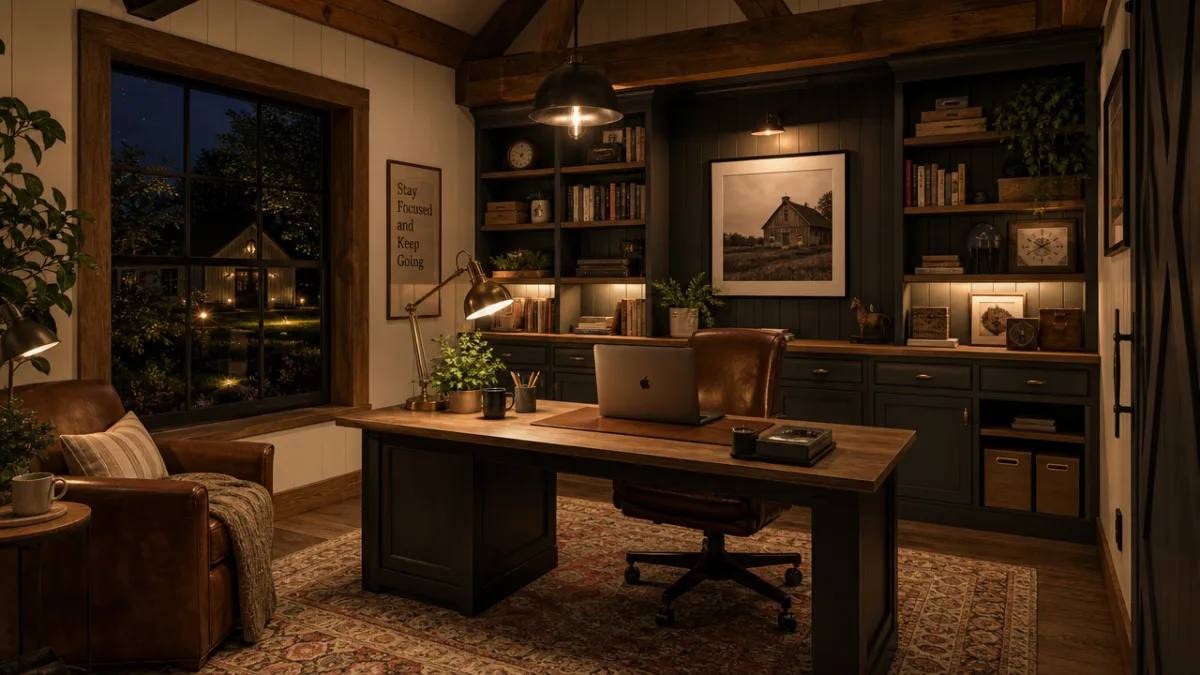
Once your shell is weathertight, insulated, and mechanically complete, the interior finishing phase is where your garden office transforms from a construction project into an inspiring workspace. For wall surfaces, tongue-and-groove shiplap paneling in a painted white or warm off-white finish has become the signature interior choice for barnhouse-aesthetic spaces because it is easy to install over standard 2×4 framing, accepts paint beautifully, and adds a subtle texture that makes the space feel crafted and considered rather than generic. Alternatively, standard drywall finished to a Level 4 or Level 5 smooth finish provides a cleaner, more contemporary backdrop that suits minimalist workstation setups particularly well.
Flooring in a garden office needs to balance aesthetic warmth with practical durability, since you will be rolling an office chair across it daily and tracking in grass clippings and mud on your shoes. Luxury vinyl plank flooring has emerged as the near-universal recommendation among backyard office builders for good reason: it is dimensionally stable in the face of humidity fluctuations that would cause solid hardwood to gap and cup, it installs as a floating floor without adhesive directly over your subfloor, it is genuinely waterproof rather than merely water-resistant, and the best products are visually indistinguishable from real wood at normal viewing distances. A wide-plank format in a warm oak or walnut tone complements the barnhouse aesthetic beautifully.
Lighting design is the interior element that most dramatically affects how your garden office feels during the long hours you will actually spend working there. A single overhead fixture, even a beautiful one, creates flat, shadowless illumination that feels institutional and quickly becomes tiring. Instead, layer your lighting with a combination of a dimmable overhead fixture for general ambient light, a quality LED task lamp at your primary workstation for focused illumination without screen glare, and at least one accent light — a simple picture light, a strip light beneath a floating shelf, or a table lamp on a credenza — that creates a warm, inviting atmosphere during early mornings and evening work sessions.
Built-in storage is what separates a thoughtfully designed garden office from a shed with a desk in it. Even in 144 square feet, a well-planned combination of floating shelves, a built-in desk with drawers, and a tall storage cabinet can accommodate everything a knowledge worker needs without the space feeling cluttered or cramped. The key principle is to think vertically: carry storage up to ceiling height on at least one wall, which not only maximizes your capacity but also draws the eye upward and makes the space feel taller and more generous than its dimensions suggest. Dedicate one section of wall to a pegboard or slatwall system for flexible tool and supply storage that can evolve as your work needs change over the years.
- Choose shiplap or smooth drywall for walls based on your aesthetic preference and skill level
- Install luxury vinyl plank flooring for durability, comfort, and moisture resistance
- Layer ambient, task, and accent lighting for a flexible, fatigue-reducing environment
- Plan built-in storage that reaches ceiling height to maximize capacity and visual height
- Include a dedicated cable management solution to keep your workstation clean and organized
- Add window treatments that control glare without fully blocking garden views
Budgeting, Timeline, and Making Your Garden Office Project a Success
A realistic budget for a well-built, fully finished 12×12 DIY barnhouse garden office with electrical service, insulation, a mini-split, and quality interior finishes typically ranges from $8,000 to $18,000 depending on your regional material costs, the quality tier of your selections, and how much of the labor you perform yourself versus subcontract to professionals. The electrical and HVAC work, which together often account for 25 to 35 percent of total project cost, are the areas where many DIYers choose to hire licensed professionals both for code compliance reasons and because the consequences of errors in these systems are serious. Every other phase — foundation, framing, roofing, siding, insulation, drywall, and finish work — is genuinely achievable for a motivated homeowner with basic carpentry skills and a willingness to learn.
Building a realistic timeline is equally important as building a realistic budget, because a half-finished structure sitting in your backyard through a winter is both demoralizing and potentially damaging to materials left exposed to the elements. A practical approach is to plan around key weather-sensitive milestones: foundation work in dry weather, framing and roof sheathing completed in a single push to get the structure under roof as quickly as possible, then interior work which can proceed at a more leisurely pace regardless of conditions outside. For a motivated DIY builder working most weekends and occasional weekday evenings, expect a realistic timeline of three to five months from breaking ground to moving in.
Perhaps the most valuable investment you can make before swinging a single hammer is in thorough permit research and neighbor communication. Visit your local building department early in your planning process, describe your project clearly, and ask specifically about setback requirements from property lines and other structures, maximum allowable accessory structure sizes, and what permits are required for electrical work. In most jurisdictions, the permit fees for a project of this scale are modest — typically $200 to $600 — and the inspections that accompany the permit process actually serve your interests by catching potential issues before they become expensive problems. Telling your immediate neighbors about your plans before construction begins transforms potential adversaries into curious supporters who may even offer help.
The return on investment for a quality backyard garden office extends well beyond the simple calculation of construction cost versus added property value, though that calculation is typically favorable in strong real estate markets where separate office structures command genuine buyer enthusiasm. The more personal return — in daily quality of life, in work-life boundary clarity, in the reduced commuting costs and time that a home office enables, and in the simple pleasure of walking through your garden to a beautiful space that you built with your own hands — is harder to quantify but ultimately more meaningful. A 12×12 barnhouse garden office, thoughtfully designed and carefully built, is the kind of project that repays its builders many times over in years of daily satisfaction and productive, inspired work.








What do you think?
It is nice to know your opinion. Leave a comment.