










How to Pre-Sprout Ranunculus Corms for Healthy Spring Blooms
Understanding Ranunculus Corms and Why Pre-Sprouting Matters
Ranunculus are among the most breathtaking flowers a gardener can grow, producing layers upon layers of silky, tissue-thin petals in shades ranging from creamy white and soft blush to deep crimson and vivid orange. But before those dazzling blooms appear, the journey begins underground with a small, knobby structure called a corm. Understanding what a ranunculus corm is and how it functions gives you a decisive advantage when planning your spring garden, because these little powerhouses respond remarkably well to a technique called pre-sprouting.
A ranunculus corm is a compressed, nutrient-dense storage organ — not quite a bulb and not quite a tuber, but something uniquely its own. It looks a little like a dried-out, miniature octopus, with small claws radiating outward from a central mass. These claws are where the roots will eventually emerge. The corm stores all the energy the plant needs to push through cold soil and begin its growth cycle. When conditions are right — the right temperature, the right moisture, the right amount of air — those dormant cells wake up and begin dividing with astonishing enthusiasm.
Pre-sprouting is the practice of waking your corms up before they ever go into the ground. Rather than planting dormant corms directly into garden beds and waiting anxiously through weeks of silence, you give them a controlled head start indoors. This process shortens the time between planting and first bloom, dramatically increases germination rates, and helps you identify any corms that are too weak or damaged to bother with. For gardeners in regions with shorter growing seasons or unpredictable spring weather, pre-sprouting is not just helpful — it can be the difference between a spectacular floral display and a disappointing season.
Gathering Your Supplies Before You Begin
Successful pre-sprouting depends heavily on preparation. Before you bring your corms anywhere near water or soil, take the time to gather everything you need. The process itself is beautifully simple, but having the right materials on hand ensures you won’t have to improvise at a critical moment. Think of this stage as setting up a small, temporary nursery for some of the most rewarding flowers you’ll ever grow. A little organization at the outset pays enormous dividends when your corms begin to show their first signs of life.
You will need a shallow tray or container with good drainage — something like a seed flat, a low plastic storage bin with holes punched in the bottom, or even a baking dish lined with damp paper towels for the very first hydration step. You’ll also want a well-draining growing medium such as barely moist coconut coir, perlite, or a mix of the two. Avoid regular potting soil at this stage, as it tends to retain too much moisture and can encourage fungal rot before the corms have a chance to establish. A spray bottle filled with clean water gives you precise moisture control without soaking.
Other useful items include a thermometer to monitor ambient temperature, labels or a small notebook to track which varieties are which, and a source of soft, indirect light — or the ability to keep your tray in a cool, dim location, depending on your climate and the time of year. Many experienced growers also keep a mild fungicide powder on hand to dust corms that show any signs of soft spots or surface mold before the pre-sprouting process begins. Taking five minutes to inspect each corm individually before starting can save you from losing an entire tray to rot later on.
- Shallow tray or flat with drainage holes
- Coconut coir, perlite, or damp paper towels
- Spray bottle for controlled moisture application
- Thermometer to monitor temperature range
- Variety labels or a garden notebook
- Optional: mild fungicide powder for corm treatment
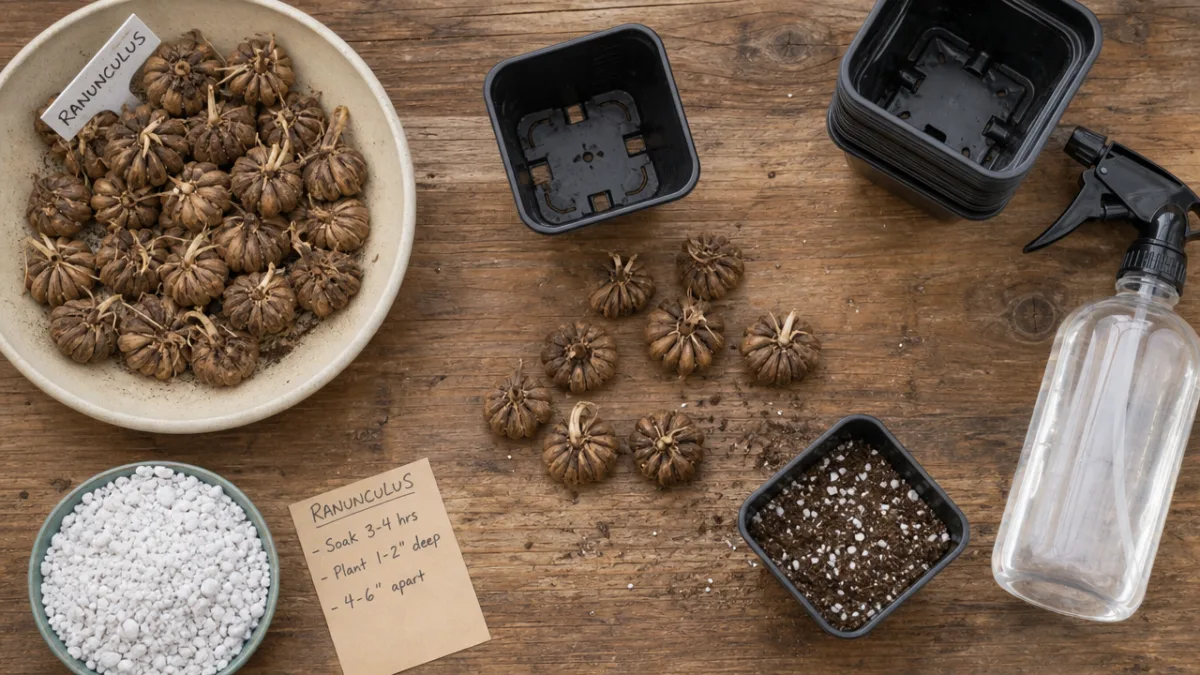
The Step-by-Step Pre-Sprouting Process
Begin by soaking your corms in room-temperature water for a period of three to four hours. This initial hydration step rehydrates the outer tissue and signals to the corm that it is time to break dormancy. Do not soak for longer than four hours, as extended soaking dramatically increases the risk of rot — a common and disheartening mistake among first-time growers. You will notice the corms plumping slightly as they absorb water, which is a satisfying and encouraging sign that they are responding well to the process.
After soaking, allow the corms to drain and air out for about fifteen to twenty minutes so that excess surface moisture evaporates. Then nestle them into your prepared tray of barely moist coconut coir or perlite, claws facing downward. This orientation matters enormously. The claws are where the roots emerge, and placing them downward allows the plant to orient itself correctly from the very beginning. Space the corms about an inch apart from one another to allow adequate airflow between them, which reduces the risk of mold spreading from one corm to another.
Place your tray in a cool location — ideally between 50°F and 55°F (10°C to 13°C). Ranunculus are cool-season flowers and they thrive in conditions that many other plants would find inhospitably cold. A garage, a basement corner, a cool mudroom, or even a refrigerator set to the right temperature can all work beautifully for this stage. Keep the medium barely moist by misting lightly every day or two — you want humidity, not wetness. Within seven to fourteen days, you should begin to see tiny white root tips emerging from the claws, which means the pre-sprouting process is working exactly as it should.
Monitoring Progress and Recognizing Success
Once your corms are nestled into their trays, resist the urge to check on them constantly. Ranunculus corms prefer consistency and calm during this early stage, and repeatedly disturbing them — moving the tray, poking at the medium, or adjusting moisture levels erratically — can stress the developing cells and slow the process considerably. Set a light schedule for yourself: check moisture levels every two to three days, and do a thorough visual inspection once per week. This rhythm gives the corms the stability they need while keeping you informed about their progress.
Successful pre-sprouting has a few unmistakable signs. First, you will see thin, white root hairs extending from the claw tips — these are fragile and precious, so handle pre-sprouted corms with extraordinary gentleness once roots appear. Second, a small, pale green or cream-colored shoot may begin to emerge from the top of the corm, pointing upward. This shoot is the embryonic stem, and its appearance means your corm is well on its way. At this point, if you have a grow light available, providing a few hours of gentle artificial light each day can encourage the shoot to develop into a stronger, greener seedling before transplanting.
Unfortunately, not every corm will make it through pre-sprouting, and learning to recognize failure is just as important as celebrating success. A corm that feels mushy when gently pressed, emits a foul or fermented odor, or shows dark, sunken spots on its surface has likely succumbed to rot and should be removed from the tray immediately to prevent spreading. A corm that remains completely firm, dry, and unchanged after three weeks in the right conditions may simply be too old or damaged to revive. Discard any non-performers without guilt — this is exactly why pre-sprouting is so valuable, because it reveals the true viability of your stock before you invest garden space.
- Days 1–4: Corms absorb moisture and begin to rehydrate internally.
- Days 5–7: Surface changes may be subtle; maintain consistent cool temperature.
- Days 7–10: First white root tips should become visible at claw tips.
- Days 10–14: Roots lengthen; a pale shoot tip may appear at the corm’s crown.
- Days 14–21: Corms with visible roots and shoots are ready for transplanting.

Transplanting Pre-Sprouted Corms into the Garden
The moment your ranunculus corms show white roots roughly half an inch to one inch in length, they are ready to move into their final growing location. This transition requires care and attention, because those new roots are extraordinarily delicate — they can be torn or damaged by rough handling, and even a small setback at this stage can delay blooming or weaken the plant significantly. Work gently and methodically, and if possible, transplant on a cool, overcast day rather than in bright midday sun, which can stress young plants during the transition period.
Choose a planting site that receives full sun for at least six to eight hours per day and has well-draining soil. Ranunculus absolutely cannot tolerate standing water around their corms — waterlogged conditions are one of the primary causes of corm rot in the garden, and even a brief period of poor drainage can be fatal. If your garden soil tends toward clay or compaction, amend it generously with compost and coarse sand before planting. Raised beds are an excellent option for ranunculus, as they naturally provide the elevated drainage these plants require while also warming up earlier in the spring season.
Plant your pre-sprouted corms with the roots facing down and the shoot pointing upward, setting them approximately two inches deep in the prepared soil. Space them six to nine inches apart to allow good air circulation as the foliage develops. Cover gently with soil and water in lightly — remember that the corms are already hydrated and actively growing, so they need far less water at planting than dormant corms would. If frost is still possible in your area, be prepared to cover newly planted ranunculus with a frost cloth or row cover on cold nights, as the young foliage that emerges is tender and vulnerable to hard freezes.
Caring for Ranunculus Through the Growing Season
Once your pre-sprouted ranunculus are settled into the garden, the primary focus shifts to maintaining the cool, moist-but-not-wet conditions they love. Water at the base of the plants rather than overhead to reduce the risk of fungal disease on the foliage and crowns. A consistent moisture level during the active growing season encourages steady stem elongation and bud development. Mulching lightly around the base of the plants with straw or shredded wood helps retain soil moisture, moderate temperature swings, and suppress weeds that would otherwise compete for nutrients.
Ranunculus are moderate feeders, and a light application of a balanced, low-nitrogen fertilizer every two to three weeks during active growth supports robust bloom production without pushing the plant toward excessive foliage at the expense of flowers. Some growers prefer a fertilizer slightly higher in phosphorus and potassium during the budding stage, as these nutrients specifically support flower development and stem strength. Avoid high-nitrogen formulas, which encourage lush green leaves but can delay or reduce flowering — the opposite of what you are working toward after all your careful pre-sprouting effort.
Harvest ranunculus blooms when the buds are just beginning to open — what growers call the “marshmallow” stage, when the bud is still rounded and soft but color is fully visible. Cutting at this stage gives you the longest possible vase life, often seven to ten days or more with clean water and a cool location. Remove foliage that would sit below the water line in your vase, and recut stems at an angle every two days. If you are growing ranunculus as a cut flower crop rather than for garden display, this harvesting practice also encourages the plant to continue producing additional stems throughout the remainder of the cool season.

Troubleshooting Common Ranunculus Challenges
Even with careful pre-sprouting and attentive care, ranunculus growers occasionally encounter setbacks. One of the most common is corm rot, which can occur both during pre-sprouting and after transplanting into the garden. Rot is almost always linked to excessive moisture — whether from overwatering, poor drainage, high humidity without adequate airflow, or a combination of factors. If you notice plants wilting suddenly despite adequate soil moisture, suspect rot at the crown or corm level. Carefully excavate one plant to examine the corm; soft, discolored tissue confirms the diagnosis. Improve drainage immediately and allow the bed to dry somewhat before resuming normal watering.
Aphids and thrips occasionally target ranunculus, particularly during warm stretches within the cool growing season. These small insects feed on tender new growth and developing buds, sometimes distorting petals and leaving flowers that are misshapen or streaked. A strong blast of water from a garden hose knocks aphids off effectively, and neem oil or insecticidal soap applied in the early morning can manage persistent populations without harming beneficial insects. Check the undersides of leaves regularly, as this is where many pests congregate and where early infestations are easiest to address before they become serious problems.
Premature dormancy — when ranunculus foliage yellows and dies back before the gardener expects it — is another common concern, particularly in climates where spring temperatures rise quickly. Ranunculus naturally go dormant as the weather warms and soil temperatures climb above 65°F (18°C). This is not a failure; it is simply the plant completing its natural cycle. Allow the foliage to yellow and die back completely before digging the corms if you intend to store them for replanting the following season. Cure the harvested corms in a cool, dry, well-ventilated location for several weeks before placing them in breathable storage for the summer.
- Rot during pre-sprouting: Reduce moisture, improve airflow, discard affected corms promptly.
- Rot after transplanting: Improve bed drainage, reduce watering frequency, consider raised beds.
- Aphid or thrip damage: Use water spray, neem oil, or insecticidal soap in the early morning.
- Premature dormancy from heat: Accept the natural cycle; focus on corm storage for next season.
- Failure to bloom: Check for insufficient sun, excessive nitrogen, or late planting timing.
- Weak or short stems: Ensure adequate spacing, cool temperatures, and phosphorus-rich feeding.
With a solid understanding of pre-sprouting technique, attentive care through the growing season, and the confidence to troubleshoot problems as they arise, you are fully equipped to grow ranunculus that will genuinely stop people in their tracks. These flowers reward patience and precision with blooms of extraordinary beauty, and the pre-sprouting process you have now mastered is the single most powerful tool in a ranunculus grower’s repertoire. Each spring, when those first layered flowers open in your garden or fill a vase on your table, the careful work of those quiet indoor days will feel like the best investment of time you have ever made.








What do you think?
It is nice to know your opinion. Leave a comment.