










Crochet Design: Cozy Owl with Decorated Details — A Complete Creative Guide
The Enchanting World of Owl Crochet Design
Owls have long captured the human imagination with their wide, knowing eyes, soft feathered bodies, and mysterious nocturnal presence. It is no surprise, then, that they have become one of the most beloved subjects in the world of crochet artistry. When crafters reach for their hooks and yarn to recreate these magnificent birds, they are tapping into a tradition that blends nature-inspired creativity with the meditative joy of fiber arts. The cozy owl crochet design, in particular, has become a staple in craft communities around the world, celebrated for its warmth, personality, and the endless decorative possibilities it invites.
What makes a crocheted owl truly special is the layering of decorated details that bring the piece to life. From intricately stitched feather textures to oversized button eyes that seem to glow with intelligence, every element of an owl design is an opportunity for creative expression. Crafters who dedicate themselves to learning these techniques find that each project becomes more than just a finished object — it becomes a small work of art imbued with hours of careful attention and personal flair. The cozy quality of the piece comes not just from the soft yarn used, but from the warmth of intention behind every stitch.
The popularity of owl crochet designs has surged in recent years, driven by the broader renaissance of handmade crafts and the thriving online communities where patterns and inspiration are shared freely. Platforms like Pinterest have become treasure troves of owl crochet ideas, from simple amigurumi figures suitable for beginners to highly complex sculptural pieces that challenge even experienced crafters. Whether you are drawn to the whimsy of a small stuffed owl ornament or the grandeur of a large decorative wall hanging, understanding the foundational techniques of owl crochet design will open a world of creative possibility that is limited only by your imagination and the colors of yarn in your basket.
Choosing the Right Materials for Your Cozy Owl Project
The success of any crochet project begins long before the first stitch is made — it begins with the thoughtful selection of materials. For a cozy owl design with decorated details, the choice of yarn is paramount. Bulky or super-bulky yarns in warm, earthy tones such as amber, chestnut brown, burnt sienna, cream, and deep forest green are natural choices that evoke the owl’s natural habitat. However, do not be afraid to experiment with rich jewel tones like teal, mustard yellow, or plum, which can give your owl a more whimsical or artistic character. The weight and texture of the yarn will significantly influence the final look and feel of the piece.
Beyond yarn, the decorative details that distinguish a truly cozy owl design require a thoughtful selection of embellishments. Buttons of varying sizes are essential for creating expressive, layered eyes — one of the owl’s most defining features. Consider collecting an assortment of wooden buttons for a rustic aesthetic, clear acrylic buttons for a contemporary look, or vintage glass buttons for an heirloom quality. In addition to buttons, you may want to gather felt in coordinating colors for cutting beak shapes and wing accents, embroidery floss for adding fine stitched details, and small amounts of contrasting yarn for decorative tufts, ear details, and textured feather stitching.
Your crochet hook selection matters more than many beginners realize. For the body and larger sections of your owl, a hook sized appropriately to your chosen yarn weight will ensure even tension and a fabric that is neither too loose nor too tight. For decorative details and surface embellishment, having a smaller hook on hand allows for finer, more controlled work. In addition to your hook, gather a yarn needle for weaving in ends and attaching details, sharp scissors, and if you are making a stuffed owl, a good quality polyester fiberfill that will maintain its loft and give your finished piece a pleasingly plump, huggable quality that adds to its overall coziness.
- Yarn: Choose bulky or worsted weight in earthy or jewel tones; textured boucle or chenille yarns add wonderful tactile interest to feather sections.
- Buttons: Collect layered button pairs in graduated sizes for expressive, dimensional owl eyes that form the visual centerpiece of the design.
- Felt and embroidery floss: Ideal for precise beak shapes, wing accents, and delicate surface stitching that adds personality and fine detail.
- Crochet hooks: Keep a range available, using a larger hook for the body and a smaller hook for intricate decorative detail work.
- Stuffing and structure: High-quality fiberfill ensures a well-shaped, cozy finished piece; wire armature can be added for poseable wings or feet.

Essential Stitches and Techniques for Owl Feather Textures
The defining visual element of any crocheted owl is the suggestion of feathers, and achieving a convincing, beautiful feather texture requires familiarity with a handful of key crochet stitches and techniques. The shell stitch, formed by working multiple double crochets into a single stitch or space, creates a naturally curved, overlapping pattern that mimics the layered look of real feathers with remarkable effectiveness. When worked in alternating rows of complementary colors, the shell stitch produces a richly textured fabric that catches light beautifully and gives your owl’s body a depth and dimension that plain single crochet simply cannot achieve.
The bobble stitch and the puff stitch are two additional techniques that experienced owl crochet designers rely on heavily for adding three-dimensional detail. Bobbles, created by working several incomplete double crochets together into a single point, produce small rounded bumps on the surface of the fabric that can suggest individual feathers, especially when arranged in diagonal or curved rows across the owl’s chest or belly. Puff stitches, which are softer and more rounded than bobbles, are particularly effective for creating the fluffy, soft-looking chest that gives a cozy owl its characteristic approachable appearance. Both stitches are versatile enough to be worked in contrasting colors, making them ideal for creating the lighter coloring typical of owl bellies.
Surface crochet is a technique that deserves special mention for anyone pursuing a decorated owl design with maximum detail. Rather than building texture into the fabric as you go, surface crochet involves working chain stitches or slip stitches directly onto the surface of a finished piece, allowing you to draw lines, curves, and patterns that define feather shafts, wing outlines, and other fine details. Combined with embroidery techniques such as the satin stitch, chain stitch, and French knots worked with embroidery floss, surface embellishment opens up an extraordinary range of decorative possibilities that can take a charming crocheted owl and elevate it into a genuinely heirloom-quality decorative object with remarkable artistic presence.
- Shell stitch body sections: Work the main body panels using a consistent shell stitch pattern, changing colors every two rows to create realistic feather layering across the owl’s back and sides.
- Bobble stitch chest: Work bobbles in a lighter contrasting yarn across the front panel in curved, descending rows to mimic the spotted or streaked breast markings of real owls.
- Puff stitch wings: Construct wings separately using puff stitches for maximum texture before attaching them to the body with careful whipstitching at natural shoulder positions.
- Surface crochet detail lines: Add feather shaft lines and wing vein details using slip stitch surface crochet in a slightly darker or shinier yarn than the base fabric.
- Embroidery embellishments: Use embroidery floss to add satin-stitched highlights around the eyes, delicate claw details on the feet, and any additional surface ornamentation.
Constructing the Owl’s Face — Eyes, Beak, and Personality
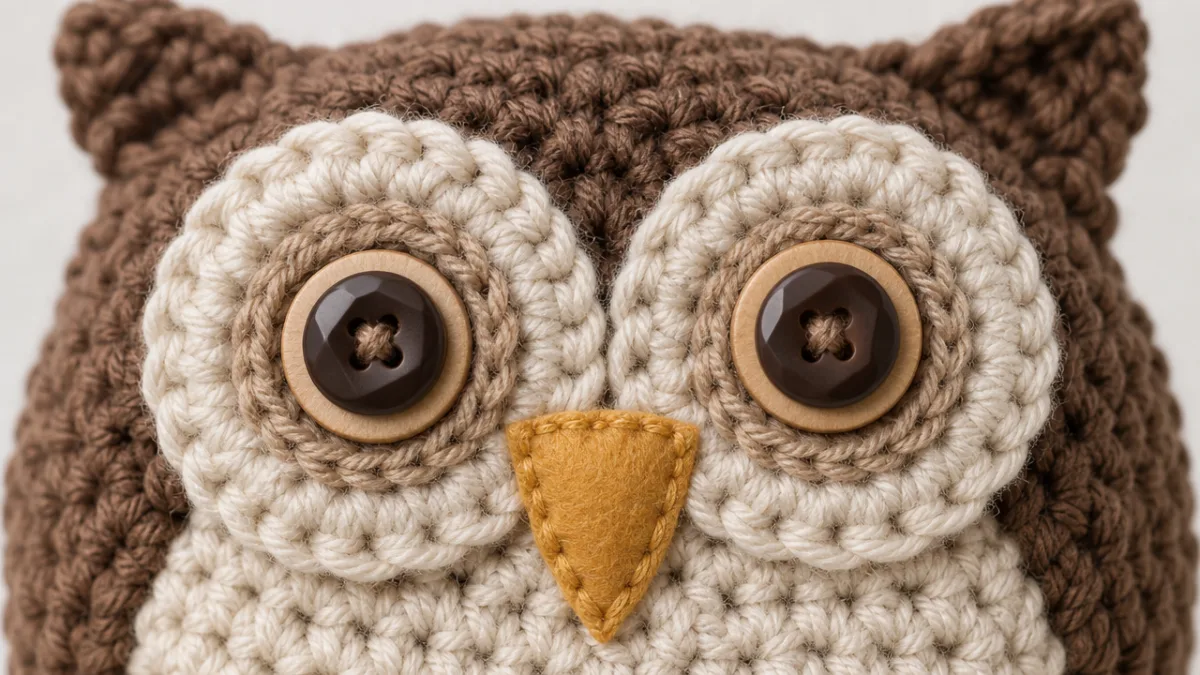
If the feathered body of a crocheted owl is its soul, then the face is its personality — and nothing determines the character of a crocheted owl more immediately and powerfully than the design of its eyes. The classic approach for a cozy, decorated owl is to create large, layered button eyes that dominate the face with an endearing intensity. This typically involves selecting two sets of buttons in graduated sizes: a large base button, a medium button in a contrasting color, and sometimes a small, dark button or bead at the center to suggest the pupil. When stacked and sewn securely through the face of the owl, these layered buttons create an eye that is both simple and surprisingly expressive.
The placement and spacing of the eyes is critically important and worth taking considerable time to experiment with before committing to permanent attachment. Eyes placed too close together can make an owl look pinched and anxious, while eyes placed too far apart may appear unfocused or comical. The most pleasing result typically comes from positioning the eye circles so that they are separated by approximately one eye-width of space, set in the upper third of the face panel, and framed by a crocheted or embroidered disc of contrasting color that suggests the owl’s distinctive facial disk — the heart-shaped or circular arrangement of feathers around the face that gives owls their uniquely frontal, almost human-like gaze.
The beak, though small, is another detail that carries enormous expressive weight in a crocheted owl design. A simple triangle of felt in golden yellow or orange, carefully cut and whipstitched into position between and just below the eyes, is the most straightforward approach and produces a clean, classic result. For crafters who want more dimension, a small crocheted beak worked in short rows and lightly stuffed before attachment will create a slightly three-dimensional feature that casts a tiny shadow and gives the face more sculptural interest. Adding a few small stitches of embroidery floss above the beak to suggest a subtle furrowed expression, or curving the edges of the felt beak downward slightly before attachment, are small touches that dramatically increase the expressive warmth and coziness of the finished owl’s face.
Decorative Details That Elevate Your Owl from Craft to Keepsake
The difference between a pleasant crocheted owl and a truly memorable, keepsake-quality piece lies almost entirely in the thoughtfulness and quality of its decorative details. Once the basic structure is complete — body stuffed, face attached, wings positioned — the real artistry begins. Consider adding a small crocheted bow tie or a miniature scarf in a plaid or striped pattern worked in contrasting yarn colors, transforming your owl from a nature-inspired figure into a whimsical character with its own personality and style. These small accessories require minimal additional yarn and time but dramatically increase the charm and individuality of the finished piece.
Texture mixing is another powerful decorative strategy that experienced crafters use to extraordinary effect in owl designs. Incorporating a small section of fuzzy boucle yarn into an otherwise smooth fabric adds a surprising tactile element that begs to be touched. Alternating matte and slightly shiny yarn in the feather sections catches light differently across the surface of the piece, creating a subtle shimmer that suggests the iridescent quality of real feathers. Thin metallic thread, couched or embroidered onto the surface near the eyes or along the edges of the wings, can add just a hint of sparkle without overwhelming the overall cozy, natural aesthetic that makes the owl design so appealing in the first place.
Perching accessories deserve consideration as a finishing detail that can elevate your crocheted owl from a stuffed figure to a fully realized decorative object. A crocheted or carved wooden branch, positioned beneath the owl’s feet and anchored with simple crocheted talons gripping the surface, creates a display piece of remarkable charm and visual coherence. Wrapping the branch with a thin layer of yarn in bark-toned colors, then adding a few tiny crocheted leaves or a hanging decorative tag with the owl’s name or a small poem, completes the scene and transforms your work into something that genuinely functions as interior decoration, a thoughtful handmade gift, or a display piece worthy of prominent placement in any home.
- Miniature accessories: Tiny bow ties, scarves, hats, or spectacles made from coordinating yarn or felt give the owl distinct character and narrative personality.
- Texture contrasting: Combine smooth, boucle, and slightly shiny yarn in different sections of the body for a rich, multi-dimensional tactile and visual experience.
- Metallic accents: A subtle application of thin metallic embroidery thread near the eyes or along wing edges adds refined sparkle that enhances without overwhelming.
- Perching displays: Mount the finished owl on a crocheted or natural branch with gripping talons for a cohesive, display-ready decorative object of real visual impact.
- Personalization details: Embroider a name, date, or small design onto the chest or base of the piece to create a truly unique, personalized heirloom gift.
Sharing Your Owl Creation and Finding Community Inspiration
One of the most rewarding aspects of completing a decorated owl crochet project is the opportunity to share it with others who understand and appreciate the skill, patience, and creativity invested in every stitch. Online communities dedicated to crochet have flourished across platforms like Pinterest, Instagram, Ravelry, and dedicated Facebook groups, creating vibrant, supportive spaces where crafters of all skill levels exchange patterns, tips, finished project photos, and encouragement. Posting your finished owl — particularly one with distinctive decorated details and personal touches — invariably generates enthusiastic response, thoughtful questions about technique, and the wonderful, motivating energy of fellow crafters who are inspired to try their own version.
Beyond social sharing, the completed owl project can serve as the foundation for a broader creative practice. Many crafters who complete their first owl find themselves immediately planning variations — a barn owl in pale cream and white with delicate gray shading, a Great Horned Owl with prominent ear tufts made from bundles of looped yarn, or an entirely fantastical owl in rainbow colors with glitter-thread accents that exists nowhere in nature but entirely in the joyful imagination of its creator. Each subsequent project builds on the skills and insights gained from the last, creating a satisfying progression of craft development that many people find genuinely transformative in terms of patience, focus, and creative confidence.
Teaching the techniques you have learned to others is perhaps the most generous and satisfying way to extend the life of your owl crochet experience beyond your own hands. Hosting a small craft gathering, contributing a tutorial video to YouTube, or simply sitting with a friend or family member and walking them through the basic stitches of the owl’s feathered body is an act of creative generosity that deepens your own understanding of the craft while sharing its rewards. The cozy owl with decorated details is, in many ways, a perfect teaching project — structured enough to provide clear learning objectives at each stage, yet flexible and forgiving enough to accommodate the inevitable variations that arise when individual creativity meets yarn and hook, resulting in an owl that is always, in the most wonderful way, uniquely one’s own.








What do you think?
It is nice to know your opinion. Leave a comment.