










Cozy Days Daisy Blanket: Your Complete Guide to This Free Crochet Pattern
Introduction to the Cozy Days Daisy Blanket
There’s something really special about wrapping yourself in a blanket you made with your own two hands. The Cozy Days Daisy Blanket is exactly that kind of project — a beautifully textured design that brings together the charm of daisy motifs with the kind of warmth and weight you actually want in a throw blanket. Whether you’ve been crocheting for years and are looking for something satisfying to sink your teeth into, or you’re a confident beginner wanting a project with a little more personality, this one is genuinely a joy to work through.
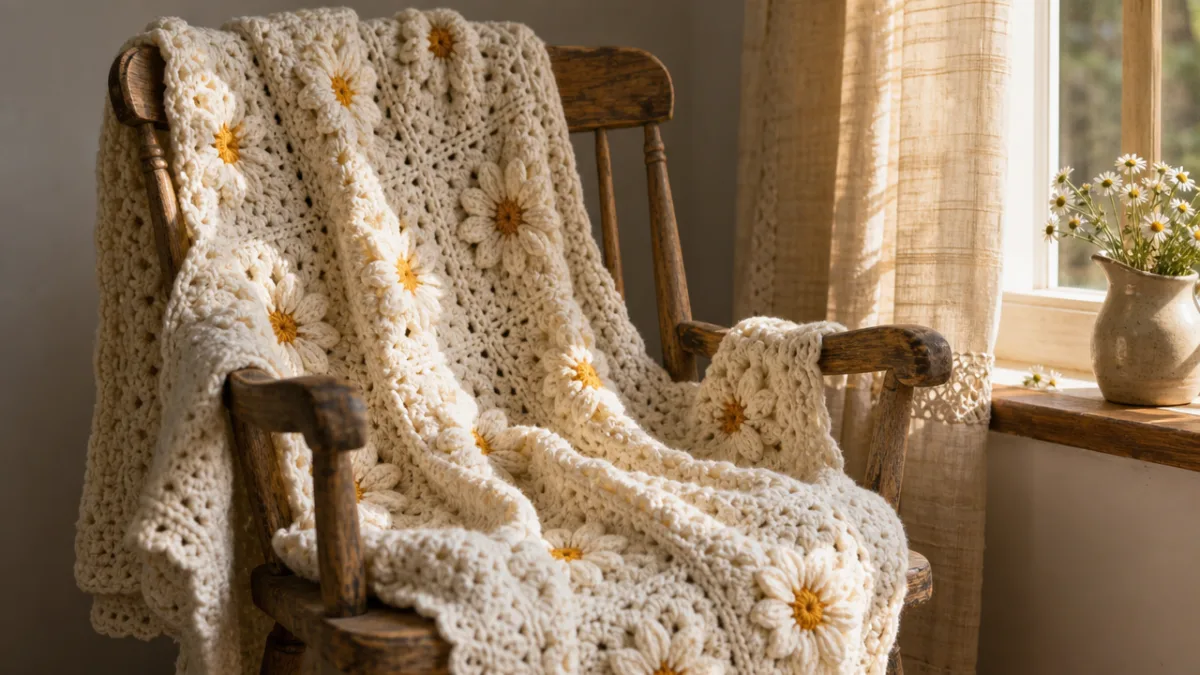
Part of why this blanket has such a devoted following in the crochet community is how deceptively impressive it looks. The daisy pattern builds up a raised, three-dimensional texture that honestly looks way more complicated than it is to actually make. From across the room, you’d swear it was some kind of intricate tapestry of blooming flowers — but get up close and you’ll realize it’s built from stitches that feel totally approachable once you hit your stride. It’s the project that makes people do a double-take and go, “Wait, you made that?” And yes, you absolutely did.
This free pattern has spread through the crochet world for all the right reasons. No paid subscription, no specialty tools beyond a regular crochet hook, no advanced techniques that’ll leave you staring at your screen in confusion. The instructions are clear, the stitch repeat makes sense, and what you end up with is a substantial, cozy blanket that works just as well as a heartfelt gift as it does draped over your own couch. In this guide, we’ll cover everything you need to take this from your very first chain all the way to the final weave-in.
Materials and Tools You Will Need
Getting your materials together before you start is one of those small habits that makes a big difference. For the Cozy Days Daisy Blanket, you want a yarn with enough stitch definition to let those daisy textures really show up. A smooth or semi-smooth worsted weight yarn is your best bet — classic acrylic blends, cotton-acrylic combos, or a soft merino wool if you’re treating yourself or someone you love to something extra nice. The daisy stitch lives and dies on the contrast between those raised petals and the background fabric, so stay away from anything overly fuzzy or hairy that might muddy the detail.
Color selection is honestly one of the most fun parts of this project. A lot of people go with a single neutral — cream, ivory, soft white, warm oatmeal — which gives the finished blanket that timeless, cottage-style look that fits into just about any home. Others lean into a deep navy, forest green, or rich burgundy, where the daisy texture really pops with some drama. If you want something lighter and spring-forward, pastels like sage green, lavender, blush pink, or butter yellow are all over craft blogs and Pinterest boards for a reason — they’re gorgeous.
Here’s a general checklist of what you’ll need to get started:
- Approximately 1,500 to 2,000 yards of worsted weight yarn, depending on how big you want your blanket
- A 5.0mm (H/8) or 5.5mm (I/9) crochet hook — your yarn label will point you in the right direction
- Scissors and a yarn needle for weaving in ends
- Stitch markers to help you keep track of pattern repeats
- A row counter or notepad to hold your place in the pattern
- A tape measure for checking your gauge and finished dimensions
Gauge is something a lot of beginners brush past, but spending twenty minutes on a small swatch before diving in can genuinely save you hours of headache later. With most worsted weight yarn and a 5.0mm hook, you’re aiming for roughly fourteen to sixteen stitches and twelve to fourteen rows per four inches in the daisy stitch pattern. Swatch coming out too small? Go up a hook size. Too big? Try going down. Getting this right means your blanket will actually hit the dimensions you’re going for — and that your yarn will last the whole project.

Understanding the Daisy Stitch
The daisy stitch — you might also see it called the puff flower stitch or the cluster daisy stitch — is the whole heart of this pattern. If you’ve never worked it before, the first few repeats might feel a little clunky while your hands figure out the movements, but most crafters find it clicks pretty quickly and turns almost meditative once the muscle memory kicks in. The basic idea is that you pull up multiple loops through specific stitch positions to create a gathered, petal-like cluster that looks like a simple flower sitting right on the surface of your fabric.
To work the stitch, you insert your hook into a designated stitch and pull up a loop to a specific height, then repeat that same action in the stitches around it — usually five or six loop pulls total — before drawing a single loop through all of them and locking it down with a chain stitch. That’s one complete daisy. The stitches in between each daisy, typically single crochets or half double crochets, create the background fabric and give each flower the space it needs to stand out. The pattern repeat falls across an even number of stitches and rows, which makes it simple to size up or down.
One of the most useful tips for getting the daisy stitch right is to pay attention to your tension on those pulled-up loops. Pull too tight and the petals go flat and lose their dimension. Pull too loose and the loops slide around, making the surface look uneven. You’re going for a consistent, relaxed tension that holds its shape without puckering. Many experienced crocheters actually recommend working this stitch a little looser than your usual tension, especially when you’re just learning it, because those gathered loops need a bit of give to bloom properly. Practice on a small swatch of twenty to thirty stitches before committing to the full blanket — it’s worth it.
One more thing worth knowing: the daisy stitch is typically worked on wrong-side rows, which means that beautiful raised texture shows up on the front when you flip your work. This feels backwards at first, but the pattern instructions walk you through it clearly with each row directive. Keeping your yarn consistent and working your right-side rows in standard single or double crochet between the daisy rows keeps the blanket’s structure solid and gives you that satisfying alternating rhythm that makes this such a pleasant project to come back to session after session.
Step-by-Step Pattern Instructions
You’ll start your Cozy Days Daisy Blanket with a foundation chain that’s a multiple of the pattern repeat, plus any turning chains needed. For a standard throw around fifty by sixty inches, most versions of this pattern put the foundation chain somewhere between 150 and 180 stitches — but always adjust based on your own gauge swatch. Make that beginning chain on the looser side. A classic trick is to use a hook one size larger just for the foundation chain, which keeps the starting edge from pulling in and giving you a wonky bottom border on the finished blanket.
The basic row sequence for most daisy blanket patterns goes like this:
- Row 1 (Right Side): Work a single crochet across the entire foundation chain, turn.
- Row 2 (Wrong Side — Daisy Row): Chain one, single crochet in the first stitch, then work your daisy stitch clusters across the row following the pattern repeat, ending with a single crochet in the last stitch, turn.
- Row 3 (Right Side): Chain one, single crochet across the entire row, working into each stitch including the tops of daisy clusters, turn.
- Repeat Rows 2 and 3 until your blanket reaches the length you want.
- Final Row: Work a single crochet border row across the top edge to create a clean, even finish.
Once the blanket body is done, the border is where you get to put your own stamp on it. A lot of crocheters finish with a simple single crochet border worked in rounds around all four edges, with three stitches into each corner to keep everything flat and square. Others go for a shell stitch edging, a scallop border, or a delicate picot trim for a more feminine feel. Whatever direction you take, working at least two full rounds of single crochet first will stabilize all four edges and give any decorative border a clean, solid foundation to sit on.
As you work through the rows, especially deep into a long project, it’s a good habit to periodically lay your blanket flat and check that it’s lying straight and even. Crochet fabric can bias slightly if your tension shifts over time, and catching it early — by adjusting your hook grip or how you’re holding the yarn — is much easier than trying to fix a parallelogram at the end. A light mist of water and gentle blocking once you’re finished can also even out any mild distortions and give the whole thing a polished, professional look.
Tips for Success and Common Mistakes to Avoid
Even experienced crocheters run into small snags when they’re learning a new stitch pattern, and the daisy stitch has a few specific traps that are worth knowing about going in. The most common one is losing track of your stitch repeat, which throws off the placement of your daisy clusters and leaves you with flowers that don’t line up from row to row. Stitch markers are your best friend here — pop them in every twenty to twenty-five stitches across your foundation chain and move them up as you go. That way you can catch a miscounted repeat before it becomes several rows of rework you really don’t want to undo.
Keeping consistent yarn tension across the daisy rows is another thing people struggle with, especially as your hands get tired during a long session. The gathered loops of the daisy stitch use a bit more yarn than a standard single crochet row, so your tension can naturally drift as your ball gets lighter. A lot of crafters find it helps to take short breaks every thirty to forty-five minutes and let their hands reset before picking it back up. If you notice the daisies in one section looking noticeably different from the rest, that’s usually a tension thing rather than a stitch count problem.
Joining new yarn is another thing worth thinking about ahead of time. Because the daisy stitch creates a dense, textured fabric, ends joined in the middle of a cluster can be tricky to weave in neatly and invisibly. Whenever you can, plan your yarn joins at the start of a right-side row, where the fabric is smoother and there’s more room to hide the ends cleanly. A tiny dab of fabric glue or a few extra passes with your yarn needle can also help keep stubborn ends tucked in on the wrong side.
And don’t skip blocking your finished blanket before you give it away or put it to use. Blocking — wetting or steaming your finished piece and laying it flat to dry in its intended shape — evens out stitch inconsistencies, opens up the daisy texture so the flowers look more defined, and makes the whole fabric feel softer and more drapey. For acrylic yarn, steam blocking works well — just hold your iron several inches above the surface rather than pressing it down. For natural fibers like cotton or wool, a cool water wet block lets you gently ease the blanket to your exact dimensions and the results are really lovely.
Customization Ideas and Creative Variations
Once you’ve finished your first Cozy Days Daisy Blanket and experienced that deep satisfaction of the final stitch, there’s a good chance you’ll immediately start thinking about what you can do differently next time. The great news is that the daisy stitch is incredibly adaptable. Color blocking is one of the most popular ways to put a fresh spin on it — working several rows in one color before switching to something harmonious or contrasting creates a striped, gradient, or ombré effect that gives the blanket a completely different personality while using the exact same stitch pattern.
Playing with scale opens up a whole range of project possibilities beyond the classic throw. A smaller version worked on a chain of sixty to eighty stitches makes a beautiful baby blanket — soft, substantial, and genuinely special as a nursery gift. Scale it way up to a chain of two hundred stitches or more and that same pattern becomes a dramatic bed-sized coverlet that would look right at home in a farmhouse, cottagecore, or vintage-inspired bedroom. Same stitch, same yarn, different starting chain — and you’ve got something completely new.
You might also have fun mixing the daisy stitch with other complementary textures within a single blanket. A wide border of waffle stitch or moss stitch surrounding a central daisy field creates a layered, heirloom feel that looks sophisticated and intentional. Or try working the daisy stitch in panels separated by columns of braided cable stitches for a cozy, Scandinavian warmth that would feel right at home in any winter-inspired space. The daisy stitch has enough visual presence to hold its own without overpowering whatever’s beside it, which makes it a really natural partner for other textures.

Caring for Your Finished Blanket
A handmade blanket is a real investment of time, love, and creative energy, and taking care of it properly means it’ll stay beautiful and functional for years to come. The care instructions for your Cozy Days Daisy Blanket will depend on the yarn fiber you chose, so keeping your yarn labels until the project is finished — and then tucking one into a small tag or card with the blanket — is a genuinely thoughtful habit, especially if you’re giving it as a gift. The person receiving it will be grateful to have that information on hand when laundry day comes around.
For acrylic and acrylic blend yarns, which are some of the most popular choices for blanket projects, machine washing on a gentle or delicate cycle in cool water is usually totally fine. Lay it flat to dry rather than hanging it up, since the weight of a wet throw can stretch out the stitches if it’s suspended from a line or hanger. Avoid high heat in the dryer — it can cause acrylic fibers to lose their softness over time. A low tumble dry or simply air drying flat on a clean surface will keep the texture and daisy detail looking great.
For blankets made with natural fibers like cotton, wool, or alpaca, hand washing in cool water with a gentle wool wash or baby shampoo is the safest route. Press out the excess water gently — don’t wring it — then roll the blanket in a clean towel to pull out as much moisture as possible before laying it flat to dry on a blocking mat or clean surface. Natural fiber blankets often benefit from a light re-blocking every few washes to keep those daisy motifs looking crisp and dimensional. With a little care, a well-made Cozy Days Daisy Blanket can genuinely become something that gets passed down through generations, carrying with it the warmth and intention of the hands that made it.








What do you think?
It is nice to know your opinion. Leave a comment.