










Seashell and Pearl Initial DIY: A Complete Guide to Creating Stunning Coastal Monogram Art
Introduction to Coastal Craft: Why Seashell and Pearl Initials Are the Perfect DIY Project
There is something undeniably magical about bringing the ocean indoors, and a seashell and pearl initial DIY project offers the perfect way to do exactly that. This craft combines the timeless elegance of natural shells with the luminous beauty of pearls to create a personalized piece of art that feels both meaningful and luxurious. Whether you are crafting a gift for a loved one or creating a decorative accent for your own home, this project delivers stunning results that look far more expensive and complex than they actually are.
The appeal of seashell and pearl crafts has surged in recent years as coastal and cottagecore aesthetics have taken over interior design trends. People are increasingly drawn to pieces that feel natural, handmade, and personal — and a monogram crafted from shells and pearls checks every single one of those boxes. Unlike mass-produced home décor, a handcrafted initial carries a story, a moment in time, and the unique touch of the person who made it.
What makes this particular project so accessible is that it requires no advanced artistic skill, no expensive equipment, and no extensive crafting background. If you can sort shells by size, use a hot glue gun, and appreciate beauty, you are already qualified to create something truly breathtaking. The learning curve is gentle, the materials are widely available, and the final result is something you will genuinely be proud to display or give away as a heartfelt, one-of-a-kind gift.
Gathering Your Materials: Everything You Need to Get Started
Before diving into the creative process, it is essential to gather all your materials in advance so your workflow remains smooth and uninterrupted. The foundation of this project is a letter form, which you can find at most craft stores in various sizes — typically made from papier-mâché, wood, or thick foam board. A letter that is at least six to eight inches tall will give you enough surface area to create a visually rich arrangement of shells and pearls without the design feeling cramped or cluttered.
Your shell collection is the star of the show, and sourcing beautiful shells is part of the joy of this craft. You can collect shells from beach walks over time, purchase mixed shell bags from craft stores or online retailers, or combine both approaches for the best variety. For this type of project, you will want a range of sizes — larger shells like scallops or clam shells for focal points, medium fan shells and moon snails to fill in the mid-layer, and tiny rice shells, periwinkles, and cowrie shells to fill gaps and add texture. The more variety you have, the richer and more dimensional your finished initial will look.
Here is a complete materials list to ensure you are fully prepared before beginning:
- One large papier-mâché or wooden letter form (6–10 inches recommended)
- Assorted seashells in a variety of sizes and types
- Faux or real pearl beads in various sizes (6mm, 8mm, and 10mm work beautifully together)
- Hot glue gun and plenty of glue sticks
- Strong craft adhesive or E6000 glue for heavier shells
- Tweezers for placing tiny shells and pearls
- Acrylic paint in white, ivory, or sand tones (optional, for base coating)
- Paintbrush for base coat application
- Clear matte or glossy sealant spray
- Foam brush or small palette knife for spreading adhesive
- Newspaper or craft mat to protect your workspace
Pearl beads deserve special attention when selecting your materials. Faux pearl beads are available in craft stores in bags or on strands, and they come in a gorgeous range of whites, creams, and blush tones that complement the natural ivory and tan hues of most seashells beautifully. If you want an elevated look, you can find higher-quality acrylic or resin pearl beads with a convincing luster that photographs particularly well. Real freshwater pearls can also be used for an ultra-luxurious version of this project, though they are significantly more expensive and generally reserved for smaller accent pieces.

Preparing Your Letter Form: Building the Perfect Foundation
Preparation is what separates a craft project that looks polished and professional from one that looks rushed and amateur. Before you place a single shell, take the time to properly prepare your letter form so that the surface is ready to hold your materials securely and the overall color is cohesive beneath your design. If you are using a papier-mâché letter, begin by giving it a light coat of white or ivory acrylic paint. This step is important because even though you will be covering most of the surface with shells and pearls, small gaps will inevitably remain visible — and a painted white base will make those gaps look intentional rather than like mistakes.
Once your base coat is dry, consider how you want to approach the overall layout before committing anything to glue. A technique many experienced crafters recommend is doing a “dry run” — arranging your shells and pearls on the letter without gluing them down first. This allows you to experiment with placement, identify which shells look best as focal points, and ensure you have enough material to fill the entire surface. Take a photo of your dry run so you can refer back to it once you start the actual gluing process, since pieces inevitably shift around as you work.
Think about the visual flow and hierarchy of your design as you plan. The most visually striking initial arrangements follow a principle borrowed from floral design: begin with your largest, most impressive shells as anchor pieces, then build outward and inward with progressively smaller elements. Scallop shells or large clam shells placed in the corners or at the curves of the letter create natural focal points. From there, medium-sized shells radiate outward, and finally the tiny shells, rice beads, and pearls fill every remaining gap. This layered, dimensional approach is what gives these initial pieces their incredibly lush, jewel-box quality.
The Art of Arrangement: Design Principles for a Beautiful Composition
Understanding a few basic design principles will elevate your seashell initial from a simple craft project to a genuinely artistic creation. The first principle to embrace is variety in texture and form. Seashells are extraordinary because no two are exactly alike, and they come in an almost endless diversity of shapes — spiral, fan-shaped, dome-shaped, flat, ridged, smooth, and everything in between. Deliberately mixing these different forms creates a composition that is visually interesting from every angle and invites the viewer to look more closely at the details.
Color coordination is another element worth thinking about carefully. While seashells are naturally beautiful in their raw state, many shells have subtle tones of peach, lavender, gray, or golden brown that can either harmonize or clash depending on how they are combined. For a cohesive, elegant look, try grouping shells by color family — creamy whites with ivory pearls for a monochromatic palette, or warm tans and peachy tones with blush pearls for a warmer, more romantic aesthetic. You can also lean into the natural variety and embrace the full spectrum of shell colors for a more eclectic, maximalist style that feels playful and beachy.
Pearl placement is arguably the element that transforms this craft from “cute shell art” to something that feels genuinely luxurious. Pearls serve several functions in the composition: they fill the awkward gaps between shells where no shell would naturally fit, they add a consistent pop of luster that catches the light and draws the eye, and they reinforce the overall theme of oceanic treasure. Place larger pearls strategically near focal-point shells to create little clusters of visual interest, and use smaller pearls to trace the contours and curves of the letter, guiding the viewer’s eye around the full shape of the initial.
Some additional design tips to keep in mind as you work:
- Vary your angles: Avoid placing all shells flat. Tilt some slightly upward, nestle others on their sides, and overlap edges to create depth and dimension that photographs beautifully.
- Create intentional clusters: Group three to five shells of complementary shapes together, then transition to a new grouping. This creates a sense of intentional rhythm across the composition.
- Save your most beautiful shells: Your single most spectacular shell — perhaps a perfect scallop or an iridescent abalone piece — should be reserved for a prominent position, usually the largest or most central area of the letter.
- Balance weight visually: If you place a very large shell on one side, balance it with a cluster of medium shells and pearls on the opposite side so the design feels harmonious rather than lopsided.
- Think about the edges: Do not neglect the sides of your letter form. Wrapping some shells and pearl strands around the sides adds a finished, three-dimensional quality that looks exceptional when the piece is displayed.

Step-by-Step Assembly: Bringing Your Vision to Life
With your materials gathered, your letter prepared, and your design planned, it is finally time to begin the most satisfying part of the process: assembling your seashell and pearl initial. Start by heating your hot glue gun and ensuring you have your tweezers and reference photo close at hand. Work in sections rather than trying to cover the entire letter at once — this keeps the glue from cooling too quickly and prevents the overwhelming feeling of staring at an entire empty surface.
Begin with your largest focal shells and apply a generous amount of hot glue to the base of each shell before pressing it firmly into position on the letter. Hold each piece in place for fifteen to thirty seconds to allow the glue to set properly. For particularly large or heavy shells, consider using E6000 adhesive instead of hot glue — it creates a stronger bond that will keep your statement pieces secure for years. After your anchor shells are placed and set, move to the medium-sized shells and begin filling in the surrounding areas, always working from the center of each section outward toward the edges.
Once your shells are in place, shift your attention to the pearl placement. Thread pearl beads onto short lengths of thin wire or simply place them individually using tweezers. Apply a small dot of hot glue to the spot where you want each pearl to sit, then press the pearl into place with your tweezers and hold gently until set. For areas where you want a cluster effect, apply a slightly larger glue dot and press three to five pearls into it simultaneously for a jewel-like grouping. This technique is particularly beautiful in the deepest gaps between shells, where a little pearl cluster catches the light and glimmers like something discovered on the ocean floor.
Finishing the assembly requires patience and a careful eye. Step back from your work every ten minutes or so to assess the overall composition from a distance — this perspective reveals gaps, imbalances, or areas that need more material that are impossible to see when you are working up close. Fill any remaining visible gaps with your smallest shells and individual pearl beads until you are satisfied that the surface feels complete, layered, and lush. The finishing touch is a light coat of clear sealant spray, which will protect the shells from moisture, keep the glue from yellowing over time, and enhance the natural luster of both the shells and the pearls.
Display and Gifting: Sharing Your Coastal Creation with the World
A completed seashell and pearl initial is a genuinely striking piece of art that deserves to be displayed thoughtfully. For home display, consider propping the letter on a small easel on a shelf, mantel, or side table surrounded by other coastal elements — a few loose shells, a piece of driftwood, a small glass bottle of sand, or a votive candle in a shell-shaped holder. This creates a cohesive vignette that feels styled and intentional rather than like a single craft item sitting in isolation. The initial also looks beautiful hung on a wall using a simple picture-hanging strip on the back of the letter form.
Lighting makes an enormous difference in how your finished piece is perceived and photographed. Natural light from a nearby window is ideal for bringing out the subtle iridescence of the shells and the soft glow of the pearls. For evening display, a small spotlight or warm lamp positioned slightly above and to the side of the letter will create beautiful shadows and highlights that make the dimensional quality of the arrangement absolutely breathtaking. Many people who have created these pieces report that guests frequently mistake them for expensive, professionally made art objects — which is a testament to just how high-end the natural materials look when thoughtfully arranged.
As a gift, a seashell and pearl initial is extraordinarily thoughtful and personal. It works beautifully for virtually any occasion: a wedding gift featuring the couple’s shared initial or each of their initials displayed side by side, a housewarming present personalized to the new homeowner’s last name, a birthday gift for someone who loves the ocean or coastal aesthetics, a nursery decoration for a new baby, or a sentimental keepsake for a grandmother, mother, or best friend. The relatively low material cost belies the incredible perceived value of the finished piece, making it one of those rare crafts that punches far above its weight in terms of the impression it makes on the recipient.
If you want to take this project further, consider these creative variations and extensions:
- Ombre color gradients: Arrange shells from white and cream at the top of the letter transitioning to deeper tan, brown, and even purple-toned shells at the bottom for a stunning ombre beach effect.
- Themed collections: Use only one type of shell throughout — all scallops, or all cowrie shells — for a more graphic, modern look that feels curated and minimalist.
- Mixed metallics: Incorporate gold or rose gold accent beads alongside the pearls for a glamorous, fashion-forward version that feels more elevated and contemporary.
- Framed versions: Instead of a letter form, spell out an entire word like “love,” “home,” or “joy” and frame the completed piece in a shadow box for a gallery-wall-ready art installation.
- Seasonal accents: Add dried botanicals, tiny starfish, or sand dollar fragments to the arrangement for a more complex mixed-media look that tells a richer visual story.
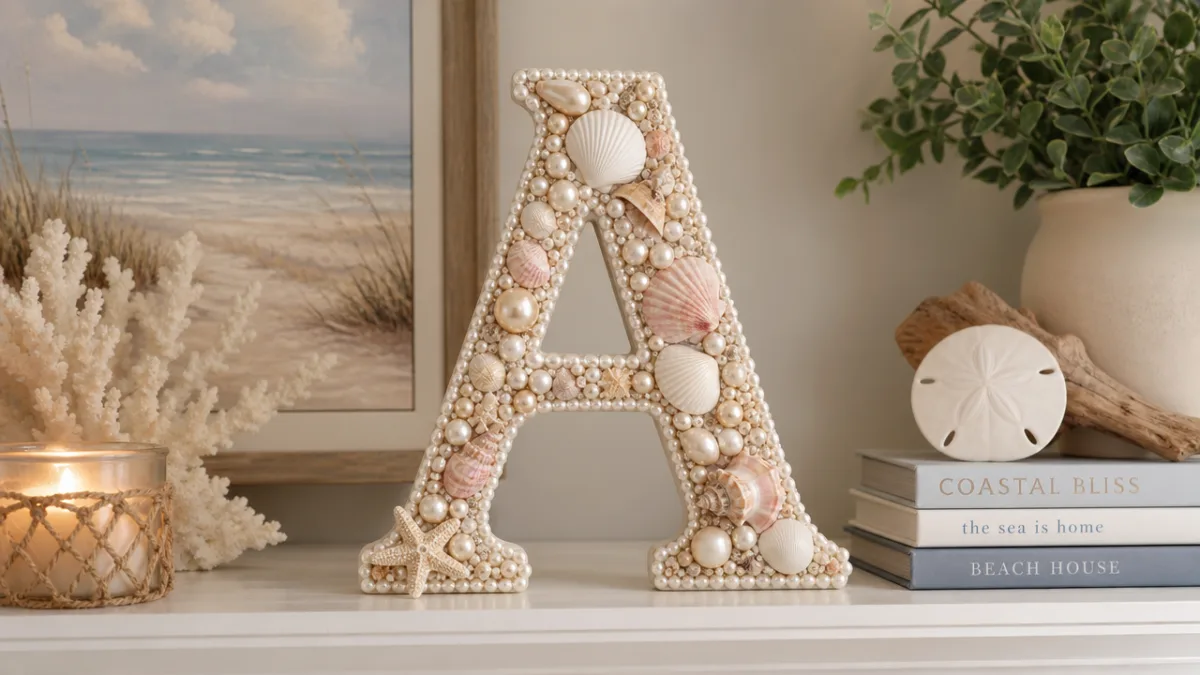
The beauty of the seashell and pearl initial DIY lies not just in the finished object but in the entire experience of making it. There is something meditative and deeply satisfying about sorting through shells, remembering where they came from, and slowly building something beautiful piece by piece. It is a craft that rewards attention and patience, that connects you to the natural world, and that results in something genuinely unique. Whether you are a seasoned crafter or picking up a glue gun for the very first time, this project has the remarkable quality of making everyone who tries it feel like an artist — because in the act of creating it, that is exactly what you are.








What do you think?
It is nice to know your opinion. Leave a comment.