










Fork Stamped Tulips: A Charming and Easy Craft for All Ages
Introduction to Fork Stamped Tulip Art
Fork stamped tulips are one of those wonderfully clever craft ideas that seem almost too simple to produce beautiful results — and yet they do, every single time. By dipping the tines of an ordinary dinner fork into paint and pressing it onto paper, you can create the unmistakable layered petals of a tulip bloom in just seconds. This technique has delighted parents, teachers, and craft enthusiasts alike because it transforms one of the most common household utensils into an artistic tool that even the youngest children can use with ease and confidence.
What makes this craft so enduringly popular is its accessibility. You don’t need an art degree, expensive supplies, or a dedicated studio space to create something genuinely lovely. A plastic fork from your kitchen drawer, some acrylic or tempera paint, a sheet of paper, and a few minutes of time are all that stand between you and a colorful arrangement of tulips that could grace a greeting card, a framed print, or a child’s bedroom wall. The simplicity of the method belies the charm of the finished product.
Beyond its ease of execution, this craft also carries real educational and developmental value. For children, pressing a fork into paint and stamping it on paper builds fine motor coordination, teaches basic color theory, and introduces the concept of pattern making. For adults, it offers a meditative, low-pressure creative outlet that produces results quickly and satisfyingly. Whether you are working alone on a quiet afternoon or leading a room full of kindergartners, fork stamped tulips deliver a rewarding experience from start to finish.
Materials You Will Need
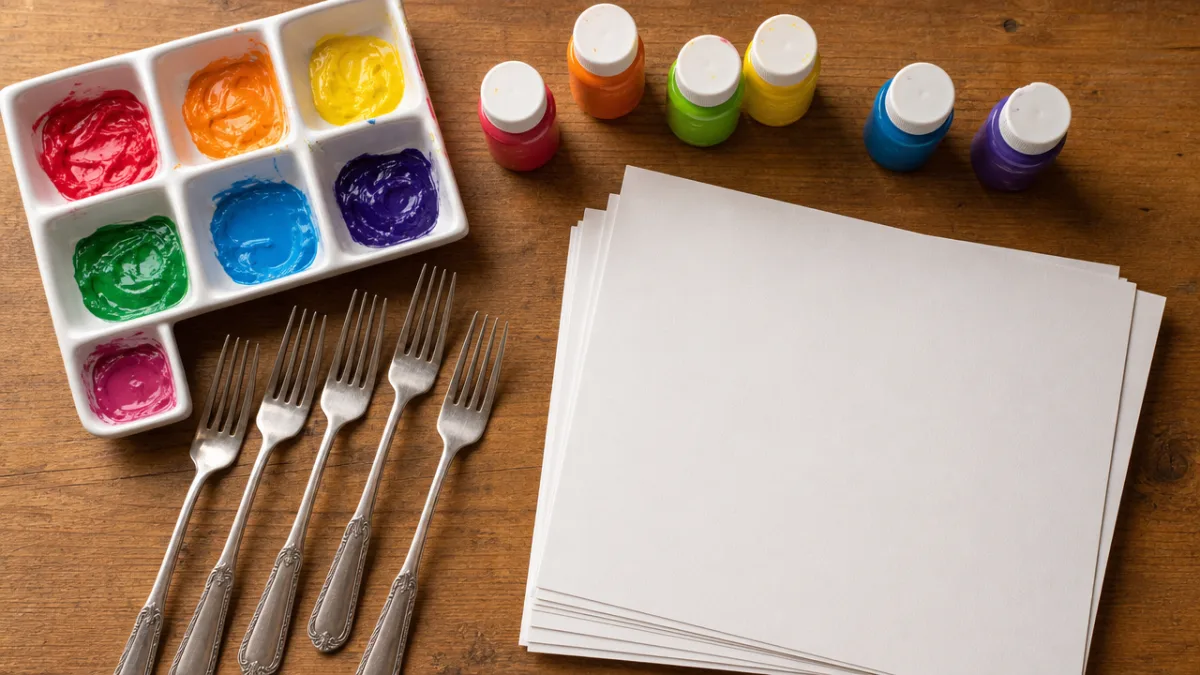
Gathering your supplies before you begin is one of the keys to a smooth and enjoyable crafting session. For fork stamped tulips, the materials list is refreshingly short, and most items are likely already sitting in your home. Having everything laid out on your workspace before you dip your first fork will prevent interruptions and help even young children stay focused and engaged throughout the process. A little preparation goes a long way in keeping the creative energy flowing.
For the painting itself, you will want to choose a paint that has enough body to hold the impression of the fork tines without spreading too much on contact with paper. Tempera paint is ideal for children because it washes off skin and fabric easily, dries relatively quickly, and comes in a wide range of vivid colors. Acrylic paint works beautifully for older crafters and produces richer, more saturated tulip blooms. Watercolor paint can also be used for a softer, more translucent effect, though you may need to apply it more thickly than usual to get a clear stamp impression.
Here is a complete list of everything you should have ready before you begin:
- A standard dinner fork or plastic fork (one per color, if possible, to avoid constant cleaning)
- Tempera or acrylic paint in tulip colors such as red, pink, yellow, purple, orange, and white
- Heavy cardstock or watercolor paper, which holds up better to wet paint than standard printer paper
- A green marker, crayon, or thin paintbrush for drawing stems and leaves
- A shallow palette, plate, or tray for spreading paint
- Paper towels for blotting excess paint and cleaning up between colors
- A cup of water for rinsing forks if you are switching colors with the same utensil
- Optional: a pencil for lightly sketching stem placement guides before painting
One optional but highly recommended addition to your supply list is a shallow foam tray or piece of craft foam onto which you can pour and spread your paint. This gives you a surface that holds a thin, even layer of paint perfectly suited to loading the fork tines consistently. Styrofoam trays saved from grocery store produce work wonderfully for this purpose and cost nothing. If you are working with children, consider covering your work surface with a disposable tablecloth or several layers of newspaper to make cleanup as painless as possible.
Step-by-Step Instructions for Creating Your Tulips
Once your materials are assembled and your workspace is protected, you are ready to begin. The process itself is wonderfully intuitive, but walking through it step by step the first time ensures that you achieve clean, recognizable tulip shapes rather than smudged blobs. Take a moment before you start to look at a real tulip or a photograph of one, noticing how the petals cup upward and inward, creating a rounded, slightly elongated form. This mental image will guide your stamping angle and help you achieve a more naturalistic result.
Start by deciding on your composition. Are you making a single large tulip as the focal point of a card? A row of tulips marching across the bottom of the page? A full vase bouquet? Lightly pencil in the positions of your stems first, since the flower heads will be stamped on top. This compositional planning step is often skipped but makes a significant difference in the final look of your piece. A few gentle pencil lines indicating where stems will grow give you anchor points for placing your fork stamps at the correct angle and height.
Follow these steps to stamp each tulip head:
- Pour a small amount of your chosen color onto your palette and spread it into a thin, even layer using the back of a spoon or a foam brush.
- Press the tines of your fork flat into the paint, making sure all four tines are evenly coated. You want a thorough but not dripping load of paint on the fork.
- Blot the fork once on a paper towel to remove any excess paint that might cause the stamp to fill in and lose its distinct tine marks.
- Hold the fork so that the tines face upward, mimicking the cupped shape of tulip petals, and press it firmly onto your paper at the top of a stem.
- For a fuller tulip, rotate the fork slightly to one side and stamp again, overlapping the first impression by about half. Repeat on the other side for three impressions total.
- Allow each tulip head to dry completely before drawing or painting in the stem and leaves with green marker or paint.
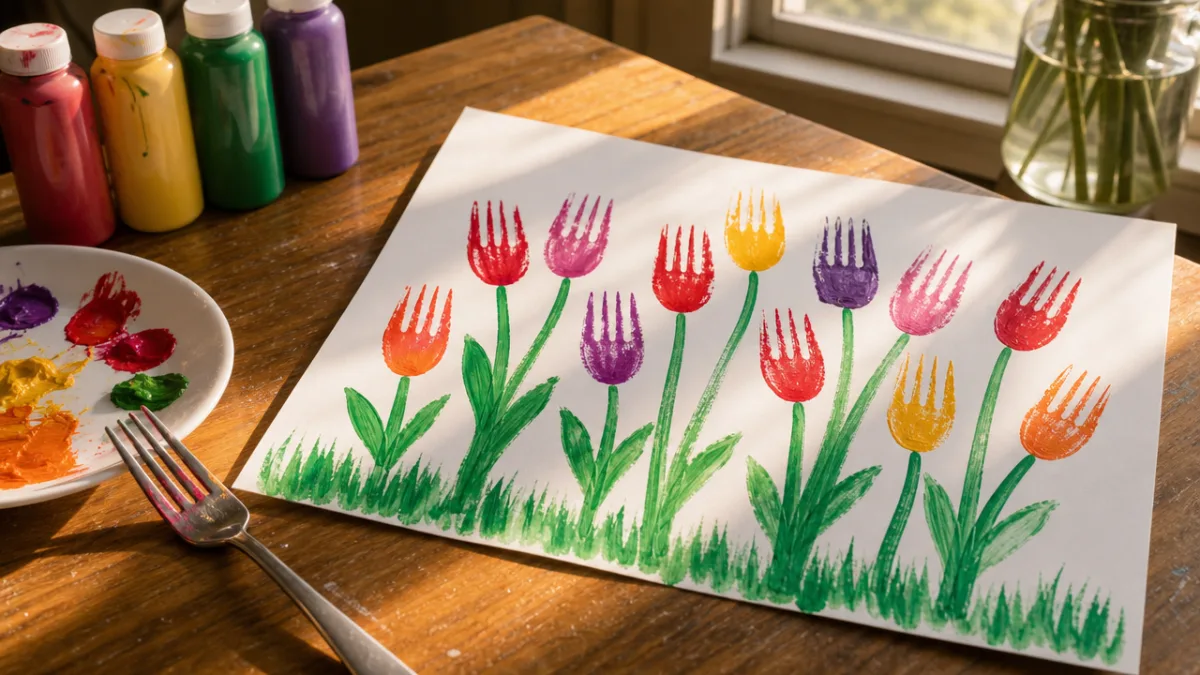
The three-stamp method — center, slightly left, slightly right — is the secret to creating a tulip that looks lush and multi-petaled rather than flat. Each individual fork stamp creates the impression of two or three petals, so three overlapping stamps together suggest a full bloom from the front. If you want a side-view tulip, a single stamp with the fork tilted slightly away from vertical gives you a graceful profile. Experimenting with different angles and numbers of stamps allows you to create variety within a single arrangement, making your finished piece feel more dynamic and artistically intentional.
Creative Variations and Artistic Extensions
Once you have mastered the basic fork-stamped tulip, a world of creative variations opens up before you. One of the most popular adaptations is the two-tone tulip, created by loading one half of the fork tines with one color and the other half with a contrasting or complementary shade. When stamped, this produces a tulip that appears to have petals of two different colors, mimicking the look of variegated heirloom tulip varieties. This technique takes a little practice to execute neatly but produces results that look impressively sophisticated for such a simple method.
Another delightful variation involves using the fork stamp as a base layer and then adding detail with a thin brush or colored pencil once the paint has dried. You might add delicate petal veining in a slightly darker shade, a white highlight stroke along the center of each petal, or a contrasting color at the petal edges to suggest the picotee coloring seen on some real tulip varieties. These finishing touches elevate the piece from a children’s craft to something that genuinely resembles a botanical illustration, and they require very little additional skill or time.
Here are some further creative extensions worth exploring:
- Mixed media backgrounds: Stamp your tulips over a watercolor wash background in soft blues, greens, or yellows to suggest a spring sky or garden setting.
- Seasonal color palettes: Use burgundy, burnt orange, and gold for an autumnal arrangement, or white and silver on black paper for a dramatic winter version.
- Greeting card applications: Fold cardstock in half before stamping to create handmade cards for Mother’s Day, birthdays, or spring holidays.
- Gift wrap design: Stamp tulips in a repeating pattern across plain kraft paper to create personalized, one-of-a-kind gift wrap.
- Fabric printing: Use fabric paint and this same method to decorate canvas tote bags, tea towels, or plain cotton pillowcases.
- Collaborative murals: In a classroom or family setting, have multiple participants each stamp several tulips across a large shared piece of paper or butcher paper to create a collective garden scene.
The fork stamping technique also translates beautifully to other flower forms beyond tulips. The same three-stamp approach, with subtle adjustments to angle and overlap, can suggest daffodils, peonies, or even abstract florals. Once children or beginners understand the principle of using a tool’s natural shape to create organic-looking forms, they often begin looking at other household objects with fresh eyes, wondering what impressions a comb, a coin, or a crumpled piece of plastic wrap might produce. This curiosity is one of the most valuable things any craft can inspire.
Tips for Working with Children of Different Ages
Fork stamped tulips are genuinely one of those rare crafts that can be adapted to suit virtually any age group, from toddlers barely out of diapers to grandparents rediscovering the joy of making things with their hands. The key is understanding what each age group can comfortably manage and adjusting your expectations, your level of assistance, and your setup accordingly. A two-year-old will produce something charmingly abstract, while a ten-year-old can execute a carefully planned composition with real finesse. Both experiences are equally valid and equally joyful.
For toddlers and preschoolers between the ages of two and four, the primary goal is sensory exploration and the delight of cause and effect. At this age, children are thrilled simply by the act of pressing the fork into paint and watching color appear on paper. Use plastic forks with rounded tines for safety, limit the color palette to two or three options to prevent overwhelming brown mud, and keep paper large. Don’t worry about recognizable tulip shapes at this stage. The experience of stamping, the feel of the paint, and the pride of making marks on a page are the real learning outcomes.
Children between five and eight can begin to understand and follow the three-stamp tulip method with a bit of demonstration and guidance. Show them once, let them try, and resist the urge to correct or refine their work. At this age, the value lies in building confidence and developing a personal approach to the craft rather than replicating a perfect model. You might introduce the idea of planning their composition first by asking questions like “How many tulips will you make?” and “What colors will you choose?” to encourage intentional decision-making and the early seeds of artistic thinking.
Older children and teenagers can be challenged with more demanding variations, such as creating a realistic still-life composition with a vase, working with a limited or analogous color palette, or combining the fork stamp technique with other media in a mixed-media piece. At this age, they benefit from understanding a little of the “why” behind the technique — how the fork tines mimic the cupped structure of petals, for example, or how overlapping stamps create visual depth. Framing the craft within a broader context of printmaking as an art form can help older students engage with it on a more intellectually satisfying level.
Display, Preservation, and Gifting Your Finished Artwork
Once your fork stamped tulips are complete and thoroughly dry, the question of what to do with them deserves some thought. These pieces have a freshness and vitality that makes them genuinely display-worthy, and with a little care in presentation, a sheet of fork-stamped tulips can look like something you might find in an artisan print shop. The simplest approach is to slip the finished piece into a plain clip frame, which can be purchased inexpensively at any home goods store, and hang it somewhere it will be seen and appreciated daily.
For pieces made on standard copy paper, which may have buckled slightly from the wet paint, consider placing the finished artwork face down under a stack of heavy books for several hours before framing. This gentle pressing will flatten the paper significantly and make it much easier to frame neatly. Pieces made on cardstock or watercolor paper are generally sturdy enough to frame without this step. If you used acrylic paint, the dried surface will be slightly raised and textured in a pleasing way that adds tactile interest when framed under glass.
Fork stamped tulip pieces make genuinely meaningful handmade gifts, particularly for occasions associated with spring, gratitude, or new beginnings. A few thoughtful presentation approaches include the following options, each of which adds polish without requiring significant additional effort or expense:
- Mount the finished piece on a slightly larger sheet of contrasting cardstock before framing, creating a simple mat effect that makes the image pop.
- Scan or photograph the artwork at high resolution and have it printed as a set of notecards through an online printing service, turning one original into dozens of usable cards.
- Roll the finished piece loosely, secure it with a ribbon, and slip it inside a cardboard tube or a reused wrapping paper tube for a charming, eco-friendly gift presentation.
- If children made the piece, add a small label on the back with the child’s name, age, and date — a detail that future family members will treasure enormously.
- Create a coordinating set of pieces in a consistent color palette to give as a group, which can be displayed together as a small gallery wall.
Preserving children’s artwork specifically is worth addressing, because these pieces carry sentimental value that grows over time. If you want to keep fork-stamped tulip pieces for the long term, store them flat in acid-free sleeves or folders to prevent yellowing and deterioration. Standard copy paper will not last as long as archival paper, but even pieces on lesser paper can be preserved for many decades with simple, careful storage. The effort of preservation pays dividends in years to come, when a now-grown child encounters their four-year-old self’s enthusiastic tulip stamping and feels the warm rush of remembered joy.
The Broader Value of Simple Process-Based Crafts
Fork stamped tulips belong to a category of crafts often described as process art — activities where the experience of making matters more than the perfection of the product. In an era when children’s activities are increasingly structured, evaluated, and optimized for measurable outcomes, process-based crafts offer something increasingly rare: the freedom to explore, experiment, and make something without fear of doing it wrong. There is no wrong way to stamp a fork into paint and press it onto paper. Every impression is a valid one, and every finished piece reflects the unique hand and personality of its maker.
Research in early childhood development consistently supports the value of unstructured creative play and open-ended art making. When children engage with materials freely, without a rigid template to follow or a “correct” result to achieve, they develop problem-solving skills, build tolerance for ambiguity, and practice the kind of flexible thinking that serves them in every area of life. A craft like fork-stamped tulips, which has simple enough parameters to provide structure but open enough outcomes to allow genuine creative choice, hits a productive sweet spot that more prescriptive crafts often miss.
For adults, the benefits are different but equally real. Many people find that engaging in simple, repetitive, hands-on creative activities induces a state of focused calm that closely resembles the effects of meditation. The rhythmic process of dipping, blotting, and pressing — repeated across a sheet of paper to build a garden of tulips — quiets the analytical mind and invites a gentler, more associative mode of thinking. People who claim they are not creative often discover through experiences like this that what they lacked was not innate ability but simply the right low-stakes invitation to begin.
In classrooms, community centers, art therapy settings, and family living rooms alike, fork-stamped tulips have served as exactly that kind of invitation. They ask nothing more of you than your willingness to try, and they give back color, form, and the quiet satisfaction of having made something with your own hands. In a world that can feel increasingly abstract and screen-mediated, the simple act of pressing a paint-loaded fork onto paper and lifting it to reveal a tulip bloom carries a disproportionately powerful charge of delight. That delight — immediate, honest, and entirely your own — is the real gift this humble craft has to offer.








What do you think?
It is nice to know your opinion. Leave a comment.