










Candle Tunneling: What It Is and How to Fix It
What Is Candle Tunneling?
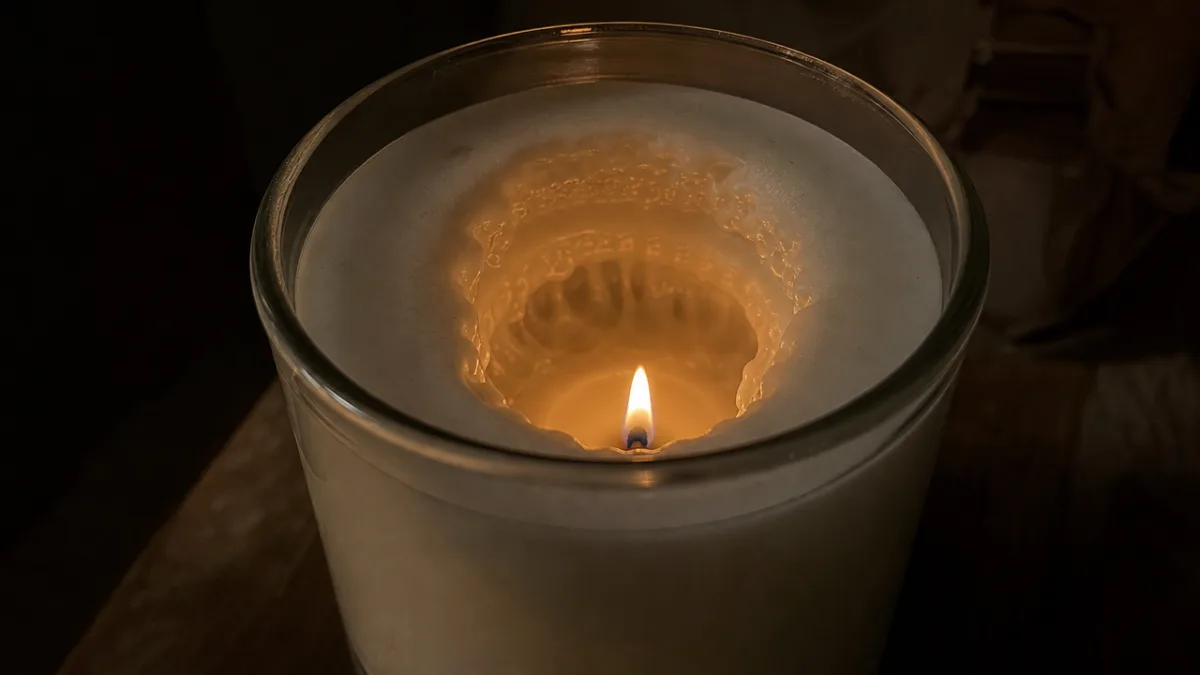
If you’ve ever lit a candle only to watch it burn straight down the middle while the wax around the edges just sits there untouched, you’ve experienced candle tunneling. It’s one of those frustrating little problems that candle lovers run into all the time. Instead of the whole surface melting down nice and evenly, you end up with a deep cylindrical hole in the center and a thick ring of perfectly good wax clinging to the sides of the jar — wax that will never get used.
It happens because wax has a kind of memory. When you first light a candle and only let it burn for a short time, the wax hardens in that same small pattern — and from then on, it tends to follow that path every single time you light it again. The wax essentially “remembers” how far it melted and sticks to that boundary, digging the tunnel deeper with every burn instead of spreading outward to the edges.
And here’s the thing — tunneling isn’t just an eyesore. It’s a real waste of money. All that wax stuck to the sides of your jar is packed with the fragrance oils you paid for, and if it never melts, those scents never actually make it into the air. A badly tunneled candle can waste 50 percent or more of its wax, which means you’re essentially throwing away half your candle every time you let it tunnel.
Why Does Candle Tunneling Happen?
The number one culprit is burning a brand-new candle for too short a time on that very first use. Candle people sometimes call this the most important burn of a candle’s life, and it really is. Because wax holds onto its thermal memory, if you light a fresh candle for just 30 minutes and then blow it out, you’ve basically told it that melting only in that small center circle is the way things work — and it’ll keep doing exactly that every time you light it.
Wick size is another big factor. If the wick is too small for the width of the container, the flame just doesn’t throw enough heat to melt the wax all the way out to the edges. This is a quality control issue, and it can vary even between batches of the same brand. A well-sized wick should produce a melt pool that reaches the full diameter of the container within two to four hours, depending on how wide the jar is.
The environment you burn your candle in matters too. Drafts from open windows, air conditioning vents, or ceiling fans can push the flame to one side, causing one part of the wax to melt faster than another. Do that enough times and you’ll end up with uneven or lopsided tunneling. Even a cold room can slow things down, making it harder for the wax near the edges to keep up with the heat in the center.
How to Fix an Already Tunneled Candle
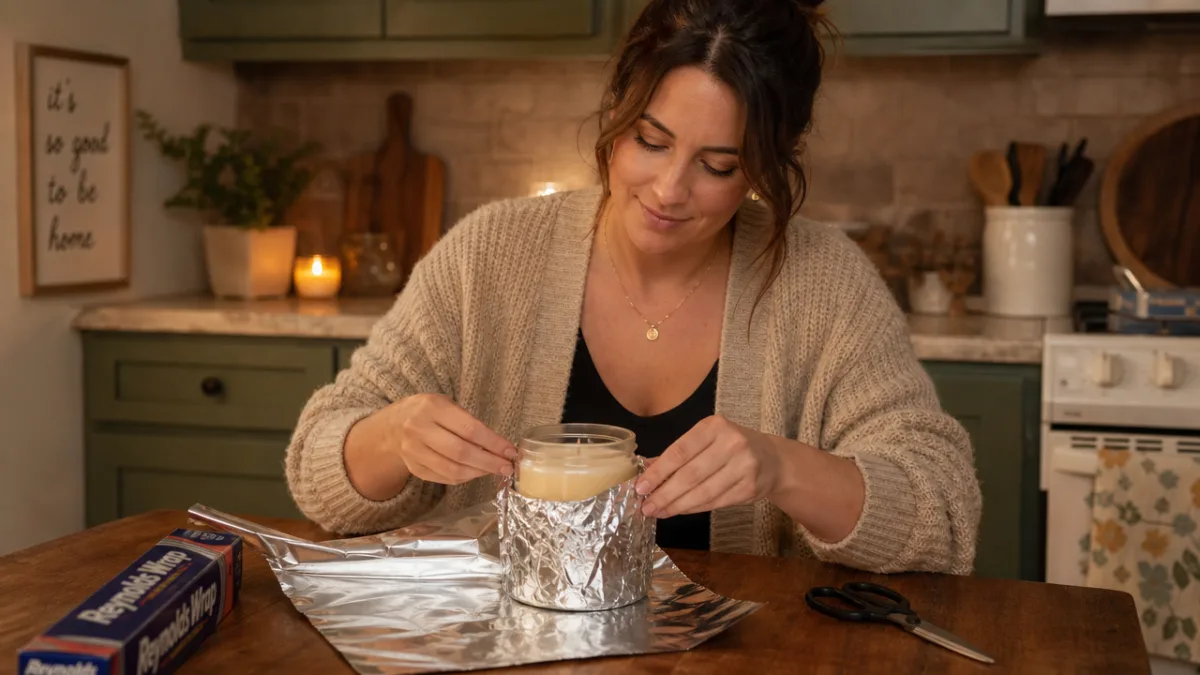
Already dealing with a tunneled candle? Don’t give up on it yet. There are a few solid ways to bring it back, and the most popular one is the foil method. The idea is simple: you use aluminum foil to trap heat around the top of the candle, which warms up those stubborn wax walls from above and coaxes them into melting down toward the center. It requires no special equipment and works really well on mild to moderate tunneling if you give it enough time.
Here’s how to do it: tear off a piece of foil big enough to wrap loosely around the top of your jar, fold it over the rim, and leave a small opening — about one to two inches across — right above the wick. Light the candle and let it burn through the foil tent. The trapped heat builds up around the wax walls and gradually melts them inward. Depending on how deep the tunnel is, this can take anywhere from one to three hours, so settle in.
Another option is the hair dryer method. Set a hair dryer to low or medium heat and slowly move it in a circular motion around the inside rim of the jar, warming the wax walls until they start to soften and collapse inward. This gives you a bit more control than the foil method and is especially handy for narrow tunnels where foil might be awkward to work with. Just be careful not to blow the flame out or overheat the glass.
For really severe tunneling, you might need to roll up your sleeves before you even try to relight the candle. Grab a spoon, butter knife, or a dedicated candle tool and carefully scrape away some of the excess wax from the walls to level out the surface as much as you can. Don’t throw that wax away — save it for a wax warmer or use it as a fire starter. Once you’ve manually evened things out, follow up with the foil method on your next burn to finish the job properly.
Preventing Candle Tunneling from the Start
Of course, it’s much easier to prevent tunneling than to fix it after the fact. The golden rule of candle care is this: give your candle enough time to form a full melt pool on the very first burn. A full melt pool means the liquid wax reaches all the way to the edge of the container across the whole surface. The general guideline is one hour of burn time for every inch of the candle’s diameter on that first lighting.
For a typical three- to four-inch jar candle, that means you’re looking at a three- to four-hour burn the first time around. That might sound like a commitment, but it’s genuinely the most effective way to set the wax’s memory in the right direction from the start. After that initial good burn, things get more flexible — though it’s still smart to let a full melt pool develop each time you use the candle, which usually takes an hour or two.
Buying quality candles from makers who actually care about their craft also makes a huge difference. A well-made candle uses a wick that’s matched to the specific wax type and vessel size, so you’re not fighting an uphill battle from the beginning. Look for candles that mention their wick type and burn time on the label, and check reviews for comments about even burning. Soy wax candles tend to have a reputation for burning more evenly, though any candle can tunnel if you don’t treat it right. A printed burn time recommendation is usually a sign that the maker has actually tested their product.
- Always burn your candle for at least one hour per inch of diameter on the first use to establish a proper wax memory.
- Keep your candle away from drafts, air vents, and fans that can push the flame unevenly across the wax surface.
- Trim the wick to approximately one quarter of an inch before every burn to maintain a clean, steady flame height.
- Never burn a candle for more than four hours at a stretch, as excessive heat can cause the wick to mushroom and burn unevenly.
- Store candles in a cool, dry place away from direct sunlight to prevent the wax from softening or warping before use.
The Role of Wick Maintenance in Preventing Tunneling
Wick maintenance is one of those things most people completely skip, but it makes a surprisingly big difference in how evenly a candle burns. A wick that’s too long creates a large, flickery flame that throws way more heat than the candle needs. The wax directly under it burns away fast while the wax around the edges can’t keep pace — and over time, that imbalance carves out a funnel even in candles that would otherwise burn just fine.
Trimming your wick to about a quarter inch before every single burn is one of the best habits you can pick up. Wick trimmers — those angled scissors made specifically for reaching into deep jar candles — make this really easy and precise. If you don’t have one, nail clippers or regular scissors work fine, especially early on when the wax surface is still near the top of the jar. Just pinch off the dark, charred tip before you light it, and toss the debris rather than letting it fall into the wax.
If the wick tip looks bulbous and carbon-coated after the candle cools — what’s called a mushroom — that’s a sign the wick ran too hot. A mushroomed wick dramatically increases flame size and causes the kind of uneven, accelerated burning that starts or worsens tunneling. It only takes a few seconds to check and trim the wick before each use, but that tiny habit really does make a noticeable difference in how cleanly and evenly your candle burns.
Understanding Different Wax Types and Their Tunneling Tendencies
Not all candle waxes are created equal, and knowing a bit about what’s in your candle can help you get ahead of tunneling problems before they start. Paraffin wax is by far the most widely used — it’s petroleum-derived, has a relatively high melting point, and needs a decent-sized wick to melt all the way to the edges. Budget candle brands that cut corners on wick size tend to use paraffin, which is part of why cheaper candles so often tunnel.
Soy wax has become really popular over the past decade or so, largely because it comes from soybeans and has a reputation for burning cleaner. It has a lower melting point than paraffin, which generally makes it a bit more forgiving when it comes to getting a full melt pool. That said, soy isn’t tunnel-proof. Because it’s softer and more sensitive to temperature swings, it can develop a white crystalline coating called “frosting” and will still tunnel if you don’t give it long enough on that first burn.
Beeswax is a more premium natural option with a lovely honey scent and a slow, clean burn. It has the highest melting point of the three, which means it takes more time to reach the edges — making that first-burn rule even more important with beeswax candles. Coconut wax is a newer player in the candle world and has quickly earned a reputation as one of the most tunnel-resistant options out there, with excellent melt pool behavior and a beautifully even burn. Blended waxes mix two or more of these materials together and can behave unpredictably depending on the exact recipe.
- Paraffin Wax: High melting point, most prone to tunneling when paired with a small wick, requires careful attention on the first burn.
- Soy Wax: Lower melting point, more forgiving but still susceptible, popular for its natural composition and longer burn times.
- Beeswax: Highest melting point of common waxes, slow and clean burning, requires extended initial burns to prevent tunneling.
- Coconut Wax: Premium option with excellent melt pool characteristics and natural tunnel resistance, often used in high-end candles.
- Blended Waxes: Variable behavior depending on composition; always follow manufacturer burn time guidelines carefully.
Knowing what wax you’re working with helps you set realistic expectations and adjust how you burn the candle. A lot of quality candle makers will list the wax type on the packaging or their website — it’s worth looking for. And if you make your own candles, getting the wax-to-wick pairing right for your specific vessel is honestly the most important decision you’ll make. Most experienced candle makers test several wick sizes before landing on the right one, and there’s a good reason for that.

When to Let Go: Knowing the Limits of a Tunneled Candle
Most tunneled candles can be saved, but every now and then you’ll come across one that has gone too far. When the tunnel is so deep that the flame is sitting several inches below the rim of the jar, burning it becomes genuinely unsafe. Heat has nowhere to escape, which can crack or overheat the glass, and the flame starts getting starved of oxygen — causing it to sputter and throw off a lot of soot. At that point, pushing through just isn’t worth it.
The better move is to harvest whatever wax is left rather than risk burning the candle in that state. You can pop the jar in a low oven — around 170 to 200 degrees Fahrenheit — for 15 to 20 minutes, or use a wax melter to gently melt everything down. Once it’s liquid, carefully pour it into a heat-safe container or silicone mold and let it set. You’ll end up with a wax melt you can use in an electric warmer, which means you still get to enjoy the fragrance without any of the safety concerns.
At the end of the day, candle tunneling is almost always fixable and very often preventable. Once you understand how wax memory works and why that first burn matters so much, it becomes pretty easy to avoid the whole problem in the first place. A few extra hours of patience the first time you light a new candle can mean the difference between one that lasts twice as long as expected and one that burns through half its wax while leaving the rest stuck to the jar. Give your candles a proper start, and they’ll pay you back with a much longer, more fragrant, more satisfying burn.








What do you think?
It is nice to know your opinion. Leave a comment.