










Introduction to Clay Vegetable Garden Markers
There is something deeply satisfying about growing your own vegetables, and even more so when every corner of your garden reflects your personal creativity. Clay vegetable garden markers are a wonderful way to combine practical organization with handmade artistry, turning a simple labeling task into an opportunity for self-expression. Whether you are a seasoned gardener or just beginning to tend your first raised bed, these charming little markers bring warmth, personality, and a touch of whimsy to any outdoor growing space.
Unlike store-bought plastic labels that fade in the sun and snap in the frost, handcrafted clay markers are built to last and beautiful to look at. They can be shaped, stamped, painted, and glazed to suit any aesthetic, from rustic farmhouse gardens to sleek modern herb plots. The process of making them is accessible to crafters of all skill levels, requiring no kiln or professional equipment when you choose the right type of clay. Air-dry clay in particular has made this hobby wonderfully approachable for families, hobbyists, and garden enthusiasts alike.
This article will walk you through everything you need to know about creating your own clay vegetable garden markers, from choosing the right materials and shaping your designs, to finishing, waterproofing, and installing them in your garden beds. You will also find inspiration for creative shapes and decorative techniques that go beyond simple flat tags, helping you craft markers that are truly one of a kind. By the end, you will have all the knowledge you need to get your hands delightfully dirty and start this rewarding project.
Why Handmade Markers Matter
In a world dominated by mass-produced garden accessories, handmade clay markers offer something that simply cannot be bought off a shelf: a genuine connection between the maker and the garden. When you press your thumb into soft clay to shape a tiny tomato or carve the name of your favorite basil variety, you are investing your time and care into the space where your food grows. That investment transforms a functional object into something meaningful, and visitors to your garden will notice and appreciate the difference immediately.
Handmade markers also allow for complete customization. You can create markers in exactly the sizes you need, in colors that complement your garden’s palette, and with labels that use your own handwriting or stamps. This is particularly useful for gardeners who grow unusual heirloom varieties with names that you would never find on a pre-made label. A hand-lettered clay tag for “Brandywine Tomato” or “Dragon Tongue Bean” tells a story and honors the heritage of the seeds you have chosen to grow.
Choosing the Right Clay for Your Garden Markers
The first and most important decision you will make when embarking on this project is which type of clay to use. For outdoor garden markers, not all clays are created equal, and your choice will significantly affect the durability and appearance of the finished product. The three most commonly used options are air-dry clay, polymer clay, and traditional earthenware or stoneware clay that requires kiln firing. Each has distinct advantages and limitations that are worth understanding before you begin.
Air-dry clay is by far the most popular choice for beginners and casual crafters, and for good reason. It requires no special equipment, is widely available at craft stores, and dries simply by exposure to air over one to three days. Brands like DAS, Crayola Air-Dry Clay, and Creative Paperclay are all reliable options that hold detail well and can be sanded and painted once dry. The main drawback is that air-dry clay is porous and relatively fragile, meaning it will need a good sealant to survive rain and frost. With proper finishing, however, air-dry clay markers can last for several garden seasons.
Polymer clay, such as Sculpey or Fimo, is another excellent option. It is baked in a regular home oven at low temperatures, typically between 265 and 275 degrees Fahrenheit, making it more durable than air-dry alternatives. Polymer clay is also available in a wide range of pre-mixed colors, which means you can skip the painting step entirely if you prefer. It holds fine details beautifully and is resistant to moisture once cured, though it can become brittle if overbaked or exposed to prolonged freezing temperatures. For gardeners in mild climates, polymer clay is an outstanding choice.
Comparing Clay Types at a Glance
When deciding between clay types, it helps to weigh your priorities clearly. Consider how much time you want to invest, what tools you have available, and how long you need your markers to last. The following points summarize the key attributes of each clay type to help you make an informed decision before purchasing your materials.
- Air-Dry Clay: No equipment needed, widely available, affordable, requires sealing for outdoor use, good for beginners and children.
- Polymer Clay: Baked in home oven, very durable, available in many colors, excellent detail retention, best for moderate climates.
- Earthenware or Stoneware: Requires kiln firing, most durable and frost-resistant option, ideal for permanent markers, best for experienced ceramicists or those with kiln access.
- Self-Hardening Terracotta: A hybrid option that mimics fired clay aesthetics, good color payoff when painted, benefits from waterproof sealant.
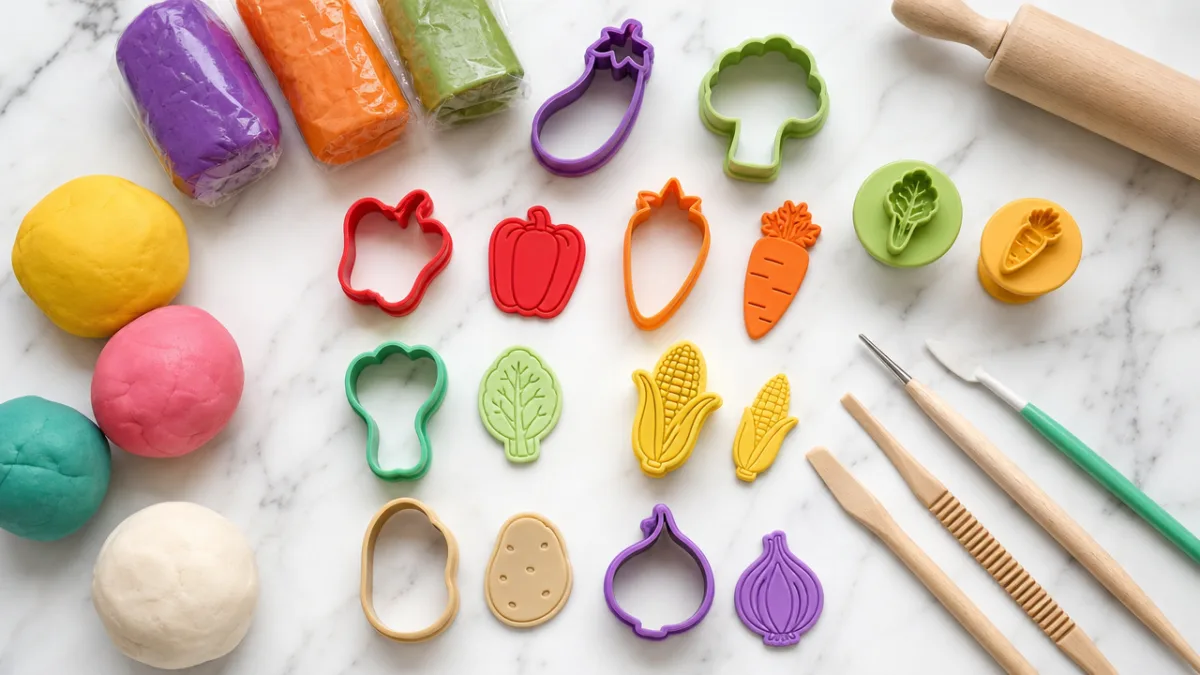
Once you have selected your clay, gather any additional materials you will need before beginning. A smooth, non-stick work surface such as a silicone mat or a piece of wax paper is essential. A rolling pin or acrylic roller will help you achieve even thickness. Cookie cutters, letter stamps, wooden skewers for making holes, and sculpting tools or toothpicks for detail work are all worth having on hand. Having everything ready before you begin makes the creative process flow much more smoothly and enjoyably.
Shaping and Designing Your Clay Markers
Once your materials are assembled, it is time to begin shaping your clay markers. Start by conditioning your clay, which simply means working it with your hands until it becomes soft and pliable. For air-dry clay, this usually takes just a minute or two of kneading. For polymer clay, conditioning is more important and may take three to five minutes of working the clay until it is warm, smooth, and free of cracks. Properly conditioned clay will roll out evenly and hold impressions and details much more crisply.
Roll your clay to a thickness of approximately a quarter inch, or six millimeters. This thickness provides enough strength to survive being pushed into garden soil without snapping, while still being thin enough to dry evenly without cracking through the center. Thicker is generally better for outdoor use, but avoid going beyond half an inch as this significantly increases drying time and the risk of cracking during the drying process. Use a guide, such as two wooden craft sticks of equal thickness placed on either side of your clay, to help you roll to a consistent depth.
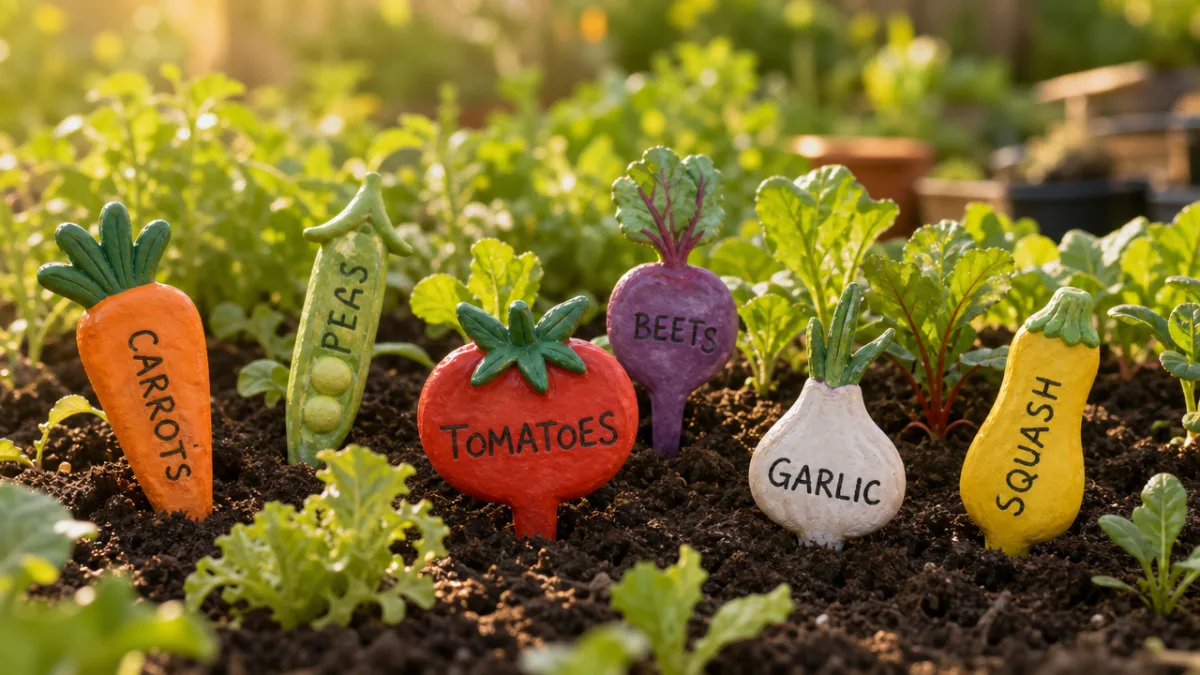
From this rolled sheet, you can cut your markers in many ways. Simple rectangles and ovals are classic choices and leave plenty of space for writing vegetable names. However, one of the great joys of clay garden markers is the opportunity to cut them into vegetable shapes themselves. A carrot-shaped marker for your carrot row, a round marker for onions, or a tall narrow strip for leeks can be both playful and intuitive. You can use cookie cutters, a craft knife, or clay-specific cutters to achieve these shapes, or you can sculpt freehand for a more organic, artisanal look.
Adding Text and Decorative Details
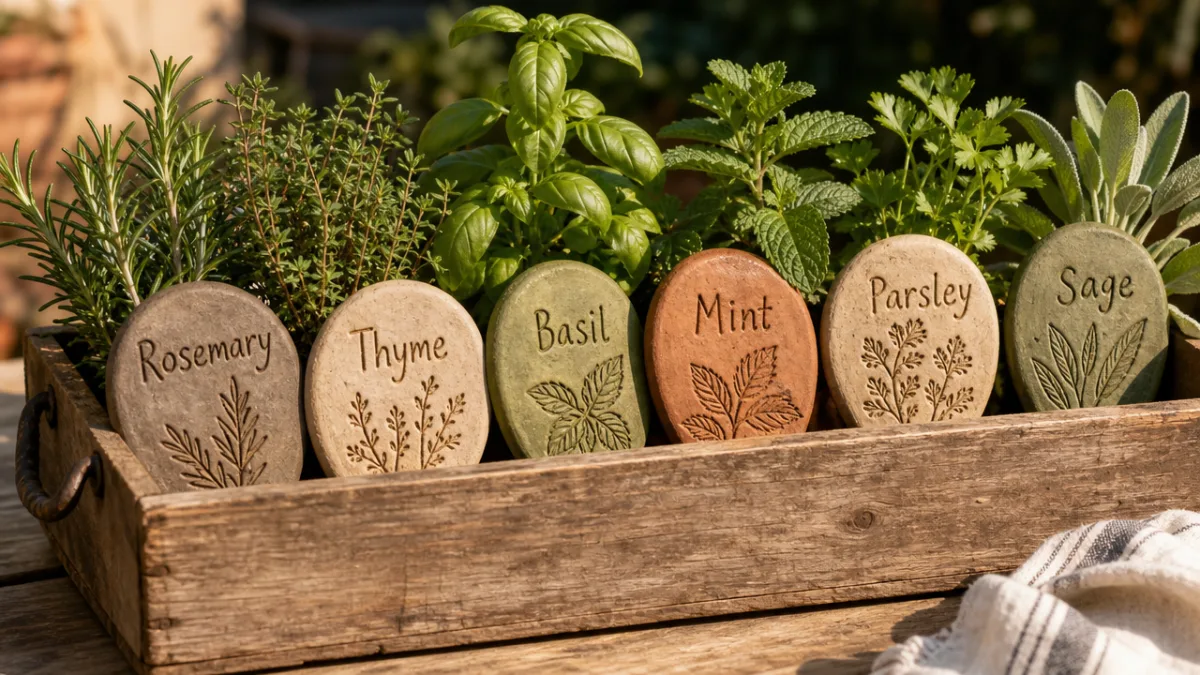
There are several methods for adding text to your clay markers, each giving a distinctly different aesthetic result. Letter stamps pressed firmly into soft clay create clean, consistent lettering and work particularly well with rubber or metal alphabet stamp sets. You can press each letter individually, or use a word stamp if you happen to have one that fits your needs. Always test your stamps on a scrap piece of clay first to get a feel for the pressure required, as too little pressure leaves a faint impression while too much can distort the surrounding clay.
For a more freehand look, you can inscribe letters and designs directly into the clay using a wooden skewer, a toothpick, a blunt pencil, or a clay stylus. This technique, known as incising or carving, produces beautifully rustic markers with a handcrafted quality that is difficult to replicate with stamps. Some crafters write the vegetable name in the clay while it is fresh, then allow it to dry and paint over the raised or recessed letters with a contrasting color to make the text pop visually.
Beyond text, consider adding small decorative details to enhance the visual appeal of your markers. Tiny textured impressions made with the back of a fork, a piece of burlap, or a lace doily can create lovely patterns around the edges. You might also press actual leaves, herbs, or seed pods into the clay surface before it dries to leave natural botanical impressions, which is an especially meaningful touch for an edible garden. Small sculpted elements like a coiled vine tendril or a miniature flower can be added to the top of a marker using a dab of water as adhesive.
Drying, Painting, and Finishing Your Markers
Proper drying is critical to the longevity of clay garden markers, particularly those made from air-dry clay. After shaping and decorating your pieces, lay them on a flat, non-stick surface in a dry, well-ventilated area away from direct sunlight or heat sources. Direct heat can cause the outer layers of clay to dry too quickly while the interior remains moist, leading to cracks and warping. Turn your markers over once or twice during the drying process to ensure even drying on both sides, which helps prevent curling.
Drying times will vary depending on the thickness of your clay, the humidity of your environment, and the specific brand you are using. Most air-dry clay markers of standard thickness will be fully dry within 24 to 48 hours, though some may take up to 72 hours in humid conditions. You can test for complete drying by feeling the marker: it should feel room temperature to the touch rather than cool, as moisture in the clay will cause a slightly cool sensation against the skin. Polymer clay, of course, skips this step and goes directly into the oven after shaping.
Once dry, your markers are ready for painting if desired. Acrylic paints are the best choice for clay garden markers because they adhere well to porous surfaces, dry quickly, and are available in an enormous range of colors. Use a base coat to cover the entire marker, allow it to dry completely, then add detail colors for vegetable illustrations, decorative borders, or highlighted text. Fine detail brushes will help you paint within small stamped or incised letters. You can also use paint pens for exceptionally crisp, thin lines and lettering details.
Sealing for Outdoor Durability
Sealing is the single most important step for ensuring your clay garden markers survive the elements. Without a waterproof sealant, air-dry clay will absorb moisture from rain and soil, gradually softening and crumbling over time. A good exterior-grade sealant creates a protective barrier that repels water, resists UV fading, and helps the marker withstand temperature fluctuations. There are several excellent options available, and choosing the right one depends on your preferred finish and how much protection you need.
Mod Podge Outdoor formula is a popular and widely available option that provides good water resistance and a clear finish that can be either matte or glossy. Apply at least three coats with a clean brush, allowing each coat to dry fully before applying the next. For maximum protection, especially in rainy climates or for markers that will be left out through winter, consider using an exterior spray varnish such as Krylon Crystal Clear or a dedicated ceramic sealer. These spray-on products create a more even, professional-looking coat and often provide superior moisture resistance.
Pay special attention to sealing the bottom portion of your markers, which will be inserted into the soil. This area is most vulnerable to moisture damage and should receive extra coats of sealant on all sides and edges. Some gardeners go the extra step of dipping the bottom inch or two of each marker in liquid waterproof sealant rather than brushing it on, ensuring complete coverage in this high-risk zone. Allow all sealed markers to cure for at least 24 hours before placing them in your garden to ensure the sealant has fully hardened.
Installing Your Markers in the Garden
With your markers shaped, dried, painted, and sealed, it is finally time to place them in your garden. The most traditional method is simply to push a wooden skewer, a chopstick, a length of dowel, or a bamboo stake through a hole in the base of the marker and insert the stake into the soil. This approach keeps the clay body of the marker elevated above the soil line, reducing the amount of moisture that contacts the clay directly and extending the life of your creation considerably. Always make the hole in the clay before it dries, as drilling through dried clay can cause cracking.
Another popular installation method is to sculpt a built-in stake directly into the bottom of your clay marker while the clay is still soft. Simply extend the bottom portion into a long, tapered shape like the tail of a flag or a narrow spike, leaving it thicker than you might think necessary since this portion will bear the mechanical stress of being pushed into the ground. Smooth this section carefully and seal it thoroughly. This integrated approach gives the marker a more cohesive appearance and eliminates the need for a separate stake, though it requires slightly more clay and shaping skill.
Consider the placement of each marker thoughtfully within your garden bed. Place markers at the beginning of each row or at the front edge of each planting area where they will be easily visible and least likely to be disturbed by digging and weeding. In raised beds, markers look particularly attractive when spaced evenly and positioned at consistent heights. You might also create a small dedicated display area near the entrance to your garden where all your markers are shown together, creating a kind of hand-crafted garden directory that doubles as a piece of outdoor art.
Caring for Your Markers Through the Seasons
Even well-sealed clay markers will benefit from seasonal care and attention. At the end of each growing season, consider bringing your markers indoors for the winter months, particularly if you live in a climate with hard frosts or heavy snowfall. The freeze-thaw cycle is particularly harsh on clay objects, as water that has penetrated tiny surface cracks will expand when frozen and can cause fractures over time. Storing your markers in a dry indoor space during the off-season will significantly extend their lifespan and keep their colors vibrant.
Before returning your markers to the garden each spring, inspect them carefully for any signs of cracking, flaking paint, or sealant degradation. Small cracks can often be repaired with a dab of white craft glue or a clay repair compound, then touched up with paint and re-sealed. Faded paint can be refreshed with a new coat of acrylic paint followed by fresh sealant. Treating this annual refresh as a pleasant early spring ritual keeps your markers looking their best and gives you an opportunity to update any that need new labels as your planting plans evolve from year to year.
If you find that certain markers have not survived the season, do not be discouraged. Making new ones is part of the joy of this craft, and each batch you create will benefit from your accumulated experience. Many experienced clay crafters intentionally make new markers every spring as a creative warm-up for the gardening season ahead, experimenting with new shapes, colors, and techniques each year. This iterative approach transforms clay garden markers from a one-time project into an ongoing seasonal practice that deepens your connection to your garden over time.
Creative Variations and Advanced Techniques
Once you have mastered the basics of clay garden markers, a world of creative possibilities opens up. One particularly striking variation is the three-dimensional sculptural marker, in which the vegetable itself is modeled in the round rather than simply depicted in flat relief or painted imagery. A fully sculpted mini carrot with feathery green tops, a realistic head of garlic with papery layers, or a plump little pumpkin can be created from clay and mounted on a stake, turning your garden markers into a collection of tiny sculptures. These take more time and skill to create but are genuinely impressive and joyful to look at.
Texture and pattern work can also be elevated beyond simple surface impressions. Consider creating marbled clay by partially blending two or more colors of polymer clay to create swirling patterns that run through the entire marker. You might also experiment with the Japanese technique of nerikomi, in which layers of different colored clay are stacked, rolled, and sliced to reveal intricate cross-sectional patterns. While this technique requires some practice to master, the results are extraordinary and each marker becomes a tiny work of art in its own right.
Collaborative and community-based approaches to clay garden markers can also be deeply rewarding. Organizing a clay marker-making session with neighbors, friends, or family members before the planting season is a wonderful way to share skills, exchange designs, and build community around the shared joy of gardening. Community gardens in particular benefit enormously from a set of cohesive, handmade markers that give the shared space a sense of identity and pride. Schools, libraries, and community centers often welcome such workshops as educational and creative programming for all ages.
Incorporating Natural and Recycled Materials
For crafters interested in sustainability, clay markers can be made even more eco-friendly by incorporating natural or recycled materials into their construction. Natural clay harvested from local soil is an option for those willing to process and prepare it, though this requires some additional knowledge and effort. More practically, many crafters find ways to use reclaimed wooden dowels, fallen branches, or bamboo chopsticks as stakes rather than purchasing new materials, reducing waste while giving the markers an appealingly rustic character.
You can also embed natural objects directly into the clay body of your markers before drying. Small pebbles pressed into the surface create tactile texture and an organic aesthetic. Dried pressed flowers or leaves sealed beneath a layer of glaze add botanical beauty and a sense of place. Even crushed eggshells mixed into air-dry clay before rolling can give the finished markers a subtle speckled texture reminiscent of traditional ceramic glazes, all while diverting a kitchen byproduct from the waste stream.
The beauty of clay vegetable garden markers lies not just in their practicality or their aesthetic appeal, but in what they represent: a slowing down, a commitment to making things with your hands, and a deepening of your relationship with the food you grow. Every time you walk through your garden and see those small, carefully crafted signs rising from the soil, you are reminded that gardening is not merely a matter of planting and harvesting but of creating and tending a living space that reflects your values, your creativity, and your care for the natural world around you. That is a story worth telling, one clay marker at a time.








What do you think?
It is nice to know your opinion. Leave a comment.