










The Art of Mending: Giving New Life to Wide-Legged Levi’s
There is something quietly revolutionary about choosing to repair a piece of clothing rather than discard it. Wide-legged Levi’s, with their sturdy denim construction and roomy silhouette, are exactly the kind of garment worth preserving. Whether you’ve inherited a beloved pair from the back of a closet, found them at a thrift store, or worn your own pair down to the point of visible wear, mending these jeans is both a practical skill and a deeply satisfying creative act that connects you to generations of makers who came before.
The wide-legged silhouette has made a triumphant return to fashion consciousness, but more importantly, it represents a cut of denim that is genuinely comfortable and versatile. These are jeans built to move with the body, to be lived in, and inevitably, to show the marks of that living. Inner thigh wear, fraying hems, split seams along the side panels — these are the common injuries of a well-loved pair of wide-leg Levi’s, and every single one of them is repairable with patience, the right materials, and a willingness to let the mending itself become part of the garment’s story.
This project combines the structural integrity of classic denim repair techniques with the expressive beauty of Japanese boro-influenced patchwork, using kimono fabric scraps as the primary mending material. The result is a garment that feels entirely unique — something that could not have been bought in any store, at any price point. It is a wearable record of time, care, and creative problem-solving that only deepens in meaning with every wear.
Assessing the Damage Before You Begin
Before cutting a single thread or selecting a single scrap of kimono fabric, spend time really looking at your jeans. Lay them flat on a large work surface in good natural light and examine every seam, every panel, and every stress point. Run your fingers along the inner thigh area, the seat seams, the waistband, and the hem. You are looking not just for holes or tears that have already opened, but for thin spots — areas where the weave of the denim has begun to loosen and pull apart — because these are tomorrow’s holes and should be addressed today while they are still easier to manage.
Take notes or even photographs of the damage you find. This might sound overly formal for what feels like a simple home project, but having a record of where the wear is concentrated will help you plan your patchwork placement strategically. You want the kimono scraps to do double duty: they should cover and reinforce damaged areas while also creating a visual composition across the garment that feels intentional and beautiful rather than random and haphazard. Understanding the full scope of the damage before you begin is what separates a thoughtful mending project from a rushed patch job.
Also consider the overall structure of the jeans at this stage. Are the belt loops intact? Is the zipper functioning properly? Do the rivets feel secure? These are quick fixes if addressed now, but they become frustrating complications if you discover them midway through an intricate patchwork repair. A thorough initial assessment is the foundation of a successful mending project, and it is worth every minute you invest in it.

Understanding Kimono Fabric: Choosing and Preparing Your Scraps
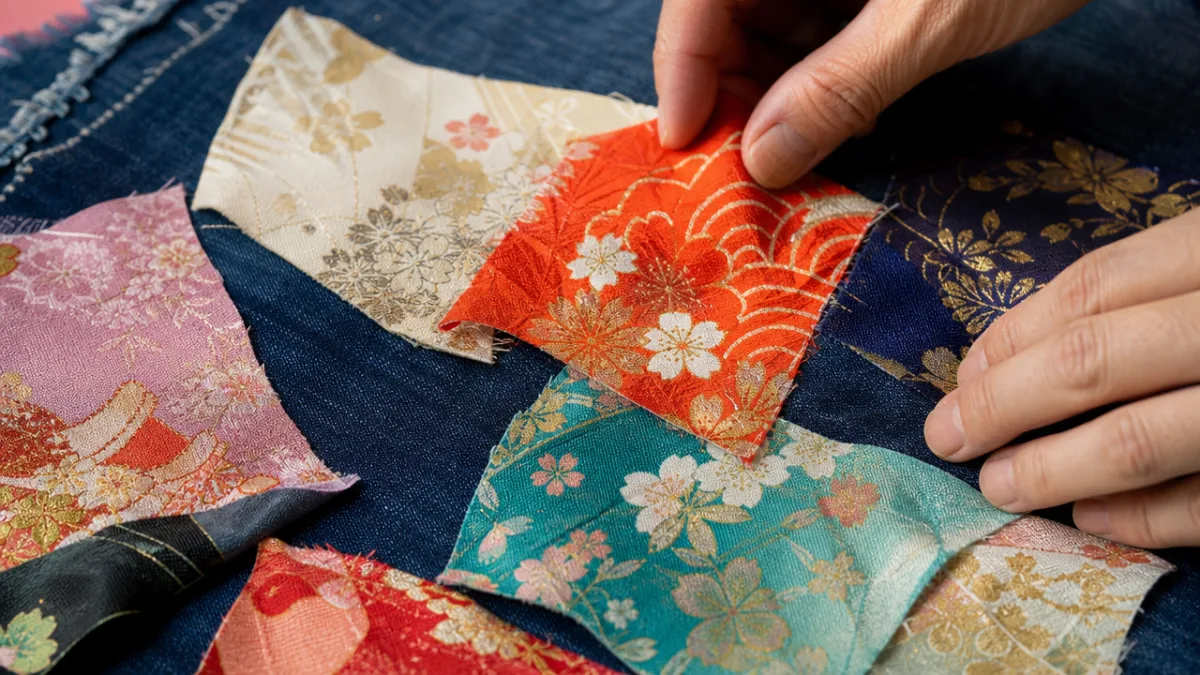
Kimono fabric — whether salvaged from a damaged vintage kimono, purchased from a textile dealer, or sourced from a specialty fabric shop — is among the most beautiful and historically rich material you can incorporate into a mending project. Traditional kimono silk is woven in narrow panels, typically around fourteen inches wide, which makes scraps from these garments an ideal scale for denim patches. The patterns found on kimono fabric — cranes, chrysanthemums, flowing water motifs, geometric silk brocades, hand-painted landscapes — bring a visual sophistication to denim that is unmatched by any commercially produced patch material.
Not all kimono fabric is silk, however, and for a mending project destined to be worn and washed regularly, you will want to think carefully about fiber content and durability. Cotton kimono fabric, including the woven cotton used in yukata (summer kimono), is particularly practical for denim mending because it is washable, sturdy, and relatively forgiving when sewn by hand or machine. Silk scraps can certainly be used, but they benefit from being applied with a backing fabric — a layer of iron-on interfacing or a scrap of muslin behind the silk will help it hold up to the friction and stress of everyday wear, particularly in high-movement areas like the inner thighs.
Before incorporating any kimono scraps into your project, wash and press them. Even scraps that appear clean may carry residual sizing, storage odors, or dye that has not fully set, and you want to discover any issues — like color bleeding or unexpected shrinkage — before the fabric is sewn permanently to your jeans. Press each scrap flat with an iron on the appropriate heat setting for its fiber content, and lay them out alongside your jeans to begin thinking about color relationships and pattern placement. This compositional phase is genuinely enjoyable — it is the point where the project begins to feel less like repair work and more like art-making.
Selecting Colors and Patterns That Complement Denim
Denim is, at its core, a textile with its own strong visual identity — the indigo-blue warp thread, the white weft, the way it fades unevenly with wear to create gradients of light and dark that are unique to each pair of jeans. When selecting kimono scraps to work alongside this material, you have two broad aesthetic directions to choose from: harmony or contrast. Harmonious choices lean into the blue and white palette of denim, selecting kimono fabrics in indigo, navy, soft white, pale grey, and muted earth tones that blend gently into the denim ground. Contrasting choices embrace the unexpected — a vivid coral silk with a crane pattern, a deep emerald brocade, a bright geometric cotton — and let the patches announce themselves as deliberate, celebratory additions.
Neither approach is wrong, and many of the most successful mending projects use a combination of both: quieter, more harmonious fabrics in the areas where subtlety is desired (a barely-visible reinforcement along a side seam, for instance) and bolder, more expressive fabrics in the areas where the mending becomes a design feature (a large patch over a significant hole at the knee or inner thigh). The key is to make conscious decisions rather than random ones, to think of yourself as composing the surface of the garment the way a visual artist might compose a canvas.
It is also worth considering the scale of the patterns on your kimono scraps in relation to the scale of the patches you will be cutting. A very large, elaborate motif — say, a full chrysanthemum bloom spanning six inches — needs to be placed as a centerpiece of the composition, in a patch large enough to show it off. Smaller, more delicate patterns like tiny geometric repeats or fine floral sprigs can fill in between larger patches as connective tissue, creating visual rhythm across the repaired sections without competing with the focal pieces.
Hand Stitching Techniques for Denim Mending
The hand stitching tradition most closely associated with this type of textile repair is sashiko, a Japanese embroidery technique that uses a simple running stitch in heavy white or colored thread to both reinforce fabric and create geometric patterns. Sashiko was historically used to repair and strengthen work clothing, layering stitches over worn areas to extend the life of garments that were too valuable to discard. When applied to a denim mending project, sashiko stitching has the additional benefit of being visually striking — those rows of even, deliberate stitches communicate care and intentionality in a way that machine stitching simply cannot replicate.
To begin sashiko stitching on your denim, you will need sashiko thread (a thick, matte cotton thread available in a wide range of colors, though traditional sashiko uses white), a sashiko needle (longer and with a larger eye than a standard hand sewing needle), and a thimble if you are not accustomed to pushing a needle through multiple layers of dense fabric. Thread your needle with a length of approximately eighteen inches — longer than this and the thread tends to tangle and weaken from the friction of being pulled through fabric repeatedly. Knot one end securely.
The most basic sashiko pattern — horizontal or vertical rows of running stitches — is also one of the most effective for reinforcing a patched area. Work in rows spaced approximately one quarter inch apart, keeping your stitches and the spaces between them as even as possible. The rhythm of this work is meditative and genuinely calming; many people find hand mending to be one of the more peaceful creative activities available precisely because it demands just enough focused attention to quiet the mind without requiring the kind of intense concentration that creates tension. As you build up rows of stitching over a patch, you will see the fabric visibly stiffen and strengthen beneath your hands.
Machine Stitching as a Complement to Hand Work
While hand stitching is the heart of this mending project, machine stitching has an important supporting role. Before applying kimono scraps by hand, it is wise to secure them initially with a machine baste — a long, loose machine stitch around the perimeter of each patch that holds it in place while you work. This is especially important for slippery silk scraps, which have a frustrating tendency to shift position during hand sewing. A quick machine baste costs almost no time and saves enormous frustration later.
Machine stitching can also be used deliberately as a design element. A close zigzag stitch around the raw edges of a patch, worked in a thread color that picks up one of the colors in the kimono fabric, creates a neat, decorative border that reinforces the patch edge while adding visual definition. Straight machine topstitching worked in parallel lines across a patch before the hand sashiko is added creates a layered textile surface with depth and complexity that rewards close examination. Do not feel that hand stitching and machine stitching are in competition — they are collaborators, each contributing something the other cannot.
For areas of significant structural damage, such as a fully open seam or a tear that has propagated along a grain line, machine stitching is the more appropriate primary repair method, with hand stitching added afterward for reinforcement and aesthetics. Rebuild the structural integrity of the garment with machine work first, then apply patches and decorative stitching over the repaired area to integrate it into the overall visual composition. Layering repairs in this way ensures that the garment will actually hold up to wear, which is, after all, the whole point.
Applying the Patches: A Step-by-Step Process
With your jeans assessed, your kimono scraps prepared, and your compositional plan in mind, you are ready to begin applying patches. Start with the largest, most structurally important areas first — typically the inner thigh region in a well-worn pair of wide-leg jeans. Cut your patch fabric several inches larger than the damaged area on all sides; when mending for durability, generosity in patch size is always rewarded. A patch that extends well beyond the visible damage anchors itself in healthy fabric on all sides and distributes stress across a much larger area, making it far less likely to lift at the edges or tear free under tension.
Position the patch on the wrong side of the jeans for internal patches, which provide invisible reinforcement that the sashiko stitching on the right side will anchor in place, or on the right side of the jeans for visible, decorative patches that you want to celebrate as part of the garment’s new design. Both approaches are valid and can be combined within the same garment — an internal patch stabilizes the structure while a coordinating visible patch adds surface beauty. Pin the patch securely in multiple places, or use fabric clips if you prefer to avoid pin holes in delicate silk.
Work methodically from the center of each patch outward as you stitch, whether by hand or machine, to prevent puckering and to ensure the patch lays flat against the denim. Take your time. There is no rushing a mending project of this kind, and a patch applied in haste will show its haste in every wear. Smooth the fabric with your fingers frequently as you work, feeling for any bubbles or tension that could cause the finished patch to distort. When the patch is fully secured, press it firmly with a hot iron — this simple step dramatically improves the final appearance and helps the patch bond more completely with the underlying fabric.
Working Around Hardware and Structural Details
Wide-leg Levi’s typically feature reinforcing rivets at stress points, a sturdy waistband with belt loops, and a five-pocket construction with contrast stitching in Levi’s signature orange thread. Working around these structural details requires patience and some degree of hand sewing dexterity, since a machine presser foot cannot always navigate the terrain around a metal rivet or a thickly constructed pocket opening. Keep a pair of small embroidery scissors close at hand for trimming patches precisely around hardware, and do not be afraid to clip curves and notch seam allowances wherever a patch needs to turn a corner or curve.
The orange contrast stitching that is so characteristic of Levi’s denim is worth acknowledging in your mending design. You can choose to honor it by selecting an orange sashiko thread for some of your hand stitching, creating a visual conversation between the original construction and the new repair. Alternatively, you can choose a color that bridges the original orange thread and the palette of your kimono scraps — a warm gold, a terracotta, a deep amber — that nods to the original without slavishly imitating it. These small decisions accumulate into the overall character of the finished piece.
If you are mending along a side seam or an inseam, you will need to work on the garment while it is open — either turned inside out or with the seam itself opened and resewn after the patching is complete. Do not try to patch a seam area without adequate access to both layers; the result will be stiff, poorly reinforced, and frustrating to wear. Take the time to open what needs to be opened, do the work properly, and resew the structural seam before finishing the surface with decorative stitching.

Finishing, Care, and the Philosophy of Visible Mending
Once all patches are applied and all stitching is complete, finish your mended jeans with a thorough pressing on both the right and wrong sides. Use a pressing cloth between the iron and any silk patches to protect delicate fibers, and steam generously to relax any puckering or tension that has built up during the sewing process. This final pressing step transforms a project that looks finished into one that looks considered and professional — it is the difference between hand-made and handcrafted, and it is worth the extra few minutes without exception.
For ongoing care of your mended jeans, turn them inside out before washing, use a gentle or delicate cycle with cold water, and avoid the dryer whenever possible — the heat and tumbling of machine drying is hard on both denim and the more delicate kimono fabrics. Line drying or flat drying will extend the life of your repairs significantly. If any stitching begins to loosen or lift over time, address it immediately rather than waiting for further damage to develop. Mended clothing rewards attentiveness; it asks you to pay attention to it in a way that fast fashion never does, and that relationship between maker and garment is one of the quiet gifts of this kind of work.
The philosophy underlying visible mending — the deliberate choice not to hide repairs but to celebrate them — is one of the most meaningful counter-cultural stances available to a person through the simple act of getting dressed. It rejects the disposability logic of fast fashion, asserts the value of things that have been used and are still worth using, and invites a different kind of beauty into daily life: the beauty of accumulated time, of skill applied with care, of materials drawn from different traditions and woven together into something new. Your wide-legged Levi’s, mended with kimono scraps and sashiko stitching, will wear these values on their surface for everyone to see.
Building a Mending Practice Over Time
One mending project, completed with care and attention, tends to open into a practice. You begin to look at damaged clothing differently — not as waste, but as raw material for something more interesting than what it was before. You start keeping a scrap bag, collecting offcuts of beautiful fabric from other projects, saving pieces of vintage textiles, accumulating threads in colors that speak to you. The tools of mending — needles, thimbles, embroidery hoops, a good pair of scissors — begin to feel like old friends, familiar in the hand, ready to be picked up whenever a free evening presents itself.
Consider keeping a simple mending journal, even just a few photographs and notes in a notebook, documenting the garments you have repaired, the materials you used, and what you learned from each project. Over months and years, this journal becomes a record not just of repairs but of the development of your eye and your hand — you will be able to see, quite clearly, how your stitching has become more confident, your color choices more nuanced, your compositional instincts more assured. This kind of documentation also gives you a library of approaches to draw on when a new mending challenge presents itself.
Share your work when it feels right. The visible mending community — active on social media platforms, in textile arts circles, and in maker spaces around the world — is genuinely warm and generous, full of people at every level of skill and experience who are united by a shared belief in the value of repair. Seeing others’ work will expand your sense of what is possible; sharing yours will encourage someone else who is just beginning. Mending is, at its heart, a communal practice, rooted in the understanding that beautiful, useful things are worth taking care of — and that taking care of them is itself a beautiful and useful act.
- Sashiko thread in multiple colors, especially white and tones that complement your kimono scraps
- Sashiko or embroidery needles with large eyes suitable for thick thread
- Iron-on interfacing for backing delicate silk scraps before application
- Small embroidery scissors for precise trimming around hardware and curves
- A thimble appropriate for your dominant hand, particularly for pushing through multiple denim layers
- Fabric clips or fine pins for holding patches in position during stitching
- A pressing cloth to protect delicate kimono fabrics during ironing








What do you think?
It is nice to know your opinion. Leave a comment.