










Funky DIY Briefcase Floating Shelves: Unique Living Room Decor Ideas
Introduction: The Rise of Upcycled Home Decor
Something has quietly shifted in the world of home decorating over the past few years. People are tired of walking into a living room that looks like it was assembled straight from a catalog. Instead, they want spaces that actually mean something — rooms that tell a story and feel like nobody else’s. That’s a big part of why upcycling and repurposing have taken off the way they have. And one of the coolest ideas to come out of that movement? Taking old vintage briefcases and turning them into floating shelves.
There’s something irresistible about a weathered leather briefcase or a beat-up retro hard-sided case mounted on a wall. It’s got history baked into it — a kind of character that you simply cannot buy off a shelf at a furniture store. The moment guests see it, they want to know the story behind it. That’s the magic of this project: it sits right at the intersection of art, function, and nostalgia in a way that very few DIY ideas manage to pull off.
The best part? You don’t need to be a seasoned crafter or own a workshop full of tools. This is genuinely one of those projects where a beginner can walk away with something that looks like it belongs in a design magazine. All it takes is a thrifted briefcase, a few basic supplies, and a free afternoon. This guide covers everything you need to know to make it happen.
Sourcing the Perfect Briefcase: What to Look For
Finding your briefcase is honestly half the fun. These things are everywhere once you start looking — thrift stores, estate sales, flea markets, garage sales, eBay, Etsy, Facebook Marketplace. You name it. And the prices are usually very forgiving. Don’t go in expecting to find something perfect and pristine, either. A bit of wear and scuffing often makes the finished shelf look even better. Patina is your friend here.
That said, you do need to think about a few practical things when you’re evaluating a potential candidate. Structural integrity is the big one — the case has to be solid enough to hang on a wall and hold whatever you plan to put inside it. Hard-sided cases in aluminum, rigid plastic, or old-school heavy cardboard are usually your best bet. Soft leather or fabric cases can work too, but they may need some extra reinforcement to keep their shape once they’re mounted. Give the hinges, latches, and corners a good look while you’re at it. Significant damage in those spots could be a problem down the line.
Size and depth matter more than people expect going in. A bigger case gives you more room to play with, while a shallower one reads as sleeker and more minimal on the wall. Think about what you actually want to display — a couple of small succulents don’t need much depth, but books or stacked objects do. Vintage attache cases, old school suitcases, and mid-century office briefcases tend to hit a sweet spot in terms of proportions. And of course, the overall look of the thing — its color, texture, hardware, any old labels or graphics — should feel like it belongs in your space.

Tools and Materials You Will Need
Here’s the good news: you really don’t need much. No professional gear, no fancy workshop. Most of what’s required is either already floating around your home or costs next to nothing at a hardware store. Getting everything laid out before you start will save you a lot of mid-project frustration.
Here’s a rundown of what you’ll typically need:
- One or more vintage briefcases in good structural condition
- A power drill with appropriate drill bits for your wall type
- Wall anchors and screws sized appropriately for the weight of your shelf
- A stud finder (recommended for heavier cases or heavier display items)
- A level to ensure your shelf mounts straight
- A pencil for marking drill points
- Heavy-duty L-brackets or a custom mounting board
- Sandpaper, leather conditioner, or paint for optional case refinishing
- A tape measure
- Optional: command strips rated for heavy weight, as an alternative mounting method for lighter cases
Before you even pick up the drill, take a few minutes to think through your mounting method. The two most common approaches are L-brackets screwed directly into the back interior of the briefcase, or a small wooden mounting board that gets fixed to the wall and the briefcase hangs from. Which one makes more sense depends on your wall type, how heavy the case is, and what you’re planning to put on it. For anything on the heavier side, always anchor into studs or use wall anchors that are actually rated for the load. A shelf falling off the wall is no fun — get the safety side right first.
Step-by-Step Installation Guide
Now that you’ve got your materials together and your briefcase chosen, it’s time to get into it. Start with the briefcase itself. Wipe it down with a damp cloth and a gentle cleaner suited to the material. If it’s leather, a good conditioner will bring it back to life and give it a beautiful sheen. If you want to paint or otherwise customize the exterior, now is the time — do all of that before you attach any mounting hardware. Let everything dry fully before moving on.
Next, think about how you want to orient the case on the wall. Most people go with the opening facing upward so the interior becomes the display surface, like a traditional open shelf. But mounting it on its side with the opening facing outward gives you a really cool shadow-box effect if that’s more your style. Once you’ve decided, hold the case up against the wall where you want it and lightly mark the position with a pencil. Then grab your level — this step matters more than it might seem. A shelf that’s even slightly crooked draws the eye immediately and undermines the whole look.
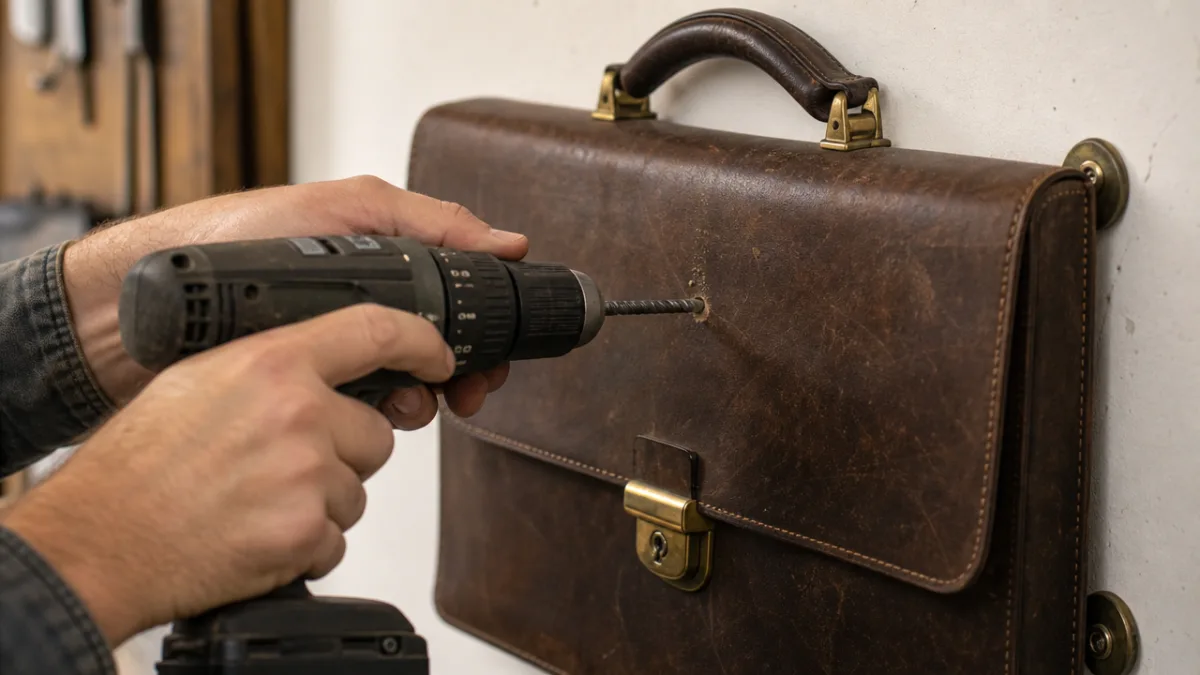
With your marks on the wall, find your studs if you’re going into drywall and the shelf is going to carry any real weight. Attach your L-brackets or mounting board to the wall, then secure the briefcase to them. If you’re using L-brackets, open the case, drill small pilot holes through the back interior panel into the brackets, and fasten with screws. Once it’s up, give it a firm tug from a few different angles to make sure it’s not going anywhere. When you’re satisfied it’s solid, arrange your decor, step back, and enjoy it.
Styling Your Briefcase Shelves: Creative Display Ideas
Getting the briefcase on the wall is really just the beginning — styling it is where things get genuinely fun. Think of the open interior as a tiny stage. It naturally frames whatever you put inside it in a way that a regular shelf never could, so even a simple arrangement of objects ends up looking considered and intentional. The key is having some kind of thread running through the display, whether that’s a color palette, a mood, or a shared theme. Without that, it can tip from “curated” into “cluttered” pretty quickly.
If you’re drawn to a botanical, earthy look, small succulents, air plants, or a little trailing ivy work beautifully inside a briefcase shelf. Add a few river stones or a piece of driftwood, maybe lean a vintage postcard against the back of the case, and you’ve got something that feels warm and alive. This approach is especially lovely with natural leather or worn wood briefcases — there’s a nice tension between the industrial quality of the case and the softness of the plants. A tiny strand of fairy lights tucked along the inner edge takes the whole thing up a notch after dark.
For a more collector-style display, fill the case with meaningful small objects — a vintage camera, old skeleton keys, a miniature globe, a stack of tiny art books. Use small risers or folded fabric to create different heights and add depth to the arrangement. For a bohemian or eclectic vibe, mix metallics with organic textures: brass candleholders alongside dried botanicals and a hand-thrown ceramic piece, for example. The briefcase frames it all and gives the arrangement a sense of purposefulness that a standard floating shelf just doesn’t have.
Grouping Multiple Briefcase Shelves for Maximum Impact
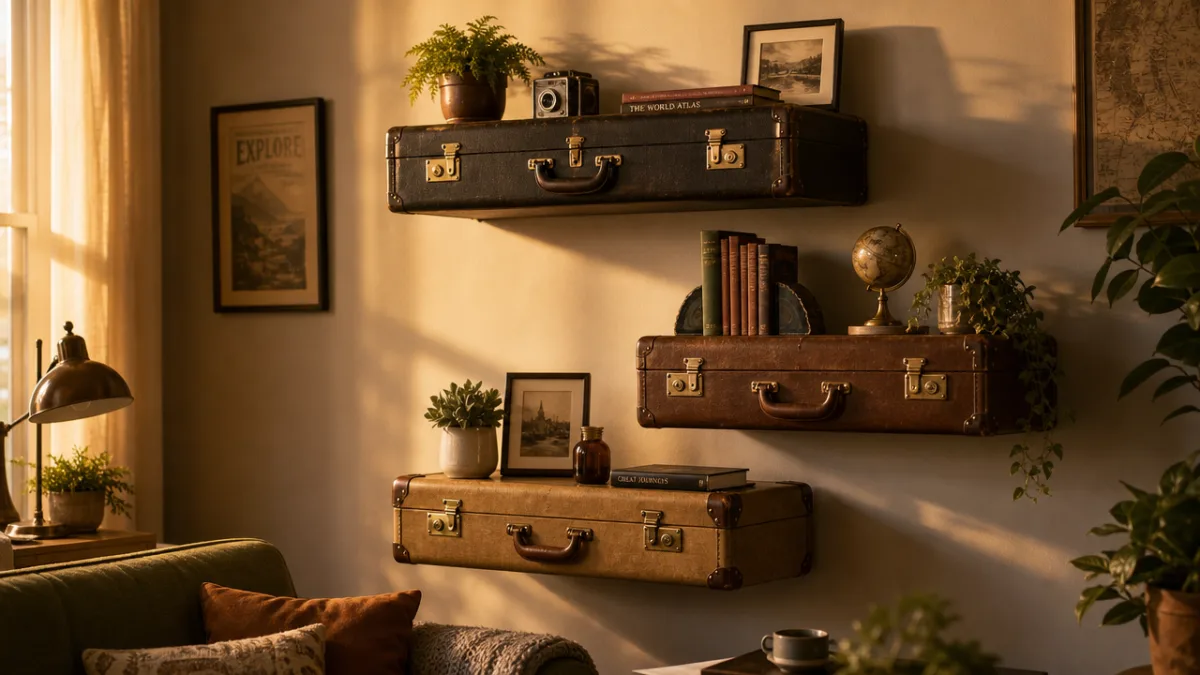
A single briefcase shelf is charming. A whole wall of them? That’s a statement. When you group multiple cases together, you can create a gallery-style installation that becomes the focal point of an entire room. The trick is being intentional about which cases you pair together. Mixing sizes, materials, and eras — a large aluminum attache next to a smaller soft leather case next to a medium hard-plastic one — creates a composition with real visual rhythm rather than something that just looks like a random pile of old luggage.
Before you drill anything, lay your briefcases out on the floor and play around with different arrangements. A staggered, asymmetrical layout almost always feels more natural and artistic than a rigid grid. Mixing the orientation of the cases — some landscape, some portrait — adds another layer of variety. Give each case enough breathing room that it reads as its own thing, but keep them close enough together that the whole arrangement reads as one cohesive installation.
Color does a lot of work in a multi-briefcase grouping. A collection in varying shades of tan, caramel, and cognac feels warm and harmonious even when the individual cases are quite different from each other. Or you could go the opposite direction — a bright turquoise vintage case next to a classic black attache and a warm brown leather piece creates a high-energy, maximalist look that suits bold, personality-forward spaces. You can also tie the whole grouping together through the objects inside each case, choosing one accent color that appears in every single shelf to pull the eye across the composition.
Customizing and Personalizing Your Briefcase Shelves
This is where the project really opens up. Because every briefcase starts with its own history and you have complete creative control over what you do with it, no two of these shelves ever turn out the same. That’s exactly the point. There are so many ways to put your stamp on these things, from quick and easy to more involved, and all of them are worth exploring.
Paint is probably the fastest way to make a dramatic change. A hard-sided case sprayed matte black looks sleek and contemporary. Pastel pink or mint green gives it a playful retro feel. Deep forest green or navy reads as sophisticated and rich. Chalk paint is great for this because it sticks to almost anything and you can rough it up with sandpaper afterward to get a beautifully distressed vintage finish. Painter’s tape opens up all kinds of geometric possibilities — color-blocked panels, stripes, diamond patterns. For leather cases, leather dye and specialist leather paint let you do a full color transformation while keeping that natural texture intact.
Don’t overlook the hardware, either. Swapping out the original latches, clasps, and corner protectors for something in brass, copper, or matte black can completely change the personality of a case. Inside, consider lining the interior with decorative wallpaper, a scrap of patterned fabric, or even a piece of mirror tile — it creates a gorgeous backdrop for whatever you display. A hand-painted motif on the exterior, some decorative iron-on patches, a wax seal stamp, or a bit of hand-lettered text can take the piece from “cool thrifted briefcase” to something that feels completely and unmistakably yours.
Caring for Your Briefcase Shelves Over Time
Vintage and repurposed pieces do need a little looking after — nothing intensive, but a bit of regular attention goes a long way. What that looks like depends mainly on the material of your case and the conditions in your home. Leather is the highest-maintenance option: it can dry out and crack over time, especially in rooms with low humidity or a lot of direct sunlight. Working in a good leather conditioner once or twice a year keeps it supple and maintains that rich, lived-in patina that makes vintage leather so appealing in the first place.
Hard-sided cases in aluminum, plastic, or rigid vintage materials are much easier to maintain. A periodic wipe-down with a damp microfiber cloth takes care of dust and surface grime without harming the finish. If you’ve painted the case, be gentle around the painted areas to avoid chipping. Every few months, take a moment to check the mounting hardware — give the shelf a gentle test and tighten anything that’s worked itself loose. This is especially worth doing if you have young kids or pets, or if the wall in question gets any regular vibration. Wall anchors can gradually loosen over time, and it’s much better to catch that early.
The displays themselves are worth refreshing occasionally too. Dust accumulates on small objects, and arrangements that once felt fresh can start to look a bit tired. Pull everything off, clean the inside of the case and the objects themselves, and put it all back together — or take the opportunity to rearrange, swap things out, and try something new. That’s really the spirit of the whole project anyway. Your home should keep evolving along with you, and a briefcase shelf is a pretty wonderful invitation to keep experimenting.








What do you think?
It is nice to know your opinion. Leave a comment.