










Dollar Tree DIY Riser: Elevate Your Home Décor on a Budget
Introduction: The Magic of Dollar Tree DIY Projects
There is something undeniably satisfying about walking into your home and seeing a beautifully styled shelf, mantel, or tabletop display that looks like it came straight from a high-end home décor boutique. What makes it even more rewarding is knowing that the entire project cost you just a few dollars and an afternoon of creative work. That is exactly the promise behind the Dollar Tree DIY riser trend that has taken Pinterest, Instagram, and home décor communities by storm over the past few years, captivating crafters of every skill level.
Dollar Tree stores are a treasure trove of affordable materials that, with a little imagination and elbow grease, can be transformed into stunning home décor pieces. Wooden plaques, candlesticks, small trays, crates, and bowls are just a few of the items you can repurpose into elegant risers that add height, dimension, and visual interest to any display. The best part is that you are not limited to one style or aesthetic — these DIY risers can be customized to match farmhouse, modern, bohemian, glam, or traditional décor with simple changes in paint color, finish, or embellishment.
The DIY riser concept is rooted in a fundamental principle of interior styling: varying heights in a display creates a more dynamic, professional, and eye-catching arrangement. Professional interior designers and stylists have long used risers and pedestals to elevate objects in a vignette, drawing the eye upward and creating layered compositions. By making your own risers from Dollar Tree supplies, you are essentially learning and applying the same techniques the pros use, all without spending a fortune at a specialty décor store or online retailer.
What You Will Need: Gathering Your Dollar Tree Supplies
Before you begin your Dollar Tree DIY riser project, the first step is a strategic shopping trip to your local Dollar Tree store. The most popular base combination for a classic riser involves a small wooden tray or flat wooden plaque paired with a candlestick, wooden bowl, or small turned wood piece that acts as the pedestal. Many crafters love using the round wooden plaques combined with wooden candle holders in varying heights to create a set of risers at different elevations, which gives you maximum flexibility when styling your displays.
Beyond the structural components, you will want to pick up a few finishing supplies. Spray paint in colors like matte white, chalk white, soft black, or warm gold tends to be the most versatile and popular choice for these risers because neutral tones blend seamlessly into nearly any décor scheme. Some crafters prefer to use chalk paint for a more textured, matte finish that reads as very upscale and farmhouse-chic. You may also want to grab sandpaper, wood glue or a strong craft adhesive, and any embellishments you plan to add, such as decorative trim, rope, or twine.
Here is a general shopping list to get you started on your Dollar Tree DIY riser project:
- Wooden plaques or flat round discs (these will form the top surface of your riser)
- Wooden candlesticks or turned wooden candle holders in one or two heights
- Small wooden bowls or decorative wooden bases for variation
- Strong craft glue or wood glue, such as E6000 or a hot glue gun with plenty of glue sticks
- Spray paint or chalk paint in your preferred color palette
- Fine-grit sandpaper for smoothing surfaces and preparing them for paint adhesion
- Optional embellishments: decorative trim, twine, ribbon, or stencils for added detail
- Painter’s tape if you plan to create two-tone or striped effects on your risers
It is worth noting that Dollar Tree inventory varies by location and can change frequently, so it helps to visit a couple of different stores or check in regularly if you are looking for specific items. Many experienced Dollar Tree crafters recommend buying multiples of your favorite bases and candlesticks when you find them, because they tend to sell out quickly once a particular style catches on in the DIY community. Having extras on hand also means you can make risers in different sizes and gift them to friends and family who admire your handiwork.

Step-by-Step Instructions: Building Your DIY Riser
Once you have all your supplies gathered, the construction process is surprisingly quick and beginner-friendly. Start by lightly sanding all your wooden pieces with your fine-grit sandpaper. This step is important because it removes any rough edges or splinters from the wood and, more critically, creates a slightly abraded surface that allows your paint or adhesive to bond much more effectively. Even a minute or two of light sanding per piece can make a noticeable difference in the final quality and longevity of your finished riser.
After sanding, wipe all the pieces down with a clean, slightly damp cloth to remove sawdust and debris, and allow them to dry completely. Next, it is time to assemble your riser before painting, which many crafters find easier than painting first and then trying to glue. Apply your wood glue or E6000 adhesive to the top of your candlestick or pedestal piece, center your wooden plaque or disc on top, and press firmly. Hold it in place for at least thirty seconds and then prop or clamp it if needed while it cures. Allow the adhesive to cure fully according to the manufacturer’s instructions, often anywhere from one hour for initial set to twenty-four hours for full strength.
Once your riser is fully assembled and the glue has cured, it is time for the most transformative step: painting. Take your assembled riser outside or to a well-ventilated area if you are using spray paint. Apply thin, even coats rather than one heavy coat to avoid drips and achieve a smooth, professional finish. For most risers, two to three light coats of spray paint with drying time between each coat will give you beautiful, full coverage. If you are using chalk paint applied with a brush, work in smooth strokes and allow each coat to dry before adding the next. The paint is what truly unifies all the mismatched Dollar Tree pieces into one cohesive, polished-looking object.
After your final coat of paint has dried completely, you can add any finishing touches or embellishments you have planned. Some popular options include dry brushing a lighter or darker tone over the base color to create depth and an aged look, wrapping the base of the pedestal with twine or jute rope for a rustic farmhouse feel, stenciling a simple pattern or monogram onto the top surface, or adding a small ring of decorative trim around the edge of the plaque. These details are entirely optional, but they are what elevate a simple DIY riser from cute and functional to truly impressive and unique.
Styling Tips: How to Use Your Riser in Home Displays
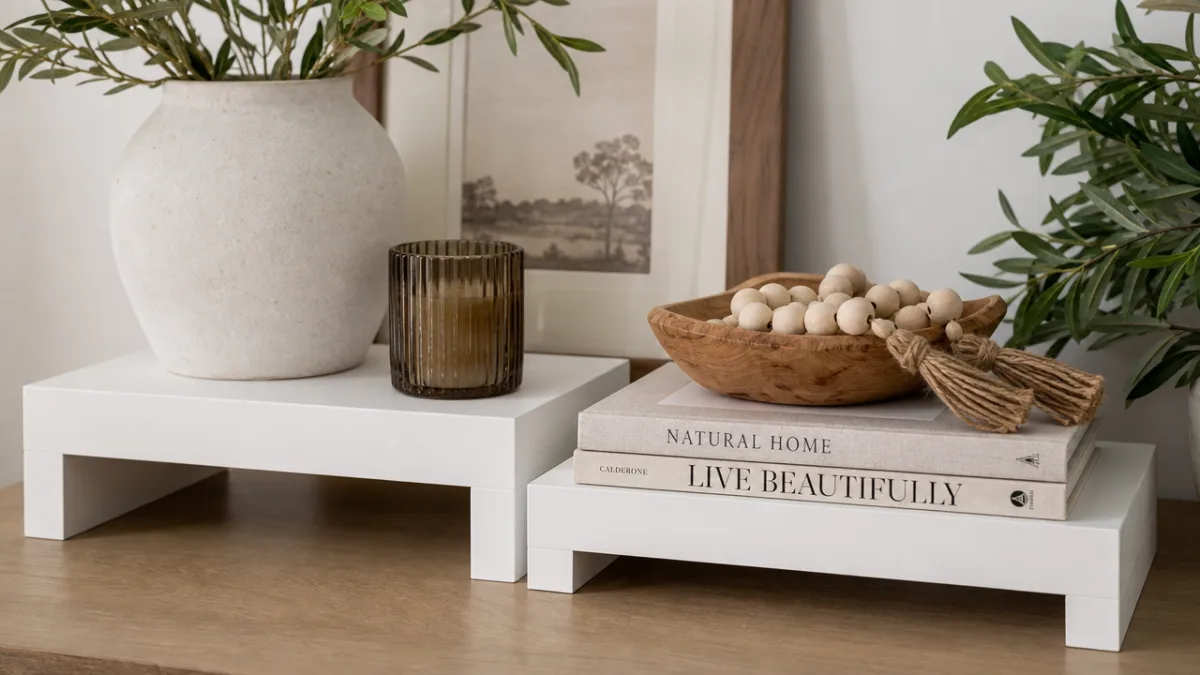
Now that your riser is complete and fully cured, the real fun begins: using it to create gorgeous styled displays throughout your home. The most common and effective way to use a DIY riser is as part of a tiered vignette arrangement on a shelf, mantel, console table, or kitchen counter. The basic rule of thumb for a visually pleasing vignette is to group objects in odd numbers — typically threes or fives — and to vary the heights within the grouping. Your new riser instantly adds one of those height variations, making it an incredibly useful styling tool.
On a coffee table or ottoman tray, a single riser topped with a small candle, succulent, or decorative object can serve as a beautiful focal point that anchors the entire arrangement. On a floating shelf, a set of two or three risers in different heights, each holding a different small object, creates a layered gallery-style display that looks intentional and curated. In the kitchen, a riser is perfect for elevating a small potted herb, a decorative bottle, or a seasonal figurine on the counter or open shelving, keeping things looking styled without being cluttered.
Seasonal decorating is one area where DIY risers truly shine in their versatility. Because your riser is a neutral base that you can paint to any color, it transitions effortlessly from season to season simply by swapping out the objects you place on top of it or around it. In the fall, surround it with small pumpkins, dried leaves, and candles in warm amber tones. For the winter holidays, top it with a small evergreen sprig, a glittery ornament, or a candle in a festive holder. In spring and summer, pair it with fresh flowers, shells, or bright colorful accents. One riser, styled twelve different ways across the year.

Creative Variations: Taking Your Riser Beyond the Basics
Once you have mastered the basic Dollar Tree DIY riser, a whole world of creative variations opens up before you. One of the most popular elevated versions involves creating a two-tiered riser by stacking a smaller plaque on top of a larger one, with two different-sized candlesticks serving as the pedestals. This multi-tiered version has a beautiful tiered cake-stand quality to it and is especially popular in bathroom styling, where it can hold cotton balls, small soaps, candles, or decorative trinkets at two different heights.
Another creative variation that has gained tremendous popularity involves using a Dollar Tree wooden crate or small box as the body of the riser instead of a candlestick. This creates a more substantial, box-style riser with a flat base that is very stable and has a slightly more rustic, farmhouse-inspired look. You can leave the crate open and use it as a container inside the riser, or glue a plaque on top and use it as a solid elevated platform. Either way, this variation is particularly well-suited to displaying heavier objects or creating a more substantial presence in a large-scale vignette.
For those who love a glamorous or modern aesthetic, consider upgrading your basic painted riser with metallic accents. After your base coat of paint has dried, use a small brush to dry-brush gold, silver, or rose gold metallic craft paint over the raised details of your candlestick pedestal. This technique catches the light beautifully and gives your riser a high-end, boutique-quality appearance that is hard to believe came from a Dollar Tree shopping trip. Pair this metallic version with white marble-look contact paper on the top plaque surface for an especially luxurious look that costs almost nothing to achieve.
You can also experiment with texture to add visual interest to your risers. Applying a coat of baking soda mixed into white paint creates a chalky, stone-like texture that is incredibly trendy in modern and minimalist home décor. Some crafters apply strips of Dollar Tree air-dry clay around the base of their candlestick and then smooth it with wet fingers before it dries, creating an organic, sculptural quality reminiscent of expensive artisan pottery. The possibilities truly are limited only by your imagination, and the low cost of the materials means you can experiment freely without worrying about wasting money on a test that does not turn out perfectly.
Why Dollar Tree DIY Is More Than Just a Trend
The Dollar Tree DIY movement, of which these risers are just one small but beloved part, represents something meaningful beyond simple budget crafting. It speaks to a growing cultural appetite for creativity, personalization, and mindful spending in the realm of home décor. Rather than purchasing mass-produced, disposable décor items that look exactly like what everyone else has in their home, Dollar Tree DIY crafters are making something unique with their own hands, infused with their own sense of style, and tailored precisely to their own space and aesthetic vision. That sense of ownership and pride is genuinely priceless.
There is also a powerful community dimension to the Dollar Tree DIY world that makes it particularly rewarding to participate in. Pinterest boards, YouTube channels, Instagram accounts, and Facebook groups dedicated to Dollar Tree crafts have amassed millions of followers and members who share their creations, offer encouragement, trade tips and tricks, and inspire one another to try new techniques. When you share your completed DIY riser online and see the positive response from fellow crafters, or when you use someone else’s tutorial as a jumping-off point for your own creative twist on the concept, you are participating in a vibrant and genuinely generous creative community.
From a practical standpoint, Dollar Tree DIY projects like these risers are also an excellent way to develop real skills in woodworking basics, paint techniques, adhesive work, color theory, and interior styling. Many home crafters who started with simple Dollar Tree projects have gone on to tackle more complex and ambitious DIY endeavors, building genuine confidence and competence along the way. The low stakes and low cost of Dollar Tree materials make them the perfect classroom for learning, experimenting, and growing as a creative person without the fear and pressure that comes with working with expensive materials.
Sustainability is another compelling reason to embrace Dollar Tree DIY over buying new décor. By repurposing and transforming inexpensive items rather than purchasing brand-new decorative objects, you are in a small but meaningful way participating in a more circular approach to consumption. Many crafters also use their Dollar Tree DIY skills to refresh and reimagine existing items in their homes rather than discarding them when they feel stale, further extending the useful life of objects that might otherwise end up in a landfill. Creativity, community, skill-building, and sustainability — the humble Dollar Tree DIY riser delivers all of this and a gorgeous new piece of home décor to boot.
Final Thoughts: Start Your Dollar Tree Riser Project Today
If you have been scrolling through Pinterest or Instagram feeling inspired by beautiful home décor displays but discouraged by the price tags attached to the pieces that create them, the Dollar Tree DIY riser project is your invitation to step into that world on your own terms and your own budget. With just a few dollars, a couple of hours, and the basic supplies outlined in this guide, you can create a set of stylish, customized risers that will genuinely transform the look of your shelves, mantels, tables, and countertops in a way that feels both professional and deeply personal.
The beauty of starting with something as simple and forgiving as a Dollar Tree riser is that there is very little pressure and very little to lose. If your first attempt does not look exactly as you imagined, you are out only a few dollars and a short afternoon, and you have gained invaluable experience that will make your next attempt significantly better. Most crafters find that by their second or third riser, they have developed a confident rhythm with the materials and techniques, and the results begin to look truly impressive. Give yourself permission to learn as you go, and you will be amazed at what you can create.
Whether you make a single riser for your bedroom nightstand or a whole coordinated set for an elaborate shelfie display in your living room, this project is a wonderful entry point into the world of Dollar Tree DIY crafting. Share your creations online with the hashtags that inspired this very article — #dollartreediy, #diydecor, #dollartreecrafts — and join the thousands of creative, budget-savvy home decorators who are proving every day that stunning style does not have to come with a stunning price tag. Your next favorite home décor piece is waiting for you at Dollar Tree, and all it needs is your imagination to bring it to life.








What do you think?
It is nice to know your opinion. Leave a comment.