










Waterproof DIY Garden Markers: A Complete Guide to Modern Cricut Projects
Why Garden Markers Matter More Than You Think
If you’ve ever watched a carefully planted herb garden descend into complete mystery after a few weeks of growth, you already understand the fundamental problem that garden markers solve. Young basil and young parsley look remarkably similar when they’re just an inch or two tall, and the same goes for dozens of vegetable seedlings that seem indistinguishable until they’re well established. A thoughtful labeling system isn’t just decorative — it’s genuinely practical, saving you from guessing games and accidental harvest mistakes throughout the growing season.
Beyond pure function, garden markers have become a meaningful part of outdoor design culture. Home gardeners increasingly treat their plots, raised beds, and container gardens as extensions of their interior aesthetic. Just as you might coordinate the cushions on your patio furniture or choose a unified color palette for your planters, matching, well-crafted markers pull the visual story of a garden together. The difference between a handful of popsicle sticks with scrawled Sharpie labels and a set of sleek, cohesive markers is the difference between a neglected corner and a genuinely inviting outdoor space.
The explosion of DIY crafting tools — especially cutting machines like the Cricut — has made it easier than ever to produce markers that look professionally made without requiring professional skills or a professional budget. With the right materials, a little patience, and a good design file, you can create garden markers that are beautiful, personalized to your plant selection, and built to withstand months of outdoor exposure. This guide walks you through everything you need to know to make that happen from start to finish.
Choosing Your Materials: The Foundation of Durability
The single biggest mistake people make with DIY garden markers is underestimating how harsh the outdoor environment truly is. Even in mild climates, markers face a relentless combination of UV radiation, moisture cycling from rain and irrigation, soil contact, and temperature swings. A material that looks great on your craft table can fade, warp, crack, or dissolve within a single season if it wasn’t chosen with these conditions in mind. Starting with the right substrate is the most important decision in the entire project.
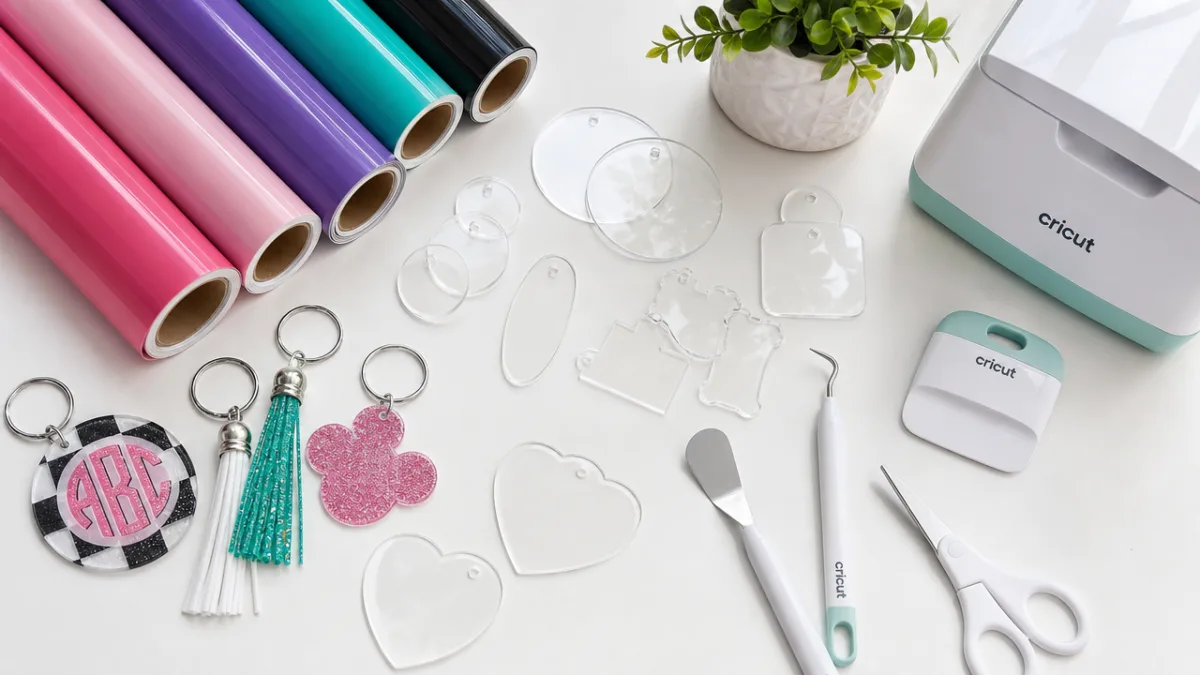
For Cricut-based garden marker projects, the most popular and reliable material choices fall into a few clear categories. Acrylic sheets — particularly white or clear cast acrylic in the 1/8-inch thickness range — offer outstanding durability and a clean, modern look that photographs beautifully. Acrylic does not absorb water, resists UV fading reasonably well when paired with UV-resistant vinyl, and can be cut cleanly with a Cricut Maker using the appropriate blade and settings. Slate tiles are another excellent option, offering a natural, organic aesthetic that works well in cottage-style and kitchen gardens. Aluminum blanks, available pre-cut in stake shapes from craft suppliers, combine lightness with serious weather resistance and give vinyl adhesive a particularly strong bonding surface.
Beyond the marker blank itself, your vinyl selection is equally critical. Standard adhesive vinyl — the kind used for most indoor Cricut projects — will typically begin peeling or fading within a few weeks of outdoor exposure. For garden markers specifically, you want to use outdoor-rated permanent adhesive vinyl, which is formulated with UV inhibitors and a stronger adhesive designed for extended exterior use. Brands like Oracal 651 and similar marine-grade alternatives are widely recommended in the crafting community for exactly this type of application. Pair your vinyl with a high-quality laminate overlay or a clear UV-resistant topcoat spray to push your markers’ outdoor life from one season to potentially several years.
Quick Material Checklist
- Acrylic sheet blanks, slate tiles, or aluminum stake blanks as your base material
- Outdoor permanent adhesive vinyl (Oracal 651 or equivalent)
- UV-resistant clear laminate or protective topcoat spray
- Transfer tape for clean vinyl application
- Weeding tools for detailed design work
- Garden stakes or wire flag holders for mounting
Setting Up Your Cricut Design Space Files
Cricut Design Space is the software platform where your garden marker project will take shape before it ever becomes a physical object. If you’re new to the software, the learning curve is gentler than it might initially appear — Cricut has invested heavily in making Design Space accessible to beginners while still offering enough depth to satisfy experienced crafters. You’ll use it to create or import your text and graphic elements, size them to fit your marker blanks, and send cut files or print-then-cut instructions to your machine. Taking the time to set up your files carefully at this stage will save you a significant amount of wasted material later.
For garden markers with a modern aesthetic, typography is your most powerful design tool. Clean sans-serif fonts like Futura, Montserrat, or Helvetica Neue convey a contemporary feel that complements the geometric shapes of acrylic or aluminum blanks beautifully. Script fonts can work well for a more romantic or cottage-garden sensibility, but be aware that highly detailed scripts with very thin strokes can be challenging to weed at small sizes. As a general guideline, aim for a minimum font size that keeps your thinnest letterform strokes at least 1.5mm wide — anything narrower risks tearing during the weeding process, particularly in permanent vinyl which is thinner and more delicate than heat transfer vinyl.
Beyond text, consider incorporating small graphic elements that add visual interest and help at-a-glance plant identification. Simple botanical line drawings — a small leaf, a herb sprig, a vegetable silhouette — pair well with the plant name and can be sourced from free SVG libraries or purchased from independent designers on platforms like Etsy and Creative Market. Design Space allows you to combine text and SVG graphics into a single cohesive cut file, and you can duplicate and resize designs efficiently to create a matched set of markers in one cutting session. Save your completed file clearly labeled with the dimensions you used, so rebuilding or expanding your set next season takes only minutes.
Design Space Tips for Cleaner Results
- Always attach or group your text and graphics before sending to cut, to preserve exact positioning.
- Use the “mirror” function if cutting heat transfer vinyl — it’s easy to forget and costly to waste.
- Test cut on a small scrap of your chosen vinyl before committing to the full sheet.
- Resize designs proportionally by holding shift while dragging corner handles.
- Set your material type precisely — outdoor vinyl and standard vinyl require different pressure settings.
Step-by-Step: Cutting, Weeding, and Application
With your design files finalized and your materials assembled, the actual production process moves through three distinct phases: cutting, weeding, and application. Each phase has its own set of techniques that separate clean, professional-looking results from messy, frustrating ones. Working methodically through each step — rather than rushing ahead — is what consistently produces markers you’ll be proud to put in your garden. Give yourself a relaxed afternoon for your first batch, and the process will feel intuitive by the time you’ve finished.
Cutting is the most automated step once your settings are dialed in. Load your outdoor vinyl onto the cutting mat with the vinyl face-up, and confirm your material setting in Design Space matches the specific product you’re using. For most outdoor permanent vinyls, a Fine Point Blade with standard pressure produces clean cuts without cutting through the carrier sheet. If your Cricut offers a “more pressure” setting, a single click up from standard is often beneficial for thicker vinyl products. Send your design to cut, and resist the temptation to pull the mat from the machine before the blade has returned fully to its home position — doing so can drag your vinyl and distort the cut lines.
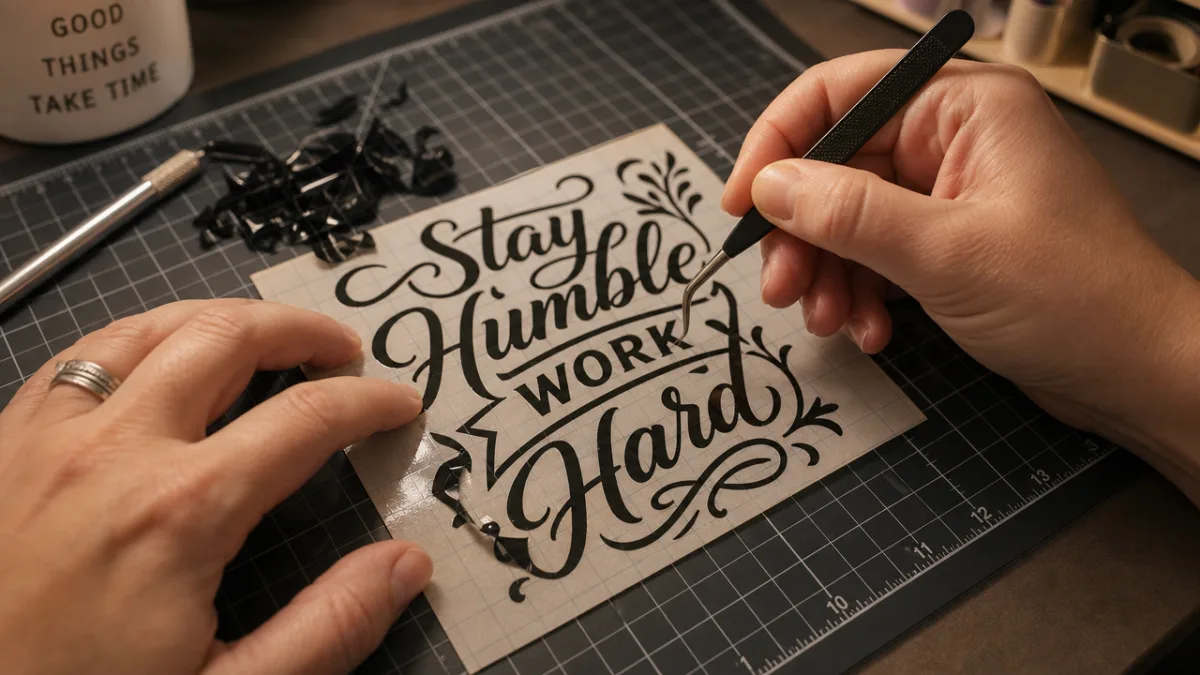
Weeding is where patience pays off most visibly. Using a weeding tool or a fine-tipped dental pick, remove all the vinyl from areas that should not appear on your finished marker — the spaces inside letters like O, A, and B, as well as all the background vinyl surrounding your design. Work under good lighting, and if your design is complex, go slowly and methodically from one corner to the other rather than jumping around. Once weeded, cut a piece of transfer tape slightly larger than your design, press it firmly over the vinyl using a brayer or credit card to ensure full contact, and peel the transfer tape back slowly at a low angle. Your design should lift cleanly from the carrier sheet on the tape, ready for application to your marker blank. Press it into position, burnish firmly, and peel the transfer tape back at a slow, consistent angle. Finish by applying your clear UV laminate or topcoat according to the manufacturer’s instructions.
Weatherproofing Strategies That Actually Work
Even the best outdoor vinyl benefits from an additional layer of protection, and understanding your weatherproofing options is what separates markers that last one season from markers that look sharp for three or four years. The enemy isn’t any single weather condition — it’s the cumulative effect of UV exposure breaking down dyes and adhesives, water seeping under vinyl edges and lifting them from the substrate, and freeze-thaw cycles stressing both the vinyl and the base material. A multi-layer protection strategy addresses all three threat vectors and gives your markers the best possible chance of long-term survival.
For vinyl-based designs, a self-adhesive clear laminate is the single most effective protective upgrade you can make. These laminates are available in gloss and matte finishes and are designed to bond permanently to vinyl, sealing all edges and creating a continuous waterproof barrier over the entire decorated surface. Cut your laminate slightly larger than your vinyl design so it wraps around to cover the very edges — this edge seal is particularly important because edge lifting is where deterioration almost always begins. For a complementary approach, a finishing spray of UV-resistant clear coat (such as Krylon UV-Resistant Clear or Rust-Oleum Painter’s Touch Clear) adds another layer of UV protection and helps bond the laminate to the substrate around its perimeter.
The stake or mounting system you choose is equally important to consider from a weatherproofing standpoint. Stakes that trap water at the point where marker blank meets stake — particularly when the mounting involves drilled holes or slots — create perfect conditions for moisture infiltration and eventual cracking or delamination. Waterproof adhesive or two-part epoxy to bond blank to stake, rather than mechanical fasteners, eliminates these problem points. For acrylic blanks especially, a dab of clear marine-grade silicone sealant around any mounting point provides both adhesion and a complete water seal. Store a small batch of spare blanks and vinyl so that after two or three seasons, refreshing your marker set is a quick afternoon project rather than starting entirely from scratch.
Weatherproofing Layers at a Glance
- Layer 1: Outdoor permanent adhesive vinyl as your base graphic layer
- Layer 2: Self-adhesive UV clear laminate over the entire vinyl surface
- Layer 3: UV-resistant clear coat spray for additional protection and edge sealing
- Layer 4: Waterproof adhesive or epoxy at all mounting and connection points
Design Inspiration and Styling Ideas for Modern Gardens
One of the most exciting aspects of making your own garden markers is the creative freedom it affords. Unlike store-bought options that tend toward either purely functional or overly whimsical aesthetics, DIY markers let you hit exactly the design note your garden calls for. Modern garden design in particular has embraced a language of clean geometry, neutral palettes punctuated by natural textures, and typography that borrows as much from graphic design as from traditional garden ornamentation. Your markers can be a direct expression of that sensibility, or they can deliberately contrast with it for visual interest.
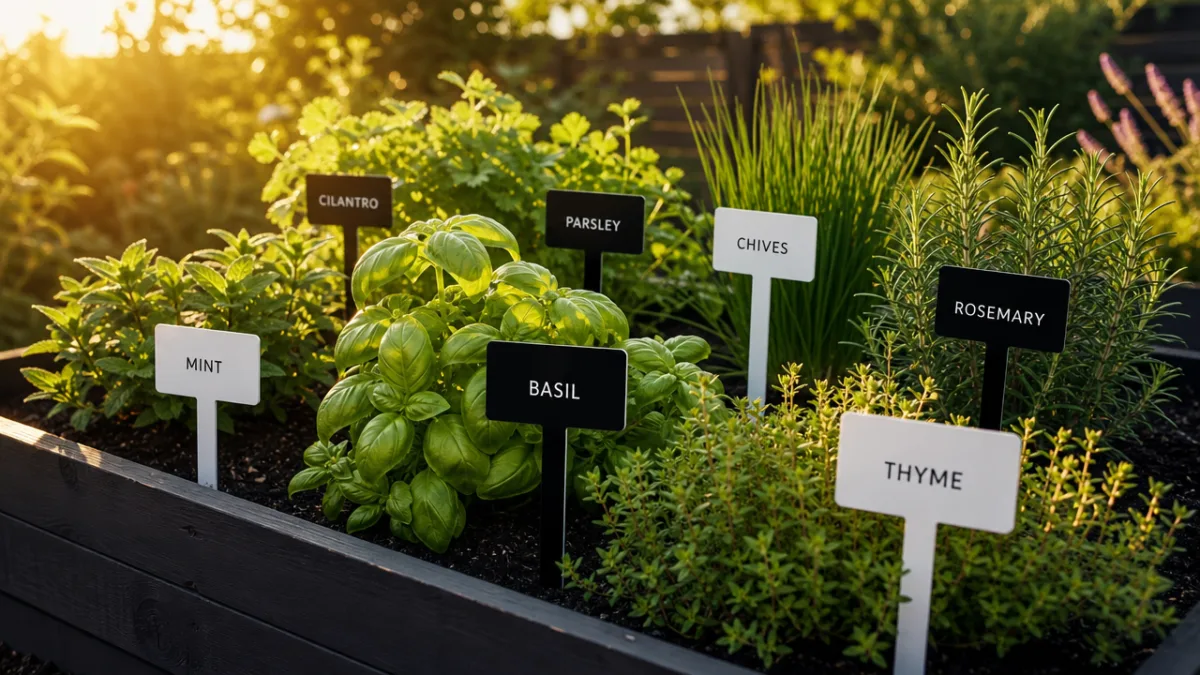
For a truly contemporary look, consider black vinyl on white acrylic — a combination that reads crisply from a distance, photographs beautifully for social media, and pairs with virtually any planting palette. Alternatively, white vinyl on matte black acrylic creates a chalkboard-like effect with a more dramatic, architectural presence. If your garden includes raised wooden beds with a warm natural tone, brass or gold vinyl on clear acrylic strikes a sophisticated note that feels both modern and timeless. Don’t overlook the power of shape: rectangular markers feel graphic and urban, arched or rounded tops soften the look considerably, and irregular organic shapes carved from acrylic (achievable with the Cricut Maker’s extended-range blade) add handcrafted personality.
Beyond individual plant labels, consider thinking about your marker set as a cohesive design system that includes zone markers for different garden areas, seasonal flags for beds that rotate through plantings, and even decorative markers for non-plant elements like birdbaths or compost areas that you want to acknowledge visually in the landscape. Cricut makes it entirely practical to produce large sets of coordinated markers in a single session, and the cost per piece drops significantly when you’re cutting an entire sheet of vinyl at once. Photographing your finished garden with your new marker set in place and sharing the result on Pinterest or Instagram often inspires other gardeners — and might just become the start of a small side business if the demand from friends and neighbors is any indication of the broader appetite for well-designed garden accessories.
Troubleshooting Common Problems and Refining Your Process
Even with careful preparation, your first few rounds of garden marker production will likely surface at least a handful of small problems. This is entirely normal — the combination of variables involved, from vinyl brand to blade age to ambient humidity affecting adhesion, means that troubleshooting is part of every crafter’s journey. The good news is that most problems in the Cricut vinyl workflow have well-established solutions, and once you’ve identified and resolved an issue once, it rarely recurs. Keeping brief notes on what worked and what didn’t in each session builds a personal reference that’s more useful than any generic tutorial.
Vinyl that tears during weeding is one of the most common frustrations, and it almost always traces back to one of three causes: a dull or damaged blade, a cut that didn’t go deep enough through the vinyl layer, or letterforms and graphics with strokes too fine for the scale you’re working at. Replace your blade more frequently than feels intuitively necessary — Cricut blades dull gradually and the degradation is easy to miss until you’re fighting with torn designs. If your cuts feel clean but weeding is still difficult, bump your pressure up one level and run a test cut. For fine design elements, enlarge your overall design slightly and see whether weeding becomes easier — sometimes just a few extra millimeters of stroke width makes the difference between frustrating and effortless.
Vinyl that lifts from the marker blank after a few weeks in the garden usually indicates either an adhesion failure at application or a weatherproofing gap that allowed moisture under the vinyl edge. Before applying any vinyl to acrylic or metal blanks, clean the surface thoroughly with isopropyl alcohol and allow it to dry completely — skin oils, dust, and manufacturing residue all compromise adhesion. Press your vinyl down with firm, consistent pressure using a brayer, working from the center outward to eliminate air bubbles. If lifting persists despite careful surface preparation, switching to a vinyl with a more aggressive adhesive formulation — some outdoor vinyl products offer “super permanent” variants specifically for challenging substrates — typically resolves the issue. Combined with proper lamination and topcoat, these steps should give you markers that stay sharp, legible, and firmly adhered through many growing seasons to come.
Quick Troubleshooting Reference
- Vinyl tears when weeding: replace blade, increase cut pressure, or enlarge design elements
- Letters not cutting completely through: increase pressure setting or slow cut speed
- Vinyl lifts from blank: clean surface with isopropyl alcohol before applying, use firmer pressure during transfer
- Design shifts during transfer tape application: ensure vinyl is fully cut before attempting transfer
- Laminate bubbles: apply slowly from one edge using a brayer, popping small bubbles with a pin before sealing
- Fading after one season: upgrade to a higher-grade outdoor vinyl and add UV topcoat spray








What do you think?
It is nice to know your opinion. Leave a comment.