










DIY Wood Slice Garden Path: A Complete Guide to Creating a Natural Woodland Walkway
Introduction: The Timeless Beauty of Wood Slice Pathways
There is something undeniably magical about a garden path made from natural wood slices. Whether you are winding through a cottage garden, creating a stepping stone trail through a woodland-inspired backyard, or simply looking for a budget-friendly alternative to poured concrete or brick pavers, wood slice paths offer a warmth and organic charm that no manufactured material can replicate. These rustic discs of timber feel like they belong in the landscape rather than being imposed upon it, making them a favorite among garden designers and DIY enthusiasts alike.
The concept is deceptively simple: cross-sections of tree trunks or large branches are cut into thick rounds and set directly into the ground to form a walking surface. Yet within that simplicity lies enormous creative potential. You can arrange them in perfectly spaced stepping stones, create a dense mosaic of different-sized slices, surround them with creeping ground cover, or embed them in gravel or bark mulch for a more finished look. Each installation is entirely unique, shaped by the character of the wood you use and the vision you bring to the project.
Beyond aesthetics, wood slice paths are also a wonderfully sustainable garden feature. They can be made from salvaged timber, fallen trees, or offcuts from logging operations that would otherwise go to waste. A skilled chainsaw operator or a good jigsaw can transform a pile of rough-cut logs into dozens of usable path pieces in an afternoon. Even if you purchase pre-cut slices, the cost remains significantly lower than most conventional paving options, making this project accessible to gardeners at virtually every budget level.
Choosing the Right Wood for Your Garden Path
Not all wood is created equal when it comes to outdoor use, and choosing the right species and quality of timber is arguably the most important decision you will make during this entire project. Hardwoods such as oak, black locust, osage orange, and cedar are the gold standard for wood slice paths because their dense cellular structure naturally resists moisture, rot, and insect damage. Oak in particular is widely available, relatively affordable, and known to last many years even when embedded in damp soil, especially when treated with a penetrating preservative oil or sealant before installation.
Softer woods like pine, spruce, or poplar can also be used, but they require considerably more preparation and maintenance to achieve a reasonable lifespan. If you do choose a softwood, plan on applying multiple coats of a wood hardener and a waterproof sealant, and accept that you may need to replace some slices every few years as they soften and decay. That said, even a path that lasts three or four seasons before needing partial replacement is often considered worthwhile given how inexpensive and enjoyable the project is to build and rebuild.
When sourcing your wood, look for logs that are as freshly cut as possible. Green wood, meaning timber that still contains significant moisture, will shrink as it dries, which can cause cracking and splitting. Ideally, you want wood that has been allowed to air-dry for several months before cutting, or you can cut fresh slices and allow them to dry slowly under cover before treating and installing them. Avoid wood that already shows signs of fungal decay, deep cracking, or insect tunneling, as these problems will only accelerate once the slices are in the ground.
- Best hardwood choices: Oak, black locust, osage orange, cedar, chestnut, and teak (where available and sustainably sourced).
- Acceptable softwood choices: Treated pine, Douglas fir, larch, and Western red cedar, all of which benefit from additional sealing.
- Woods to avoid: Cottonwood, willow, basswood, and other very soft or fast-decaying species that will break down rapidly in soil contact.
The diameter and thickness of your slices will depend on the scale of your path and the aesthetic you are after. For a standard garden walkway that adults and children will use regularly, aim for slices that are at least four to six inches thick and wide enough to comfortably accommodate a single footstep, typically twelve to eighteen inches in diameter. Thicker slices last longer and feel more stable underfoot, while wider slices give the path a more generous, welcoming appearance. Mixing different sizes can create a pleasingly irregular, natural mosaic effect.
Tools, Materials, and Preparation
Before you begin cutting and laying your wood slices, it pays to spend time gathering the right tools and materials. The investment in proper preparation will save you frustration during the build and significantly extend the life of your finished path. At minimum, you will need a chainsaw or circular saw capable of making clean crosscut sections, safety equipment including eye protection, ear defenders, and cut-resistant gloves, a spade or half-moon edger for excavating the path bed, a rubber mallet for setting slices firmly, a level for checking surface height, and a sharp handsaw or reciprocating saw for trimming slices that need to be fitted around curves or edges.
For treating and sealing the wood, stock up on a generous supply of your chosen preservative. Boiled linseed oil is a traditional and highly effective choice that penetrates deep into the wood grain, conditioning the timber from the inside out while creating a degree of water repellency. Alternatively, a commercial deck oil or outdoor wood sealant will provide similar protection with the convenience of faster drying times. Some builders also swear by a coating of raw linseed oil mixed with a small amount of turpentine for deeper penetration, though this mixture takes longer to cure. Whatever product you choose, plan on applying at least two coats to all surfaces, including the cut faces and the bark edges, before the slices go into the ground.
Your choice of infill material between the slices will have a significant effect on both the look and the longevity of the path. Common options include bark chip mulch, fine gravel or crushed stone, river pebbles, and low-growing ground cover plants such as creeping thyme, moss, or chamomile. Bark mulch is soft, inexpensive, and gives the path a woodland feel, but it decomposes over time and needs topping up annually. Gravel is more durable and provides excellent drainage, which helps keep the underside of the wood slices drier and therefore less prone to rot. Planting ground cover between the slices is the most beautiful long-term option, though it requires the most patience as the plants establish themselves.
- Gather all tools and personal protective equipment before starting any cutting work.
- Source, cut, and dry your wood slices well in advance of the installation date.
- Apply two to three coats of preservative oil or sealant to all surfaces of every slice, paying particular attention to the end grain.
- Allow full curing time as specified by your product before laying slices in the ground.
- Choose and procure your infill material based on your aesthetic goals and maintenance preferences.
Step-by-Step Installation Guide
With your materials prepared and your tools at hand, it is time to begin the most satisfying part of the project: laying your path. Start by marking out the route of the path on the ground using garden twine, spray paint, or a line of sand. This is your opportunity to experiment with the shape before committing to any digging. Curved paths look particularly beautiful with wood slice materials, so do not be afraid to introduce gentle sweeping bends that follow the natural contours of your garden. Stand back frequently and view the layout from different angles, including from upper-story windows if your garden is overlooked, to make sure the shape flows well.
Once you are happy with the path layout, begin excavating the path bed. Using a flat spade or half-moon edger, remove the turf and topsoil to a depth of at least six inches across the full width of the path, plus a few extra inches on each side to allow for the infill material. This depth is important: you want each wood slice to sit with its upper surface either flush with the surrounding ground level or raised by no more than half an inch, which keeps the path safe to walk on and prevents trip hazards. Remove any stones, roots, or debris from the excavated bed and tamp the base soil down firmly with your foot or a hand tamper.
At this point, many experienced builders recommend laying a sheet of landscape fabric or weed suppressing membrane across the entire path bed before placing the slices. This layer will significantly reduce the amount of weed growth that pushes up between your slices over time, saving you considerable maintenance effort in future seasons. Cut slits in the fabric where each slice will be positioned, folding the edges down neatly. Then spread a two-inch layer of coarse sharp sand or fine gravel over the fabric to create a stable, free-draining bedding layer on which the slices will rest.
Place each wood slice into position on the bedding layer and use your rubber mallet to drive it down firmly until it sits at the correct height. Check it with a level and adjust the bedding material beneath it until the surface is stable and does not rock when stepped on. Work your way along the path systematically, spacing slices according to your design plan. For a continuous mosaic surface, slices can be butted close together with only an inch or two of gap for infill. For a stepping stone style, space them to match a comfortable walking stride, roughly eighteen to twenty-four inches between centers.
Once all slices are placed and set, fill in the gaps between them with your chosen infill material, tamping it down gently as you work. If you are planting ground cover, backfill with a good quality, free-draining topsoil mixed with a little horticultural grit, then plant your plugs or seeds and water them in well. Finish the edges of the path with timber edging boards, metal path edging, or a line of larger cobblestones to give the whole installation a clean, defined boundary that will also help keep the infill material from migrating into the surrounding lawn or beds.
Treating, Sealing, and Long-Term Maintenance
The longevity of your wood slice path depends more on maintenance than on any other single factor. Even the hardest, most naturally rot-resistant timber will eventually succumb to moisture, freeze-thaw cycles, and fungal attack if left entirely untreated and unattended. The good news is that maintaining a wood slice path is a straightforward and even enjoyable task, requiring only a few hours of attention each year to keep the installation looking its best and to maximize the usable lifespan of every individual slice in the path.
The most important maintenance task is the annual application of a fresh coat of penetrating wood oil or sealant to the exposed upper surfaces of the slices. Choose a dry spell in early spring or early autumn, when the wood is neither frozen nor waterlogged, and brush or wipe on a generous coat of your chosen product, allowing it to soak in fully before adding a second coat. Pay particular attention to any cracks or checks that have developed in the wood surface since the last treatment, as these are the entry points through which moisture penetrates most aggressively. A small bottle of wood hardener or consolidant is useful for treating any slices that are beginning to soften at the surface.
Inspect the path thoroughly at least twice a year, in spring and autumn, checking for slices that have shifted, sunk, or become unstable. Any slice that rocks or wobbles underfoot is a potential trip hazard and should be lifted, have its bedding layer adjusted, and be re-set promptly. Check also for signs of serious decay: deep softness, crumbling wood fiber, or a distinctive musty smell that indicates active fungal rot. Slices that have reached the end of their useful life should be removed and replaced with fresh prepared ones, which can be cut, treated, and kept in reserve specifically for this purpose.
- Reapply wood oil or sealant to all exposed surfaces once or twice per year, depending on your climate and the exposure of the path.
- Top up bark mulch or gravel infill as it settles, compacts, or is displaced by weather and foot traffic.
- Trim back any ground cover plants that are beginning to encroach too heavily onto the walking surface.
- Clear fallen leaves promptly in autumn, as wet leaf litter trapped against the wood surface accelerates decay.
- Re-level any slices that have shifted due to frost heave or soil movement during winter months.
Creative Variations and Design Inspiration
One of the greatest pleasures of the wood slice garden path project is the enormous scope for creative interpretation. While the basic concept remains the same, the aesthetic possibilities are virtually limitless, shaped by the species and character of the wood, the spacing and arrangement of the slices, the choice of infill material, and the surrounding planting design. Whether you are aiming for a wild, naturalistic woodland feel or a more carefully curated artisan garden aesthetic, wood slices can be adapted to suit your vision with remarkable flexibility.
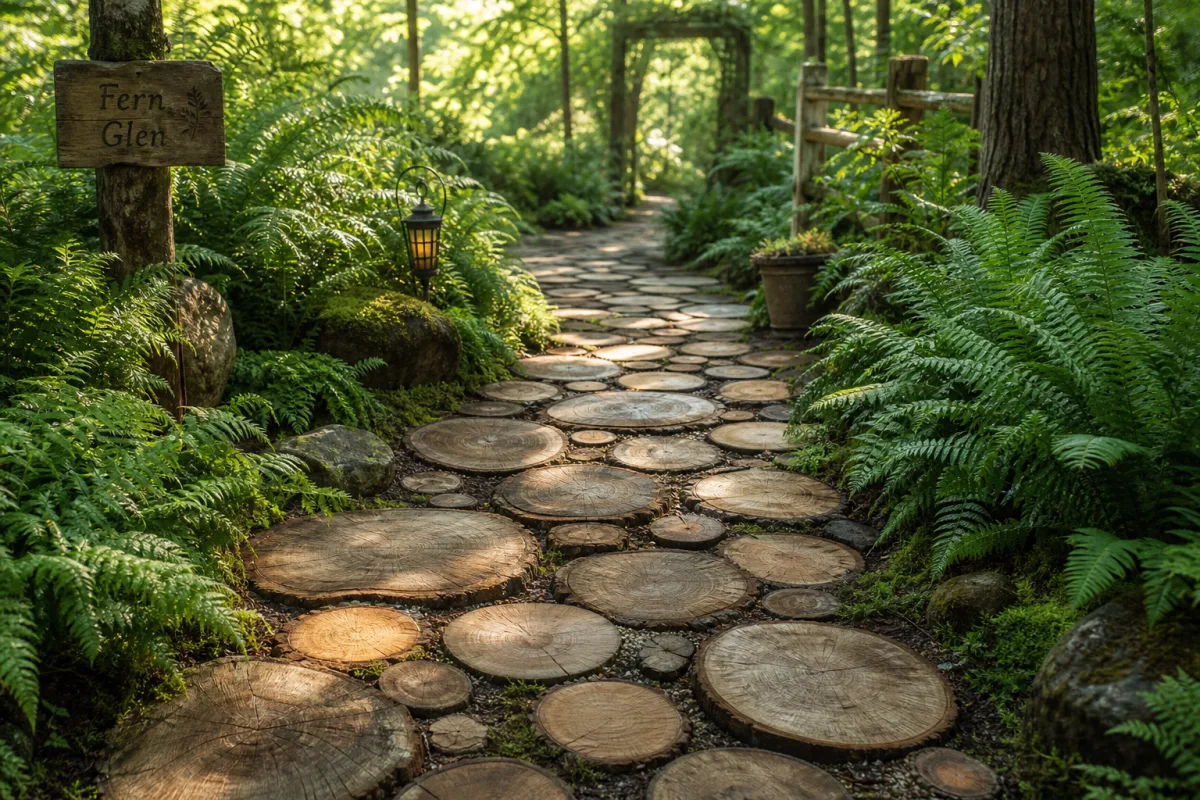
For a truly immersive woodland garden effect, consider allowing moss to colonize the surfaces of the slices naturally over time. In shaded, damp conditions, native mosses will often establish themselves without any encouragement, creating a velvety green coating that looks as though the path has been part of the garden for decades. You can accelerate this process by blending fresh moss with plain yogurt and water to create a moss slurry, then painting it directly onto the wood surfaces. Keep the area misted with water during dry periods while the moss establishes, and within a season or two you will have a beautifully aged-looking path that seems to have grown organically from the forest floor.
For a more formal or contemporary garden setting, consider using slices cut from a single species of uniform diameter and arranging them in a precise grid or diamond pattern with perfectly even gravel-filled joints. This approach creates an elegant, geometric look that references the natural material without the rustic irregularity of a mixed-slice woodland path. Complement it with clipped hedging, architectural planting, or a clean modern fence line, and the result is a sophisticated garden feature that bridges the gap between the organic and the designed.
Another creative variation worth exploring is the raised wood slice stepping stone path, where individual large slices are placed on a flat lawn or meadow area without any excavation, simply resting on the surface and held in place by their own weight and the slight impression they make in the turf over time. This is an excellent low-commitment approach if you are not yet sure of the permanent layout of your garden, and it works beautifully through a wildflower meadow or an informal orchard where the soft, natural material complements the relaxed planting style. The slices will gradually settle into the ground naturally as the lawn grows around them.
Finally, do not overlook the potential for combining wood slices with other materials in a mixed-media path design. Embedding occasional smooth river stones or large pebbles between slices adds textural contrast and helps with drainage in wetter areas of the garden. Using reclaimed bricks or cobblestones as a border or edging treatment can bridge the gap between a wood slice path and an adjacent terrace or formal area. Even mixing in occasional pieces of polished recycled glass, colored gravel, or decorative aggregate can add unexpected moments of sparkle and whimsy to what is already a deeply characterful garden feature.

Common Mistakes to Avoid and Troubleshooting Tips
Even with careful planning and preparation, first-time builders of wood slice paths encounter a handful of recurring challenges that can compromise both the appearance and the durability of the finished installation. Being aware of these pitfalls before you begin will save you significant time, money, and frustration, and will help ensure that your path looks as good five years from now as it does on the day you complete it. The most common mistake is simply underestimating how much preparation the wood requires before it is ready to go into the ground, and rushing through the treatment stage in the excitement of wanting to see the finished result.
Insufficient depth of excavation is another frequent issue. When slices are not set deeply enough into the ground, they sit too proud of the surrounding surface, creating an unstable, rocking walking surface that is both uncomfortable and potentially dangerous. They also tend to shift and migrate more readily when they protrude above grade, particularly in areas subject to frost heave or heavy foot traffic. Always excavate to the full recommended depth, even if the ground is hard and the digging is tedious. The additional effort at the preparation stage pays enormous dividends in the stability and safety of the finished path.
Poor drainage beneath the slices is perhaps the most serious technical problem a builder can encounter, because it is the primary driver of accelerated wood decay. If the path bed retains standing water after rain, the undersides of the slices will be in near-constant contact with moisture, dramatically shortening their lifespan regardless of how well they have been treated on their upper surfaces. If you are working in a part of the garden with known drainage problems, consider laying a deeper layer of coarse aggregate beneath the sand bedding layer, or even installing a simple perforated drainage pipe along the center of the path bed to carry away excess water.
- Never skip or rush the wood treatment stage; proper sealing is the single most important factor in longevity.
- Always excavate to full depth and create a stable, level bedding layer before placing any slices.
- Address drainage issues before laying the path rather than hoping they will resolve themselves over time.
- Keep a small stock of pre-treated replacement slices so that worn or damaged ones can be swapped out quickly without delay.
- Inspect the path seasonally and address minor issues promptly before they develop into more significant problems.
If you find that slices are cracking badly shortly after installation, the most likely cause is that the wood was too green, meaning too high in moisture content, when it was installed. As the wood dries out in its warm, exposed position in the garden, the outer layers shrink faster than the inner core, creating tension that manifests as radial cracks spreading outward from the center of the slice. While some surface checking is entirely normal and does not compromise the structural integrity of the slice, deep or wide cracks can allow water to penetrate to the core, accelerating decay. If cracking is severe, fill the cracks with a flexible exterior wood filler or sealant to reduce moisture ingress, and redouble your sealing efforts at the next maintenance interval.








What do you think?
It is nice to know your opinion. Leave a comment.