










Build Raised Garden Beds from Pallet Wood: A Complete Guide
Why Pallet Wood is Perfect for Raised Garden Beds
Raised garden beds have taken off in popularity for good reason — better drainage, easier soil management, and no more hunching over to tend your plants. The catch? Lumber isn’t cheap, and the cost of building a few nice beds can give even an enthusiastic gardener pause. That’s where pallet wood comes in. It’s practical, it’s budget-friendly, and it holds up better than you might expect. Gardeners all over the world have figured this out, and once you try it yourself, it’s hard to go back.
Pallets are genuinely everywhere. Hardware stores, grocery warehouses, furniture retailers, manufacturing plants — they all churn through thousands of pallets every year, and most businesses would rather hand them off for free than deal with disposal. That’s a great deal for anyone who wants to build raised beds without spending a fortune. What would otherwise end up in a dumpster becomes a solid, functional garden structure with a little time and elbow grease.
There’s also something aesthetically appealing about reclaimed wood. The weathered texture, the warm tones, the slightly imperfect boards — it all adds up to a rustic charm that freshly milled lumber just doesn’t have. And beyond the looks, building with pallets is a genuine form of upcycling. You’re keeping useful material out of the landfill and giving it a second life in your garden. That’s a nice thing to be part of.
Understanding Pallet Grades and Heat Treatment
Here’s something you really need to know before you start hauling pallets home: not all of them are safe to use in a food garden. Pallets that cross international borders have to be treated to prevent pests and diseases from hitching a ride, and the treatment method makes a huge difference. There are two main options — heat treatment and methyl bromide fumigation — and only heat-treated pallets belong anywhere near your vegetables.
The way to tell them apart is the IPPC stamp, which you’ll find somewhere on the pallet’s frame. Look for the letters HT, which means heat treated and gives you the green light. If you see MB instead, that pallet was treated with methyl bromide, a pesticide that can stick around in the wood and leach into your soil. Don’t use MB pallets in a food garden, full stop — it doesn’t matter how clean or solid they look.
Even with an HT stamp, give each pallet a good once-over before committing to it. Look for dark stains, chemical smells, or any mystery residue that might suggest it carried something hazardous. Pallets that transported food, hardware, or general merchandise are your safest bets. If something about a pallet seems off and you can’t identify why, just leave it. There are always more pallets — it’s not worth the risk to your soil or your harvest.
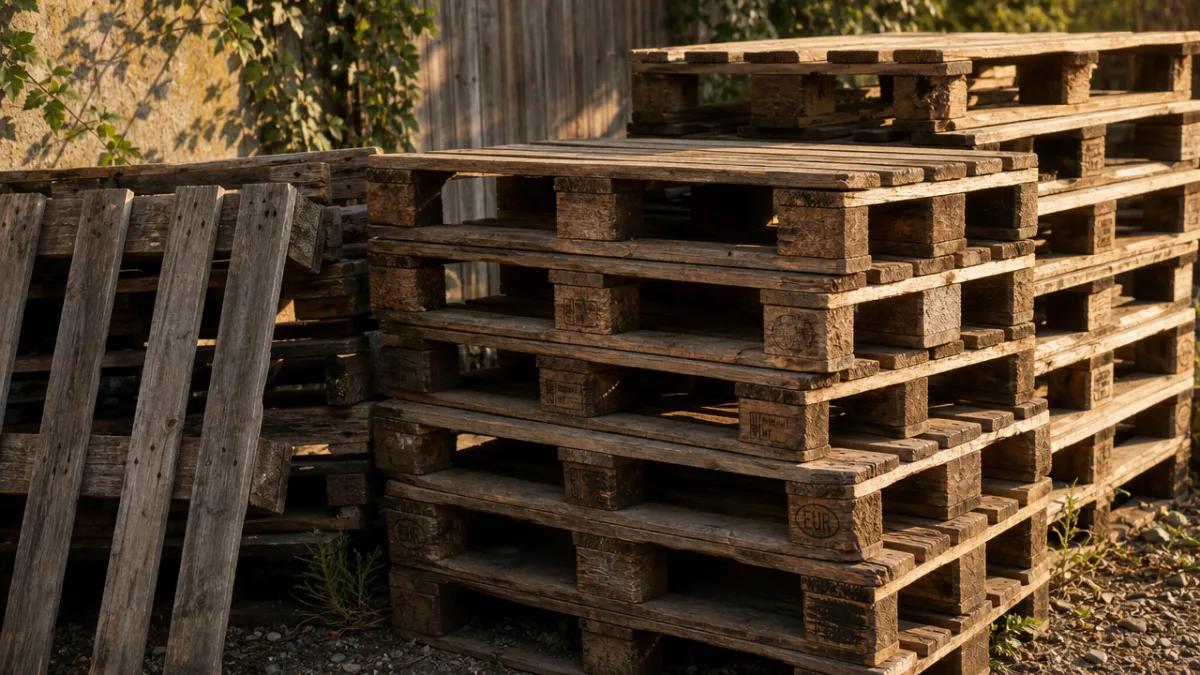
Gathering Tools and Materials
One of the things that makes this project so approachable is that you don’t need much in the way of tools. This isn’t a complex carpentry job — it’s accessible whether you’re new to DIY or you’ve been building things for years. Still, getting everything together before you start saves a lot of frustration mid-build, so take a few minutes to round up your materials before you dive in.
For a bed that’s roughly four feet by eight feet, you’ll typically need somewhere between three and six pallets depending on their size and how tall you want the finished bed to be. Go for pallets that are in decent shape — boards still firmly attached, no obvious rot or major cracking. You’ll also want corrosion-resistant screws or galvanized nails for reassembly, since the original hardware is often rusty and not up to the job.
Tool-wise, a circular saw or reciprocating saw makes breaking down pallets and cutting boards to length much easier than wrestling with hand tools. Add a drill with screwdriver bits, a hammer, a tape measure, a carpenter’s square, and proper safety gear — gloves and eye protection at a minimum. If you plan to line the inside of the bed with landscape fabric to help with weeds and moisture retention, grab a roll of that too along with some staples to hold it in place.
Optional Enhancements and Upgrades
The basics will get you a perfectly functional raised bed, but a few optional additions can make a real difference in how long it lasts and how well it performs. One of the best things you can do is treat the interior wood surfaces with linseed oil or a food-safe sealant. It significantly slows moisture penetration and decay, which matters a lot if you live somewhere rainy. Untreated pallet wood in a wet climate can start breaking down sooner than you’d like.
If gophers or moles are a problem in your area, lining the bottom of the bed with hardware cloth is worth the extra effort. Quarter-inch mesh will stop most common burrowing pests while still letting earthworms and other beneficial organisms pass through freely. Cut it a bit larger than the bed’s footprint and fold the edges up the inside walls so there are no gaps for determined diggers to sneak through.
Placing your bed on a hard surface like a patio or deck? You’ll want to think about a few things. Go deeper — at least twelve inches — so roots have room to grow, and make sure drainage won’t be an issue by leaving small gaps between bottom boards or drilling evenly spaced holes. You can even add casters to make the whole bed movable, which is a great option if you rent or just like having the flexibility to chase the sun through the seasons.
Step-by-Step Assembly Instructions
With your pallets vetted and your materials lined up, it’s time to actually build the thing — which, honestly, is the fun part. This is a project a confident beginner can knock out in a weekend, and there’s something genuinely satisfying about standing back and looking at the finished structure knowing you made it yourself. Take your time, measure carefully, and resist the urge to rush, especially when cutting.
If you want to work with individual boards rather than whole pallet panels, start by breaking down your pallets. A pry bar and hammer are your best tools here. Go slowly and patiently — forcing it tends to split boards that you’d rather keep intact. That said, plenty of gardeners skip this step entirely and just use whole pallets as the side walls, standing them on edge and fastening them together at the corners. It’s faster and requires less skill, though the look is a bit more industrial.
Once you’ve got your boards or panels ready, build the frame. Cut four corner posts from your thickest boards, making them slightly taller than your target bed height — these are what hold everything together. Attach your side boards to the posts with corrosion-resistant screws, checking with a carpenter’s square as you go to keep your corners true. A slightly unlevel bed isn’t the end of the world, but water will pool on the low side, which can create drainage and growth problems over time.
Filling and Preparing the Bed for Planting
Before you add a single shovelful of soil, get the frame into its permanent spot first. A filled raised bed is surprisingly heavy and moving it is miserable. Once it’s in place, clear out whatever’s growing underneath — dig out grass and weeds, or lay cardboard over the area as a biodegradable weed barrier. Cardboard smothers existing vegetation, breaks down over the season, and quietly adds organic matter to the soil below. It’s a simple step that pays off.
Your soil mix will probably do more to determine how your garden performs than anything else you decide on this project. A good raised bed mix is roughly equal parts compost, topsoil, and a lightweight amendment like perlite or vermiculite. You get great drainage, solid nutrients, and a texture roots can actually move through. Avoid heavy clay soil or straight topsoil from your yard — both tend to compact badly in a raised bed and can really struggle plant roots.
Fill the bed in layers and tamp each one down lightly before adding the next to cut down on settling. Leave a few inches of headroom at the top for mulch, which will help with moisture, temperature regulation, and weed suppression. Once the bed is full, water it thoroughly before you plant anything. This helps the soil settle and lets you see how drainage is working. If water’s still sitting there after a few minutes, you’ll want to rethink your soil mix or add more drainage material before you start planting.
Best Plants to Grow in a Pallet Wood Raised Bed
One of the best things about raised bed gardening is how flexible it is. Because you’re in charge of the soil, the drainage, and the layout, a well-built bed can grow an impressive range of plants — salad greens, root vegetables, climbing beans, compact fruit bushes, herbs. The trick is matching what you plant to the depth and dimensions of your bed, and thinking ahead about sunlight, watering needs, and how much room things will need once they’re fully grown.
Shallow-rooted crops are some of the easiest wins you can get in a raised bed. Lettuce, spinach, radishes, and herbs like basil, parsley, and chives will thrive in as little as six to eight inches of soil depth, and they’re wonderfully forgiving for anyone just getting started. They grow fast, you can harvest them repeatedly, and they don’t demand much fussing. If your bed is twelve inches deep or more, you can expand into carrots, beets, and potatoes — crops that need real room to develop underground.
Short on space? Raised beds are perfect for intensive planting. Instead of rows, arrange plants in a grid where each one has just enough room to reach mature size. This is often called square foot gardening, and it can dramatically boost how much you harvest from a small area. Less bare soil between plants also means fewer weeds and better moisture retention — it’s a surprisingly elegant approach once you get the hang of it.
Companion Planting Strategies
Companion planting is the idea of growing certain plants near each other because they genuinely help one another out, and raised beds are a great place to experiment with it. The most famous example is the Three Sisters combination that Indigenous North American farmers developed over centuries: corn, beans, and squash together. The corn gives the beans something to climb, the beans pull nitrogen out of the air and into the soil, and the squash sprawls along the ground shading out weeds and keeping moisture in. Each plant does something the others benefit from.
Herbs are especially useful companion plants. Basil near tomatoes is said to help with flavor and keep aphids and hornworms at bay. Marigolds around the edges of a bed are a classic deterrent for whiteflies, nematodes, and even rabbits. Nasturtiums work as a trap crop, drawing aphids away from more vulnerable plants while also producing edible flowers that look great in a salad. Pretty and functional — hard to beat that combination.
Plants to consider growing together in your pallet wood raised bed include some of the following proven companion pairings:
- Tomatoes and basil for pest deterrence and improved flavor
- Carrots and onions, which repel each other’s primary pests
- Beans and brassicas, where beans fix nitrogen that heavy-feeding brassicas readily use
- Cucumbers and radishes, where radishes deter cucumber beetles effectively
- Lettuce and tall crops like tomatoes or trellised peas that provide beneficial afternoon shade
Maintenance, Longevity, and Seasonal Care
Finishing your raised bed is a great milestone, but it’s really just the start. Like anything in the garden, it needs some ongoing attention to keep performing well and to last as long as possible. The good news is that the maintenance isn’t demanding — most of it is simple enough that it becomes just another part of your regular garden rhythm rather than something you dread.
During the growing season, make it a habit to glance at the wood every so often, especially near the soil line. That’s where moisture concentrates and where decay typically starts first. If a board begins to soften or crack, swapping it out is easy — the whole point of pallet wood construction is that it’s modular. You can pull out and replace a single board without touching the rest of the structure. Keep a few spare pallet boards around for exactly this reason.
At the end of each growing season, add compost. This is the single most important thing you can do for the long-term health of your bed. Soil levels drop as plant roots work through it and organic matter breaks down, and nutrients get used up by whatever you’ve been growing. Spreading two to four inches of fresh compost each autumn or spring puts that vitality back and keeps your bed productive for years. It takes maybe twenty minutes and makes an enormous difference.
Protecting Your Bed Through Winter
If you get hard freezes where you live, it’s worth giving your bed a little protection when the cold sets in. Covering the soil with a thick layer of mulch — straw, shredded leaves, or wood chips all work well — insulates it from the worst temperature swings and protects the beneficial organisms living in it. It also means your soil warms up faster come spring, so you can get back to planting a bit earlier than you otherwise might.
If you want to stretch your growing season in both directions, a simple cold frame or hoop house built over your raised bed is a remarkably effective upgrade. Flexible conduit bent into hoops, anchored with rebar, and covered with greenhouse plastic or row cover fabric can push your planting dates weeks earlier in spring and keep frost-hardy crops going well into autumn. The raised bed frame already gives you a solid base to anchor the hoops — the two really do work well together.
With decent care, a pallet wood raised bed can realistically last five to ten years, sometimes longer depending on the wood, the climate, and how much attention you give it. When it eventually comes time to replace it, the old wood can go straight into a compost pile, and building the next one will feel easy and familiar. That’s one of the things worth appreciating about this approach — it’s not a one-time project but an ongoing practice that grows with you.








What do you think?
It is nice to know your opinion. Leave a comment.