










Backyard Shade: 9 Clever DIY Ideas to Beat the Heat
Why Backyard Shade Matters More Than You Think
When summer temperatures climb, an unshaded backyard can become an uninviting, sweltering space that nobody wants to use. The difference between a backyard you love and one you avoid often comes down to a single element: shade. Strategic shade solutions not only make your outdoor space comfortable and usable during the hottest months of the year, but they also protect your skin from harmful UV rays, reduce glare on outdoor screens and surfaces, and can even lower the ambient temperature of your entire property by several degrees.
Beyond the comfort factor, well-designed shade structures add tremendous visual interest and architectural character to your backyard. A bare, featureless yard feels unfinished and unwelcoming, while a space thoughtfully layered with pergolas, sail shades, or lush climbing plants takes on a sense of intentionality and style. Shade becomes a design element in its own right, defining zones for dining, lounging, or play, and giving your outdoor space the same kind of spatial organization you expect from your interior rooms.
The good news is that creating effective backyard shade does not require a huge budget or professional contractors. With a weekend’s worth of effort, some basic tools, and a handful of clever materials, you can transform a sun-baked yard into a cool, shaded retreat. The nine DIY ideas explored in this article range from simple weekend projects to more ambitious builds, covering every budget level and aesthetic preference so you can find the approach that fits your space perfectly.
1. Build a Freestanding Pergola for Timeless Structure
A freestanding pergola is one of the most rewarding DIY shade projects a homeowner can undertake. Unlike attached pergolas that require wall anchors and structural considerations tied to your home’s exterior, a freestanding version can be positioned anywhere in the yard, moved conceptually as your landscaping evolves, and built to whatever size and scale your space demands. The classic open-beam design allows dappled light to filter through while blocking direct overhead sun, creating a pleasantly shaded zone that still feels open and airy rather than closed in.
Building a pergola from scratch is more achievable than most people assume. The basic structure requires four main posts set into the ground or secured onto concrete footings, a series of horizontal beams connecting them at the top, and a layer of smaller crossing rafters spaced evenly across the top. Pressure-treated lumber is the most affordable material choice, though cedar and redwood offer natural rot resistance and a more refined appearance. For a more contemporary look, metal square tubing provides a sleek, industrial aesthetic that pairs well with modern landscaping.
Once the frame is up, the pergola becomes a canvas for additional shade layers. You can drape outdoor fabric across the top beams, hang a retractable canopy, or train climbing plants like wisteria, jasmine, or climbing roses up the posts and across the rafters for a lush, living roof. Each of these additions increases the density of shade while adding texture, color, and fragrance to the structure. Over a few growing seasons, a well-planted pergola transforms from a simple wood frame into a spectacular garden feature that anchors the entire backyard design.

2. Install Shade Sails for a Modern, Minimal Look
Shade sails have surged in popularity over the past decade, and it is easy to understand why. These tensioned fabric triangles or rectangles stretch between anchor points to create bold geometric shapes overhead, casting wide swaths of shade without any heavy framing or structural complexity. The visual effect is architectural and modern, evoking the aesthetic of resort pools and boutique hotels while remaining entirely achievable as a DIY installation on a weekend afternoon. They come in a wide range of colors, from neutral canvas tones to vivid blues, greens, and oranges, making them as much a decorative statement as a functional solution.
Installing shade sails correctly is mostly a matter of choosing good anchor points and maintaining proper tension. Posts sunk into the ground, existing fence posts, the corners of your home’s eaves, or mature trees can all serve as anchors, provided they are strong enough to handle the lateral pulling force of the tensioned sail. Most shade sail kits come with stainless steel hardware including D-rings, turnbuckles, and carabiner clips that allow you to fine-tune the tension after installation. The sail should be pulled taut enough to avoid sagging and pooling water during rain, which means anchors at different heights create that characteristic tilted, asymmetric geometry.
One of the biggest advantages of shade sails over more permanent structures is their flexibility. They can be taken down easily at the end of summer, stored through winter to prolong their lifespan, and repositioned the following year if your shade needs change. Layering two or three overlapping sails of different sizes and colors creates more complete coverage while adding visual depth and complexity. For a cohesive look, choose sails in complementary tones and vary the heights of their anchor points to create a dynamic, layered canopy overhead that feels thoughtfully designed rather than improvised.
3. Construct a DIY Patio Canopy with Outdoor Curtains
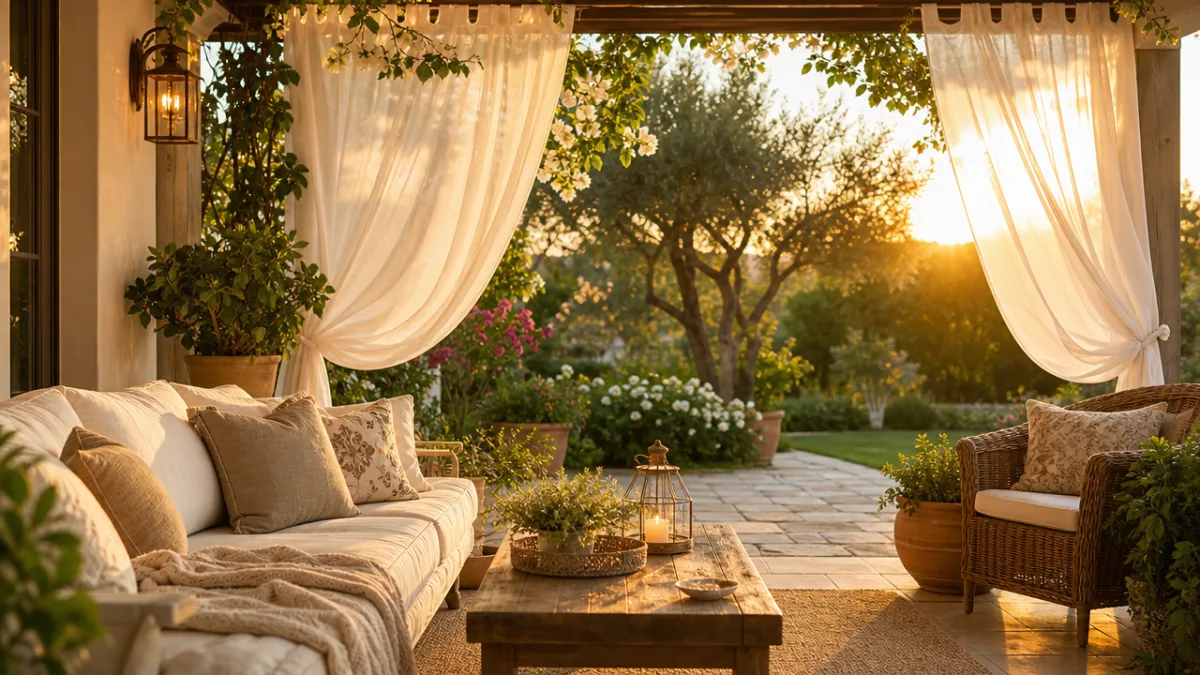
If you already have a patio slab, deck, or defined outdoor seating area, adding a simple overhead canopy structure with flowing outdoor curtains is one of the most elegant and cost-effective shade solutions available. The concept involves building or repurposing a simple rectangular frame overhead, then hanging weather-resistant curtain panels from the perimeter and across the top. The curtains can be tied back during breezy evenings when shade is not needed, then released to create a fully enclosed, shaded room-like space during the heat of the day. The effect is immediately luxurious, transforming an ordinary patio into something that feels like a private outdoor cabana.
The structural frame can be as simple as four posts in the ground connected by horizontal top rails made from PVC conduit, electrical conduit, or lightweight lumber. Curtain rods or simple tension wire strung between the posts provides the hanging rail for the fabric. For the curtains themselves, look for outdoor-rated fabrics made from solution-dyed acrylic or polyester that resist UV fading, mildew, and moisture. IKEA’s outdoor curtain panels, for instance, offer an affordable starting point, though purpose-made outdoor drapery will hold up better over multiple seasons. Grommeted tops make installation on tension wire particularly easy and give a clean, finished appearance.
The curtain canopy approach lends itself beautifully to personalization. You can choose fabrics that echo the color palette of your home’s exterior, your garden plantings, or your outdoor furniture upholstery. Adding string lights woven through the overhead frame transforms the space after dark into a glowing, intimate gathering spot. A simple outdoor rug, a few potted plants placed at the base of each post, and some comfortable cushioned seating complete the transformation from patio to outdoor living room. This project rewards a little extra attention to styling and can be completed in a single day with minimal tools and a modest budget.
4. Use Climbing Plants and Trellises for Living Shade
Perhaps no shade solution is more satisfying over the long term than growing your own using fast-climbing plants trained over trellises, arbors, or wire frameworks. Living shade structures bring together beauty, ecology, and function in a way that no manufactured product can replicate. The process requires patience, since plants take weeks to months to establish meaningful coverage, but the payoff is a completely natural, self-renewing canopy that improves with every growing season, provides habitat for pollinators and birds, and costs almost nothing to maintain once established. A well-covered trellis can reduce temperatures beneath it by five to ten degrees compared to an open sunny area.
Choosing the right plants for your trellis depends on your climate, your desired timeline, and the level of maintenance you are willing to commit to. Annual climbing plants like morning glory, black-eyed Susan vine, and scarlet runner bean grow astonishingly fast, covering a trellis fully within a single season and providing dense shade with minimal investment. Perennial climbers such as clematis, climbing hydrangea, trumpet vine, or Virginia creeper take a season or two to become established but then return reliably each year with increasingly lush coverage. For year-round screening in mild climates, evergreen climbing plants like Carolina jessamine or star jasmine maintain their foliage through winter.
The trellis or support structure itself can be a beautiful design element. Wooden lattice panels are the most common choice, but welded wire fencing stretched between timber posts, bent rebar formed into arched shapes, or repurposed wooden pallets can all serve as imaginative and affordable alternatives. Freestanding trellis panels can be arranged in an L-shape or U-shape to create a sheltered alcove, or a series of panels can be positioned overhead on a frame to form a tunnel or arbor walk. Whatever form your structure takes, annual pruning and occasional training of the vines will keep the growth tidy and ensure the shade develops evenly across the surface rather than bunching up in one area.
5. Repurpose Bamboo and Natural Materials for Rustic Shade
For gardeners drawn to organic textures and a naturalistic aesthetic, bamboo and other natural materials offer remarkable potential as shade-building components. Bamboo poles are lightweight, incredibly strong, and genuinely sustainable when sourced responsibly, and they lend any structure they are part of a relaxed, tropical, or bohemian character that painted lumber simply cannot match. Bamboo roll fencing, which comes in pre-made panels that unroll to cover a frame or fence, can transform an exposed pergola or overhead structure into a densely shaded retreat within an hour of installation. It is also remarkably affordable, especially compared to shade sails or custom canopies.
Beyond bamboo roll panels, individual bamboo poles can be lashed together using natural twine or jute rope to build freestanding shade screens, overhead canopy frames, or decorative partitions. The lashing technique, borrowed from traditional construction methods used in tropical regions around the world, requires no hardware and creates surprisingly strong and durable connections when done correctly. Larger diameter bamboo poles, often sold at garden centers or Asian specialty stores, can serve as main structural posts, while smaller diameter canes fill in the lattice work or become the overhead screening layer. Sealing the cut ends of bamboo poles with outdoor wood sealant or linseed oil extends their useful life significantly.
Combining bamboo with other natural materials amplifies the organic appeal of the finished shade structure. Jute burlap stretched over a bamboo frame creates a filtered shade effect that softens harsh sunlight into a warm, ambient glow. Dried palm fronds, reed mats, or even reclaimed wooden shutters can be layered into a bamboo framework for a layered, eclectic aesthetic. Adding potted tropical plants like banana trees, elephant ears, or bird of paradise around the base of a bamboo shade structure completes the lush, resort-inspired atmosphere. The resulting space feels miles away from an ordinary suburban backyard, all without a significant financial investment or professional assistance.

6. Stretch a Retractable Awning Over a Deck or Patio
Retractable awnings occupy a sweet spot between permanent shade structures and flexible, removable options. A properly installed retractable awning can extend several feet out from a wall to cover a deck or patio on demand, then retract neatly when you want full sun exposure or when high winds make leaving it extended risky. While motorized retractable awnings from professional installers can cost thousands of dollars, there is a growing market for DIY-friendly manual retractable awning kits that install with basic tools and deliver comparable performance at a fraction of the cost. These kits are widely available at home improvement stores and online retailers.
The installation process for a wall-mounted retractable awning involves securing the mounting brackets firmly into wall studs or masonry, attaching the awning housing to the brackets, and running the crank mechanism or motor wiring if applicable. For DIY installations, choosing an awning size that is manageable for one or two people to handle during installation is important, since the housing can be heavy and awkward to maneuver. Most residential awnings range from eight to eighteen feet wide, with a projection of five to twelve feet from the wall. Choosing a size appropriate to your patio dimensions ensures useful coverage without overwhelming the scale of the space.
The fabric selection matters enormously both for durability and aesthetics. Solution-dyed acrylic fabrics like Sunbrella are the industry standard for outdoor awnings, offering excellent UV resistance, color stability, and mold resistance that keeps the awning looking fresh for many seasons. Striped awning fabrics in classic navy and white or green and cream give a timeless, cheerful look, while solid neutral tones create a more understated, contemporary appearance. Whatever fabric you choose, periodically brushing off debris and cleaning the fabric with mild soap and water each season will keep the awning performing well and looking its best for a decade or more.
7. Hang Outdoor Umbrellas and Gazebo Canopies Strategically
Sometimes the simplest solution is also the most practical, and large outdoor umbrellas or prefabricated gazebo canopies deliver immediate, no-assembly-required shade that can be repositioned as needed. Cantilever umbrellas, in particular, have evolved dramatically in recent years, with commercial-grade models now available at consumer prices that offer nine to thirteen feet of shade coverage on an offset arm, eliminating the annoying central pole that traditional patio umbrellas place right in the middle of your seating area. A pair of well-positioned cantilever umbrellas can shade a surprisingly large outdoor dining or lounging area without any permanent installation.
Pop-up gazebo canopies, while not technically permanent structures, can be staked securely into the ground and left in place for an entire season with proper anchoring. The frames are typically made from powder-coated steel or aluminum, and the canopy tops are made from polyester fabric with UV protection ratings. Higher-end models include sidewall panels that can be added or removed to create a more enclosed, sheltered environment. For families with young children, a shaded gazebo over a sandbox or play area protects children from harmful sun exposure during outdoor play without requiring them to retreat indoors during peak sun hours.
For a more polished look, consider mixing umbrella or canopy shade with other elements discussed in this article. A cantilever umbrella positioned over an outdoor dining table provides focused shade at meal times, while a nearby shade sail covers the lounging and conversation area. The layering of different shade structures at varying heights and angles creates a dynamic overhead landscape that feels intentionally designed rather than piecemeal. Choosing shade structures in a cohesive color palette and material language ties the different elements together visually and elevates the overall design quality of the backyard as a whole.
8. Plant Trees and Tall Shrubs for Long-Term Shade Investment
Every other shade solution in this article works best when complemented by the most fundamental and long-lasting shade source available: trees. Planting a fast-growing deciduous shade tree in the right location can shade a patio, a bedroom window, or an entire section of lawn within five to ten years, and that tree will continue providing increasing amounts of shade for decades or even centuries to come. Deciduous trees offer the added seasonal benefit of losing their leaves in winter, allowing warming sunlight to reach the house and yard during the months when shade is least desired and warmth is most welcome. This natural seasonal adjustment is something no manufactured shade structure can replicate.
Selecting the right tree species for your climate, soil, and space is crucial for success. Fast-growing shade trees appropriate for most temperate climates include the October Glory Red Maple, the Tulip Poplar, the River Birch, and the Sawtooth Oak, all of which can add several feet of height per year under good growing conditions. For smaller yards or tighter spaces, columnar or narrow-form trees like the Emerald Green Arborvitae, the Sky Pencil Holly, or the columnar hornbeam provide vertical screening and overhead shade without spreading widely into neighboring areas. Consulting with a local nursery professional about which species perform best in your specific microclimate will dramatically improve your success rate.
While waiting for trees to mature, tall ornamental grasses, bamboo clumps, or large shrubs like oakleaf hydrangea, viburnum, or Leyland cypress can provide interim screening and shade at a faster pace. Planting a combination of quick-establishing shrubs alongside your slower-growing shade trees gives you immediate impact while the trees develop. As the trees mature and provide their own canopy, the understory shrubs can be gradually removed or relocated to other parts of the garden. This layered, long-term approach to shade gardening results in the most naturalistic, self-sustaining outdoor environment, one that rewards patient investment with decades of cool, comfortable outdoor living.
9. Combine Multiple Techniques for Maximum Impact
The most effective and visually impressive backyard shade environments are almost always the result of combining multiple techniques rather than relying on any single solution. A pergola draped with climbing vines, positioned near a maturing shade tree, and fitted with retractable shade fabric for peak-sun hours creates layers of protection and visual interest that no single structure could achieve on its own. This layered approach also provides redundancy: if the fabric wears out, the vines still provide shade; if the vines lose their leaves in autumn, the fabric can be extended; if either structure needs repair or replacement, the overall function of the space is not lost entirely.
When planning a layered shade strategy, begin by identifying the primary areas of the yard where you spend the most time and which receive the most intense sun exposure. These high-priority zones deserve your most substantial shade investment, whether that is a pergola, a large tree, or a quality retractable awning. Secondary zones like pathways, side seating areas, or kitchen garden beds can be addressed with simpler solutions like shade sails, trellises, or large umbrellas. Sketching a simple sun-path diagram showing where shadows fall in your yard at different times of day during summer will help you position shade structures where they will deliver the greatest benefit for the hours you are most likely to be outdoors.
Here are some effective combinations to consider when designing your layered shade strategy:
- A freestanding pergola with shade sails stretched between its posts and climbing roses trained up its columns for seasonal color and fragrance.
- A retractable awning over the main patio, supplemented by cantilever umbrellas over the dining table for focused shade during mealtimes.
- Bamboo roll fencing across an existing fence line, paired with tall ornamental grasses and a fast-growing shade tree planted nearby for progressive coverage over several seasons.
- Outdoor curtains hung from a simple overhead frame around a hot tub or plunge pool area, combined with strategically planted tall shrubs for year-round privacy and shade.
- Shade sails in varying sizes stretched between existing structures such as the house, a garage wall, and a freestanding post to cover an irregularly shaped entertaining area.
Whatever combination you choose, remember that shade planning is an evolving process. Your yard changes as plants grow, as your family’s habits shift, and as new outdoor furniture or features are added. Revisiting your shade strategy every couple of years and making small adjustments keeps your outdoor space comfortable, functional, and beautiful through every stage of your life in that home. The investment of time and creativity you put into your backyard shade solutions pays dividends every hot summer day you spend enjoying the cool, comfortable retreat you have built with your own hands.








What do you think?
It is nice to know your opinion. Leave a comment.