










How to Plant Dahlia Tubers: A Complete Guide for Healthy Plants and Lots of Blooms
Understanding Dahlia Tubers Before You Plant
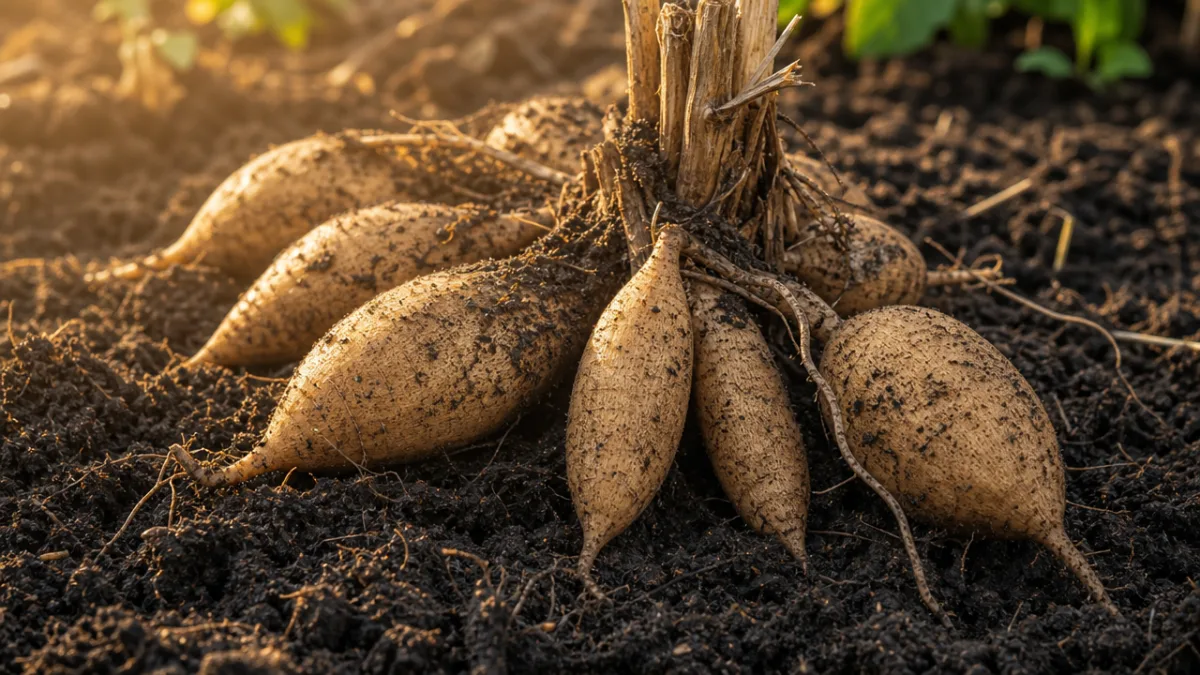
Before you put a single tuber in the ground, it pays to understand exactly what you are working with. Dahlia tubers are fleshy, underground storage organs that look something like a cluster of sweet potatoes attached at a central crown. Unlike bulbs, which contain a fully formed embryonic plant inside a papery shell, tubers store nutrients in their thick, starchy tissue and rely on small growth points called “eyes” located near the neck of the tuber to send up new shoots. Recognizing healthy eyes is the single most important skill you can develop before planting season begins.
A healthy tuber should feel firm and plump when you squeeze it gently between your fingers. Avoid any tubers that are shriveled, soft, or show signs of rot — these are unlikely to produce vigorous plants and can introduce disease into your garden soil. The neck, which is the narrow section connecting the individual tuber to the main crown, should be intact. A tuber that has separated cleanly from the crown with no visible eye attached will never sprout, no matter how carefully you plant it or how rich your soil is.
If you purchased tubers over the winter or stored your own from the previous season, inspect them again about two to three weeks before your intended planting date. Some gardeners like to place tubers in a tray of barely damp peat moss or vermiculite to encourage the eyes to swell and become more visible. This process, sometimes called “chitting,” is not strictly necessary but can give you a head start and make it much easier to confirm which tubers are viable before you invest time preparing your beds.
Choosing the Right Location and Preparing Your Soil
Dahlias are sun worshippers by nature, and choosing the right planting location is arguably as important as any other step in the process. Select a spot that receives a minimum of six to eight hours of direct sunlight each day. In regions with extremely hot summers, a position that offers gentle afternoon shade can prevent flowers from bleaching and extend the blooming season, but in most temperate climates, full sun produces the strongest stems, the most vibrant colors, and the highest flower count per plant.
Good drainage is non-negotiable for dahlias. Their thick tubers are prone to rotting in waterlogged soil, and even a brief period of standing water after heavy rain can destroy an entire planting. If your garden has clay-heavy or compacted soil, spend time amending it before you plant. Work the bed to a depth of at least twelve inches, incorporating generous amounts of aged compost, coarse sand, or perlite to open up the structure and encourage water to move freely through the root zone. Raised beds are an excellent option for gardeners dealing with persistently poor drainage.
Soil fertility matters, but dahlias respond best to a balanced approach rather than an excess of any single nutrient. A soil that is too rich in nitrogen will push the plant to produce abundant leafy growth at the expense of flowers. Before planting, work a low-nitrogen, phosphorus-rich fertilizer into the top several inches of your prepared bed. A product with a ratio such as 5-10-10 or 4-8-8 encourages strong root development and abundant blooming without promoting the kind of lush, floppy foliage that makes plants susceptible to pests and disease. Aim for a soil pH between 6.5 and 7.0 for best results.
When to Plant Dahlia Tubers
Timing your dahlia planting correctly is the difference between plants that thrive and plants that struggle from the very beginning. The single most important rule is to wait until the soil has warmed sufficiently and all danger of frost has passed. Dahlia tubers planted in cold, wet soil will sit dormant at best or rot at worst. As a general guideline, wait until the soil temperature at a depth of four to six inches consistently reads at least 60 degrees Fahrenheit. In most parts of the United States, this falls somewhere between late April and late May depending on your region.
Gardeners in warmer climates with mild winters, such as those in USDA hardiness zones 8 through 10, have the luxury of planting earlier in spring and may even be able to leave tubers in the ground year-round without lifting them. Those in colder northern zones need to be more patient and should resist the temptation to rush the process. A late frost after planting will not necessarily kill the tubers themselves if they are buried deep enough, but any tender young shoots that have already emerged above soil level will be blackened and destroyed, setting the plant back significantly.
If you are eager to get a jump on the season, you can start tubers indoors in large containers about four to six weeks before your last expected frost date. Use a light, well-draining potting mix and place the containers in a warm spot with bright light. Keep the soil only barely moist at this stage — overwatering before the plant has established roots is a common cause of tuber rot for indoor starters. Once outdoor conditions are appropriate and the plants have developed a few sets of leaves, you can transplant them into the garden with care, disturbing the root ball as little as possible.
Step-by-Step Planting Technique
Once your soil is prepared and the timing is right, the actual planting process is straightforward. Begin by digging individual holes or a continuous trench depending on the scale of your planting. For most dahlia varieties, each hole should be approximately six to eight inches deep. If you are planting tall dinner plate varieties that will require staking, now is the time to place your stake or support structure in the ground before the tuber goes in — this prevents you from accidentally spearing the tuber or damaging roots later in the season when the plant is already established.
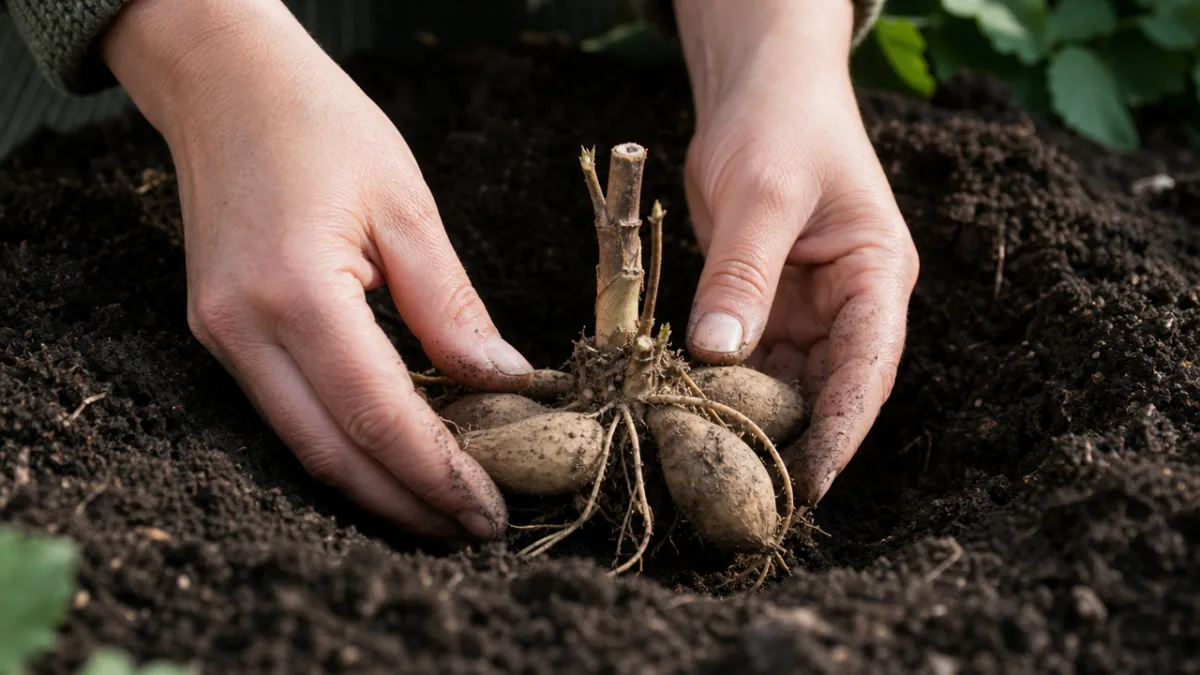
Place the tuber horizontally in the hole with the eye or growing point facing upward. This orientation is important; a tuber planted upside down will still find its way eventually, but it wastes energy and time that the plant could be using to build roots and send up productive growth. Set the crown of the tuber — the thickened point where the neck meets the main body — approximately two to three inches below the finished soil surface. Some growers position it a little deeper in sandy soils that dry out quickly, and a little shallower in heavy soils to minimize the risk of rot.
Spacing is determined by the ultimate size of the variety you are growing, and getting it right from the start prevents competition for light, water, and nutrients as the season progresses. Use the following guidelines as a starting point:
- Dwarf and border dahlias (under 24 inches tall): space plants 12 to 18 inches apart
- Medium-sized varieties (24 to 42 inches tall): space plants 18 to 24 inches apart
- Tall and dinner plate dahlias (over 42 inches tall): space plants 24 to 36 inches apart
- Bedding dahlias grown in rows: allow at least 12 inches between plants and 18 inches between rows
After placing the tuber, backfill the hole with your prepared soil, firming it gently around the tuber without compacting it so tightly that drainage is impeded. One of the most critical points at this stage is to resist watering heavily right after planting. Unlike most other garden plants, newly planted dahlia tubers do not need supplemental irrigation until you see shoots emerging at the soil surface. The tuber itself holds enough moisture and stored energy to fuel initial growth, and excess water in the surrounding soil dramatically increases the risk of rot before roots have had a chance to form.
Watering, Feeding, and Early Season Care
Once your dahlia shoots have pushed through the soil surface and reached a height of roughly six inches, you can begin a regular watering routine. Deep, infrequent watering is far superior to shallow, frequent irrigation. Aim to water thoroughly once or twice per week during dry weather, delivering enough moisture to penetrate at least eight to ten inches into the soil. This encourages the roots to grow downward in search of moisture rather than remaining close to the surface where they are vulnerable to heat and drought stress. Drip irrigation is ideal because it keeps foliage dry and reduces the risk of fungal diseases such as powdery mildew.
Feeding dahlias on a consistent schedule pays dividends in the form of bigger, more numerous blooms. For the first month after shoots emerge, hold off on fertilizing or apply only a very light dose of a balanced fertilizer to support early root and stem development. As the plants approach their pre-budding stage — typically when they are around twelve to eighteen inches tall — switch to a low-nitrogen formula with higher phosphorus and potassium levels to fuel flower production. Many experienced dahlia growers apply a liquid feed every two to three weeks throughout the blooming season, adjusting the formula as the plant’s needs change.
Mulching around your dahlias after planting offers multiple benefits that make it well worth the small effort required. A two- to three-inch layer of straw, shredded bark, or wood chips applied around — but not directly against — the base of each plant helps conserve soil moisture, moderate soil temperature during heat spells, and suppress weeds that would otherwise compete with your plants for nutrients and water. Organic mulches also break down gradually over the season, adding a steady supply of organic matter to the soil and improving its structure for future planting seasons.
Pinching, Staking, and Supporting Your Plants
Two early-season techniques — pinching and staking — have an outsized impact on the final quality of your dahlia display. Pinching refers to the practice of removing the central growing tip of the main stem when the plant has produced three to four sets of leaves. This simple act redirects the plant’s energy outward into lateral branches, resulting in a bushier, more compact plant that produces far more flowering stems than an unpinched dahlia left to grow naturally as a single central leader. Use clean, sharp scissors or your fingernails to snip or pinch out the very tip of the main shoot, just above a leaf node.
Staking is essential for any dahlia that will grow taller than about twenty-four inches, and it is best done at planting time rather than after the plant has grown. Bamboo canes, metal stakes, or sturdy wooden dowels all work well. Drive your stake into the ground eight to twelve inches deep, keeping it three to four inches away from where the tuber is planted to avoid damage. As the plant grows, use soft ties — strips of cotton fabric, jute twine, or purpose-made plant clips — to loosely attach the main stem and primary lateral branches to the support. Never tie stems so tightly that you restrict their natural movement in the breeze, as some flexibility is important for building strong stem tissue.
Throughout the growing season, a few additional maintenance habits will keep your dahlias performing at their peak. Deadheading — the removal of spent blooms before they set seed — is particularly important for maintaining continuous flower production. Dahlias that are allowed to go to seed redirect energy away from producing new buds and toward ripening seeds, which cuts the blooming season short. Develop a habit of walking through your dahlia bed every two to three days during peak blooming season, removing any flowers that have fully opened and begun to fade. If you are cutting dahlias for bouquets, always cut stems in the early morning when the plants are well-hydrated for the longest possible vase life.

Troubleshooting Common Problems
Even the most carefully tended dahlias can run into difficulties, and knowing what to watch for allows you to intervene before small problems become serious setbacks. Slugs and earwigs are among the most common early-season pests, and both do their damage primarily at night, leaving tell-tale ragged holes in young leaves and chewed-off emerging shoots by morning. Set out slug traps baited with beer in shallow containers sunk to ground level, apply food-grade diatomaceous earth around the base of plants, or use iron phosphate pellets — a safer option than traditional metaldehyde baits — to protect newly emerged shoots during the vulnerable early weeks.
Powdery mildew, a fungal disease that appears as a dusty white coating on leaves and stems, is another frequent issue, particularly in late summer when warm days and cool nights create ideal conditions for spore spread. Good air circulation between plants — achieved through proper spacing and regular removal of crowded inner growth — is your best preventive measure. If mildew does appear, treat affected plants promptly with a spray of diluted neem oil, potassium bicarbonate solution, or a purpose-made fungicide. Remove and dispose of heavily affected foliage rather than composting it, since composting may not kill the fungal spores.
Failure to bloom is a frustrating problem that most often has one of three causes: insufficient sunlight, excess nitrogen in the soil, or planting tubers too deeply. If your dahlias are producing abundant lush green foliage but few or no flowers, start by evaluating how many hours of direct sun the bed actually receives and consider whether a nearby tree or structure has cast more shade than you anticipated. Next, hold off on any further fertilizing and avoid high-nitrogen products for the remainder of the season. In most cases, a combination of these adjustments will coax the plant into redirecting its energy toward what every gardener grows dahlias for — the spectacular, endlessly varied blooms that make these plants one of the great joys of the summer garden.








What do you think?
It is nice to know your opinion. Leave a comment.